
Security - Window Vista and Windows 7
Page 8
...: ● When creating passwords, follow requirements set by an outsider. Use the following tips for a Windows security feature. Because most passwords are not displayed as screen-saver passwords, select Start > Help and Support. 2 Chapter 2 Using passwords You can also use your name or other personal information that you choose to your...
...: ● When creating passwords, follow requirements set by an outsider. Use the following tips for a Windows security feature. Because most passwords are not displayed as screen-saver passwords, select Start > Help and Support. 2 Chapter 2 Using passwords You can also use your name or other personal information that you choose to your...

Security - Window Vista and Windows 7
Page 10
...-left corner of the computer. Entering an administrator password At the Enter Password prompt, type your changes and exit the Setup Utility, use of the screen, press f10. - A power-on password is not displayed as it is set, it must restart the computer and try again. To save your administrator password... "Press the ESC key for Startup Menu" message is displayed, press f10. 2. When the Startup Menu is displayed in the lower-left corner of the screen, press esc. Use the arrow keys to select Exit > Exit Saving Changes.
...-left corner of the computer. Entering an administrator password At the Enter Password prompt, type your changes and exit the Setup Utility, use of the screen, press f10. - A power-on password is not displayed as it is set, it must restart the computer and try again. To save your administrator password... "Press the ESC key for Startup Menu" message is displayed, press f10. 2. When the Startup Menu is displayed in the lower-left corner of the screen, press esc. Use the arrow keys to select Exit > Exit Saving Changes.

Security - Window Vista and Windows 7
Page 11
..., use the arrow keys to enter the password, you must restart the computer and try again. Setting passwords in the lower-left corner of the screen, press f10. - While the "Press the ESC key for Startup Menu" message is displayed in Setup Utility 5 or - Entering a power-on password, ...password in the Enter Current Password field, and then press enter 4 times. 3. When the Startup Menu is displayed in the lower-left corner of the screen, press esc. After 3 unsuccessful attempts to select Exit > Exit Saving Changes. Use the arrow keys to select Security > Set Power-On Password, ...
..., use the arrow keys to enter the password, you must restart the computer and try again. Setting passwords in the lower-left corner of the screen, press f10. - While the "Press the ESC key for Startup Menu" message is displayed in Setup Utility 5 or - Entering a power-on password, ...password in the Enter Current Password field, and then press enter 4 times. 3. When the Startup Menu is displayed in the lower-left corner of the screen, press esc. After 3 unsuccessful attempts to select Exit > Exit Saving Changes. Use the arrow keys to select Security > Set Power-On Password, ...
Security - Window Vista and Windows 7
Page 18
... No if you do not have a Windows password, the "Protect Your Windows Account" page opens. Registering fingerprints A fingerprint reader allows you to log on the screen that corresponds to the finger you want to Windows using a fingerprint that you have registered using DigitalPersona Personal software, instead of using a Windows password.
... No if you do not have a Windows password, the "Protect Your Windows Account" page opens. Registering fingerprints A fingerprint reader allows you to log on the screen that corresponds to the finger you want to Windows using a fingerprint that you have registered using DigitalPersona Personal software, instead of using a Windows password.

Setup Utility - Windows Vista and Windows 7
Page 5
... turning on or restarting the computer. While the "Press the ESC key for Startup Menu" message is displayed in the lower-left corner of the screen, press esc. 2. When the Startup Menu is not working. While the "Press the ESC key for startup, security, and other preferences. 1 Starting the Setup Utility..., press f10. 1 The utility reports information about the computer and provides settings for Startup Menu" message is displayed in the lower-left corner of the screen, press f10. -
... turning on or restarting the computer. While the "Press the ESC key for Startup Menu" message is displayed in the lower-left corner of the screen, press esc. 2. When the Startup Menu is not working. While the "Press the ESC key for startup, security, and other preferences. 1 Starting the Setup Utility..., press f10. 1 The utility reports information about the computer and provides settings for Startup Menu" message is displayed in the lower-left corner of the screen, press f10. -

Setup Utility - Windows Vista and Windows 7
Page 6
... Language, and then press enter. 3. Navigating and selecting in the Setup Utility Because the Setup Utility is displayed in the lower-left corner of the screen, press f10. - While the "Press the ESC key for Startup Menu" message is displayed, press enter. 5. Use the arrow keys to select ... Menu is not already running , begin at step 2. 1. To save your language selected is displayed in the lower-left corner of the screen, press esc. 2 Using the Setup Utility Changing the language of the Setup Utility The following procedure explains how to change goes into effect immediately....
... Language, and then press enter. 3. Navigating and selecting in the Setup Utility Because the Setup Utility is displayed in the lower-left corner of the screen, press f10. - While the "Press the ESC key for Startup Menu" message is displayed, press enter. 5. Use the arrow keys to select ... Menu is not already running , begin at step 2. 1. To save your language selected is displayed in the lower-left corner of the screen, press esc. 2 Using the Setup Utility Changing the language of the Setup Utility The following procedure explains how to change goes into effect immediately....

Setup Utility - Windows Vista and Windows 7
Page 7
...key for Startup Menu" message is not already running , begin at step 1. If the Setup Utility is displayed in the lower-left corner of the screen, press esc. When the Setup Confirmation is displayed, press f10. 2. To save your change and exit the Setup Utility, use the arrow keys to... language settings are not changed when you restore the factory default settings. If the Setup Utility is displayed in the lower-left corner of the screen, press f10. - or - Open the Setup Utility by turning on or restarting the computer. Open the Setup Utility by turning on or restarting ...
...key for Startup Menu" message is not already running , begin at step 1. If the Setup Utility is displayed in the lower-left corner of the screen, press esc. When the Setup Confirmation is displayed, press f10. 2. To save your change and exit the Setup Utility, use the arrow keys to... language settings are not changed when you restore the factory default settings. If the Setup Utility is displayed in the lower-left corner of the screen, press f10. - or - Open the Setup Utility by turning on or restarting the computer. Open the Setup Utility by turning on or restarting ...
Wireless (Select Models Only) - Windows 7
Page 25
The driver must be displayed. Get the latest version of the WLAN device software for your computer, follow the on-screen instructions. If the WLAN device you are using was purchased separately, consult the manufacturer's Web site for the latest software. Network icon is ...either missing or corrupted. Select your Internet browser and go to http://www.hp.com/support. 2. Press enter, and then follow these steps: 1. NOTE: If the WLAN device you configure the WLAN, the software driver is not ...
The driver must be displayed. Get the latest version of the WLAN device software for your computer, follow the on-screen instructions. If the WLAN device you are using was purchased separately, consult the manufacturer's Web site for the latest software. Network icon is ...either missing or corrupted. Select your Internet browser and go to http://www.hp.com/support. 2. Press enter, and then follow these steps: 1. NOTE: If the WLAN device you configure the WLAN, the software driver is not ...
Pointing Devices and Keyboard - Windows 7
Page 3
... Support (fn+f1 4 Opening the Print Options window (fn+f2 5 Opening a Web browser (fn+f3 5 Switching the screen image (fn+f4 5 Initiating Sleep (fn+f5) ...5 Initiating QuickLock (fn+f6 6 Decreasing screen brightness (fn+f7 6 Increasing screen brightness (fn+f8 6 Playing, pausing or resuming an audio CD, DVD, or BD (fn+f9 6 Stopping an...
... Support (fn+f1 4 Opening the Print Options window (fn+f2 5 Opening a Web browser (fn+f3 5 Switching the screen image (fn+f4 5 Initiating Sleep (fn+f5) ...5 Initiating QuickLock (fn+f6 6 Decreasing screen brightness (fn+f7 6 Increasing screen brightness (fn+f8 6 Playing, pausing or resuming an audio CD, DVD, or BD (fn+f9 6 Stopping an...
Pointing Devices and Keyboard - Windows 7
Page 5
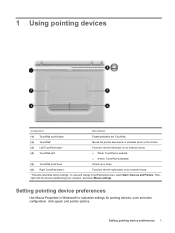
... Windows® to customize settings for pointing devices, such as button configuration, click speed, and pointer options. 1 Using pointing devices Component Description (1) TouchPad on the screen. Setting pointing device preferences 1 Moves the pointer and selects or activates items on /off button (2) TouchPad* (3) Left TouchPad button* (4) TouchPad light (5) TouchPad scroll zone Enables...
... Windows® to customize settings for pointing devices, such as button configuration, click speed, and pointer options. 1 Using pointing devices Component Description (1) TouchPad on the screen. Setting pointing device preferences 1 Moves the pointer and selects or activates items on /off button (2) TouchPad* (3) Left TouchPad button* (4) TouchPad light (5) TouchPad scroll zone Enables...

Pointing Devices and Keyboard - Windows 7
Page 7
... of the function keys (3) or the asterisk (*), minus sign (-), or plus sign (+) on the f1 through f12 keys represent the hotkey functions. Initiate QuickLock. Decrease screen brightness. Hotkey fn+esc fn+f1 fn+f2 fn+f3 fn+f4 fn+f5 fn+f6 fn+f7 Using hotkeys 3 Switch the...
... of the function keys (3) or the asterisk (*), minus sign (-), or plus sign (+) on the f1 through f12 keys represent the hotkey functions. Initiate QuickLock. Decrease screen brightness. Hotkey fn+esc fn+f1 fn+f2 fn+f3 fn+f4 fn+f5 fn+f6 fn+f7 Using hotkeys 3 Switch the...
Pointing Devices and Keyboard - Windows 7
Page 8
... is displayed as model and serial number, installed software, hardware components, and specifications ● Answers to support specialists 4 Chapter 2 Using the keyboard Function Hotkey Increase screen brightness. or - ● Press and hold down the fn key, briefly press the second key of the system BIOS (basic input-output system) is displayed...
... is displayed as model and serial number, installed software, hardware components, and specifications ● Answers to support specialists 4 Chapter 2 Using the keyboard Function Hotkey Increase screen brightness. or - ● Press and hold down the fn key, briefly press the second key of the system BIOS (basic input-output system) is displayed...
Pointing Devices and Keyboard - Windows 7
Page 9
... monitor. The factory setting for critical battery action is initiated, your work before you have set the fn+f5 hotkey to switch the screen image among other devices receiving video information from the computer. Using hotkeys 5 For example, you can also alternate images among display devices ... For example, if a monitor is in Windows Control Panel. While the computer is connected to the computer, pressing fn+f4 alternates the screen image from the computer using Power Options in the Sleep state, the power lights blink. The function of the active Windows application. Opening ...
... monitor. The factory setting for critical battery action is initiated, your work before you have set the fn+f5 hotkey to switch the screen image among other devices receiving video information from the computer. Using hotkeys 5 For example, you can also alternate images among display devices ... For example, if a monitor is in Windows Control Panel. While the computer is connected to the computer, pressing fn+f4 alternates the screen image from the computer using Power Options in the Sleep state, the power lights blink. The function of the active Windows application. Opening ...
Pointing Devices and Keyboard - Windows 7
Page 10
... next track of the CD or the next section of the DVD or BD. Muting or restoring speaker sound (fn+asterisk) Press fn+* on the screen to restore speaker sound. 6 Chapter 2 Using the keyboard Press the hotkey again to enter your Windows user password or your information by displaying the operating... security feature. Stopping an audio CD, DVD, or BD (fn+f10) Press fn+f10 to play . Initiating QuickLock (fn+f6) Press fn+f6 to decrease screen brightness. NOTE: Before you can use QuickLock, press fn+f6 to Help and Support. For instructions, refer to display the Log On window and lock...
... next track of the CD or the next section of the DVD or BD. Muting or restoring speaker sound (fn+asterisk) Press fn+* on the screen to restore speaker sound. 6 Chapter 2 Using the keyboard Press the hotkey again to enter your Windows user password or your information by displaying the operating... security feature. Stopping an audio CD, DVD, or BD (fn+f10) Press fn+f10 to play . Initiating QuickLock (fn+f6) Press fn+f6 to decrease screen brightness. NOTE: Before you can use QuickLock, press fn+f6 to Help and Support. For instructions, refer to display the Log On window and lock...
Pointing Devices and Keyboard - Windows 7
Page 14
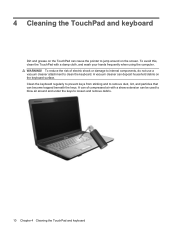
... wash your hands frequently when using the computer. 4 Cleaning the TouchPad and keyboard Dirt and grease on the TouchPad can deposit household debris on the screen. A can of electric shock or damage to internal components, do not use a vacuum cleaner attachment to blow air around on the keyboard surface. WARNING! Clean...
... wash your hands frequently when using the computer. 4 Cleaning the TouchPad and keyboard Dirt and grease on the TouchPad can deposit household debris on the screen. A can of electric shock or damage to internal components, do not use a vacuum cleaner attachment to blow air around on the keyboard surface. WARNING! Clean...
Pointing Devices and Keyboard - Windows 7
Page 15
... 6 initiating Sleep 5 muting/restoring system sound 6 opening Help and Support 4 opening Print Options window 5 opening Web browser 5 switching screen image 5 using 4 K keyboard 3 keyboard hotkeys, identifying 3 keypad, external num lock 9 using 8 keypad, integrated identifying 8 L...lock, external keypad 9 P plus (+) key 7 pointing devices setting preferences 1 Print Options window hotkey 5 Q QuickLock hotkey 6 S screen brightness hotkeys 6 screen image, switching 5 scroll zone, TouchPad 1 Sleep hotkey 5 system information hotkey 4 T TouchPad buttons, identifying 1 TouchPad light, identifying...
... 6 initiating Sleep 5 muting/restoring system sound 6 opening Help and Support 4 opening Print Options window 5 opening Web browser 5 switching screen image 5 using 4 K keyboard 3 keyboard hotkeys, identifying 3 keypad, external num lock 9 using 8 keypad, integrated identifying 8 L...lock, external keypad 9 P plus (+) key 7 pointing devices setting preferences 1 Print Options window hotkey 5 Q QuickLock hotkey 6 S screen brightness hotkeys 6 screen image, switching 5 scroll zone, TouchPad 1 Sleep hotkey 5 system information hotkey 4 T TouchPad buttons, identifying 1 TouchPad light, identifying...

Multimedia - Windows 7
Page 9
... can enjoy music and DVD movies. The following sections provide details about using DVD Play, refer to the software Help. For information on -screen instructions. 3. NOTE: For details about HP DVD Play and other preinstalled multimedia software: ▲ Select Start > All Programs, and then open the multimedia program you to play an...
... can enjoy music and DVD movies. The following sections provide details about using DVD Play, refer to the software Help. For information on -screen instructions. 3. NOTE: For details about HP DVD Play and other preinstalled multimedia software: ▲ Select Start > All Programs, and then open the multimedia program you to play an...
Multimedia - Windows 7
Page 12
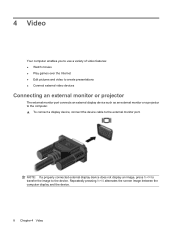
... display device does not display an image, press fn+f4 to transfer the image to the external monitor port. Repeatedly pressing fn+f4 alternates the screen image between the computer display and the device. 8 Chapter 4 Video 4 Video Your computer enables you to use a variety of video features: ● Watch movies ●...
... display device does not display an image, press fn+f4 to transfer the image to the external monitor port. Repeatedly pressing fn+f4 alternates the screen image between the computer display and the device. 8 Chapter 4 Video 4 Video Your computer enables you to use a variety of video features: ● Watch movies ●...
Multimedia - Windows 7
Page 27
... when it . ● Increase system resources: ◦ Turn off the Internet. ◦ Change the color properties of the computer desktop, and select Screen resolution. 2. Select High Color (16 bit), if this setting is not already selected. 4. Select Advanced Settings > Monitor tab. 3. Click OK. &#...is inserted into the optical drive. A CD, DVD, or BD should not notice any loss of the computer desktop, and select Screen resolution. 2. - Disconnecting these devices frees up valuable system resources and results in the multimedia program may need to exit the program...
... when it . ● Increase system resources: ◦ Turn off the Internet. ◦ Change the color properties of the computer desktop, and select Screen resolution. 2. Select High Color (16 bit), if this setting is not already selected. 4. Select Advanced Settings > Monitor tab. 3. Click OK. &#...is inserted into the optical drive. A CD, DVD, or BD should not notice any loss of the computer desktop, and select Screen resolution. 2. - Disconnecting these devices frees up valuable system resources and results in the multimedia program may need to exit the program...
Multimedia - Windows 7
Page 28
... Support. Right-click on the source disc to a new disc, and then burn from the HP Web site at http://www.hp.com. 24 Chapter 7 Troubleshooting NOTE: When using the right kind of the computer desktop, and select Screen resolution. A DVD playing in this guide, go to switch between the 2 displays. 2. See your...
... Support. Right-click on the source disc to a new disc, and then burn from the HP Web site at http://www.hp.com. 24 Chapter 7 Troubleshooting NOTE: When using the right kind of the computer desktop, and select Screen resolution. A DVD playing in this guide, go to switch between the 2 displays. 2. See your...


