Service Guide
Page 6
... (select models only 8-4 9 Connector pin assignments Audio-in (microphone 9-1 Audio-out (headphone 9-1 External monitor 9-2 HDMI 9-3 RJ-11 (modem 9-4 RJ-45 (network 9-4 Universal Serial Bus 9-5 10 Power cord set requirements Requirements for all countries and regions 10-1 Requirements for specific countries and regions 10-2 11 Recycling Battery 11-1 Display 11-1 Index Contents vi
... (select models only 8-4 9 Connector pin assignments Audio-in (microphone 9-1 Audio-out (headphone 9-1 External monitor 9-2 HDMI 9-3 RJ-11 (modem 9-4 RJ-45 (network 9-4 Universal Serial Bus 9-5 10 Power cord set requirements Requirements for all countries and regions 10-1 Requirements for specific countries and regions 10-2 11 Recycling Battery 11-1 Display 11-1 Index Contents vi

Service Guide
Page 33
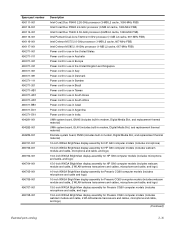
Miscellaneous parts Description AC adapters: 65-W AC adapter Power cords: For use in Argentina For use in Australia For use in Brazil For use in Denmark For use in Europe For use in India For ...
Miscellaneous parts Description AC adapters: 65-W AC adapter Power cords: For use in Argentina For use in Australia For use in Brazil For use in Denmark For use in Europe For use in India For ...
Service Guide
Page 36
...Intel Pentium Dual-Core T3200 2.0-GHz processor (1-MB L2 cache, 667-MHz FSB) Intel Celeron-M 575 2.0-GHz processor (1-MB L2 cache, 667-MHz FSB) Intel Celeron-M 585 2.16-GHz processor (1-MB L2 cache, 667-MHz FSB) Power cord for use in the United States Power cord for use in Australia Power cord for use in Europe Power cord... Media Slot, and replacement thermal material) 16-inch WXGA BrightView display assembly for HP G60 computer models (includes microphone) 16-inch WXGA BrightView display assembly for HP G60 computer models (includes webcam module and cable, microphone and cable, and logo) 15...
...Intel Pentium Dual-Core T3200 2.0-GHz processor (1-MB L2 cache, 667-MHz FSB) Intel Celeron-M 575 2.0-GHz processor (1-MB L2 cache, 667-MHz FSB) Intel Celeron-M 585 2.16-GHz processor (1-MB L2 cache, 667-MHz FSB) Power cord for use in the United States Power cord for use in Australia Power cord for use in Europe Power cord... Media Slot, and replacement thermal material) 16-inch WXGA BrightView display assembly for HP G60 computer models (includes microphone) 16-inch WXGA BrightView display assembly for HP G60 computer models (includes webcam module and cable, microphone and cable, and logo) 15...
Service Guide
Page 43
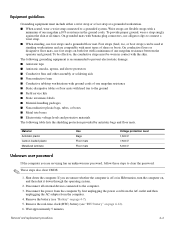
... and sleeve protectors ■ Conductive bins and other assembly or soldering aids ■ Nonconductive foam ■ Conductive tabletop workstations with ground cords of one megohm resistance ■ Static-dissipative tables or floor mats with a minimum of shoes or boots. Disconnect all times. Material ...antistatic bags and floor mats. Wait approximately 5 minutes. The following table lists the shielding protection provided by first unplugging the power cord from the AC outlet and then unplugging the AC adapter from the computer. 4. If you are flexible straps with a ...
... and sleeve protectors ■ Conductive bins and other assembly or soldering aids ■ Nonconductive foam ■ Conductive tabletop workstations with ground cords of one megohm resistance ■ Static-dissipative tables or floor mats with a minimum of shoes or boots. Disconnect all times. Material ...antistatic bags and floor mats. Wait approximately 5 minutes. The following table lists the shielding protection provided by first unplugging the power cord from the AC outlet and then unplugging the AC adapter from the computer. 4. If you are flexible straps with a ...
Service Guide
Page 46
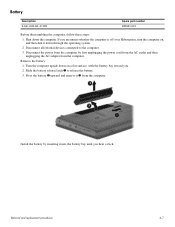
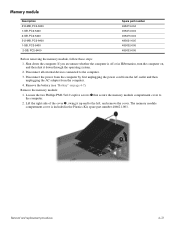
... the computer by inserting it down the computer. Removal and replacement procedures 4-7 Remove the battery: 1. Install the battery by first unplugging the power cord from the AC outlet and then unplugging the AC adapter from the computer. Slide the battery release latch 1 to the computer. 3. If you are unsure ...
... the computer by inserting it down the computer. Removal and replacement procedures 4-7 Remove the battery: 1. Install the battery by first unplugging the power cord from the AC outlet and then unplugging the AC adapter from the computer. Slide the battery release latch 1 to the computer. 3. If you are unsure ...
Service Guide
Page 47
... shut it down the computer. Disconnect all external devices connected to the computer. 3. Shut down through the operating system. 2. Disconnect the power from the computer by first unplugging the power cord from the AC outlet and then unplugging the AC adapter from the computer. 4. Description DVD±RW and CD-RW SuperMulti Double...
... shut it down the computer. Disconnect all external devices connected to the computer. 3. Shut down through the operating system. 2. Disconnect the power from the computer by first unplugging the power cord from the AC outlet and then unplugging the AC adapter from the computer. 4. Description DVD±RW and CD-RW SuperMulti Double...
Service Guide
Page 49
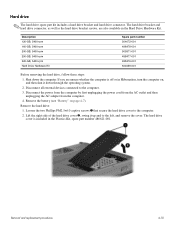
... the computer by first unplugging the power cord from the AC outlet and then unplugging the AC adapter from the computer. 4. Removal and replacement procedures 4-10 The hard drive bracket and hard drive ...
... the computer by first unplugging the power cord from the AC outlet and then unplugging the AC adapter from the computer. 4. Removal and replacement procedures 4-10 The hard drive bracket and hard drive ...
Service Guide
Page 51
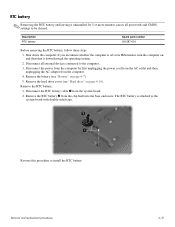
... 4-7). 5. Disconnect all passwords and CMOS settings to install the RTC battery. Remove the RTC battery 2 from the system board. 2. Disconnect the power from the computer by first unplugging the power cord from the AC outlet and then unplugging the AC adapter from the computer. 4. Remove the hard drive cover (see "Battery" on , and...
... 4-7). 5. Disconnect all passwords and CMOS settings to install the RTC battery. Remove the RTC battery 2 from the system board. 2. Disconnect the power from the computer by first unplugging the power cord from the AC outlet and then unplugging the AC adapter from the computer. 4. Remove the hard drive cover (see "Battery" on , and...
Service Guide
Page 52
... to the left, and remove the cover. If you are unsure whether the computer is included in Hibernation, turn the computer on page 4-7). Disconnect the power from the computer by first unplugging the power cord from the AC outlet and then unplugging the AC adapter from the computer. 4.
... to the left, and remove the cover. If you are unsure whether the computer is included in Hibernation, turn the computer on page 4-7). Disconnect the power from the computer by first unplugging the power cord from the AC outlet and then unplugging the AC adapter from the computer. 4.
Service Guide
Page 54
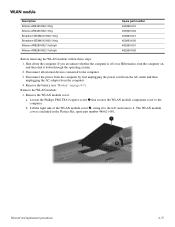
... the computer by first unplugging the power cord from the AC outlet and then unplugging the AC adapter from the computer. 4. Remove the WLAN module cover: a. Loosen the Phillips PM2.5X6.0 captive screw 1 ...
... the computer by first unplugging the power cord from the AC outlet and then unplugging the AC adapter from the computer. 4. Remove the WLAN module cover: a. Loosen the Phillips PM2.5X6.0 captive screw 1 ...
Service Guide
Page 57
... , with the front toward you are unsure whether the computer is off or in Hibernation, turn the computer on page 4-7). Disconnect the power from the computer by first unplugging the power cord from the AC outlet and then unplugging the AC adapter from the computer. 4. If you . 2. Before removing the keyboard, follow these...
... , with the front toward you are unsure whether the computer is off or in Hibernation, turn the computer on page 4-7). Disconnect the power from the computer by first unplugging the power cord from the AC outlet and then unplugging the AC adapter from the computer. 4. If you . 2. Before removing the keyboard, follow these...

Service Guide
Page 59
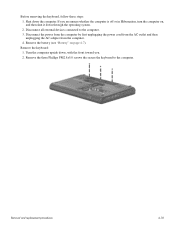
... 1 at the corners and the 2 Phillips PM2.0x4.0 screws 2 in Hibernation, turn the computer on, and then shut it down the computer. Disconnect the power from the computer. 4. Remove the keyboard cover: 1. Disconnect all external devices connected to the computer. Remove the keyboard (see "Battery" on page 4-17). Removal... and replacement procedures 4-20 If you are identified by first unplugging the power cord from the AC outlet and then unplugging the AC adapter from the computer by a triangle icon.
... 1 at the corners and the 2 Phillips PM2.0x4.0 screws 2 in Hibernation, turn the computer on, and then shut it down the computer. Disconnect the power from the computer. 4. Remove the keyboard cover: 1. Disconnect all external devices connected to the computer. Remove the keyboard (see "Battery" on page 4-17). Removal... and replacement procedures 4-20 If you are identified by first unplugging the power cord from the AC outlet and then unplugging the AC adapter from the computer by a triangle icon.
Service Guide
Page 61
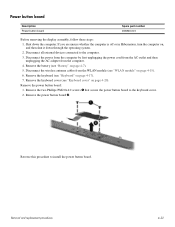
... wireless antenna cables from the computer. 4. Remove the keyboard cover (see "Keyboard" on page 4-17). 7. Remove the power button board 2. Remove the power button board: 1. Disconnect the power from the computer by first unplugging the power cord from the AC outlet and then unplugging the AC adapter from the WLAN module (see "Battery" on , and...
... wireless antenna cables from the computer. 4. Remove the keyboard cover (see "Keyboard" on page 4-17). 7. Remove the power button board 2. Remove the power button board: 1. Disconnect the power from the computer by first unplugging the power cord from the AC outlet and then unplugging the AC adapter from the WLAN module (see "Battery" on , and...
Service Guide
Page 63
... the computer by first unplugging the power cord from the AC outlet and then unplugging the AC adapter from the clip 2 in Hibernation, turn the computer on the top cover. Remove the display ...
... the computer by first unplugging the power cord from the AC outlet and then unplugging the AC adapter from the clip 2 in Hibernation, turn the computer on the top cover. Remove the display ...
Service Guide
Page 69
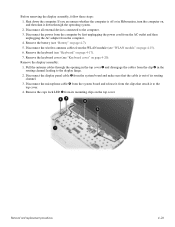
... the top cover to the computer. 3. Hard drive (see "Display assembly" on page 4-17) d. Removal and replacement procedures 4-30 Disconnect the power from the computer by first unplugging the power cord from the AC outlet and then unplugging the AC adapter from the computer. 4. Display assembly (see "Hard drive" on page 4-20) e. Top... steps: 1. Shut down through the operating system. 2. If you . 2. Remove the battery (see "Keyboard cover" on page 4-10) c. Keyboard cover (see "Battery" on page 4-22) f. Power button board (see "Power button board" on page 4-7). 5.
... the top cover to the computer. 3. Hard drive (see "Display assembly" on page 4-17) d. Removal and replacement procedures 4-30 Disconnect the power from the computer by first unplugging the power cord from the AC outlet and then unplugging the AC adapter from the computer. 4. Display assembly (see "Hard drive" on page 4-20) e. Top... steps: 1. Shut down through the operating system. 2. If you . 2. Remove the battery (see "Keyboard cover" on page 4-10) c. Keyboard cover (see "Battery" on page 4-22) f. Power button board (see "Power button board" on page 4-7). 5.
Service Guide
Page 71
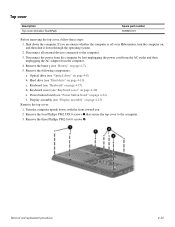
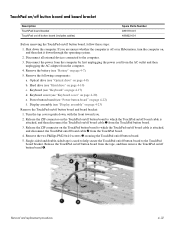
Shut down through the operating system. 2. Disconnect the power from the computer by first unplugging the power cord from the AC outlet and then unplugging the AC adapter from the tape, and then remove the TouchPad on /off button board from the computer. 4. ...
Shut down through the operating system. 2. Disconnect the power from the computer by first unplugging the power cord from the AC outlet and then unplugging the AC adapter from the tape, and then remove the TouchPad on /off button board from the computer. 4. ...
Service Guide
Page 73
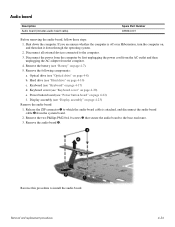
...4-20) e. Remove the following components: a. Display assembly (see "Power button board" on page 4-23) Remove the audio board: 1. Removal and replacement procedures 4-34 Disconnect the power from the computer by first unplugging the power cord from the AC outlet and then unplugging the AC adapter from the ... the audio board cable is off or in Hibernation, turn the computer on page 4-8) b. Reverse this procedure to the base enclosure. 3. Power button board (see "Display assembly" on page 4-22) f. Remove the two Phillips PM2.0×4.0 screws 3 that secure the audio board ...
...4-20) e. Remove the following components: a. Display assembly (see "Power button board" on page 4-23) Remove the audio board: 1. Removal and replacement procedures 4-34 Disconnect the power from the computer by first unplugging the power cord from the AC outlet and then unplugging the AC adapter from the ... the audio board cable is off or in Hibernation, turn the computer on page 4-8) b. Reverse this procedure to the base enclosure. 3. Power button board (see "Display assembly" on page 4-22) f. Remove the two Phillips PM2.0×4.0 screws 3 that secure the audio board ...
Service Guide
Page 74
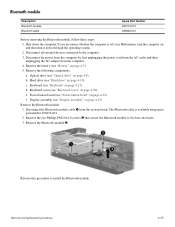
... the computer by first unplugging the power cord from the AC outlet and then unplugging the AC adapter from the system board. Optical drive (see "Optical drive" on page 4-20) e. Reverse this procedure ... Bluetooth module cable 1 from the computer. 4. Shut down through the operating system. 2. Disconnect all external devices connected to install the Bluetooth module. Hard drive (see "Power button board" on page 4-10) c. Removal and replacement procedures 4-35 Display assembly (see "Keyboard" on page 4-23) Remove the Bluetooth module: 1. Keyboard (see "Display assembly...
... the computer by first unplugging the power cord from the AC outlet and then unplugging the AC adapter from the system board. Optical drive (see "Optical drive" on page 4-20) e. Reverse this procedure ... Bluetooth module cable 1 from the computer. 4. Shut down through the operating system. 2. Disconnect all external devices connected to install the Bluetooth module. Hard drive (see "Power button board" on page 4-10) c. Removal and replacement procedures 4-35 Display assembly (see "Keyboard" on page 4-23) Remove the Bluetooth module: 1. Keyboard (see "Display assembly...
Service Guide
Page 75
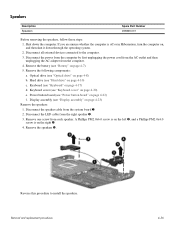
... the speakers. Hard drive (see "Keyboard" on page 4-10) c. Remove the speakers 5. Disconnect the power from the computer by first unplugging the power cord from the AC outlet and then unplugging the AC adapter from the system board 1. 2. Power button board (see "Keyboard cover" on page 4-22) f. Reverse this procedure to the computer. 3. Speakers...
... the speakers. Hard drive (see "Keyboard" on page 4-10) c. Remove the speakers 5. Disconnect the power from the computer by first unplugging the power cord from the AC outlet and then unplugging the AC adapter from the system board 1. 2. Power button board (see "Keyboard cover" on page 4-22) f. Reverse this procedure to the computer. 3. Speakers...
Service Guide
Page 76
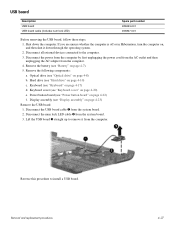
... (see "Optical drive" on page 4-23) Remove the USB board: 1. Power button board (see "Display assembly" on page 4-8) b. Display assembly (see "Power button board" on page 4-20) e. Removal and replacement procedures 4-37 Disconnect the power from the computer by first unplugging the power cord from the AC outlet and then unplugging the AC adapter from...
... (see "Optical drive" on page 4-23) Remove the USB board: 1. Power button board (see "Display assembly" on page 4-8) b. Display assembly (see "Power button board" on page 4-20) e. Removal and replacement procedures 4-37 Disconnect the power from the computer by first unplugging the power cord from the AC outlet and then unplugging the AC adapter from...

