
Software Update - Windows Vista and Windows 7
Page 6
... BIOS version information (also known as ROM date and System BIOS) can be displayed by unplugging the power cord from the AC outlet. To exit the Setup Utility, use the arrow keys to an optional power source. Access the page on the screen to identify your computer and access the BIOS update you... are already in the lower-left corner of the screen, press f10. 2. Follow the instructions on the HP Web site that is displayed. 3. Updating the...
... BIOS version information (also known as ROM date and System BIOS) can be displayed by unplugging the power cord from the AC outlet. To exit the Setup Utility, use the arrow keys to an optional power source. Access the page on the screen to identify your computer and access the BIOS update you... are already in the lower-left corner of the screen, press f10. 2. Follow the instructions on the HP Web site that is displayed. 3. Updating the...
Wireless (Select Models Only) - Windows 7
Page 18
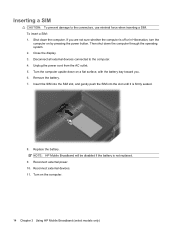
To insert a SIM: 1. Close the display. 3. Disconnect all external devices connected to the connectors, use minimal force when inserting a SIM. Unplug the power cord from the AC outlet. 5. Insert the SIM into the SIM slot, and gently push the SIM into the slot until it is off or in ..., with the battery bay toward you are not sure whether the computer is firmly seated. 8. Remove the battery. 7. If you . 6. Reconnect external devices. 11. NOTE: HP Mobile Broadband will be disabled if the battery is not replaced. 9. Then shut down the computer through the operating system. 2.
To insert a SIM: 1. Close the display. 3. Disconnect all external devices connected to the connectors, use minimal force when inserting a SIM. Unplug the power cord from the AC outlet. 5. Insert the SIM into the SIM slot, and gently push the SIM into the slot until it is off or in ..., with the battery bay toward you are not sure whether the computer is firmly seated. 8. Remove the battery. 7. If you . 6. Reconnect external devices. 11. NOTE: HP Mobile Broadband will be disabled if the battery is not replaced. 9. Then shut down the computer through the operating system. 2.
Wireless (Select Models Only) - Windows 7
Page 19
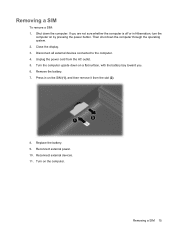
Close the display. 3. Turn the computer upside down the computer. Reconnect external power. 10. Unplug the power cord from the slot (2). 8. Shut down on by pressing the power button. Remove the battery. 7. Removing a SIM To remove a SIM: 1. Press in Hibernation, turn the computer on a flat surface, with the battery bay toward you are ...
Close the display. 3. Turn the computer upside down the computer. Reconnect external power. 10. Unplug the power cord from the slot (2). 8. Shut down on by pressing the power button. Remove the battery. 7. Removing a SIM To remove a SIM: 1. Press in Hibernation, turn the computer on a flat surface, with the battery bay toward you are ...
Memory Modules - Windows Vista and Windows 7
Page 7
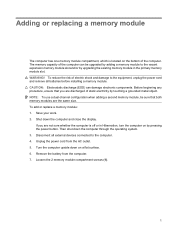
...to the computer. 4. Save your work. 2. Remove the battery from the AC outlet. 5. Shut down on by pressing the power button. Unplug the power cord from the computer. 7. Before beginning any procedure, ensure that both memory modules are discharged of electric shock and damage to the equipment..., unplug the power cord and remove all external devices connected to the vacant expansion memory module slot and/or by touching a grounded metal object. Then...
...to the computer. 4. Save your work. 2. Remove the battery from the AC outlet. 5. Shut down on by pressing the power button. Unplug the power cord from the computer. 7. Before beginning any procedure, ensure that both memory modules are discharged of electric shock and damage to the equipment..., unplug the power cord and remove all external devices connected to the vacant expansion memory module slot and/or by touching a grounded metal object. Then...

Drives - Windows 7
Page 14
4 Replacing the hard drive CAUTION: To prevent information loss or an unresponsive system: Shut down the computer and close the display. 3. Unplug the power cord from the computer. 7. Remove the battery from the AC outlet. 5. Lift the hard drive cover away from the hard drive bay. To remove the hard ... hard drive while the computer is off or in Hibernation. If you , loosen the 2 hard drive cover screws (1). 8. Then shut down on by pressing the power button.
4 Replacing the hard drive CAUTION: To prevent information loss or an unresponsive system: Shut down the computer and close the display. 3. Unplug the power cord from the computer. 7. Remove the battery from the AC outlet. 5. Lift the hard drive cover away from the hard drive bay. To remove the hard ... hard drive while the computer is off or in Hibernation. If you , loosen the 2 hard drive cover screws (1). 8. Then shut down on by pressing the power button.
Notebook Tour - Windows 7
Page 20
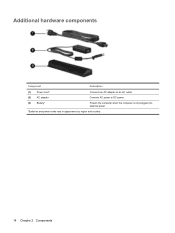
Additional hardware components Component Description (1) Power cord* Connects an AC adapter to an AC outlet. (2) AC adapter Converts AC power to DC power. (3) Battery* Powers the computer when the computer is not plugged into external power. *Batteries and power cords vary in appearance by region and country. 14 Chapter 2 Components
Additional hardware components Component Description (1) Power cord* Connects an AC adapter to an AC outlet. (2) AC adapter Converts AC power to DC power. (3) Battery* Powers the computer when the computer is not plugged into external power. *Batteries and power cords vary in appearance by region and country. 14 Chapter 2 Components
Notebook Tour - Windows 7
Page 22
...9 WLAN module 9 components additional hardware 14 bottom 9 display 10 front 5 left-side 8 rear 6 right-side 7 top 2 connectors, power 8 cord, power 14 D Digital Media Slot, identifying 8 display switch, identifying 10 drive light, identifying 5, 12 drives, hard 9 E esc key, identifying...fn key, identifying 3 function keys, identifying 3 H hard drive bay, identifying 9 HDMI port, identifying 8 headphone (audio-out) jack 5 HP Mobile Broadband Module serial number label 15 I integrated webcam, identifying 10 internal display switch, identifying 10 internal microphone, identifying 10 J jacks audio-...
...9 WLAN module 9 components additional hardware 14 bottom 9 display 10 front 5 left-side 8 rear 6 right-side 7 top 2 connectors, power 8 cord, power 14 D Digital Media Slot, identifying 8 display switch, identifying 10 drive light, identifying 5, 12 drives, hard 9 E esc key, identifying...fn key, identifying 3 function keys, identifying 3 H hard drive bay, identifying 9 HDMI port, identifying 8 headphone (audio-out) jack 5 HP Mobile Broadband Module serial number label 15 I integrated webcam, identifying 10 internal display switch, identifying 10 internal microphone, identifying 10 J jacks audio-...
Notebook Tour - Windows 7
Page 23
... light, identifying 11 O operating system Microsoft Certificate of Authenticity label 15 Product Key 15 optical drive, identifying 7 P ports external monitor 8 HDMI 8 USB 7, 8 power button, identifying 4 power connector, identifying 8 power cord, identifying 14 power light, identifying 5, 11 Product Key 15 product name and number, computer 15 R regulatory information modem approval label 15 regulatory label 15 wireless...
... light, identifying 11 O operating system Microsoft Certificate of Authenticity label 15 Product Key 15 optical drive, identifying 7 P ports external monitor 8 HDMI 8 USB 7, 8 power button, identifying 4 power connector, identifying 8 power cord, identifying 14 power light, identifying 5, 11 Product Key 15 product name and number, computer 15 R regulatory information modem approval label 15 regulatory label 15 wireless...
Power Management - Windows 7
Page 23
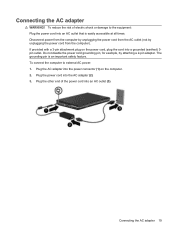
... with a 3-pin attachment plug on the computer. 2. Do not disable the power cord grounding pin, for example, by unplugging the power cord from the AC outlet (not by attaching a 2-pin adapter. Plug the power cord into a grounded (earthed) 3pin outlet. Plug the AC adapter into an AC...to the equipment: Plug the power cord into an AC outlet that is an important safety feature. Disconnect power from the computer by unplugging the power cord from the computer). To reduce the risk of the power cord into the power connector (1) on the power cord, plug the cord into the AC adapter (2)....
... with a 3-pin attachment plug on the computer. 2. Do not disable the power cord grounding pin, for example, by unplugging the power cord from the AC outlet (not by attaching a 2-pin adapter. Plug the power cord into a grounded (earthed) 3pin outlet. Plug the AC adapter into an AC...to the equipment: Plug the power cord into an AC outlet that is an important safety feature. Disconnect power from the computer by unplugging the power cord from the computer). To reduce the risk of the power cord into the power connector (1) on the power cord, plug the cord into the AC adapter (2)....

