
Service Guide
Page 3
The computer and the AC adapter comply with the user-accessible surface temperature limits defined by the International Standard for Safety of overheating the computer, do not allow another hard surface, ... operation. Safety warning notice Å WARNING: To reduce the possibility of heat-related injuries or of Information Technology Equipment (IEC 60950). Do not allow the AC adapter to contact the skin or a soft surface, such as pillows or rugs or clothing, to block airflow. Also, do not place the computer directly on...
The computer and the AC adapter comply with the user-accessible surface temperature limits defined by the International Standard for Safety of overheating the computer, do not allow another hard surface, ... operation. Safety warning notice Å WARNING: To reduce the possibility of heat-related injuries or of Information Technology Equipment (IEC 60950). Do not allow the AC adapter to contact the skin or a soft surface, such as pillows or rugs or clothing, to block airflow. Also, do not place the computer directly on...
Service Guide
Page 12
...Hz, 1600 × 1200 external resolution at 75 Hz (hot plug/unplug with autodetect) Multi-pin AC power X None X Full-size keyboard, 40.64-cm X (16.00-in) with numeric ...AC adapter with localized X cable plug support 90-W AC adapter with localized cable plug support 6-cell, 2.20-Ah, 47-Wh battery X Security cable slot X Presario CQ60 Intel Discrete HP G60 Intel UMA X X X X X X X X X X X X X X X X X X X X X X X X X X X X X X X X X X X X X X X X X X X X HP G60 Intel Discrete X X X X X X X X X X X X X X X X X X X X X X Presario HP G60...
...Hz, 1600 × 1200 external resolution at 75 Hz (hot plug/unplug with autodetect) Multi-pin AC power X None X Full-size keyboard, 40.64-cm X (16.00-in) with numeric ...AC adapter with localized X cable plug support 90-W AC adapter with localized cable plug support 6-cell, 2.20-Ah, 47-Wh battery X Security cable slot X Presario CQ60 Intel Discrete HP G60 Intel UMA X X X X X X X X X X X X X X X X X X X X X X X X X X X X X X X X X X X X X X X X X X X X HP G60 Intel Discrete X X X X X X X X X X X X X X X X X X X X X X Presario HP G60...
Service Guide
Page 13
...: Windows Vista Business 32 Windows Vista Premium 32 Windows Vista Home Basic 32 FreeDOS RedFlag Linux End-user replaceable parts: AC adapter Battery (system) Hard drive Memory module Optical drive WLAN module Presario CQ60 Intel UMA Presario CQ60 Intel Discrete HP G60 Intel UMA HP G60 Intel Discrete Presario HP G60 CQ60 AMD UMA AMD UMA X X X X X X X X X X X X X X X X X X X X X X X X X X X X X X X X X X X X X X X X X X X X X X X X X X X X X X X X X X X X X X X X Product description...
...: Windows Vista Business 32 Windows Vista Premium 32 Windows Vista Home Basic 32 FreeDOS RedFlag Linux End-user replaceable parts: AC adapter Battery (system) Hard drive Memory module Optical drive WLAN module Presario CQ60 Intel UMA Presario CQ60 Intel Discrete HP G60 Intel UMA HP G60 Intel Discrete Presario HP G60 CQ60 AMD UMA AMD UMA X X X X X X X X X X X X X X X X X X X X X X X X X X X X X X X X X X X X X X X X X X X X X X X X X X X X X X X X X X X X X X X X Product description...
Service Guide
Page 20
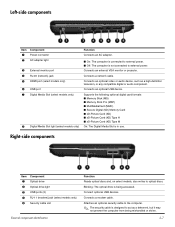
..., on select models, also writes to act as a high-definition television, or any compatible digital or audio component. Left-side components Item Component 1 Power connector 2 AC adapter light 3 External monitor port 4 RJ-45 (network) jack 5 HDMI port (select models only) 6 USB port 7 Digital Media Slot (select models only) 8 Digital Media Slot light...
..., on select models, also writes to act as a high-definition television, or any compatible digital or audio component. Left-side components Item Component 1 Power connector 2 AC adapter light 3 External monitor port 4 RJ-45 (network) jack 5 HDMI port (select models only) 6 USB port 7 Digital Media Slot (select models only) 8 Digital Media Slot light...
Service Guide
Page 34
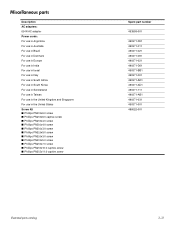
Miscellaneous parts Description AC adapters: 65-W AC adapter Power cords: For use in Argentina For use in Australia For use in Brazil For use in Denmark For use in Europe For use in ...
Miscellaneous parts Description AC adapters: 65-W AC adapter Power cords: For use in Argentina For use in Australia For use in Brazil For use in Denmark For use in Europe For use in ...

Service Guide
Page 35
... Tobago, Tunisia, Turkey, Turkmenistan, Tuvalu, Uganda, Ukraine, the United Arab Emirates, the United Kingdom, Uruguay, Uzbekistan, Vanuatu, Venezuela, Vietnam, Yemen, Zaire, Zambia, and Zimbabwe 65-W AC adapter Atheros AR9280 802.11a/b/g/n WLAN module for use in Afghanistan, Albania, Algeria, Andorra, Angola, Antigua and Barbuda, Argentina, Armenia, Aruba, Australia, Austria, Azerbaijan, the Bahamas...
... Tobago, Tunisia, Turkey, Turkmenistan, Tuvalu, Uganda, Ukraine, the United Arab Emirates, the United Kingdom, Uruguay, Uzbekistan, Vanuatu, Venezuela, Vietnam, Yemen, Zaire, Zambia, and Zimbabwe 65-W AC adapter Atheros AR9280 802.11a/b/g/n WLAN module for use in Afghanistan, Albania, Algeria, Andorra, Angola, Antigua and Barbuda, Argentina, Armenia, Aruba, Australia, Austria, Azerbaijan, the Bahamas...
Service Guide
Page 45
..., use foot straps and a grounded floor mat. The following table lists the shielding protection provided by first unplugging the power cord from the AC outlet and then unplugging the AC adapter from the computer. 4. Disconnect all times. Remove the real-time clock (RTC) battery (see "Battery" on page 4-12). 6. Removal and replacement procedures...
..., use foot straps and a grounded floor mat. The following table lists the shielding protection provided by first unplugging the power cord from the AC outlet and then unplugging the AC adapter from the computer. 4. Disconnect all times. Remove the real-time clock (RTC) battery (see "Battery" on page 4-12). 6. Removal and replacement procedures...
Service Guide
Page 48
Install the battery by first unplugging the power cord from the AC outlet and then unplugging the AC adapter from the computer. If you are unsure whether the computer is off or in Hibernation, turn the computer on, and then shut it down on a ...
Install the battery by first unplugging the power cord from the AC outlet and then unplugging the AC adapter from the computer. If you are unsure whether the computer is off or in Hibernation, turn the computer on, and then shut it down on a ...
Service Guide
Page 49
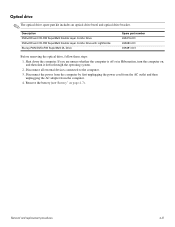
... off or in Hibernation, turn the computer on page 4-7). Disconnect the power from the computer by first unplugging the power cord from the AC outlet and then unplugging the AC adapter from the computer. 4. Removal and replacement procedures 4-8 Optical drive ✎ The optical drive spare part kit includes an optical drive bezel and...
... off or in Hibernation, turn the computer on page 4-7). Disconnect the power from the computer by first unplugging the power cord from the AC outlet and then unplugging the AC adapter from the computer. 4. Removal and replacement procedures 4-8 Optical drive ✎ The optical drive spare part kit includes an optical drive bezel and...
Service Guide
Page 51
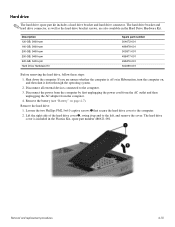
... up and to the left, and remove the cover. Disconnect the power from the computer by first unplugging the power cord from the AC outlet and then unplugging the AC adapter from the computer. 4. Remove the hard drive: 1. The hard drive cover is off or in Hibernation, turn the computer on page 4-7). Description...
... up and to the left, and remove the cover. Disconnect the power from the computer by first unplugging the power cord from the AC outlet and then unplugging the AC adapter from the computer. 4. Remove the hard drive: 1. The hard drive cover is off or in Hibernation, turn the computer on page 4-7). Description...
Service Guide
Page 53
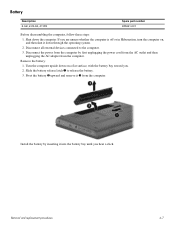
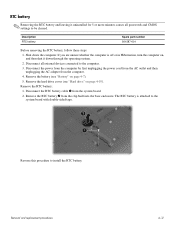
... settings to the system board with double-sided tape. Disconnect the power from the computer by first unplugging the power cord from the AC outlet and then unplugging the AC adapter from the computer. 4. Removal and replacement procedures 4-12 Description RTC battery Spare part number 501587-001 Before removing the RTC battery, follow...
... settings to the system board with double-sided tape. Disconnect the power from the computer by first unplugging the power cord from the AC outlet and then unplugging the AC adapter from the computer. 4. Removal and replacement procedures 4-12 Description RTC battery Spare part number 501587-001 Before removing the RTC battery, follow...
Service Guide
Page 54
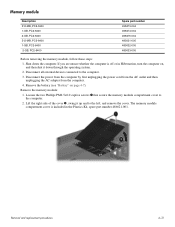
Disconnect the power from the computer by first unplugging the power cord from the AC outlet and then unplugging the AC adapter from the computer. 4. The memory module compartment cover is off or in the Plastics Kit, spare part number 486621-001. Remove the battery (see "Battery" ...
Disconnect the power from the computer by first unplugging the power cord from the AC outlet and then unplugging the AC adapter from the computer. 4. The memory module compartment cover is off or in the Plastics Kit, spare part number 486621-001. Remove the battery (see "Battery" ...
Service Guide
Page 56
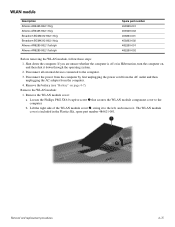
... "Battery" on , and then shut it to the computer. Disconnect the power from the computer by first unplugging the power cord from the AC outlet and then unplugging the AC adapter from the computer. 4. WLAN module Description Atheros AR2425 802.11b/g Atheros AR2425 802.11b/g Broadcom BCM4312 802.11b/g Broadcom BCM4312 802.11b...
... "Battery" on , and then shut it to the computer. Disconnect the power from the computer by first unplugging the power cord from the AC outlet and then unplugging the AC adapter from the computer. 4. WLAN module Description Atheros AR2425 802.11b/g Atheros AR2425 802.11b/g Broadcom BCM4312 802.11b/g Broadcom BCM4312 802.11b...
Service Guide
Page 59
... the keyboard to the computer. 3. Removal and replacement procedures 4-18 Disconnect the power from the computer by first unplugging the power cord from the AC outlet and then unplugging the AC adapter from the computer. 4. Shut down through the operating system. 2. If you . 2. Before removing the keyboard, follow these steps: 1. Remove the keyboard...
... the keyboard to the computer. 3. Removal and replacement procedures 4-18 Disconnect the power from the computer by first unplugging the power cord from the AC outlet and then unplugging the AC adapter from the computer. 4. Shut down through the operating system. 2. If you . 2. Before removing the keyboard, follow these steps: 1. Remove the keyboard...

Service Guide
Page 61
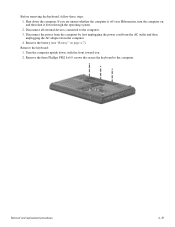
..., turn the computer on page 4-7). 5. Removal and replacement procedures 4-20 If you are identified by first unplugging the power cord from the AC outlet and then unplugging the AC adapter from the computer by a triangle icon. Keyboard cover Description Keyboard cover Silver keyboard cover Spare part number 496828-001 506848-001 Before removing...
..., turn the computer on page 4-7). 5. Removal and replacement procedures 4-20 If you are identified by first unplugging the power cord from the AC outlet and then unplugging the AC adapter from the computer by a triangle icon. Keyboard cover Description Keyboard cover Silver keyboard cover Spare part number 496828-001 506848-001 Before removing...
Service Guide
Page 63
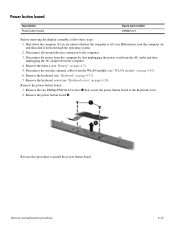
... the operating system. 2. Reverse this procedure to the computer. 3. Disconnect the power from the computer by first unplugging the power cord from the AC outlet and then unplugging the AC adapter from the WLAN module (see "Battery" on page 4-15). 6. Remove the two Phillips PM2.0x4.0 screws 1 that secure the power button board...
... the operating system. 2. Reverse this procedure to the computer. 3. Disconnect the power from the computer by first unplugging the power cord from the AC outlet and then unplugging the AC adapter from the WLAN module (see "Battery" on page 4-15). 6. Remove the two Phillips PM2.0x4.0 screws 1 that secure the power button board...
Service Guide
Page 65
... 4-7). 5. Remove the keyboard cover (see "Battery" on page 4-20). Disconnect the power from the computer by first unplugging the power cord from the AC outlet and then unplugging the AC adapter from the WLAN module (see "Keyboard" on , and then shut it to the computer. 3. Removal and replacement procedures 4-24 Disconnect the wireless...
... 4-7). 5. Remove the keyboard cover (see "Battery" on page 4-20). Disconnect the power from the computer by first unplugging the power cord from the AC outlet and then unplugging the AC adapter from the WLAN module (see "Keyboard" on , and then shut it to the computer. 3. Removal and replacement procedures 4-24 Disconnect the wireless...

Service Guide
Page 71
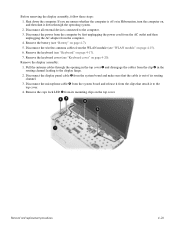
... top cover: 1. Remove the three Phillips PM2.0x4.0 screws 2. Disconnect the power from the computer by first unplugging the power cord from the AC outlet and then unplugging the AC adapter from the computer. 4. Hard drive (see "Display assembly" on page 4-10) c. Remove the four Phillips PM2.5X9.0 screws 1 that secure the top...
... top cover: 1. Remove the three Phillips PM2.0x4.0 screws 2. Disconnect the power from the computer by first unplugging the power cord from the AC outlet and then unplugging the AC adapter from the computer. 4. Hard drive (see "Display assembly" on page 4-10) c. Remove the four Phillips PM2.5X9.0 screws 1 that secure the top...
Service Guide
Page 73
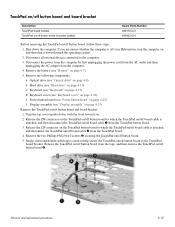
... drive" on /off button board, follow these steps: 1. Disconnect the power from the computer by first unplugging the power cord from the AC outlet and then unplugging the AC adapter from the TouchPad board. 4. Single-sided and double-sided tape is off or in Hibernation, turn the computer on /off button board to...
... drive" on /off button board, follow these steps: 1. Disconnect the power from the computer by first unplugging the power cord from the AC outlet and then unplugging the AC adapter from the TouchPad board. 4. Single-sided and double-sided tape is off or in Hibernation, turn the computer on /off button board to...

Service Guide
Page 75
... (see "Keyboard" on page 4-23) Remove the audio board: 1. Disconnect the power from the computer by first unplugging the power cord from the AC outlet and then unplugging the AC adapter from the system board. 2. Remove the battery (see "Optical drive" on page 4-7). 5. Optical drive (see "Battery" on page 4-8) b. Remove the audio board...
... (see "Keyboard" on page 4-23) Remove the audio board: 1. Disconnect the power from the computer by first unplugging the power cord from the AC outlet and then unplugging the AC adapter from the system board. 2. Remove the battery (see "Optical drive" on page 4-7). 5. Optical drive (see "Battery" on page 4-8) b. Remove the audio board...


