
Software Update, Backup and Recovery - Windows Vista
Page 6
...connect, or disconnect any device, cable, or cord. To download a BIOS update: 1. Access the page on the HP Web site that is running on or restarting the computer. Open the Setup Utility by unplugging the power cord from the computer by turning on battery power, docked in an optional docking device, or..., first determine what BIOS version you are already in Windows) or by opening the Setup Utility. You may need to reliable external power using the AC adapter. Follow the instructions on the screen to download your computer and access the BIOS update you need this information ...
...connect, or disconnect any device, cable, or cord. To download a BIOS update: 1. Access the page on the HP Web site that is running on or restarting the computer. Open the Setup Utility by unplugging the power cord from the computer by turning on battery power, docked in an optional docking device, or..., first determine what BIOS version you are already in Windows) or by opening the Setup Utility. You may need to reliable external power using the AC adapter. Follow the instructions on the screen to download your computer and access the BIOS update you need this information ...
Wireless (Select Models Only) - Windows Vista
Page 19
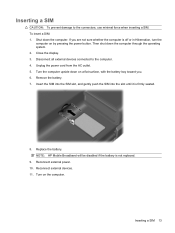
... the slot until it is not replaced. 9. Turn on by pressing the power button. Inserting a SIM 13 Close the display. 3. Remove the battery. 7. Unplug the power cord from the AC outlet. 5. NOTE: HP Mobile Broadband will be disabled if the battery is firmly seated. 8. If you... . 6. Reconnect external power. 10. Reconnect external devices. 11. Disconnect all external devices connected to the...
... the slot until it is not replaced. 9. Turn on by pressing the power button. Inserting a SIM 13 Close the display. 3. Remove the battery. 7. Unplug the power cord from the AC outlet. 5. NOTE: HP Mobile Broadband will be disabled if the battery is firmly seated. 8. If you... . 6. Reconnect external power. 10. Reconnect external devices. 11. Disconnect all external devices connected to the...
Wireless (Select Models Only) - Windows Vista
Page 20
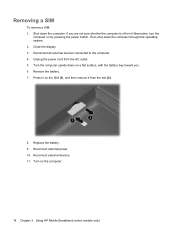
... the computer. Press in Hibernation, turn the computer on the computer. 14 Chapter 3 Using HP Mobile Broadband (select models only) Then shut down the computer through the operating system. 2. Turn on by pressing the power button. Unplug the power cord from the slot (2). 8. Close the display. 3. If you . 6. Reconnect external devices. 11. Replace the...
... the computer. Press in Hibernation, turn the computer on the computer. 14 Chapter 3 Using HP Mobile Broadband (select models only) Then shut down the computer through the operating system. 2. Turn on by pressing the power button. Unplug the power cord from the slot (2). 8. Close the display. 3. If you . 6. Reconnect external devices. 11. Replace the...
Drives - Windows Vista
Page 14
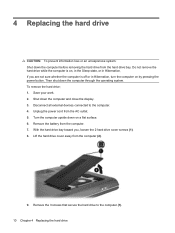
... drive while the computer is off or in Hibernation, turn the computer on , in the Sleep state, or in Hibernation. Save your work. 2. Unplug the power cord from the computer. 7. With the hard drive bay toward you are not sure whether the computer is on by pressing the... power button. To remove the hard drive: 1. Remove the battery from the AC outlet. 5. Turn the computer upside down the computer and close the display. 3. Lift ...
... drive while the computer is off or in Hibernation, turn the computer on , in the Sleep state, or in Hibernation. Save your work. 2. Unplug the power cord from the computer. 7. With the hard drive bay toward you are not sure whether the computer is on by pressing the... power button. To remove the hard drive: 1. Remove the battery from the AC outlet. 5. Turn the computer upside down the computer and close the display. 3. Lift ...
Memory Modules - Windows Vista and Windows 7
Page 7
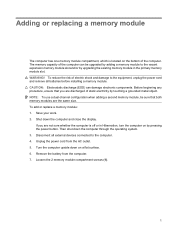
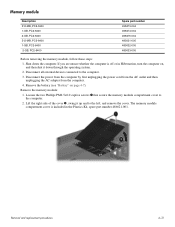
...on the bottom of electric shock and damage to the equipment, unplug the power cord and remove all external devices connected to the vacant expansion memory module slot and/or by pressing the power button. Save your work. 2. Disconnect all batteries before installing a memory ... on a flat surface. 6. To add or replace a memory module: 1. Loosen the 2 memory module compartment screws (1). 1 WARNING! Unplug the power cord from the computer. 7. Remove the battery from the AC outlet. 5. Adding or replacing a memory module The computer has one memory module compartment, ...
...on the bottom of electric shock and damage to the equipment, unplug the power cord and remove all external devices connected to the vacant expansion memory module slot and/or by pressing the power button. Save your work. 2. Disconnect all batteries before installing a memory ... on a flat surface. 6. To add or replace a memory module: 1. Loosen the 2 memory module compartment screws (1). 1 WARNING! Unplug the power cord from the computer. 7. Remove the battery from the AC outlet. 5. Adding or replacing a memory module The computer has one memory module compartment, ...
Notebook Tour - Windows Vista
Page 20
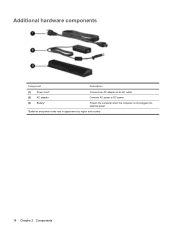
Additional hardware components Component Description (1) Power cord* Connects an AC adapter to an AC outlet. (2) AC adapter Converts AC power to DC power. (3) Battery* Powers the computer when the computer is not plugged into external power. *Batteries and power cords vary in appearance by region and country. 14 Chapter 2 Components
Additional hardware components Component Description (1) Power cord* Connects an AC adapter to an AC outlet. (2) AC adapter Converts AC power to DC power. (3) Battery* Powers the computer when the computer is not plugged into external power. *Batteries and power cords vary in appearance by region and country. 14 Chapter 2 Components
Notebook Tour - Windows Vista
Page 23
... light, identifying 11 O operating system Microsoft Certificate of Authenticity label 15 Product Key 15 optical drive, identifying 7 P ports external monitor 8 HDMI 8 USB 7, 8 power button, identifying 4 power connector, identifying 8 power cord, identifying 14 power light, identifying 5, 11 Product Key 15 product name and number, computer 15 R regulatory information modem approval label 15 regulatory label 15 wireless...
... light, identifying 11 O operating system Microsoft Certificate of Authenticity label 15 Product Key 15 optical drive, identifying 7 P ports external monitor 8 HDMI 8 USB 7, 8 power button, identifying 4 power connector, identifying 8 power cord, identifying 14 power light, identifying 5, 11 Product Key 15 product name and number, computer 15 R regulatory information modem approval label 15 regulatory label 15 wireless...
Power Management - Windows Vista
Page 23
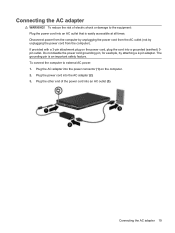
If provided with a 3-pin attachment plug on the power cord, plug the cord into the power connector (1) on the computer. 2. Do not disable the power cord grounding pin, for example, by unplugging the power cord from the AC outlet (not by attaching a 2-pin adapter. The grounding pin is easily accessible at ...all times. To connect the computer to the equipment: Plug the power cord into the AC adapter (2). 3. Plug the AC adapter into a grounded (earthed) 3pin outlet. Plug the power cord into an AC outlet that is an important safety feature. To reduce the risk...
If provided with a 3-pin attachment plug on the power cord, plug the cord into the power connector (1) on the computer. 2. Do not disable the power cord grounding pin, for example, by unplugging the power cord from the AC outlet (not by attaching a 2-pin adapter. The grounding pin is easily accessible at ...all times. To connect the computer to the equipment: Plug the power cord into the AC adapter (2). 3. Plug the AC adapter into a grounded (earthed) 3pin outlet. Plug the power cord into an AC outlet that is an important safety feature. To reduce the risk...
Service Guide
Page 6
... (select models only 8-4 9 Connector pin assignments Audio-in (microphone 9-1 Audio-out (headphone 9-1 External monitor 9-2 HDMI 9-3 RJ-11 (modem 9-4 RJ-45 (network 9-4 Universal Serial Bus 9-5 10 Power cord set requirements Requirements for all countries and regions 10-1 Requirements for specific countries and regions 10-2 11 Recycling Battery 11-1 Display 11-1 Index Contents vi
... (select models only 8-4 9 Connector pin assignments Audio-in (microphone 9-1 Audio-out (headphone 9-1 External monitor 9-2 HDMI 9-3 RJ-11 (modem 9-4 RJ-45 (network 9-4 Universal Serial Bus 9-5 10 Power cord set requirements Requirements for all countries and regions 10-1 Requirements for specific countries and regions 10-2 11 Recycling Battery 11-1 Display 11-1 Index Contents vi
Service Guide
Page 34
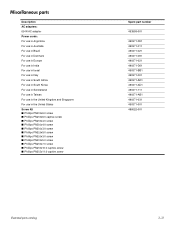
Miscellaneous parts Description AC adapters: 65-W AC adapter Power cords: For use in Argentina For use in Australia For use in Brazil For use in Denmark For use in Europe For use in India For ...
Miscellaneous parts Description AC adapters: 65-W AC adapter Power cords: For use in Argentina For use in Australia For use in Brazil For use in Denmark For use in Europe For use in India For ...
Service Guide
Page 37
...Power cord for use in Australia Power cord for use in Europe Power cord for use in the United Kingdom and Singapore Power cord for use in Italy Power cord for use in Denmark Power cord for use in Sweden Power cord for use in Brazil Power cord for use in Taiwan Power cord for use in South Korea Power cord for use in South Africa Power cord for use in Israel Power cord... thermal material) 16-inch WXGA BrightView display assembly for HP G60 computer models (includes microphone) 16-inch WXGA BrightView display assembly for HP G60 computer models (includes webcam module and cable, microphone and...
...Power cord for use in Australia Power cord for use in Europe Power cord for use in the United Kingdom and Singapore Power cord for use in Italy Power cord for use in Denmark Power cord for use in Sweden Power cord for use in Brazil Power cord for use in Taiwan Power cord for use in South Korea Power cord for use in South Africa Power cord for use in Israel Power cord... thermal material) 16-inch WXGA BrightView display assembly for HP G60 computer models (includes microphone) 16-inch WXGA BrightView display assembly for HP G60 computer models (includes webcam module and cable, microphone and...
Service Guide
Page 45
...straps are compatible with most types of one megohm ±10% resistance in the ground cords. The following table lists the shielding protection provided by first unplugging the power cord from the AC outlet and then unplugging the AC adapter from the computer. 4. Removal ... or soldering aids ■ Nonconductive foam ■ Conductive tabletop workstations with ground cords of shoes or boots. Shut down through the operating system. 2. Disconnect all times. Disconnect the power from the computer by antistatic bags and floor mats. Wait approximately 5 minutes. Equipment...
...straps are compatible with most types of one megohm ±10% resistance in the ground cords. The following table lists the shielding protection provided by first unplugging the power cord from the AC outlet and then unplugging the AC adapter from the computer. 4. Removal ... or soldering aids ■ Nonconductive foam ■ Conductive tabletop workstations with ground cords of shoes or boots. Shut down through the operating system. 2. Disconnect all times. Disconnect the power from the computer by antistatic bags and floor mats. Wait approximately 5 minutes. Equipment...
Service Guide
Page 48
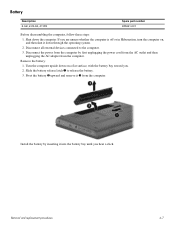
... the battery. 3. Removal and replacement procedures 4-7 Turn the computer upside down on , and then shut it 3 from the computer. Disconnect the power from the computer. Battery Description 6 cell, 2.20-Ah, 47-Wh Spare part number 485041-001 Before disassembling the computer, follow these steps:... battery 2 upward and remove it down the computer. Shut down through the operating system. 2. Install the battery by first unplugging the power cord from the AC outlet and then unplugging the AC adapter from the computer by inserting it into the battery bay until you . 2. ...
... the battery. 3. Removal and replacement procedures 4-7 Turn the computer upside down on , and then shut it 3 from the computer. Disconnect the power from the computer. Battery Description 6 cell, 2.20-Ah, 47-Wh Spare part number 485041-001 Before disassembling the computer, follow these steps:... battery 2 upward and remove it down the computer. Shut down through the operating system. 2. Install the battery by first unplugging the power cord from the AC outlet and then unplugging the AC adapter from the computer by inserting it into the battery bay until you . 2. ...
Service Guide
Page 49
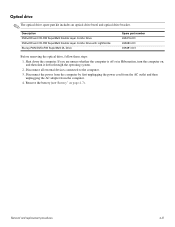
... the optical drive, follow these steps: 1. Remove the battery (see"Battery" on , and then shut it down the computer. Disconnect the power from the computer by first unplugging the power cord from the AC outlet and then unplugging the AC adapter from the computer. 4. Shut down through the operating system. 2. Disconnect all external...
... the optical drive, follow these steps: 1. Remove the battery (see"Battery" on , and then shut it down the computer. Disconnect the power from the computer by first unplugging the power cord from the AC outlet and then unplugging the AC adapter from the computer. 4. Shut down through the operating system. 2. Disconnect all external...
Service Guide
Page 51
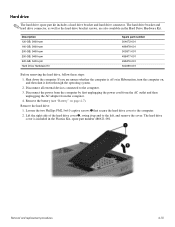
...-001 Before removing the hard drive, follow these steps: 1. The hard drive cover is off or in Hibernation, turn the computer on page 4-7). Disconnect the power from the computer by first unplugging the power cord from the AC outlet and then unplugging the AC adapter from the computer. 4.
...-001 Before removing the hard drive, follow these steps: 1. The hard drive cover is off or in Hibernation, turn the computer on page 4-7). Disconnect the power from the computer by first unplugging the power cord from the AC outlet and then unplugging the AC adapter from the computer. 4.
Service Guide
Page 53
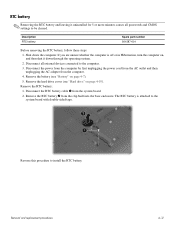
... the RTC battery: 1. Description RTC battery Spare part number 501587-001 Before removing the RTC battery, follow these steps: 1. Disconnect the power from the computer by first unplugging the power cord from the AC outlet and then unplugging the AC adapter from the clip built into the base enclosure. Disconnect the RTC battery...
... the RTC battery: 1. Description RTC battery Spare part number 501587-001 Before removing the RTC battery, follow these steps: 1. Disconnect the power from the computer by first unplugging the power cord from the AC outlet and then unplugging the AC adapter from the clip built into the base enclosure. Disconnect the RTC battery...
Service Guide
Page 54
... the computer by first unplugging the power cord from the AC outlet and then unplugging the AC adapter from the computer. 4. Disconnect all external devices connected to the left, and remove the cover. ...
... the computer by first unplugging the power cord from the AC outlet and then unplugging the AC adapter from the computer. 4. Disconnect all external devices connected to the left, and remove the cover. ...
Service Guide
Page 56
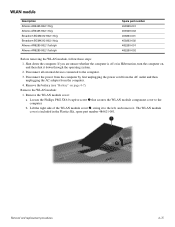
... WLAN module: 1. Loosen the Phillips PM2.5X6.0 captive screw 1 that secures the WLAN module component cover to the computer. 3. Disconnect the power from the computer by first unplugging the power cord from the AC outlet and then unplugging the AC adapter from the computer. 4. Remove the WLAN module cover: a. Removal and replacement procedures...
... WLAN module: 1. Loosen the Phillips PM2.5X6.0 captive screw 1 that secures the WLAN module component cover to the computer. 3. Disconnect the power from the computer by first unplugging the power cord from the AC outlet and then unplugging the AC adapter from the computer. 4. Remove the WLAN module cover: a. Removal and replacement procedures...
Service Guide
Page 59
... the computer upside down the computer. Disconnect all external devices connected to the computer. Removal and replacement procedures 4-18 Disconnect the power from the computer by first unplugging the power cord from the AC outlet and then unplugging the AC adapter from the computer. 4. Remove the three Phillips PM2.5x5.0 screws the secure...
... the computer upside down the computer. Disconnect all external devices connected to the computer. Removal and replacement procedures 4-18 Disconnect the power from the computer by first unplugging the power cord from the AC outlet and then unplugging the AC adapter from the computer. 4. Remove the three Phillips PM2.5x5.0 screws the secure...

Service Guide
Page 61
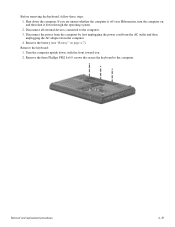
Disconnect all external devices connected to the computer. Disconnect the power from the computer by a triangle icon. Shut down through the operating system. 2. Remove the keyboard (see "Battery" on page 4-7). 5. Remove the keyboard cover: 1. Removal and ... keyboard cover Spare part number 496828-001 506848-001 Before removing the keyboard cover, follow these steps: 1. If you are identified by first unplugging the power cord from the AC outlet and then unplugging the AC adapter from the computer. 4. The keyboard cover screws are unsure whether the computer is off or...
Disconnect all external devices connected to the computer. Disconnect the power from the computer by a triangle icon. Shut down through the operating system. 2. Remove the keyboard (see "Battery" on page 4-7). 5. Remove the keyboard cover: 1. Removal and ... keyboard cover Spare part number 496828-001 506848-001 Before removing the keyboard cover, follow these steps: 1. If you are identified by first unplugging the power cord from the AC outlet and then unplugging the AC adapter from the computer. 4. The keyboard cover screws are unsure whether the computer is off or...

