Power Management - Windows Vista
Page 21
Calibrate a battery before returning it to a battery, do not disassemble, crush, or puncture a battery; Replace the battery only with a battery approved for one month or more than 50 percent, recharge the battery before using . ● ...
Calibrate a battery before returning it to a battery, do not disassemble, crush, or puncture a battery; Replace the battery only with a battery approved for one month or more than 50 percent, recharge the battery before using . ● ...

Service Guide
Page 42
In all accompanying screws) away from the work area to prevent damage. Plastic parts Ä CAUTION: Using excessive force during disassembly and assembly procedures. ✎ As you remove each subassembly from the computer, place the subassembly (and all cases, avoid bending, twisting, or ...cable placement can damage plastic parts. Cables must be sure that cables are routed in such a way that you must keep in mind during disassembly and reassembly can damage the computer. Handle cables by parts being removed or replaced. Apply only the tension required to unseat or seat the...
In all accompanying screws) away from the work area to prevent damage. Plastic parts Ä CAUTION: Using excessive force during disassembly and assembly procedures. ✎ As you remove each subassembly from the computer, place the subassembly (and all cases, avoid bending, twisting, or ...cable placement can damage plastic parts. Cables must be sure that cables are routed in such a way that you must keep in mind during disassembly and reassembly can damage the computer. Handle cables by parts being removed or replaced. Apply only the tension required to unseat or seat the...
Service Guide
Page 48
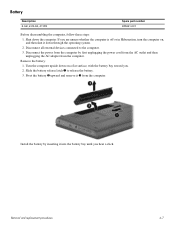
... remove it 3 from the computer. Remove the battery: 1. Removal and replacement procedures 4-7 Battery Description 6 cell, 2.20-Ah, 47-Wh Spare part number 485041-001 Before disassembling the computer, follow these steps: 1. Disconnect all external devices connected to release the battery. 3.
... remove it 3 from the computer. Remove the battery: 1. Removal and replacement procedures 4-7 Battery Description 6 cell, 2.20-Ah, 47-Wh Spare part number 485041-001 Before disassembling the computer, follow these steps: 1. Disconnect all external devices connected to release the battery. 3.
Service Guide
Page 128
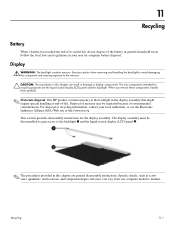
...end of its useful life, do not dispose of the battery in this chapter can vary from one computer model to another. This HP product contains mercury in the backlight in damage to the mercury. Ä CAUTION: The procedures in general household waste. Follow the local... laws and regulations in this component and causing exposure to display components. Disposal of mercury may be disassembled to gain access to avoid damaging this chapter are the liquid crystal display (LCD) panel and the backlight. When you remove these ...
...end of its useful life, do not dispose of the battery in this chapter can vary from one computer model to another. This HP product contains mercury in the backlight in damage to the mercury. Ä CAUTION: The procedures in general household waste. Follow the local... laws and regulations in this component and causing exposure to display components. Disposal of mercury may be disassembled to gain access to avoid damaging this chapter are the liquid crystal display (LCD) panel and the backlight. When you remove these ...

Service Guide
Page 129
Perform the following steps to the display assembly. 2. Lift up and out on the left and right inside edges 1 and the top and bottom inside edges 2 of the display bezel until the bezel disengages from the display assembly. 3. Recycling 11-2 Remove all screw covers 1 and screws 2 that secure the display bezel to disassemble the display assembly: 1. Remove the display bezel 3.
Perform the following steps to the display assembly. 2. Lift up and out on the left and right inside edges 1 and the top and bottom inside edges 2 of the display bezel until the bezel disengages from the display assembly. 3. Recycling 11-2 Remove all screw covers 1 and screws 2 that secure the display bezel to disassemble the display assembly: 1. Remove the display bezel 3.


