Power Management - Windows Vista
Page 21
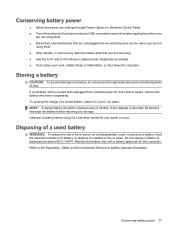
... with a battery approved for more . To reduce the risk of a battery in a cool, dry place. Storing a battery CAUTION: To prevent damage to a battery, do not disassemble, crush, or puncture a battery; Calibrate a battery before returning it in fire or water. Do not expose a battery to the Regulatory, Safety and Environmental Notices for...
... with a battery approved for more . To reduce the risk of a battery in a cool, dry place. Storing a battery CAUTION: To prevent damage to a battery, do not disassemble, crush, or puncture a battery; Calibrate a battery before returning it in fire or water. Do not expose a battery to the Regulatory, Safety and Environmental Notices for...

Service Guide
Page 42
... screws) away from the work area to prevent damage. Handle flex cables with extreme care to unseat or seat the cables during disassembly and reassembly can damage the computer. Plastic parts Ä CAUTION: Using excessive force during removal and insertion. Be sure that cables...some of the considerations that they cannot be caught or snagged by the connector whenever possible. Cables must keep in their proper locations during disassembly and assembly procedures. ✎ As you remove each subassembly from the computer, place the subassembly (and all cases, avoid bending, ...
... screws) away from the work area to prevent damage. Handle flex cables with extreme care to unseat or seat the cables during disassembly and reassembly can damage the computer. Plastic parts Ä CAUTION: Using excessive force during removal and insertion. Be sure that cables...some of the considerations that they cannot be caught or snagged by the connector whenever possible. Cables must keep in their proper locations during disassembly and assembly procedures. ✎ As you remove each subassembly from the computer, place the subassembly (and all cases, avoid bending, ...
Service Guide
Page 48
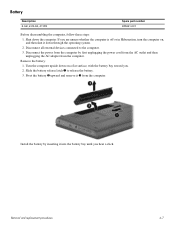
... down on a flat surface, with the battery bay toward you hear a click. Battery Description 6 cell, 2.20-Ah, 47-Wh Spare part number 485041-001 Before disassembling the computer, follow these steps: 1. Shut down the computer.
... down on a flat surface, with the battery bay toward you hear a click. Battery Description 6 cell, 2.20-Ah, 47-Wh Spare part number 485041-001 Before disassembling the computer, follow these steps: 1. Shut down the computer.
Service Guide
Page 128
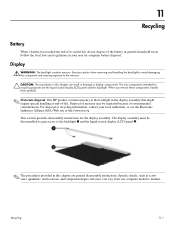
... its useful life, do not dispose of -life. When you remove these components, handle them carefully. ✎ Materials disposal. This section provides disassembly instructions for computer battery disposal. Follow the local laws and regulations in your local authorities, or see the Electronic Industries Alliance (EIA) Web site... at end-of the battery in the display assembly that might require special handling at http://www.eiae.org. This HP product contains mercury in the backlight in general household waste. The only components intended for recycling purposes are general...
... its useful life, do not dispose of -life. When you remove these components, handle them carefully. ✎ Materials disposal. This section provides disassembly instructions for computer battery disposal. Follow the local laws and regulations in your local authorities, or see the Electronic Industries Alliance (EIA) Web site... at end-of the battery in the display assembly that might require special handling at http://www.eiae.org. This HP product contains mercury in the backlight in general household waste. The only components intended for recycling purposes are general...

Service Guide
Page 129
Recycling 11-2 Perform the following steps to the display assembly. 2. Remove all screw covers 1 and screws 2 that secure the display bezel to disassemble the display assembly: 1. Remove the display bezel 3. Lift up and out on the left and right inside edges 1 and the top and bottom inside edges 2 of the display bezel until the bezel disengages from the display assembly. 3.
Recycling 11-2 Perform the following steps to the display assembly. 2. Remove all screw covers 1 and screws 2 that secure the display bezel to disassemble the display assembly: 1. Remove the display bezel 3. Lift up and out on the left and right inside edges 1 and the top and bottom inside edges 2 of the display bezel until the bezel disengages from the display assembly. 3.


