Compaq 5017 Flat Panel Monitor User Guide
Page 3
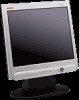
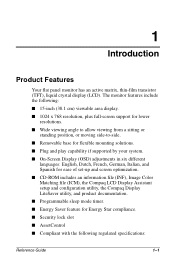
... set-up and screen optimization. I Programmable sleep mode timer. I 1024 x 768 resolution, plus full-screen support for flexible mounting solutions. I Removable base for lower resolutions. I Plug and play capability if supported by your system. I Wide viewing angle to allow viewing from a sitting or standing position, or moving side-to-side. I Security lock slot I AssetControl I 15-inch (38.1 cm) viewable area display. The monitor features include the following: I Compliant with the following regulated specifications: Reference Guide...
... set-up and screen optimization. I Programmable sleep mode timer. I 1024 x 768 resolution, plus full-screen support for flexible mounting solutions. I Removable base for lower resolutions. I Plug and play capability if supported by your system. I Wide viewing angle to allow viewing from a sitting or standing position, or moving side-to-side. I Security lock slot I AssetControl I 15-inch (38.1 cm) viewable area display. The monitor features include the following: I Compliant with the following regulated specifications: Reference Guide...

Compaq 5017 Flat Panel Monitor User Guide
Page 6
... grasping the plug firmly and pulling it from walls or other enclosures. I Install your monitor at least 3 inches (76 mm) away from the outlet. Disconnect the monitor by pulling the cord. 2-2 Reference Guide Adjust only those controls that are discussed in the operating instructions. I Use only a power source and connection appropriate for each device. the power strips must be specifically labeled as a power strip or Uninterruptible Power Supply (UPS). Safety...
... grasping the plug firmly and pulling it from walls or other enclosures. I Install your monitor at least 3 inches (76 mm) away from the outlet. Disconnect the monitor by pulling the cord. 2-2 Reference Guide Adjust only those controls that are discussed in the operating instructions. I Use only a power source and connection appropriate for each device. the power strips must be specifically labeled as a power strip or Uninterruptible Power Supply (UPS). Safety...

Compaq 5017 Flat Panel Monitor User Guide
Page 9
... computer. 7. Connect the video signal cable to the video connector 1 on the rear panel of the monitor. 3. Reference Guide 3-1 Turn off the power to the audio connector 3 on the back of the monitor. (select models only, cable not shown in illustration) 8. Place the monitor signal cable into the clip 2 on the rear panel of the monitor. 4. Connect the monitor audio cable to your computer. 1. Connect the AC power cord to an electrical wall outlet. Connect the AC power adapter cable to the audio connector 6 on...
... computer. 7. Connect the video signal cable to the video connector 1 on the rear panel of the monitor. 3. Reference Guide 3-1 Turn off the power to the audio connector 3 on the back of the monitor. (select models only, cable not shown in illustration) 8. Place the monitor signal cable into the clip 2 on the rear panel of the monitor. 4. Connect the monitor audio cable to your computer. 1. Connect the AC power cord to an electrical wall outlet. Connect the AC power adapter cable to the audio connector 6 on...

Compaq 5017 Flat Panel Monitor User Guide
Page 11
... turn on the monitor, install the Compaq LCD Display Assistant utility included on all LCD screens. Monitor Base Removal (Optional) If you choose to disassemble the monitor, be sure the monitor is turned off the monitor when it from the back of time. To remove the base from the monitor. Ä CAUTION: Before beginning to mount the monitor onto a swing arm or other mounting fixture, you turn off and the power and signal cables are...
... turn on the monitor, install the Compaq LCD Display Assistant utility included on all LCD screens. Monitor Base Removal (Optional) If you choose to disassemble the monitor, be sure the monitor is turned off the monitor when it from the back of time. To remove the base from the monitor. Ä CAUTION: Before beginning to mount the monitor onto a swing arm or other mounting fixture, you turn off and the power and signal cables are...

Compaq 5017 Flat Panel Monitor User Guide
Page 12
Installation 3. Remove the base 2 from the monitor by pushing the base away from the monitor. 3-4 Reference Guide
Installation 3. Remove the base 2 from the monitor by pushing the base away from the monitor. 3-4 Reference Guide

Compaq 5017 Flat Panel Monitor User Guide
Page 15
... displayed in this mode, refer to turn off at the end of the day and conserves energy. To access the OSD, do the following: 1. displays as 13 hours 15 minutes. Controls the volume level of the icons that the time is on. 7 Power switch Controls power to power on the monitor. 2. The LED on your viewing preferences. Operation No. 4 5 6 Icon + Control Right Adjustment Volume Control Function Moves forward through menu...
... displayed in this mode, refer to turn off at the end of the day and conserves energy. To access the OSD, do the following: 1. displays as 13 hours 15 minutes. Controls the volume level of the icons that the time is on. 7 Power switch Controls power to power on the monitor. 2. The LED on your viewing preferences. Operation No. 4 5 6 Icon + Control Right Adjustment Volume Control Function Moves forward through menu...

Compaq 5017 Flat Panel Monitor User Guide
Page 16
... or Left-Adjustment button on the front panel of your monitor to adjust these functions: Main Menu Brightness Contrast Image Control Color Advanced Menu Adjustment Scale Adjustment Scale Auto Adjustment Horizontal Image Position Vertical Image Position Clock Clock Phase Cancel Save and Return 9300 K Menu Level 3 Adjustment Message Adjustment Scale Adjustment Scale Adjustment Scale Adjustment Scale 4-4 Reference Guide Press the Right-Adjustment or Left-Adjustment buttons to save the new adjustment. 7. On-Screen Display Functions Use the Right-Adjustment and Left-Adjustment buttons found...
... or Left-Adjustment button on the front panel of your monitor to adjust these functions: Main Menu Brightness Contrast Image Control Color Advanced Menu Adjustment Scale Adjustment Scale Auto Adjustment Horizontal Image Position Vertical Image Position Clock Clock Phase Cancel Save and Return 9300 K Menu Level 3 Adjustment Message Adjustment Scale Adjustment Scale Adjustment Scale Adjustment Scale 4-4 Reference Guide Press the Right-Adjustment or Left-Adjustment buttons to save the new adjustment. 7. On-Screen Display Functions Use the Right-Adjustment and Left-Adjustment buttons found...
Compaq 5017 Flat Panel Monitor User Guide
Page 19
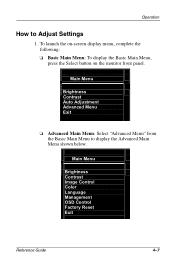
Main Menu Brightness Contrast Image Control Color Language Management OSD Control Factory Reset Exit Reference Guide 4-7 To launch the on-screen display menu, complete the following: ❏ Basic Main Menu: To display the Basic Main Menu, press the Select button on the monitor front panel. Main Menu Brightness Contrast Auto Adjustment Advanced Menu Exit ❏ Advanced Main Menu: Select "Advanced Menu" from the Basic Main Menu to Adjust Settings 1. Operation How to display the Advanced Main Menu shown below.
Main Menu Brightness Contrast Image Control Color Language Management OSD Control Factory Reset Exit Reference Guide 4-7 To launch the on-screen display menu, complete the following: ❏ Basic Main Menu: To display the Basic Main Menu, press the Select button on the monitor front panel. Main Menu Brightness Contrast Auto Adjustment Advanced Menu Exit ❏ Advanced Main Menu: Select "Advanced Menu" from the Basic Main Menu to Adjust Settings 1. Operation How to display the Advanced Main Menu shown below.

Compaq 5017 Flat Panel Monitor User Guide
Page 20
... monitor is powered on -screen menu, select Exit from the Advanced Main Menu. To select an item from the Advanced Main Menu. Use the Left Adjustment (-) button to decrease and the Right Adjustment (+) button to use, just follow the instructions on the monitor screen when identifying the following monitor conditions: 4-8 Reference Guide Monitor Messages Special messages will appear on the screen. If the display is a second or third-level menu, select Save...
... monitor is powered on -screen menu, select Exit from the Advanced Main Menu. To select an item from the Advanced Main Menu. Use the Left Adjustment (-) button to decrease and the Right Adjustment (+) button to use, just follow the instructions on the monitor screen when identifying the following monitor conditions: 4-8 Reference Guide Monitor Messages Special messages will appear on the screen. If the display is a second or third-level menu, select Save...
Compaq 5017 Flat Panel Monitor User Guide
Page 21
... and holding the Menu button on the front panel for 10 seconds. If the OSD is entering a sleep mode. The monitor also supports a reduced power state. When the monitor is in its normal operating mode. Reference Guide 4-9 The reduced power state will return to computers that have energy saver features. Upon detecting the absence of either the horizontal sync signal and/or the vertical sync signal. There is a brief...
... and holding the Menu button on the front panel for 10 seconds. If the OSD is entering a sleep mode. The monitor also supports a reduced power state. When the monitor is in its normal operating mode. Reference Guide 4-9 The reduced power state will return to computers that have energy saver features. Upon detecting the absence of either the horizontal sync signal and/or the vertical sync signal. There is a brief...
Compaq 5017 Flat Panel Monitor User Guide
Page 22
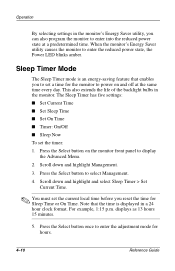
... the Select button to enter the adjustment mode for hours. 4-10 Reference Guide Sleep Timer Mode The Sleep Timer mode is displayed in a 24 hour clock format. The Sleep Timer has five settings: I Set Current Time I Set Sleep Time I Set On Time I Timer: On/Off I Sleep Now To set the current local time before you reset the time for the monitor to power on the monitor front panel to display the Advanced Menu. 2. Scroll...
... the Select button to enter the adjustment mode for hours. 4-10 Reference Guide Sleep Timer Mode The Sleep Timer mode is displayed in a 24 hour clock format. The Sleep Timer has five settings: I Set Current Time I Set Sleep Time I Set On Time I Timer: On/Off I Sleep Now To set the current local time before you reset the time for the monitor to power on the monitor front panel to display the Advanced Menu. 2. Scroll...
Compaq 5017 Flat Panel Monitor User Guide
Page 23
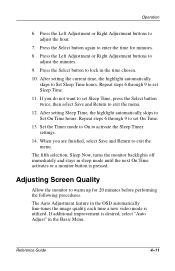
... monitor backlights off immediately and stays in the time chosen. 10. Reference Guide 4-11 Press the Select button to adjust the hour. 7. Press the Left Adjustment or Right Adjustment buttons to lock in sleep mode until the next On Time activates or a monitor button is utilized. Set the Timer mode to On to exit the menu. When you do not want to set On Time. 13. The Auto Adjustment...
... monitor backlights off immediately and stays in the time chosen. 10. Reference Guide 4-11 Press the Select button to adjust the hour. 7. Press the Left Adjustment or Right Adjustment buttons to lock in sleep mode until the next On Time activates or a monitor button is utilized. Set the Timer mode to On to exit the menu. When you do not want to set On Time. 13. The Auto Adjustment...
Compaq 5017 Flat Panel Monitor User Guide
Page 24
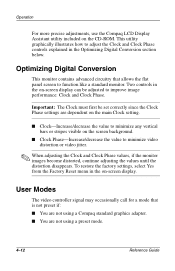
User Modes The video controller signal may occasionally call for a mode that allows the flat panel screen to improve image performance: Clock and Clock Phase. Optimizing Digital Conversion This monitor contains advanced circuitry that is not preset if: I You are not using a preset mode. 4-12 Reference Guide To restore the factory settings, select Yes from the Factory Reset menu in the Optimizing Digital Conversion section below. I You are not using a Compaq standard graphics adapter. This utility...
User Modes The video controller signal may occasionally call for a mode that allows the flat panel screen to improve image performance: Clock and Clock Phase. Optimizing Digital Conversion This monitor contains advanced circuitry that is not preset if: I You are not using a preset mode. 4-12 Reference Guide To restore the factory settings, select Yes from the Factory Reset menu in the Optimizing Digital Conversion section below. I You are not using a Compaq standard graphics adapter. This utility...

Compaq 5017 Flat Panel Monitor User Guide
Page 27
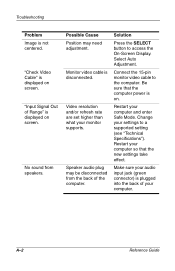
.... Connect video cable properly. Press the SELECT button to access the On-Screen Display. Video cable is blank. Press the SELECT button to access the On-Screen Display. Image appears blurred, indistinct, or too dark. Solution Connect the power cord. Select Auto Adjustment. Problem Screen is improperly connected. Possible Cause Power cord is active. adjustment. Depress any key on power. Turn on the keyboard or move the mouse. Select the Brightness and/or Contrast icons to adjust as needed. A Troubleshooting...
.... Connect video cable properly. Press the SELECT button to access the On-Screen Display. Video cable is blank. Press the SELECT button to access the On-Screen Display. Image appears blurred, indistinct, or too dark. Solution Connect the power cord. Select Auto Adjustment. Problem Screen is improperly connected. Possible Cause Power cord is active. adjustment. Depress any key on power. Turn on the keyboard or move the mouse. Select the Brightness and/or Contrast icons to adjust as needed. A Troubleshooting...
Compaq 5017 Flat Panel Monitor User Guide
Page 28
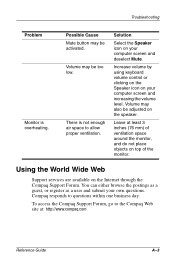
...computer power is displayed on screen. Speaker audio plug may need adjustment. Monitor video cable is displayed on . Solution Press the SELECT button to a supported setting (see "Technical Specifications"). Troubleshooting Problem Image is plugged into the back of your computer. Connect the 15-pin monitor video cable to the computer. A-2 Reference Guide Make sure your audio input jack (green connector) is not centered. Possible Cause Position may be disconnected from speakers. Restart your monitor supports. "Check Video Cable" is on screen. Select Auto...
...computer power is displayed on screen. Speaker audio plug may need adjustment. Monitor video cable is displayed on . Solution Press the SELECT button to a supported setting (see "Technical Specifications"). Troubleshooting Problem Image is plugged into the back of your computer. Connect the 15-pin monitor video cable to the computer. A-2 Reference Guide Make sure your audio input jack (green connector) is not centered. Possible Cause Position may be disconnected from speakers. Restart your monitor supports. "Check Video Cable" is on screen. Select Auto...
Compaq 5017 Flat Panel Monitor User Guide
Page 29
... monitor. There is overheating. To access the Compaq Support Forum, go to questions within one business day. Solution Select the Speaker icon on the speaker. Leave at : http://www.compaq.com Reference Guide A-3 Possible Cause Mute button may be too low. Using the World Wide Web Support services are available on your computer screen and increasing the volume level. Increase volume by using keyboard volume control...
... monitor. There is overheating. To access the Compaq Support Forum, go to questions within one business day. Solution Select the Speaker icon on the speaker. Leave at : http://www.compaq.com Reference Guide A-3 Possible Cause Mute button may be too low. Using the World Wide Web Support services are available on your computer screen and increasing the volume level. Increase volume by using keyboard volume control...

Compaq 5017 Flat Panel Monitor User Guide
Page 31
B Specifications Compaq 5017 Flat Panel Monitor Technical Specifications Display Type Viewable Image Size Face Treatment Maximum Weight (Unpacked) Dimensions Height Depth Width Maximum Graphics Resolution Text Mode Dot Pitch Horizontal Frequency Vertical Frequency 15 inches Flat panel, Active matrix-TFT LCD 15 inch diagonal 3H hardness coating with antiglare treatment 8.8 lb 38.1 cm 38.1 cm 4.0 kg 15.2 in 5.8 in 13.7 in 386 mm 147 mm 349 mm 1024 x 768 75 Hz refresh rate 720 x 400 0.297 mm 30 to 61 kHz 56 to 75 Hz Reference Guide B-1
B Specifications Compaq 5017 Flat Panel Monitor Technical Specifications Display Type Viewable Image Size Face Treatment Maximum Weight (Unpacked) Dimensions Height Depth Width Maximum Graphics Resolution Text Mode Dot Pitch Horizontal Frequency Vertical Frequency 15 inches Flat panel, Active matrix-TFT LCD 15 inch diagonal 3H hardness coating with antiglare treatment 8.8 lb 38.1 cm 38.1 cm 4.0 kg 15.2 in 5.8 in 13.7 in 386 mm 147 mm 349 mm 1024 x 768 75 Hz refresh rate 720 x 400 0.297 mm 30 to 61 kHz 56 to 75 Hz Reference Guide B-1

Compaq 5017 Flat Panel Monitor User Guide
Page 32
Pixel set as factory defaults. Specifications Technical Specifications Environmental Requirements Temperature (Independent of Altitude) Operating Temperature Storage Temperature Humidity (Noncondensing) Operating Nonoperating Power Source Power Consumption Input Terminals 41 to 95 o F -04 to +140 o F 5 to 35 o C -20 to +60 o C 20 to 80% 5 to 95% 90 - 264 VAC, 50-60 Hz 35 watts < 45 watts (speaker models) 15-pin D-type connector with cable included. Display Resolutions The display resolutions listed...
Pixel set as factory defaults. Specifications Technical Specifications Environmental Requirements Temperature (Independent of Altitude) Operating Temperature Storage Temperature Humidity (Noncondensing) Operating Nonoperating Power Source Power Consumption Input Terminals 41 to 95 o F -04 to +140 o F 5 to 35 o C -20 to +60 o C 20 to 80% 5 to 95% 90 - 264 VAC, 50-60 Hz 35 watts < 45 watts (speaker models) 15-pin D-type connector with cable included. Display Resolutions The display resolutions listed...
Compaq 5017 Flat Panel Monitor User Guide
Page 38
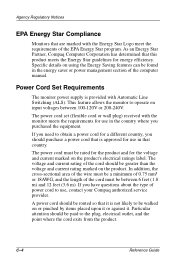
... manual. Specific details on using the Energy Saving features can be greater than the voltage and current rating marked on input voltages between 6 feet (1.8 m) and 12 feet (3.6 m). If you purchased the equipment. Power Cord Set Requirements The monitor power supply is approved for energy efficiency. The power cord must be rated for the product and for use , contact your Compaq authorized service provider. The voltage and current rating...
... manual. Specific details on using the Energy Saving features can be greater than the voltage and current rating marked on input voltages between 6 feet (1.8 m) and 12 feet (3.6 m). If you purchased the equipment. Power Cord Set Requirements The monitor power supply is approved for energy efficiency. The power cord must be rated for the product and for use , contact your Compaq authorized service provider. The voltage and current rating...

Compaq 5017 Flat Panel Monitor User Guide
Page 42
... free alternative is available. ✎Mercury is a heavy metal that is toxic in batteries, relays and switches. D-4 Reference Guide The relevant TCO'99 requirement states that batteries, the colour-generating layers of certain computer displays. It damages the nervous system and is Bioaccumulative. It also demands that batteries may not contain any of flat panel monitors as...
... free alternative is available. ✎Mercury is a heavy metal that is toxic in batteries, relays and switches. D-4 Reference Guide The relevant TCO'99 requirement states that batteries, the colour-generating layers of certain computer displays. It damages the nervous system and is Bioaccumulative. It also demands that batteries may not contain any of flat panel monitors as...


