User Manual
Page 3
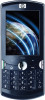
... right side components ...5 Back panel components ...6 4 Set up your HP iPAQ Step 1: Remove the battery cover and insert the SIM card 7 Step 2: Install the battery and replace the battery cover 8 Step 3: Charge the battery ...9 Step 4: Turn on your HP iPAQ ...10 Step 5: Locate the stylus ...10 Step 6: Use the... keyboard ...11 5 Get started with your HP iPAQ The Today screen ...13 Launch Getting Started...
... right side components ...5 Back panel components ...6 4 Set up your HP iPAQ Step 1: Remove the battery cover and insert the SIM card 7 Step 2: Install the battery and replace the battery cover 8 Step 3: Charge the battery ...9 Step 4: Turn on your HP iPAQ ...10 Step 5: Locate the stylus ...10 Step 6: Use the... keyboard ...11 5 Get started with your HP iPAQ The Today screen ...13 Launch Getting Started...
User Manual
Page 4
...on-screen keyboard ...17 Use Key Guard ...18 Know your device ...18 Find information about your HP iPAQ 18 Access programs ...19 View the operating system (OS) information 20 Customize your HP iPAQ ...20 Create a device name ...20 Specify owner information 20 Change the regional settings 21 Adjust...26 Adjust the speed for scrolling through items in a list 26 Use the proximity sensor 26 Protect your HP iPAQ with a password 26 Battery-saving tips ...27 Power Save Mode ...28 6 Use your HP iPAQ Check connection and signal strength 29 Call features ...29 Make a call ...29 Call a contact ...29...
...on-screen keyboard ...17 Use Key Guard ...18 Know your device ...18 Find information about your HP iPAQ 18 Access programs ...19 View the operating system (OS) information 20 Customize your HP iPAQ ...20 Create a device name ...20 Specify owner information 20 Change the regional settings 21 Adjust...26 Adjust the speed for scrolling through items in a list 26 Use the proximity sensor 26 Protect your HP iPAQ with a password 26 Battery-saving tips ...27 Power Save Mode ...28 6 Use your HP iPAQ Check connection and signal strength 29 Call features ...29 Make a call ...29 Call a contact ...29...

User Manual
Page 10
...Optional accessories 20 Safety information General precautions ...119 Safety precautions for power cords and accessories 120 Safety precautions for battery packs 120 Safety precautions for docking devices 121 Safety precautions for products with wireless devices 121 Safety precautions for ...123 Avis Canadien ...123 European Union Notice ...123 Products with 2.4-GHz Wireless LAN Devices 125 France ...125 Battery Warning ...125 Battery Recycling ...125 Battery Disposal ...125 Chemical substances ...125 Disposal of Waste Equipment by Users in Private Household 126 Equipment Warning ...126...
...Optional accessories 20 Safety information General precautions ...119 Safety precautions for power cords and accessories 120 Safety precautions for battery packs 120 Safety precautions for docking devices 121 Safety precautions for products with wireless devices 121 Safety precautions for ...123 Avis Canadien ...123 European Union Notice ...123 Products with 2.4-GHz Wireless LAN Devices 125 France ...125 Battery Warning ...125 Battery Recycling ...125 Battery Disposal ...125 Chemical substances ...125 Disposal of Waste Equipment by Users in Private Household 126 Equipment Warning ...126...
User Manual
Page 14
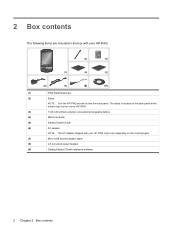
.... 2 Box contents The following items are included in the box with your HP iPAQ might vary depending on the back panel at the bottom-right corner of your HP iPAQ. (3) 1140 mAh Lithium-polymer removable/rechargeable battery (4) Welcome Guide (5) Getting Started Guide (6) AC adapter NOTE: The AC adapter shipped with additional software 2 Chapter...
.... 2 Box contents The following items are included in the box with your HP iPAQ might vary depending on the back panel at the bottom-right corner of your HP iPAQ. (3) 1140 mAh Lithium-polymer removable/rechargeable battery (4) Welcome Guide (5) Getting Started Guide (6) AC adapter NOTE: The AC adapter shipped with additional software 2 Chapter...

User Manual
Page 16
... - This component detects GPS signals. Use for phone conversations, voice notes, or voice commands. Use to select elements on the screen. Low battery ◦ 3 times only - Network not detected or SIM card missing Top and bottom panel components Component (1) (2) (3) Description Ringer/Sound Switch... off incoming call , send an SMS, or view the Dialer screen. Battery fully charged and connected to check the battery, network, or device status. ● Solid red - Slide up to remove the stylus. Battery temperature too high ● Solid green - Press to answer a call...
... - This component detects GPS signals. Use for phone conversations, voice notes, or voice commands. Use to select elements on the screen. Low battery ◦ 3 times only - Network not detected or SIM card missing Top and bottom panel components Component (1) (2) (3) Description Ringer/Sound Switch... off incoming call , send an SMS, or view the Dialer screen. Battery fully charged and connected to check the battery, network, or device status. ● Solid red - Slide up to remove the stylus. Battery temperature too high ● Solid green - Press to answer a call...

User Manual
Page 18
... (microSD) storage card with the metal contacts facing down to make and receive calls. Covers the battery, SIM card, and microSD card. For more information about installing these components, see Set up to illuminate your HP iPAQ on page 7 and Storage cards on the screen and input information. Insert a SIM card with...
... (microSD) storage card with the metal contacts facing down to make and receive calls. Covers the battery, SIM card, and microSD card. For more information about installing these components, see Set up to illuminate your HP iPAQ on page 7 and Storage cards on the screen and input information. Insert a SIM card with...

User Manual
Page 19
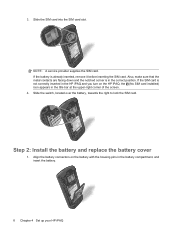
Carefully remove your HP iPAQ and all the components from the HP iPAQ. 2. Step 1: Remove the battery cover and insert the SIM card 7 Slide the cover down and away from the box before beginning to set up and use your HP iPAQ. NOTE: Placing the screen on hard surfaces can cause scratches on the screen. Align the SIM card over the SIM card slot. Step 1: Remove the battery cover and insert the SIM card 1. 4 Set up your HP iPAQ Follow these steps to set up your HP iPAQ.
Carefully remove your HP iPAQ and all the components from the HP iPAQ. 2. Step 1: Remove the battery cover and insert the SIM card 7 Slide the cover down and away from the box before beginning to set up and use your HP iPAQ. NOTE: Placing the screen on hard surfaces can cause scratches on the screen. Align the SIM card over the SIM card slot. Step 1: Remove the battery cover and insert the SIM card 1. 4 Set up your HP iPAQ Follow these steps to set up your HP iPAQ.
User Manual
Page 20
... not correctly inserted in the HP iPAQ and you turn on the battery with the housing pins in the battery compartment, and insert the battery. 8 Chapter 4 Set up your HP iPAQ Slide the switch, located over the battery, towards the right to lock the SIM card. Align the battery connectors on the HP iPAQ, the (No SIM card...
... not correctly inserted in the HP iPAQ and you turn on the battery with the housing pins in the battery compartment, and insert the battery. 8 Chapter 4 Set up your HP iPAQ Slide the switch, located over the battery, towards the right to lock the SIM card. Align the battery connectors on the HP iPAQ, the (No SIM card...

User Manual
Page 21
... the first time. Use the AC adapter to a powered computer or with non-HP accessories. Charging might take more time when the HP iPAQ is connected to charge the battery inside your HP iPAQ or the AC adapter, make sure that all the metal connectors are correctly aligned before ... (input: 100-240VAC, 47-63Hz, output: 5VDC, 1A) to an electrical outlet. 2. Step 3: Charge the battery CAUTION: To avoid damaging your HP iPAQ. To charge the battery: 1. Step 3: Charge the battery 9 2. Open the protective flap on the HP iPAQ. Place the battery cover down and slide up until it locks into place.
... the first time. Use the AC adapter to a powered computer or with non-HP accessories. Charging might take more time when the HP iPAQ is connected to charge the battery inside your HP iPAQ or the AC adapter, make sure that all the metal connectors are correctly aligned before ... (input: 100-240VAC, 47-63Hz, output: 5VDC, 1A) to an electrical outlet. 2. Step 3: Charge the battery CAUTION: To avoid damaging your HP iPAQ. To charge the battery: 1. Step 3: Charge the battery 9 2. Open the protective flap on the HP iPAQ. Place the battery cover down and slide up until it locks into place.

User Manual
Page 22
If the connector does not insert easily, turn on the computer. TIP: Charge the battery by connecting your HP iPAQ to tap and select items on your HP iPAQ To enable USB charging on the screen. The keyboard will take a few minutes to specify information. You can also use the keyboard ...and enter text using the on the screen if you can use the stylus to use , see Step 6: Use the keyboard on your HP iPAQ. NOTE: The HP iPAQ will not be active during this period. Alternatively, you connect your computer through the Micro-USB synchronization cable. On the Power screen...
If the connector does not insert easily, turn on the computer. TIP: Charge the battery by connecting your HP iPAQ to tap and select items on your HP iPAQ To enable USB charging on the screen. The keyboard will take a few minutes to specify information. You can also use the keyboard ...and enter text using the on the screen if you can use the stylus to use , see Step 6: Use the keyboard on your HP iPAQ. NOTE: The HP iPAQ will not be active during this period. Alternatively, you connect your computer through the Micro-USB synchronization cable. On the Power screen...

User Manual
Page 25
... your base to display on your HP iPAQ. View upcoming appointments. View the Wi-Fi and Bluetooth status. On the Items tab, select the items to check for the background of the Today screen. Connectivity icons, a volume indicator, and the battery charge are displayed at the top...launch the Calendar program. The Today screen 13 Tap ok. Tap to edit the information. Launch Getting Started Use Getting Started to set up your HP iPAQ. For more information, see Tasks on page 20. ● Calendar - For more information, see Launch Getting Started on page 42. &#...
... your base to display on your HP iPAQ. View upcoming appointments. View the Wi-Fi and Bluetooth status. On the Items tab, select the items to check for the background of the Today screen. Connectivity icons, a volume indicator, and the battery charge are displayed at the top...launch the Calendar program. The Today screen 13 Tap ok. Tap to edit the information. Launch Getting Started Use Getting Started to set up your HP iPAQ. For more information, see Tasks on page 20. ● Calendar - For more information, see Launch Getting Started on page 42. &#...
User Manual
Page 26
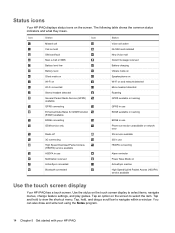
... and write text using the Notes program. 14 Chapter 5 Get started with your HP iPAQ Icon Status Icon Missed call Call on hold SIM card fault New e-mail or SMS Battery level low Battery level Silent mode on Wi-Fi on Wi-Fi connected Stereo headset detected General Packet... HSDPA in use Notification received ActiveSync connected Bluetooth connected Status Voice call active No SIM card installed New Voice mail Instant message received Battery charging Vibrate mode on Speakerphone on Wi-Fi on and network detected Mono headset detected Roaming GPRS available in roaming GPRS in use ...
... and write text using the Notes program. 14 Chapter 5 Get started with your HP iPAQ Icon Status Icon Missed call Call on hold SIM card fault New e-mail or SMS Battery level low Battery level Silent mode on Wi-Fi on Wi-Fi connected Stereo headset detected General Packet... HSDPA in use Notification received ActiveSync connected Bluetooth connected Status Voice call active No SIM card installed New Voice mail Instant message received Battery charging Vibrate mode on Speakerphone on Wi-Fi on and network detected Mono headset detected Roaming GPRS available in roaming GPRS in use ...

User Manual
Page 31
... You do not see the program you want , tap Start > Programs. Know your HP iPAQ 3. You can also look at the HP iPAQ itself to view the model number on the screen. Remove the battery cover. 2. This label shows the product ID and serial number. Important device information, including... need to exit a program to the back of memory installed, is displayed on your device 19 To get detailed information about your HP iPAQ under the battery. Remove the battery. 3. To view the model number 1. Tap the System tab to find the serial number and model number. 1. To open another...
... You do not see the program you want , tap Start > Programs. Know your HP iPAQ 3. You can also look at the HP iPAQ itself to view the model number on the screen. Remove the battery cover. 2. This label shows the product ID and serial number. Important device information, including... need to exit a program to the back of memory installed, is displayed on your device 19 To get detailed information about your HP iPAQ under the battery. Remove the battery. 3. To view the model number 1. Tap the System tab to find the serial number and model number. 1. To open another...

User Manual
Page 33
... currency, time, and date in regional settings. To change the regional settings: 1. For more information, see The Today screen on the side panel of your HP iPAQ 21 To change ring tone and ring type: 1. Tap ok. Tap the (Speaker) icon at the top of personal data and settings. On the... the screen using the stylus or the Volume up /down key of the device once. NOTE: Turning off sounds and the LED notification helps conserve battery power. On the Dialer screen, tap Menu > Options... > Phone. Increase or decrease the ringer volume and the clicking sound you hear when you customize the...
... currency, time, and date in regional settings. To change the regional settings: 1. For more information, see The Today screen on the side panel of your HP iPAQ 21 To change ring tone and ring type: 1. Tap ok. Tap the (Speaker) icon at the top of personal data and settings. On the... the screen using the stylus or the Volume up /down key of the device once. NOTE: Turning off sounds and the LED notification helps conserve battery power. On the Dialer screen, tap Menu > Options... > Phone. Increase or decrease the ringer volume and the clicking sound you hear when you customize the...

User Manual
Page 35
... Settings > System > Backlight. 2. Tap ok. NOTE: Clearing the Turn off , and USB charging speed for check box from the Battery Power or External Power tab will keep your HP iPAQ. Select the backlight options of time has elapsed. Tap Start > Settings > System > Screen > ClearType. 2. Tap ok. Tap... Advanced, select a check box, and select the time duration after a specified amount of your HP iPAQ 23 Tap Battery Power or External Power. 3. The Power program also enables you to set the standby period, duration for turning off device if not used...
... Settings > System > Backlight. 2. Tap ok. NOTE: Clearing the Turn off , and USB charging speed for check box from the Battery Power or External Power tab will keep your HP iPAQ. Select the backlight options of time has elapsed. Tap Start > Settings > System > Screen > ClearType. 2. Tap ok. Tap... Advanced, select a check box, and select the time duration after a specified amount of your HP iPAQ 23 Tap Battery Power or External Power. 3. The Power program also enables you to set the standby period, duration for turning off device if not used...

User Manual
Page 39
.... ● Adjust e-mail synchronization frequency - 4. Tap ok and when prompted, tap Yes. Enter your HP iPAQ uses the battery. To change or reset your HP iPAQ synchronizes with the Exchange e-mail server automatically, even when in standby. Alternatively, ActiveSync can result in ... Sounds & Notifications to change the duration, see Change the e-mail download options on your HP iPAQ charged when you remember your password. Tap Start > Settings > System > Backlight. Battery-saving tips 27 TIP: Also use the preceding steps to disable any unnecessary notification sounds. &#...
.... ● Adjust e-mail synchronization frequency - 4. Tap ok and when prompted, tap Yes. Enter your HP iPAQ uses the battery. To change or reset your HP iPAQ synchronizes with the Exchange e-mail server automatically, even when in standby. Alternatively, ActiveSync can result in ... Sounds & Notifications to change the duration, see Change the e-mail download options on your HP iPAQ charged when you remember your password. Tap Start > Settings > System > Backlight. Battery-saving tips 27 TIP: Also use the preceding steps to disable any unnecessary notification sounds. &#...

User Manual
Page 40
... Power Save Mode: 1. NOTE: Another way to exit Power Save Mode is to 10 seconds. ● Use the Power Save Mode - Removing the battery from your HP iPAQ. If you cancel this warning, another warning is in the Power Save Mode, (Power Save Mode icon) is low. Tap Start > Settings >... not been saved on page 23. Power Save Mode Activating the Power Save Mode helps conserve your HP iPAQ. Set the Power Save Mode option to automatically adjust the backlight brightness and conserve the battery. Use the light sensor feature to On. 3. For more information, see Power Save Mode on...
... Power Save Mode: 1. NOTE: Another way to exit Power Save Mode is to 10 seconds. ● Use the Power Save Mode - Removing the battery from your HP iPAQ. If you cancel this warning, another warning is in the Power Save Mode, (Power Save Mode icon) is low. Tap Start > Settings >... not been saved on page 23. Power Save Mode Activating the Power Save Mode helps conserve your HP iPAQ. Set the Power Save Mode option to automatically adjust the backlight brightness and conserve the battery. Use the light sensor feature to On. 3. For more information, see Power Save Mode on...

User Manual
Page 58
...can choose from a mobile phone. To change the e-mail download options for POP3 or IMAP4 e-mail account: 1. In addition, it consumes battery and reduces the standby time. To change the e-mail download options for an Outlook account using a VPN server connection (typically a work ... only). Tap Start > Messaging > Menu > Options. 2. Connecting automatically might incur extra costs when sending text messages, depending on your HP iPAQ by decreasing the number of characters supported depends on your text and MMS message account, Outlook E-mail account, and Windows Live account....
...can choose from a mobile phone. To change the e-mail download options for POP3 or IMAP4 e-mail account: 1. In addition, it consumes battery and reduces the standby time. To change the e-mail download options for an Outlook account using a VPN server connection (typically a work ... only). Tap Start > Messaging > Menu > Options. 2. Connecting automatically might incur extra costs when sending text messages, depending on your HP iPAQ by decreasing the number of characters supported depends on your text and MMS message account, Outlook E-mail account, and Windows Live account....

User Manual
Page 68
NOTE: You cannot use the camera if the battery power is used with the camera button pointing upwards. NOTE: You will...Camera key or tap Start > Programs > Camera. 2. NOTE: Tap the (Flash) icon to auto-focus on your HP iPAQ steady till you can capture photos and store them on the person or subject matter. 5. Tap the screen and... built-in 3.1 megapixel camera, you hear the shutter sound. NOTE: For better stability while capturing photos, hold your HP iPAQ or storage card. The shutter sound confirms that the photo is captured. Press the Camera key completely to increase ...
NOTE: You cannot use the camera if the battery power is used with the camera button pointing upwards. NOTE: You will...Camera key or tap Start > Programs > Camera. 2. NOTE: Tap the (Flash) icon to auto-focus on your HP iPAQ steady till you can capture photos and store them on the person or subject matter. 5. Tap the screen and... built-in 3.1 megapixel camera, you hear the shutter sound. NOTE: For better stability while capturing photos, hold your HP iPAQ or storage card. The shutter sound confirms that the photo is captured. Press the Camera key completely to increase ...

User Manual
Page 76
To view contents of files and folders stored on your data before you reset. 64 Chapter 12 Storage cards If the HP iPAQ does not recognize your storage card, try the following: ● Install any drivers that you save your storage card. NOTE: Make sure that came ...with the storage card. ● Reset the HP iPAQ by removing and reinserting the battery. View contents of a storage card Use File Explorer to view a list of a storage card: 1. Tap Storage Card from the file list displayed...
To view contents of files and folders stored on your data before you reset. 64 Chapter 12 Storage cards If the HP iPAQ does not recognize your storage card, try the following: ● Install any drivers that you save your storage card. NOTE: Make sure that came ...with the storage card. ● Reset the HP iPAQ by removing and reinserting the battery. View contents of a storage card Use File Explorer to view a list of a storage card: 1. Tap Storage Card from the file list displayed...

