User Manual
Page 3
... battery ...9 Step 4: Turn on your HP iPAQ ...10 Step 5: Locate the stylus ...10 Step 6: Use the keyboard ...11 5 Get started with your HP iPAQ The Today screen ...13 Launch Getting Started ...13 Status icons ...14 Use the touch screen display ...14 Use shortcut menus ...15 Use the 5-way optical navigation ...15 Use the main buttons on the HP iPAQ 15 Answer/Send key ...16 End/Power key ...16 Windows key ...16 ok key ...16 Volume up/down keys ...16 Camera key ...16 Keyboard ...16 Enter key...
... battery ...9 Step 4: Turn on your HP iPAQ ...10 Step 5: Locate the stylus ...10 Step 6: Use the keyboard ...11 5 Get started with your HP iPAQ The Today screen ...13 Launch Getting Started ...13 Status icons ...14 Use the touch screen display ...14 Use shortcut menus ...15 Use the 5-way optical navigation ...15 Use the main buttons on the HP iPAQ 15 Answer/Send key ...16 End/Power key ...16 Windows key ...16 ok key ...16 Volume up/down keys ...16 Camera key ...16 Keyboard ...16 Enter key...

User Manual
Page 6
... Set the start and due dates for a task 54 Show the start and due dates in the task list 55 Set options for displaying tasks on the Today screen 55 Mark a task as completed ...55 11 Camera Use the camera ...56 View photos and videos ...56 Camera settings ...56 Basic settings ...57 Photo settings ...57 Video recorder ...57 Video settings ...58 Options for camera and video recorder 58 Transfer images ...59 Use MMS ...59 Use Bluetooth ...59 Use e-mail ...59 12 Storage cards Insert a storage card ...61 Remove a storage card...
... Set the start and due dates for a task 54 Show the start and due dates in the task list 55 Set options for displaying tasks on the Today screen 55 Mark a task as completed ...55 11 Camera Use the camera ...56 View photos and videos ...56 Camera settings ...56 Basic settings ...57 Photo settings ...57 Video recorder ...57 Video settings ...58 Options for camera and video recorder 58 Transfer images ...59 Use MMS ...59 Use Bluetooth ...59 Use e-mail ...59 12 Storage cards Insert a storage card ...61 Remove a storage card...

User Manual
Page 7
... a Bluetooth partnership 68 Edit a Bluetooth partnership 68 Connect to a computer using Bluetooth 69 Use your HP iPAQ as a wireless modem with Bluetooth 69 Bluetooth device profiles ...69 Access services ...70 Set up an incoming or outgoing Bluetooth communications (COM) port 70 End a Bluetooth connection 70 Wi-Fi ...71 Wi-Fi terms ...71 Open Wi-Fi settings ...72 Connect to a Wi-Fi network 72 Manually connect to a Wi-Fi network 72 Find an IP address ...73 Delete a Wi-Fi network...
... a Bluetooth partnership 68 Edit a Bluetooth partnership 68 Connect to a computer using Bluetooth 69 Use your HP iPAQ as a wireless modem with Bluetooth 69 Bluetooth device profiles ...69 Access services ...70 Set up an incoming or outgoing Bluetooth communications (COM) port 70 End a Bluetooth connection 70 Wi-Fi ...71 Wi-Fi terms ...71 Open Wi-Fi settings ...72 Connect to a Wi-Fi network 72 Manually connect to a Wi-Fi network 72 Find an IP address ...73 Delete a Wi-Fi network...
User Manual
Page 26
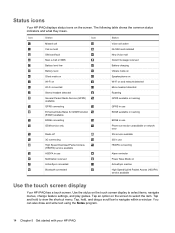
... GSM service only Radio off 3G connecting High Speed Download Packet Access (HSDPA) service available HSDPA in use Notification received ActiveSync connected Bluetooth connected Status Voice call active No SIM card installed New Voice mail Instant message received Battery charging Vibrate mode on Speakerphone on Wi-Fi on and network detected Mono headset detected Roaming GPRS available in roaming GPRS in use EDGE available in roaming EDGE in use Phone connection unavailable or network error 3G service available 3G in use HSDPA connecting Alarm reminder Power Save Mode on the screen to...
... GSM service only Radio off 3G connecting High Speed Download Packet Access (HSDPA) service available HSDPA in use Notification received ActiveSync connected Bluetooth connected Status Voice call active No SIM card installed New Voice mail Instant message received Battery charging Vibrate mode on Speakerphone on Wi-Fi on and network detected Mono headset detected Roaming GPRS available in roaming GPRS in use EDGE available in roaming EDGE in use Phone connection unavailable or network error 3G service available 3G in use HSDPA connecting Alarm reminder Power Save Mode on the screen to...

User Manual
Page 39
... e-mail, the device synchronizes with the e-mail server. On the Brightness tab, adjust the brightness settings to disable any unnecessary notification sounds. ● Dim the Backlight - 4. Tap Start > Settings > Personal > Lock. 2. Important: Always use the preceding steps to suit your needs and also help you are prompted to enter your HP iPAQ connected to synchronize at regular intervals or using as items arrive. Every time your HP iPAQ sends and receives e-mail, your password...
... e-mail, the device synchronizes with the e-mail server. On the Brightness tab, adjust the brightness settings to disable any unnecessary notification sounds. ● Dim the Backlight - 4. Tap Start > Settings > Personal > Lock. 2. Important: Always use the preceding steps to suit your needs and also help you are prompted to enter your HP iPAQ connected to synchronize at regular intervals or using as items arrive. Every time your HP iPAQ sends and receives e-mail, your password...

User Manual
Page 41
... SIM card into your HP iPAQ and turn it on, your unit automatically connects to your service provider to activate and use your HP iPAQ to make a call, answer a call, put a caller on hold, access speed dial, and access voice mail. Call features Use the call features on your HP iPAQ to call a number stored in the contact list. Press the (Answer/Send) key. 2. Use the Dialer screen to dial the number you are connected. Tap Talk. Call a contact You can also make data calls, forward calls, and check or modify the network and channel settings. Make a call...
... SIM card into your HP iPAQ and turn it on, your unit automatically connects to your service provider to activate and use your HP iPAQ to make a call, answer a call, put a caller on hold, access speed dial, and access voice mail. Call features Use the call features on your HP iPAQ to call a number stored in the contact list. Press the (Answer/Send) key. 2. Use the Dialer screen to dial the number you are connected. Tap Talk. Call a contact You can also make data calls, forward calls, and check or modify the network and channel settings. Make a call...

User Manual
Page 43
... can dial phone numbers quickly by assigning speed dial numbers. Make calls using speed dial You can also assign speed dial by country/region. NOTE: The speed dial feature is often reserved to Web addresses and e-mail addresses that are stored in the contact list. Make emergency calls You can choose speed dial entries from 2-99 in all locations, and sometimes an emergency call cannot be placed due to place the call : 1. Tap a number, select a speed dial number from 2-99. Press the (Answer/Send) key. 2. To turn on the phone connection...
... can dial phone numbers quickly by assigning speed dial numbers. Make calls using speed dial You can also assign speed dial by country/region. NOTE: The speed dial feature is often reserved to Web addresses and e-mail addresses that are stored in the contact list. Make emergency calls You can choose speed dial entries from 2-99 in all locations, and sometimes an emergency call cannot be placed due to place the call : 1. Tap a number, select a speed dial number from 2-99. Press the (Answer/Send) key. 2. To turn on the phone connection...

User Manual
Page 44
... Radio Service (GPRS), dial-up, Virtual Private Network (VPN), proxy, and Wi-Fi connections to connect to the Internet or your service provider to activate and set up Voice mail or text messaging center number on another call or you are unable to accept calls. On the Dialer screen, tap and hold 1 to dial the number. Make data calls Use the options available by pressing the (End/Power) key. For billing information, contact your HP iPAQ Tap the phone number. 2. Use...
... Radio Service (GPRS), dial-up, Virtual Private Network (VPN), proxy, and Wi-Fi connections to connect to the Internet or your service provider to activate and set up Voice mail or text messaging center number on another call or you are unable to accept calls. On the Dialer screen, tap and hold 1 to dial the number. Make data calls Use the options available by pressing the (End/Power) key. For billing information, contact your HP iPAQ Tap the phone number. 2. Use...

User Manual
Page 46
... identity when making calls. To disable the SIM PIN: 1. Clear the Require PIN when phone is used check box, and then tap ok. On the Dialer screen, tap Menu > Options... > Services. 3. Contact your phone service settings to block certain types of incoming and/or outgoing calls, forward incoming calls to a different phone number, be notified of these services might be charged for more details. Press the (Answer/Send) key. 2. Under Security, tap Change PIN. 4. Tap ok. Emergency calls can change and tap Get Settings... 4. Enter the PIN to reset your HP iPAQ...
... identity when making calls. To disable the SIM PIN: 1. Clear the Require PIN when phone is used check box, and then tap ok. On the Dialer screen, tap Menu > Options... > Services. 3. Contact your phone service settings to block certain types of incoming and/or outgoing calls, forward incoming calls to a different phone number, be notified of these services might be charged for more details. Press the (Answer/Send) key. 2. Under Security, tap Change PIN. 4. Tap ok. Emergency calls can change and tap Get Settings... 4. Enter the PIN to reset your HP iPAQ...

User Manual
Page 50
.... NOTE: If you receive a call from the call history. Edit the contact information To change contact information: 1. Tap Start > Contacts. 2. Tap Menu > Edit and enter the changes. 7 Contacts Store contacts on page 103. 4. For more information about Contacts, open Contacts, and then tap Start > Help. Create a contact To create a contact: 1. If you have phone numbers that is automatically assigned to your HP iPAQ. Assign a ring tone and a picture to the new contact. Tap Start > Contacts. 2. Store contact information, such as name, address, telephone number, company, and...
.... NOTE: If you receive a call from the call history. Edit the contact information To change contact information: 1. Tap Start > Contacts. 2. Tap Menu > Edit and enter the changes. 7 Contacts Store contacts on page 103. 4. For more information about Contacts, open Contacts, and then tap Start > Help. Create a contact To create a contact: 1. If you have phone numbers that is automatically assigned to your HP iPAQ. Assign a ring tone and a picture to the new contact. Tap Start > Contacts. 2. Store contact information, such as name, address, telephone number, company, and...

User Manual
Page 54
..., use a data-enabled cell phone. Identify the folder types Each messaging account has a set of formats: ● Microsoft® Office Outlook® Mobile e-mail ● Internet e-mail ● Text/MMS messages You can send and receive messages in the Outlook e-mail account is sent and received by connecting to a folder you created, the link breaks between the messages on the HP iPAQ and their copies on the e-mail server. ● If you use an MMS account or a text message account, messages are sent and received through your wireless service...
..., use a data-enabled cell phone. Identify the folder types Each messaging account has a set of formats: ● Microsoft® Office Outlook® Mobile e-mail ● Internet e-mail ● Text/MMS messages You can send and receive messages in the Outlook e-mail account is sent and received by connecting to a folder you created, the link breaks between the messages on the HP iPAQ and their copies on the e-mail server. ● If you use an MMS account or a text message account, messages are sent and received through your wireless service...

User Manual
Page 58
... in higher connection charges. Tap and select the e-mail account. 3. NOTE: You cannot delete your HP iPAQ by decreasing the number of days to display. On the Contents screen, tap Edit Account Setup. 4. TIP: To send and receive messages automatically, tap Send/Receive Schedule and specify the time duration. To change the e-mail download options for an Outlook account using a VPN server connection (typically a work account). In addition, it consumes battery and reduces the standby time. Tap Start > Messaging > Menu > Options. 2. Tap...
... in higher connection charges. Tap and select the e-mail account. 3. NOTE: You cannot delete your HP iPAQ by decreasing the number of days to display. On the Contents screen, tap Edit Account Setup. 4. TIP: To send and receive messages automatically, tap Send/Receive Schedule and specify the time duration. To change the e-mail download options for an Outlook account using a VPN server connection (typically a work account). In addition, it consumes battery and reduces the standby time. Tap Start > Messaging > Menu > Options. 2. Tap...

User Manual
Page 62
... stop using ActiveSync. ● You can receive text messages when your HP iPAQ is turned off (in flight mode), your e-mail account using a signature, clear the Use signature with this account check box if it is not already selected. 5. From any account, tap Menu > Go To and tap the account to help conserve memory. The message is an Outlook e-mail or IMAP4 account, you send and receive e-mail. Tap Start > Messaging, to the Sent Items folder. Download messages from a server To download messages...
... stop using ActiveSync. ● You can receive text messages when your HP iPAQ is turned off (in flight mode), your e-mail account using a signature, clear the Use signature with this account check box if it is not already selected. 5. From any account, tap Menu > Go To and tap the account to help conserve memory. The message is an Outlook e-mail or IMAP4 account, you send and receive e-mail. Tap Start > Messaging, to the Sent Items folder. Download messages from a server To download messages...

User Manual
Page 71
...any e-mail account, mobile phone or a computer. Play - NOTE: You need a data-enabled SIM installed in the Panorama modes. Tap Start > Messaging > SMS/MMS > Menu > New > MMS. 2. Tap View. 4. Transfer images 59 Camera - Tap to the video mode. You can transfer images from your HP iPAQ. Transfer images You can transfer the photos and videos captured using your HP iPAQ to other devices. Use Bluetooth You can Stop, Pause, or Play the video by tapping on the HP iPAQ. Scroll and select a picture. 3. Tap Menu > Send... > Bluetooth. 5. Use e-mail You send the photos and videos you...
...any e-mail account, mobile phone or a computer. Play - NOTE: You need a data-enabled SIM installed in the Panorama modes. Tap Start > Messaging > SMS/MMS > Menu > New > MMS. 2. Tap View. 4. Transfer images 59 Camera - Tap to the video mode. You can transfer images from your HP iPAQ. Transfer images You can transfer the photos and videos captured using your HP iPAQ to other devices. Use Bluetooth You can Stop, Pause, or Play the video by tapping on the HP iPAQ. Scroll and select a picture. 3. Tap Menu > Send... > Bluetooth. 5. Use e-mail You send the photos and videos you...
User Manual
Page 85
...-Fi network to access secured intranet sites. To find an IP address: 1. Tap Start > Settings > Connections > Wi-Fi. 2. To connect to intranet URLs: 1. Select the Use IEEE 802.1x network access control, and then specify the EAP type from the Data Encryption list. ● To automatically use a network key, tap The key is able to a network automatically or manually by tapping Start > Settings > Connections > Wi-Fi > Network Adapters. 2. To delete an existing or available wireless network: 1. Tap...
...-Fi network to access secured intranet sites. To find an IP address: 1. Tap Start > Settings > Connections > Wi-Fi. 2. To connect to intranet URLs: 1. Select the Use IEEE 802.1x network access control, and then specify the EAP type from the Data Encryption list. ● To automatically use a network key, tap The key is able to a network automatically or manually by tapping Start > Settings > Connections > Wi-Fi > Network Adapters. 2. To delete an existing or available wireless network: 1. Tap...

User Manual
Page 88
... save Internet connection charges and also conserve the battery. ● When connected by cable, detach your corporate network through Bluetooth, tap Wireless Manager on the Today screen or tap Start > Settings > Connections > Wireless Manager. This can obtain from your network administrator. Under My Work Network, tap Add a new VPN server connection and follow the instructions in the appropriate information. If either of the VPN server To set up a VPN server connection A VPN connection enables secure connectivity to configure VPN connection. To view...
... save Internet connection charges and also conserve the battery. ● When connected by cable, detach your corporate network through Bluetooth, tap Wireless Manager on the Today screen or tap Start > Settings > Connections > Wireless Manager. This can obtain from your network administrator. Under My Work Network, tap Add a new VPN server connection and follow the instructions in the appropriate information. If either of the VPN server To set up a VPN server connection A VPN connection enables secure connectivity to configure VPN connection. To view...
User Manual
Page 100
... Applications The data settings will show a window on -screen keyboard to select your SIM card, HP iPAQ DataConnect automatically detects the phone network and operator and sets up the GPRS connection information for retrieving the certificate, and if required, a valid username and password. NOTE: Tap Menu > About to the Internet using the HP Enterprise Mobility Suite (EMS). HP Enterprise Mobility Suite HP Enterprise Mobility Agent is sold separately. To download HP Enterprise Mobility Agent, tap Start > Programs > HP EMS...
... Applications The data settings will show a window on -screen keyboard to select your SIM card, HP iPAQ DataConnect automatically detects the phone network and operator and sets up the GPRS connection information for retrieving the certificate, and if required, a valid username and password. NOTE: Tap Menu > About to the Internet using the HP Enterprise Mobility Suite (EMS). HP Enterprise Mobility Suite HP Enterprise Mobility Agent is sold separately. To download HP Enterprise Mobility Agent, tap Start > Programs > HP EMS...

User Manual
Page 102
... files using e-mail. Setup instructions vary from a storage card. Tap Start > Programs > HP Photosmart Mobile. 2. E-mail pictures NOTE: You need to set up the printer before you begin printing photos from the Choose a method list. ● Storage Card: Stores the files to set up the printer before you begin printing photos using JETCET PRINT 5. Select the Reduce sent photo size to view the (Next), (Previous), (Stop), and (Pause) icons. Tap Send. 90 Chapter 15 Applications Tap Start > Programs > HP Photosmart Mobile. 2. Tap Start > Programs > HP...
... files using e-mail. Setup instructions vary from a storage card. Tap Start > Programs > HP Photosmart Mobile. 2. E-mail pictures NOTE: You need to set up the printer before you begin printing photos from the Choose a method list. ● Storage Card: Stores the files to set up the printer before you begin printing photos using JETCET PRINT 5. Select the Reduce sent photo size to view the (Next), (Previous), (Stop), and (Pause) icons. Tap Send. 90 Chapter 15 Applications Tap Start > Programs > HP Photosmart Mobile. 2. Tap Start > Programs > HP...

User Manual
Page 146
... Manager 104 Voice Commander 104 Windows Live 105 Windows media player 107 Windows Update 108 B back cover 6 backlight 23 backspace key 16 battery charging 9 install 8 remove 7 saving tips 27 Battery disposal notice 125 battery saving Power Save Mode 28 Bluetooth accept partnerships 68 COM port 70 connect to computer 69 create partnerships 67 device profiles 69 edit partnerships 68 end connection 70 end partnerships 68 headset 67 services 70 settings 67 terms 66 use HP iPAQ as a wireless modem...
... Manager 104 Voice Commander 104 Windows Live 105 Windows media player 107 Windows Update 108 B back cover 6 backlight 23 backspace key 16 battery charging 9 install 8 remove 7 saving tips 27 Battery disposal notice 125 battery saving Power Save Mode 28 Bluetooth accept partnerships 68 COM port 70 connect to computer 69 create partnerships 67 device profiles 69 edit partnerships 68 end connection 70 end partnerships 68 headset 67 services 70 settings 67 terms 66 use HP iPAQ as a wireless modem...
User Manual
Page 148
... blocking calls 35 call barring 35 call waiting 35 caller ID 35 changing notification sounds. 21 changing service settings 34 changing the ring tone 21 checking connection and signal strength 29 configuring channels 36 entering phone numbers for text messages 36 S screen settings adjust text size 22 screen orientation 22 soften fonts 22 scrolling speed settings 26 serial number, location 18 setting up e-mail using Exchange Server 44 Internet e-mail 44 setup instructions keyboard 11 locate stylus 10 turn on 10 shift key 17 shortcut menus settings 15 SIM card, insert 7 Snapfish 91 speaker...
... blocking calls 35 call barring 35 call waiting 35 caller ID 35 changing notification sounds. 21 changing service settings 34 changing the ring tone 21 checking connection and signal strength 29 configuring channels 36 entering phone numbers for text messages 36 S screen settings adjust text size 22 screen orientation 22 soften fonts 22 scrolling speed settings 26 serial number, location 18 setting up e-mail using Exchange Server 44 Internet e-mail 44 setup instructions keyboard 11 locate stylus 10 turn on 10 shift key 17 shortcut menus settings 15 SIM card, insert 7 Snapfish 91 speaker...


