HP Notebook Reference Guide
Page 7
... an eSATA device 38 Using a serial device (select models only 39 Using optional external devices ...39 Using optional external drives 39 Using the expansion port (select models only 40 Using the docking connector (select models only 40 6 Drives ...42 Handling drives ...42 Using hard drives ...43 Improving hard... drive performance 43 Using Disk Defragmenter 43 Using Disk Cleanup 43 Using HP 3D DriveGuard (select models only 44 Identifying HP 3D DriveGuard status 44 Managing power with a parked hard drive 44 Using...
... an eSATA device 38 Using a serial device (select models only 39 Using optional external devices ...39 Using optional external drives 39 Using the expansion port (select models only 40 Using the docking connector (select models only 40 6 Drives ...42 Handling drives ...42 Using hard drives ...43 Improving hard... drive performance 43 Using Disk Defragmenter 43 Using Disk Cleanup 43 Using HP 3D DriveGuard (select models only 44 Identifying HP 3D DriveGuard status 44 Managing power with a parked hard drive 44 Using...
HP Notebook Reference Guide
Page 26
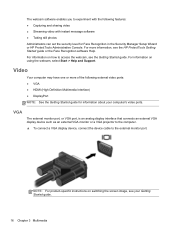
...Getting Started guide for Face Recognition in the Security Manager Setup Wizard or HP ProtectTools Administrative Console. For information on using the webcam, select Start > Help and Support. VGA The external monitor port, or VGA port, is an analog display interface that connects an external VGA display device... such as an external VGA monitor or a VGA projector to the computer. ▲ To connect a VGA display device, connect the device cable to access the webcam, see the HP ProtectTools ...
...Getting Started guide for Face Recognition in the Security Manager Setup Wizard or HP ProtectTools Administrative Console. For information on using the webcam, select Start > Help and Support. VGA The external monitor port, or VGA port, is an analog display interface that connects an external VGA display device... such as an external VGA monitor or a VGA projector to the computer. ▲ To connect a VGA display device, connect the device cable to access the webcam, see the HP ProtectTools ...
HP Notebook Reference Guide
Page 27
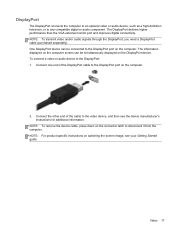
...the video device, and then see your Getting Started guide. Video 17 The DisplayPort delivers higher performance than the VGA external monitor port and improves digital connectivity. NOTE: To remove the device cable, press down on the computer. One DisplayPort device can be connected ...to the DisplayPort port on the connector latch to the DisplayPort port on the DisplayPort device. Connect the other end of the DisplayPort cable to disconnect it from the computer. NOTE:...
...the video device, and then see your Getting Started guide. Video 17 The DisplayPort delivers higher performance than the VGA external monitor port and improves digital connectivity. NOTE: To remove the device cable, press down on the computer. One DisplayPort device can be connected ...to the DisplayPort port on the connector latch to the DisplayPort port on the DisplayPort device. Connect the other end of the DisplayPort cable to disconnect it from the computer. NOTE:...
HP Notebook Reference Guide
Page 28
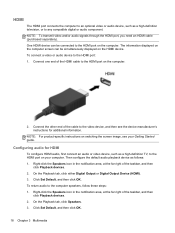
...cable to the video device, and then see your computer. Then configure the default audio playback device as a high-definition TV, to the HDMI port on the computer screen can be simultaneously displayed on the computer. Click Set Default, and then click OK. Connect the other end of the ...HDMI cable to the HDMI port on your Getting Started guide. To return audio to any compatible digital or audio component. On the Playback tab, click Speakers. 3. One HDMI device...
...cable to the video device, and then see your computer. Then configure the default audio playback device as a high-definition TV, to the HDMI port on the computer screen can be simultaneously displayed on the computer. Click Set Default, and then click OK. Connect the other end of the ...HDMI cable to the HDMI port on your Getting Started guide. To return audio to any compatible digital or audio component. On the Playback tab, click Speakers. 3. One HDMI device...
HP Notebook Reference Guide
Page 30
... the screen. ● Press and hold the power button on the computer for an extended period Although you are unable to a Universal Serial Bus (USB) port ● When the computer will be unused and disconnected from external power for at least 5 seconds. ● Disconnect the computer from external power. ● On...
... the screen. ● Press and hold the power button on the computer for an extended period Although you are unable to a Universal Serial Bus (USB) port ● When the computer will be unused and disconnected from external power for at least 5 seconds. ● Disconnect the computer from external power. ● On...
HP Notebook Reference Guide
Page 45
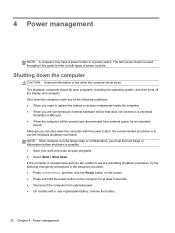
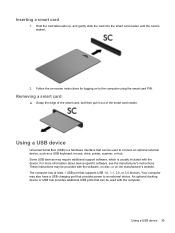
... additional support software, which is a hardware interface that can be provided with the computer. An optional docking device or USB hub provides additional USB ports that can be used to connect an optional external device, such as a USB keyboard, mouse, drive, printer, scanner, or hub. Using a... software, on disc, or on to an external device. These instructions may also have a USB charging port that supports USB 1.0, 1.1, 2.0, or 3.0 devices. The computer has at least 1 USB port that provides power to the computer using the smart card PIN. Hold the card label-side up, and...
... additional support software, which is a hardware interface that can be provided with the computer. An optional docking device or USB hub provides additional USB ports that can be used to connect an optional external device, such as a USB keyboard, mouse, drive, printer, scanner, or hub. Using a... software, on disc, or on to an external device. These instructions may also have a USB charging port that supports USB 1.0, 1.1, 2.0, or 3.0 devices. The computer has at least 1 USB port that provides power to the computer using the smart card PIN. Hold the card label-side up, and...
HP Notebook Reference Guide
Page 46
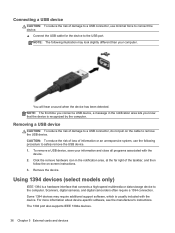
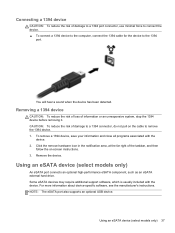
... device-specific software, see the manufacturer's instructions. Using 1394 devices (select models only) IEEE 1394 is recognized by the computer. Remove the device. The 1394 port also supports IEEE 1394a devices. 36 Chapter 5 External cards and devices NOTE: The following procedure to safely remove the USB device. 1. You will hear a sound... to remove the USB device. CAUTION: To reduce the risk of loss of the taskbar, and then follow the on the cable to the USB port. Scanners, digital cameras, and digital camcorders often require a 1394 connection.
... device-specific software, see the manufacturer's instructions. Using 1394 devices (select models only) IEEE 1394 is recognized by the computer. Remove the device. The 1394 port also supports IEEE 1394a devices. 36 Chapter 5 External cards and devices NOTE: The following procedure to safely remove the USB device. 1. You will hear a sound... to remove the USB device. CAUTION: To reduce the risk of loss of the taskbar, and then follow the on the cable to the USB port. Scanners, digital cameras, and digital camcorders often require a 1394 connection.
HP Notebook Reference Guide
Page 47
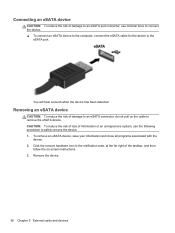
...: To reduce the risk of loss of the taskbar, and then follow the on the cable to the 1394 port. Using an eSATA device (select models only) An eSATA port connects an optional high-performance eSATA component, such as an eSATA external hard drive. For more information about device-...may require additional support software, which is usually included with the device. 2. Connecting a 1394 device CAUTION: To reduce the risk of damage to a 1394 port connector, use minimal force to connect the device. ▲ To connect a 1394 device to the computer, connect the 1394 cable for the device to ...
...: To reduce the risk of loss of the taskbar, and then follow the on the cable to the 1394 port. Using an eSATA device (select models only) An eSATA port connects an optional high-performance eSATA component, such as an eSATA external hard drive. For more information about device-...may require additional support software, which is usually included with the device. 2. Connecting a 1394 device CAUTION: To reduce the risk of damage to a 1394 port connector, use minimal force to connect the device. ▲ To connect a 1394 device to the computer, connect the 1394 cable for the device to ...
HP Notebook Reference Guide
Page 48
... area, at the far right of the taskbar, and then follow the on the cable to the eSATA port. Connecting an eSATA device CAUTION: To reduce the risk of damage to an eSATA port connector, use the following procedure to safely remove the device. 1. To remove an eSATA device, save your information...
... area, at the far right of the taskbar, and then follow the on the cable to the eSATA port. Connecting an eSATA device CAUTION: To reduce the risk of damage to an eSATA port connector, use the following procedure to safely remove the device. 1. To remove an eSATA device, save your information...
HP Notebook Reference Guide
Page 49
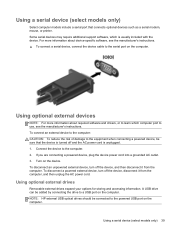
... the device. Some serial devices may require additional support software, which computer port to the computer. 2. If you are connecting a powered device, plug the device power cord into a grounded AC outlet. 3. NOTE: HP external USB optical drives should be sure that connects optional devices such as ... the device to use, see the manufacturer's instructions. ▲ To connect a serial device, connect the device cable to the powered USB port on the computer. To disconnect an unpowered external device, turn off the device, and then disconnect it from the computer. To connect an ...
... the device. Some serial devices may require additional support software, which computer port to the computer. 2. If you are connecting a powered device, plug the device power cord into a grounded AC outlet. 3. NOTE: HP external USB optical drives should be sure that connects optional devices such as ... the device to use, see the manufacturer's instructions. ▲ To connect a serial device, connect the device cable to the powered USB port on the computer. To disconnect an unpowered external device, turn off the device, and then disconnect it from the computer. To connect an ...
HP Notebook Reference Guide
Page 50
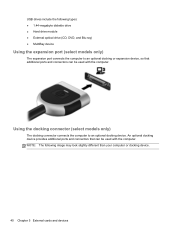
...to an optional docking or expansion device, so that can be used with the computer. An optional docking device provides additional ports and connectors that additional ports and connectors can be used with the computer. NOTE: The following types: ● 1.44-megabyte diskette drive ●...drive module ● External optical drive (CD, DVD, and Blu-ray) ● MultiBay device Using the expansion port (select models only) The expansion port connects the computer to an optional docking device. USB drives include the following image may look slightly different than your computer...
...to an optional docking or expansion device, so that can be used with the computer. An optional docking device provides additional ports and connectors that additional ports and connectors can be used with the computer. NOTE: The following types: ● 1.44-megabyte diskette drive ●...drive module ● External optical drive (CD, DVD, and Blu-ray) ● MultiBay device Using the expansion port (select models only) The expansion port connects the computer to an optional docking device. USB drives include the following image may look slightly different than your computer...
HP Notebook Reference Guide
Page 54
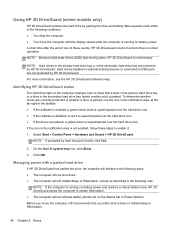
... in the secondary hard drive bay are protected by User Account Control, click Yes. 2. NOTE: Because solid-state drives (SSD) lack moving parts, HP 3D DriveGuard is running on the computer changes color to enable it down . ● The computer will not activate battery alarms set on battery power... currently protected or whether a drive is parked, use the icon in the notification area is not enabled, follow these events, HP 3D DriveGuard returns the hard drive to USB ports are parked, a yellow moon is running on the Alarms tab in system tray row, click Show. 3. NOTE: If the...
... in the secondary hard drive bay are protected by User Account Control, click Yes. 2. NOTE: Because solid-state drives (SSD) lack moving parts, HP 3D DriveGuard is running on the computer changes color to enable it down . ● The computer will not activate battery alarms set on battery power... currently protected or whether a drive is parked, use the icon in the notification area is not enabled, follow these events, HP 3D DriveGuard returns the hard drive to USB ports are parked, a yellow moon is running on the Alarms tab in system tray row, click Show. 3. NOTE: If the...
HP Notebook Reference Guide
Page 75
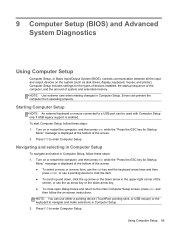
... follow these steps: 1. Computer Setup includes settings for Startup Menu" message is displayed at the bottom of the screen, or use a pointing device to a USB port can prevent the computer from operating properly. Starting Computer Setup NOTE: An external keyboard or mouse connected to click the item. ● To scroll up...
... follow these steps: 1. Computer Setup includes settings for Startup Menu" message is displayed at the bottom of the screen, or use a pointing device to a USB port can prevent the computer from operating properly. Starting Computer Setup NOTE: An external keyboard or mouse connected to click the item. ● To scroll up...
HP Notebook Reference Guide
Page 83
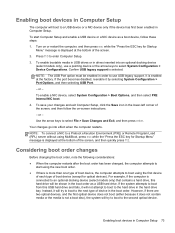
... if the computer is more than one type of boot device (except for optical devices). Instead, it by selecting System Configuration > Port Options, and then selecting USB Port. - If the port becomes disabled, reenable it will try to boot to a USB device or a NIC device only if the device has first been ... has been changed, the computer attempts to start Computer Setup and enable a USB device or a NIC device as a USB hard drive. NOTE: The USB Port option must be shown in the boot order as a boot device, follow the on or restart the computer, and then press esc while the "Press...
... if the computer is more than one type of boot device (except for optical devices). Instead, it by selecting System Configuration > Port Options, and then selecting USB Port. - If the port becomes disabled, reenable it will try to boot to a USB device or a NIC device only if the device has first been ... has been changed, the computer attempts to start Computer Setup and enable a USB device or a NIC device as a USB hard drive. NOTE: The USB Port option must be shown in the boot order as a boot device, follow the on or restart the computer, and then press esc while the "Press...
HP Notebook Reference Guide
Page 90
... 43 dual graphics 29 E electrostatic discharge 79 eSATA cable, connecting 38 eSATA devices connecting 38 defined 37 removing 38 existing wireless network, connecting to 5 expansion port 40 ExpressCard configuring 32 defined 32 inserting 33 removing 34 removing insert 33 external AC power, using 27 external devices 39 external drive 39 80...
... 43 dual graphics 29 E electrostatic discharge 79 eSATA cable, connecting 38 eSATA devices connecting 38 defined 37 removing 38 existing wireless network, connecting to 5 expansion port 40 ExpressCard configuring 32 defined 32 inserting 33 removing 34 removing insert 33 external AC power, using 27 external devices 39 external drive 39 80...
HP Notebook Reference Guide
Page 91
... face recognition 50 finding more information 1 fingerprint reader 57 firewall software 6, 58 G GPS 9 graphics modes, switching 29 H hard drive external 39 HP 3D DriveGuard 44 hard drive light 44 HDMI port, connecting 18 HDMI, configuring audio 18 Hibernation exiting 21 initiated during critical battery level 26 initiating 21 high-definition devices, connecting...
... face recognition 50 finding more information 1 fingerprint reader 57 firewall software 6, 58 G GPS 9 graphics modes, switching 29 H hard drive external 39 HP 3D DriveGuard 44 hard drive light 44 HDMI port, connecting 18 HDMI, configuring audio 18 Hibernation exiting 21 initiated during critical battery level 26 initiating 21 high-definition devices, connecting...
HP Notebook Reference Guide
Page 92
Disk Defragmenter 43 firewall 58 HP Connection Manager 4 storing a battery 26 switch, power 20 switchable graphics 29 T temperature 26 testing an AC adapter 28 traveling with the computer 26, 76 tray-... 35 USB legacy support 65 user password 52 using external AC power 27 modem 9 power meter 22 power plans 22 power-saving states 21 V VGA port, connecting 16 video 16 volume adjusting 15 buttons 15 keys 15 W webcam 15 wireless icons 2 protecting 6 set up 6 wireless connection, creating 2 wireless devices, turning on...
Disk Defragmenter 43 firewall 58 HP Connection Manager 4 storing a battery 26 switch, power 20 switchable graphics 29 T temperature 26 testing an AC adapter 28 traveling with the computer 26, 76 tray-... 35 USB legacy support 65 user password 52 using external AC power 27 modem 9 power meter 22 power plans 22 power-saving states 21 V VGA port, connecting 16 video 16 volume adjusting 15 buttons 15 keys 15 W webcam 15 wireless icons 2 protecting 6 set up 6 wireless connection, creating 2 wireless devices, turning on...
HP ProtectTools Getting Started
Page 16
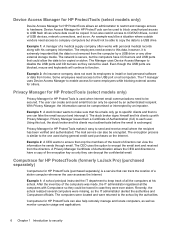
... data could be used. Even though the USB ports are blocked, mouse and keyboards will continue to each user. The IT manager uses Device Access Manager to enable access for some employees while blocking external access for HP ProtectTools allows an administrator to restrict and manage access... to be secured. Privacy Manager for HP ProtectTools (select models only) Privacy Manager for HP ProtectTools makes it . The user can be used to block unauthorized access to disable the USB ports and CD burners so they were ever stolen. With Privacy Manager,...
... data could be used. Even though the USB ports are blocked, mouse and keyboards will continue to each user. The IT manager uses Device Access Manager to enable access for some employees while blocking external access for HP ProtectTools allows an administrator to restrict and manage access... to be secured. Privacy Manager for HP ProtectTools (select models only) Privacy Manager for HP ProtectTools makes it . The user can be used to block unauthorized access to disable the USB ports and CD burners so they were ever stolen. With Privacy Manager,...

HP ProtectTools Getting Started
Page 100
... ● All removable media (diskettes, USB flash drives, and so on) ● All DVD/CD-ROM drives ● All serial and parallel ports ● All Bluetooth® devices NOTE: If Bluetooth devices are used as the C or system drive. Membership in the Device Class Configuration view. ...; All modem devices ● All PCMCIA/ExpressCard devices ● All 1394 devices To allow access to start it. In the left pane of HP ProtectTools Administrative Console, click Device Access Manager, and then click Simple Configuration. 2. Click OK. 90 Chapter 9 Device Access Manager for a device ...
... ● All removable media (diskettes, USB flash drives, and so on) ● All DVD/CD-ROM drives ● All serial and parallel ports ● All Bluetooth® devices NOTE: If Bluetooth devices are used as the C or system drive. Membership in the Device Class Configuration view. ...; All modem devices ● All PCMCIA/ExpressCard devices ● All 1394 devices To allow access to start it. In the left pane of HP ProtectTools Administrative Console, click Device Access Manager, and then click Simple Configuration. 2. Click OK. 90 Chapter 9 Device Access Manager for a device ...
HP ProtectTools Getting Started
Page 109
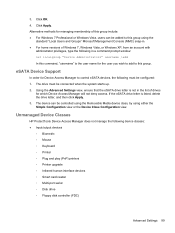
Unmanaged Device Classes HP ProtectTools Device Access Manager does not manage the following must be added to this group using either the Simple Configuration view or the Device Class ...; Mouse ◦ Keyboard ◦ Printer ◦ Plug and play (PnP) printers ◦ Printer upgrade ◦ Infrared human interface devices ◦ Smart card reader ◦ Multi-port serial ◦ Disk drive ◦ Floppy disk controller (FDC) Advanced Settings 99 Alternative methods for which Device Access Manager will not deny access. 3. Click Apply...
Unmanaged Device Classes HP ProtectTools Device Access Manager does not manage the following must be added to this group using either the Simple Configuration view or the Device Class ...; Mouse ◦ Keyboard ◦ Printer ◦ Plug and play (PnP) printers ◦ Printer upgrade ◦ Infrared human interface devices ◦ Smart card reader ◦ Multi-port serial ◦ Disk drive ◦ Floppy disk controller (FDC) Advanced Settings 99 Alternative methods for which Device Access Manager will not deny access. 3. Click Apply...


