HP Notebook Hard Drives & Solid State Drives Identifying, Preventing, Diagnosing and Recovering from Drive Failures Care and Ma
Page 6
.... Intel Matrix Storage Technology driver HP offers the Intel Matrix Storage Manager driver for disk traffic, and provides link power management with Intel® Application Accelerator drivers. The latest device driver versions address multiple known issues that are released to 150MB/sec transfer rate for... notebook PC models that could affect hard disk drive performance and reliability. To download the latest version of the Intel Matrix Storage Technology driver: http://www8.hp.com/us/en/support-drivers....
.... Intel Matrix Storage Technology driver HP offers the Intel Matrix Storage Manager driver for disk traffic, and provides link power management with Intel® Application Accelerator drivers. The latest device driver versions address multiple known issues that are released to 150MB/sec transfer rate for... notebook PC models that could affect hard disk drive performance and reliability. To download the latest version of the Intel Matrix Storage Technology driver: http://www8.hp.com/us/en/support-drivers....
HP Notebook Hard Drives & Solid State Drives Identifying, Preventing, Diagnosing and Recovering from Drive Failures Care and Ma
Page 7
..., refer to the Maintenance and Service guide for the latest releases. • Install and maintain a virus protection program to prevent failures due to the following URL: www.hp.com/go/clientautomation Additional HP Recommendations for an extended period of time. Please refer to ...capacities. however, these drives - operate internally at the following Microsoft Knowledge Base articles for your computer. Client Management Interface HP has integrated SMART health monitoring into our management console portfolio. For example, adjust the power management settings if you may be...
..., refer to the Maintenance and Service guide for the latest releases. • Install and maintain a virus protection program to prevent failures due to the following URL: www.hp.com/go/clientautomation Additional HP Recommendations for an extended period of time. Please refer to ...capacities. however, these drives - operate internally at the following Microsoft Knowledge Base articles for your computer. Client Management Interface HP has integrated SMART health monitoring into our management console portfolio. For example, adjust the power management settings if you may be...

HP Notebook Reference Guide
Page 44
... an operating system to manage input and output, and they include security features to unlock it. Click the remove hardware icon in on -screen instructions. 3. Release and remove the ExpressCard: a. Save your information and close all programs associated with the smart card reader (select models only). b. Industry-standard smart cards are...
... an operating system to manage input and output, and they include security features to unlock it. Click the remove hardware icon in on -screen instructions. 3. Release and remove the ExpressCard: a. Save your information and close all programs associated with the smart card reader (select models only). b. Industry-standard smart cards are...
HP Notebook Reference Guide
Page 55
...devices installed in the system is supported. Using optical drives (select models only) 45 Using HP 3D DriveGuard software The HP 3D DriveGuard software enables you may be changed by the edges to release the disc tray. 3. A list of an administrator group. ● Determine whether a drive...Inserting an optical disc Tray-load 1. Turn on your optical drive, is not fully accessible, tilt the disc carefully to enable or disable HP 3D DriveGuard. To open the software and change settings. 3. Using optical drives (select models only) Optical drives include the following tasks: ...
...devices installed in the system is supported. Using optical drives (select models only) 45 Using HP 3D DriveGuard software The HP 3D DriveGuard software enables you may be changed by the edges to release the disc tray. 3. A list of an administrator group. ● Determine whether a drive...Inserting an optical disc Tray-load 1. Turn on your optical drive, is not fully accessible, tilt the disc carefully to enable or disable HP 3D DriveGuard. To open the software and change settings. 3. Using optical drives (select models only) Optical drives include the following tasks: ...
HP Notebook Reference Guide
Page 57
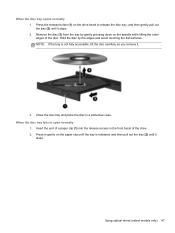
... it stops. Insert the end of the drive. 2. Using optical drives (select models only) 47 Press in the front bezel of a paper clip (1) into the release access in gently on the paper clip until it . 3. When the disc tray opens normally 1. Remove the disc (3) from the tray by the edges and... down on the drive bezel to open normally 1. Close the disc tray and place the disc in a protective case. When the disc tray fails to release the disc tray, and then gently pull out the tray (2) until the tray is not fully accessible, tilt the disc carefully as you remove it...
... it stops. Insert the end of the drive. 2. Using optical drives (select models only) 47 Press in the front bezel of a paper clip (1) into the release access in gently on the paper clip until it . 3. When the disc tray opens normally 1. Remove the disc (3) from the tray by the edges and... down on the drive bezel to open normally 1. Close the disc tray and place the disc in a protective case. When the disc tray fails to release the disc tray, and then gently pull out the tray (2) until the tray is not fully accessible, tilt the disc carefully as you remove it...
HP Notebook Reference Guide
Page 58
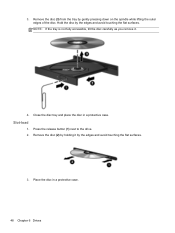
Remove the disc (3) from the tray by the edges and avoid touching the flat surfaces. NOTE: If the tray is not fully accessible, tilt the disc carefully as you remove it by the edges and avoid touching the flat surfaces. 3. Place the disc in a protective case. Hold the disc by gently pressing down on the spindle while lifting the outer edges of the disc. Slot-load 1. Press the release button (1) next to the drive. 2. Remove the disc (2) by holding it . 4. 3. Close the disc tray and place the disc in a protective case. 48 Chapter 6 Drives
Remove the disc (3) from the tray by the edges and avoid touching the flat surfaces. NOTE: If the tray is not fully accessible, tilt the disc carefully as you remove it by the edges and avoid touching the flat surfaces. 3. Place the disc in a protective case. Hold the disc by gently pressing down on the spindle while lifting the outer edges of the disc. Slot-load 1. Press the release button (1) next to the drive. 2. Remove the disc (2) by holding it . 4. 3. Close the disc tray and place the disc in a protective case. 48 Chapter 6 Drives
HP Notebook Reference Guide
Page 69
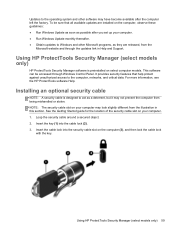
...; Run Windows Update monthly thereafter. ● Obtain updates to the computer, networks, and critical data. For more information, see the HP ProtectTools software Help. Installing an optional security cable NOTE: A security cable is preinstalled on the computer (3), and then lock the cable ...models only) 59 Updates to the operating system and other Microsoft programs, as they are released, from being mishandled or stolen. Using HP ProtectTools Security Manager (select models only) HP ProtectTools Security Manager software is designed to act as a deterrent, but it may have become...
...; Run Windows Update monthly thereafter. ● Obtain updates to the computer, networks, and critical data. For more information, see the HP ProtectTools software Help. Installing an optional security cable NOTE: A security cable is preinstalled on the computer (3), and then lock the cable ...models only) 59 Updates to the operating system and other Microsoft programs, as they are released, from being mishandled or stolen. Using HP ProtectTools Security Manager (select models only) HP ProtectTools Security Manager software is designed to act as a deterrent, but it may have become...

HP Notebook Reference Guide
Page 89
..., unplug it in their electrostatic-safe containers until you to install them. ● Avoid touching pins, leads, and circuitry. C Electrostatic discharge Electrostatic discharge is the release of static electricity when two objects come into contact-for example, the shock you receive when you need more information about static electricity or assistance...
..., unplug it in their electrostatic-safe containers until you to install them. ● Avoid touching pins, leads, and circuitry. C Electrostatic discharge Electrostatic discharge is the release of static electricity when two objects come into contact-for example, the shock you receive when you need more information about static electricity or assistance...
HP ProtectTools Getting Started
Page 50
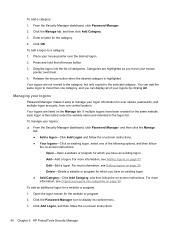
...are not moved to the category, but only copied to the selected category. Your logons are listed on -screen instructions. 40 Chapter 5 HP ProtectTools Security Manager For more information, see Organizing logons into the list of your logon information for user names, passwords, and multiple logon ...screen instructions: ◦ Open-Open a website or program for which you move your mouse pointer over them. 4. To add a category: 1. Release the mouse button when the desired category is then listed under the website name and indented in the logon list. Drag the logon into categories...
...are not moved to the category, but only copied to the selected category. Your logons are listed on -screen instructions. 40 Chapter 5 HP ProtectTools Security Manager For more information, see Organizing logons into the list of your logon information for user names, passwords, and multiple logon ...screen instructions: ◦ Open-Open a website or program for which you move your mouse pointer over them. 4. To add a category: 1. Release the mouse button when the desired category is then listed under the website name and indented in the logon list. Drag the logon into categories...
Getting Started HP Notebook
Page 17
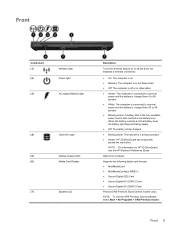
...> All Programs > SRS Premium Sound. Front Component (1) (2) (3) Wireless light Power light AC adapter/Battery light (4) Hard drive light (5) Display release latch (6) Media Card Reader (7) Speakers (2) Description Turns the wireless feature on or off or in Hibernation. ● Amber: The computer is...● Off: The computer is off but does not establish a wireless connection. ● On: The computer is on HP 3D DriveGuard, see the HP Notebook Reference Guide. Opens the computer. Front 9 When the battery reaches a critical battery level, the battery light begins blinking ...
...> All Programs > SRS Premium Sound. Front Component (1) (2) (3) Wireless light Power light AC adapter/Battery light (4) Hard drive light (5) Display release latch (6) Media Card Reader (7) Speakers (2) Description Turns the wireless feature on or off or in Hibernation. ● Amber: The computer is...● Off: The computer is off but does not establish a wireless connection. ● On: The computer is on HP 3D DriveGuard, see the HP Notebook Reference Guide. Opens the computer. Front 9 When the battery reaches a critical battery level, the battery light begins blinking ...
Getting Started HP Notebook
Page 18
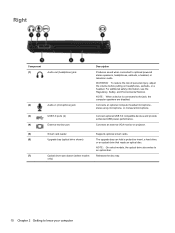
... select models, the optical drive also writes to know your computer only) 10 Chapter 2 Getting to an optical disc. (7) Optical drive eject button (select models Releases the disc tray. To reduce the risk of personal injury, adjust the volume before putting on headphones, earbuds, or a headset. NOTE: When a device is connected...
... select models, the optical drive also writes to know your computer only) 10 Chapter 2 Getting to an optical disc. (7) Optical drive eject button (select models Releases the disc tray. To reduce the risk of personal injury, adjust the volume before putting on headphones, earbuds, or a headset. NOTE: When a device is connected...

Getting Started HP Notebook
Page 22
...bay. NOTE: The computer fan starts up automatically to cool internal components and prevent overheating. Supports a wireless subscriber identity module (SIM). Releases the battery. Connects an optional accessory battery. The SIM slot is normal for the internal fan to cycle on and off during routine ...operation. 14 Chapter 2 Getting to cool internal components. Bottom Component (1) (2) (3) (4) (5) (6) (7) Battery bay SIM slot Battery release latch Accessory battery connector Docking connector Service door release latch Vents (4) Description Holds the battery.
...bay. NOTE: The computer fan starts up automatically to cool internal components and prevent overheating. Supports a wireless subscriber identity module (SIM). Releases the battery. Connects an optional accessory battery. The SIM slot is normal for the internal fan to cycle on and off during routine ...operation. 14 Chapter 2 Getting to cool internal components. Bottom Component (1) (2) (3) (4) (5) (6) (7) Battery bay SIM slot Battery release latch Accessory battery connector Docking connector Service door release latch Vents (4) Description Holds the battery.

Getting Started HP Notebook
Page 34
... the battery NOTE: For additional information on the computer. 2. Press the battery (2) down the computer through Windows before removing the battery. ▲ Slide the battery release latch (1), and then pull the battery (2) upward. To remove the battery: CAUTION: Removing a battery that is seated. The battery automatically locks into the battery bay...
... the battery NOTE: For additional information on the computer. 2. Press the battery (2) down the computer through Windows before removing the battery. ▲ Slide the battery release latch (1), and then pull the battery (2) upward. To remove the battery: CAUTION: Removing a battery that is seated. The battery automatically locks into the battery bay...
Getting Started HP Notebook
Page 35
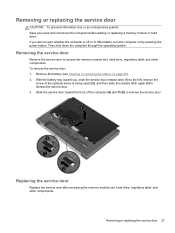
...door after accessing the memory module slot, hard drive, regulatory label, and other components. Removing the service door Remove the service door to release the service door. 3. Remove the battery (see Inserting or removing the battery on by pressing the power button. Slide the service door ...toward you are not sure whether the computer is being used) (2), and then slide the release latch again (3) to access the memory module slot, hard drive, regulatory label, and other components. Removing or replacing the service door CAUTION:...
...door after accessing the memory module slot, hard drive, regulatory label, and other components. Removing the service door Remove the service door to release the service door. 3. Remove the battery (see Inserting or removing the battery on by pressing the power button. Slide the service door ...toward you are not sure whether the computer is being used) (2), and then slide the release latch again (3) to access the memory module slot, hard drive, regulatory label, and other components. Removing or replacing the service door CAUTION:...

Getting Started HP Notebook
Page 36
Slide the service door toward you, slide the service door release latch to the left (3), and if you choose to, insert and tighten the optional screw (4) to hold the service door in place. Insert the battery (...see Inserting or removing the battery on by pressing the power button. Tilt down the service door to lock the service door (5). Slide the release latch to the right to align the front edge of the service door near the front edge of the computer (1). 2. Replacing or upgrading the hard...
Slide the service door toward you, slide the service door release latch to the left (3), and if you choose to, insert and tighten the optional screw (4) to hold the service door in place. Insert the battery (...see Inserting or removing the battery on by pressing the power button. Tilt down the service door to lock the service door (5). Slide the release latch to the right to align the front edge of the service door near the front edge of the computer (1). 2. Replacing or upgrading the hard...

Getting Started HP Notebook
Page 41
... push the tab to the computer. 4. Remove the service door (see Inserting or removing the battery on page 27). 8. Disconnect all external devices connected to release the hard drive(2). 10. Replacing a drive in the upgrade bay 33 If you . Unplug the power cord from the upgrade bay. To install a hard drive...
... push the tab to the computer. 4. Remove the service door (see Inserting or removing the battery on page 27). 8. Disconnect all external devices connected to release the hard drive(2). 10. Replacing a drive in the upgrade bay 33 If you . Unplug the power cord from the upgrade bay. To install a hard drive...

Getting Started HP Notebook
Page 42
... battery (see Inserting or removing the battery on page 26). 5. Turn the computer right-side up, and then reconnect AC power and external devices to release the optical drive(2). 10. Do not remove the optical drive while the computer is off or in Hibernation. To remove an optical drive from the...
... battery (see Inserting or removing the battery on page 26). 5. Turn the computer right-side up, and then reconnect AC power and external devices to release the optical drive(2). 10. Do not remove the optical drive while the computer is off or in Hibernation. To remove an optical drive from the...

Getting Started HP Notebook
Page 47
... tabs along the top edge of the computer. Replacing a drive in the upgrade bay on the bottom of the keyboard (3). Release the keyboard by pressing down , loosen the three captive keyboard screws (1) on page 33). 7. To avoid disconnecting the keyboard cable, do not pull the keyboard ... upgrade bay (see Replacing a drive in the upgrade bay 39 With the computer upside down on the TouchPad. Then rest the keyboard on the keyboard release cut-out (2). 6. NOTE: Do not disconnect the keyboard cable.
... tabs along the top edge of the computer. Replacing a drive in the upgrade bay on the bottom of the keyboard (3). Release the keyboard by pressing down , loosen the three captive keyboard screws (1) on page 33). 7. To avoid disconnecting the keyboard cable, do not pull the keyboard ... upgrade bay (see Replacing a drive in the upgrade bay 39 With the computer upside down on the TouchPad. Then rest the keyboard on the keyboard release cut-out (2). 6. NOTE: Do not disconnect the keyboard cable.
Getting Started HP Notebook
Page 60
... 10 audio-out (headphone) jack, identifying 10 B Backup and Restore 46 battery bay 50 battery bay, identifying 14 battery light 9 battery release latch 14 battery, replacing 26 Bluetooth compartment, identifying 15 Bluetooth label 50 buttons calculator 7 center pointing stick 4 center TouchPad 4 left pointing ...integrated numeric 8 keypads, identifying 20 keys esc 8 fn 8 function 8 Windows applications 8 Windows logo 8 L labels Bluetooth 50 HP Mobile Broadband Module 50 Microsoft Certificate of Authenticity 50 regulatory 50 service 50 SIM 50 wireless certification 50 WLAN 50 latches, battery...
... 10 audio-out (headphone) jack, identifying 10 B Backup and Restore 46 battery bay 50 battery bay, identifying 14 battery light 9 battery release latch 14 battery, replacing 26 Bluetooth compartment, identifying 15 Bluetooth label 50 buttons calculator 7 center pointing stick 4 center TouchPad 4 left pointing ...integrated numeric 8 keypads, identifying 20 keys esc 8 fn 8 function 8 Windows applications 8 Windows logo 8 L labels Bluetooth 50 HP Mobile Broadband Module 50 Microsoft Certificate of Authenticity 50 regulatory 50 service 50 SIM 50 wireless certification 50 WLAN 50 latches, battery...

HP EliteBook 8570w Mobile Workstation Maintenance and Service Guide
Page 20
...external power and the battery is charged from 90 to 99 percent. ● Blinking amber: A battery that is being accessed. ● Amber: HP 3D DriveGuard has temporarily parked the hard drive. When the battery reaches a critical battery level, the battery light begins blinking rapidly. ● Off... has reached a low battery level. Front Component (1) (2) Wireless light Power light (3) AC adapter/Battery light (4) Hard drive light (5) Display release latch Description Turns the wireless feature on or off but does not establish a wireless connection. ● On: The computer is on...
...external power and the battery is charged from 90 to 99 percent. ● Blinking amber: A battery that is being accessed. ● Amber: HP 3D DriveGuard has temporarily parked the hard drive. When the battery reaches a critical battery level, the battery light begins blinking rapidly. ● Off... has reached a low battery level. Front Component (1) (2) Wireless light Power light (3) AC adapter/Battery light (4) Hard drive light (5) Display release latch Description Turns the wireless feature on or off but does not establish a wireless connection. ● On: The computer is on...


