HP Notebook Hard Drives & Solid State Drives Identifying, Preventing, Diagnosing and Recovering from Drive Failures Care and Ma
Page 5
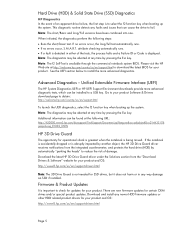
... The diagnostics may be aborted at any way damage an SSD if installed. Advanced Diagnostics - Unified Extensible Firmware Interface (UEFI) The HP System Diagnostics UEFI or HP UEFI Support Environment downloads provide more advanced diagnostics. Note: The diagnostics may be aborted at any time by pressing the Esc key. .../full test automatically runs. • If no errors occur, S.M.A.R.T. Download and install any faults and issues that can be installed to a USB key. See the UEFI section below to install the more advanced diagnostic tests, which can be found at http://welcome...
... The diagnostics may be aborted at any way damage an SSD if installed. Advanced Diagnostics - Unified Extensible Firmware Interface (UEFI) The HP System Diagnostics UEFI or HP UEFI Support Environment downloads provide more advanced diagnostics. Note: The diagnostics may be aborted at any time by pressing the Esc key. .../full test automatically runs. • If no errors occur, S.M.A.R.T. Download and install any faults and issues that can be installed to a USB key. See the UEFI section below to install the more advanced diagnostic tests, which can be found at http://welcome...
HP Notebook Reference Guide
Page 7
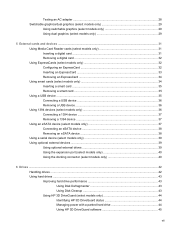
... an ExpressCard 34 Using smart cards (select models only 34 Inserting a smart card ...35 Removing a smart card ...35 Using a USB device ...35 Connecting a USB device 36 Removing a USB device ...36 Using 1394 devices (select models only 36 Connecting a 1394 device 37 Removing a 1394 device 37 Using an eSATA device......42 Handling drives ...42 Using hard drives ...43 Improving hard drive performance 43 Using Disk Defragmenter 43 Using Disk Cleanup 43 Using HP 3D DriveGuard (select models only 44 Identifying HP 3D DriveGuard status 44 Managing power with a parked hard drive 44 Using...
... an ExpressCard 34 Using smart cards (select models only 34 Inserting a smart card ...35 Removing a smart card ...35 Using a USB device ...35 Connecting a USB device 36 Removing a USB device ...36 Using 1394 devices (select models only 36 Connecting a 1394 device 37 Removing a 1394 device 37 Using an eSATA device......42 Handling drives ...42 Using hard drives ...43 Improving hard drive performance 43 Using Disk Defragmenter 43 Using Disk Cleanup 43 Using HP 3D DriveGuard (select models only 44 Identifying HP 3D DriveGuard status 44 Managing power with a parked hard drive 44 Using...
HP Notebook Reference Guide
Page 9
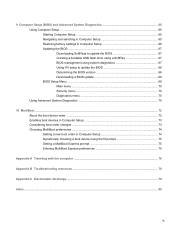
... selecting in Computer Setup 65 Restoring factory settings in Computer Setup 66 Updating the BIOS ...67 Downloading SoftPaqs to update the BIOS 67 Creating a bootable USB flash drive using a SoftPaq 67 BIOS management using system diagnostics 67 Using f10 setup to update the BIOS 68 Determining the BIOS version 68 Downloading...
... selecting in Computer Setup 65 Restoring factory settings in Computer Setup 66 Updating the BIOS ...67 Downloading SoftPaqs to update the BIOS 67 Creating a bootable USB flash drive using a SoftPaq 67 BIOS management using system diagnostics 67 Using f10 setup to update the BIOS 68 Determining the BIOS version 68 Downloading...
HP Notebook Reference Guide
Page 30
... the display and computer. If the computer is unresponsive and you are connecting an external hardware device that does not connect to a Universal Serial Bus (USB) port ● When the computer will be unused and disconnected from external power. ● On models with the power button, the recommended procedure is to...
... the display and computer. If the computer is unresponsive and you are connecting an external hardware device that does not connect to a Universal Serial Bus (USB) port ● When the computer will be unused and disconnected from external power. ● On models with the power button, the recommended procedure is to...
HP Notebook Reference Guide
Page 45
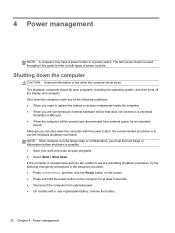
... may require additional support software, which is usually included with the software, on disc, or on to the computer using the smart card PIN. Using a USB device 35 Removing a smart card ▲ Grasp the edge of the smart card, and then pull it out of the smart card reader. These instructions... may also have a USB charging port that can be used with the computer. Your computer may be used to an external device. Inserting a smart card 1. Hold the card label...
... may require additional support software, which is usually included with the software, on disc, or on to the computer using the smart card PIN. Using a USB device 35 Removing a smart card ▲ Grasp the edge of the smart card, and then pull it out of the smart card reader. These instructions... may also have a USB charging port that can be used with the computer. Your computer may be used to an external device. Inserting a smart card 1. Hold the card label...
HP Notebook Reference Guide
Page 46
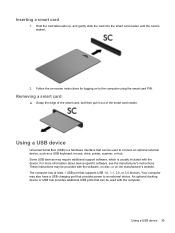
... illustration may require additional support software, which is recognized by the computer. CAUTION: To reduce the risk of loss of damage to a USB connector, do not pull on -screen instructions. 3. For more information about device-specific software, see the manufacturer's instructions. Click the remove... icon in the notification area lets you know that connects a high-speed multimedia or data storage device to remove the USB device. Removing a USB device CAUTION: To reduce the risk of information or an unresponsive system, use minimal force to connect the device. ▲ ...
... illustration may require additional support software, which is recognized by the computer. CAUTION: To reduce the risk of loss of damage to a USB connector, do not pull on -screen instructions. 3. For more information about device-specific software, see the manufacturer's instructions. Click the remove... icon in the notification area lets you know that connects a high-speed multimedia or data storage device to remove the USB device. Removing a USB device CAUTION: To reduce the risk of information or an unresponsive system, use minimal force to connect the device. ▲ ...
HP Notebook Reference Guide
Page 47
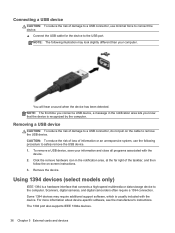
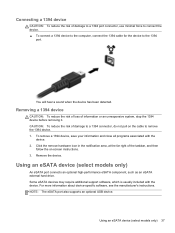
... risk of information or an unresponsive system, stop the 1394 device before removing it. Remove the device. NOTE: The eSATA port also supports an optional USB device. Using an eSATA device (select models only) 37 You will hear a sound when the device has been detected. To remove a 1394 device, save your...
... risk of information or an unresponsive system, stop the 1394 device before removing it. Remove the device. NOTE: The eSATA port also supports an optional USB device. Using an eSATA device (select models only) 37 You will hear a sound when the device has been detected. To remove a 1394 device, save your...
HP Notebook Reference Guide
Page 49
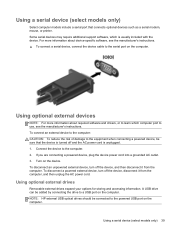
.... ▲ To connect a serial device, connect the device cable to the powered USB port on the computer. If you are connecting a powered device, plug the device power cord into a grounded AC outlet.... 3. A USB drive can be connected to the serial port on the computer. Turn on the computer. For more ... AC power cord is usually included with the device. Connect the device to a USB port on the device. NOTE: HP external USB optical drives should be added by connecting the drive to the computer. 2.
.... ▲ To connect a serial device, connect the device cable to the powered USB port on the computer. If you are connecting a powered device, plug the device power cord into a grounded AC outlet.... 3. A USB drive can be connected to the serial port on the computer. Turn on the computer. For more ... AC power cord is usually included with the device. Connect the device to a USB port on the device. NOTE: HP external USB optical drives should be added by connecting the drive to the computer. 2.
HP Notebook Reference Guide
Page 50
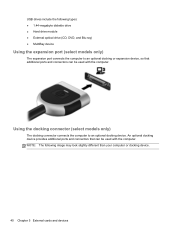
... to an optional docking device. An optional docking device provides additional ports and connectors that additional ports and connectors can be used with the computer. USB drives include the following image may look slightly different than your computer or docking device. 40 Chapter 5 External cards and devices
... to an optional docking device. An optional docking device provides additional ports and connectors that additional ports and connectors can be used with the computer. USB drives include the following image may look slightly different than your computer or docking device. 40 Chapter 5 External cards and devices
HP Notebook Reference Guide
Page 54
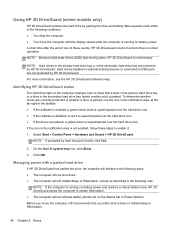
... will not initiate Sleep or Hibernation, except as described in the following conditions: ● You drop the computer. ● You move the computer, HP recommends that a drive in the primary hard drive bay or a drive in optional docking devices or connected to enable it down . ● The ..., click Yes. 2. A short time after the end of one of these steps to USB ports are not protected by parking the drive and halting data requests under either shut it : 1. Identifying HP 3D DriveGuard status The hard drive light on battery power. Hard drives installed in the secondary...
... will not initiate Sleep or Hibernation, except as described in the following conditions: ● You drop the computer. ● You move the computer, HP recommends that a drive in the primary hard drive bay or a drive in optional docking devices or connected to enable it down . ● The ..., click Yes. 2. A short time after the end of one of these steps to USB ports are not protected by parking the drive and halting data requests under either shut it : 1. Identifying HP 3D DriveGuard status The hard drive light on battery power. Hard drives installed in the secondary...
HP Notebook Reference Guide
Page 61
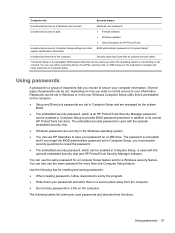
You can use either a pointing device (TouchPad, pointing stick, or USB mouse) or the keyboard to navigate and make selections in addition to its normal HP ProtectTools functions. Passwords can be set in Windows or in the non-Windows Computer Setup utility that is not working ...depending on how you choose to secure your computer information. Use the following tables list commonly used with the optional embedded security chip and HP ProtectTools Security Manager software. You can use the same password for a Computer Setup feature and for a Windows security feature. The embedded security...
You can use either a pointing device (TouchPad, pointing stick, or USB mouse) or the keyboard to navigate and make selections in addition to its normal HP ProtectTools functions. Passwords can be set in Windows or in the non-Windows Computer Setup utility that is not working ...depending on how you choose to secure your computer information. Use the following tables list commonly used with the optional embedded security chip and HP ProtectTools Security Manager software. You can use the same password for a Computer Setup feature and for a Windows security feature. The embedded security...
HP Notebook Reference Guide
Page 75
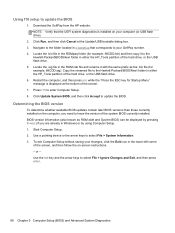
... f10 to navigate and make selections in the upper-right corner of the screen, or use either a pointing device (TouchPad, pointing stick, or USB mouse) or the keyboard to enter Computer Setup. NOTE: Use extreme care when making changes in Computer Setup, follow these steps: 1. Using Computer... Setup 65 Press f10 to a USB port can prevent the computer from operating properly. Errors can be used with Computer Setup only if USB legacy support is displayed at the bottom of the screen. 2. Navigating and selecting in ...
... f10 to navigate and make selections in the upper-right corner of the screen, or use either a pointing device (TouchPad, pointing stick, or USB mouse) or the keyboard to enter Computer Setup. NOTE: Use extreme care when making changes in Computer Setup, follow these steps: 1. Using Computer... Setup 65 Press f10 to a USB port can prevent the computer from operating properly. Errors can be used with Computer Setup only if USB legacy support is displayed at the bottom of the screen. 2. Navigating and selecting in ...
HP Notebook Reference Guide
Page 77
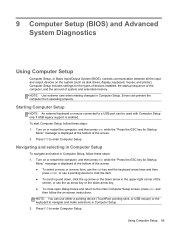
... the folder located in either the HP_Tools partition of updating the BIOS. Click BIOS Management from the HP website. 2. Updating the BIOS The next sections describe different ways of the hard drive, or the USB flash drive. 5. Click Run, and then click Cancel at the bottom of the hard drive, or the... USB flash drive. 6. To install BIOS updates from the HP website. 2. Locate the .bin file in the ROMpaq folder (for example, 68CDD.bin) and then copy it with the same prefix as the .bin file (...
... the folder located in either the HP_Tools partition of updating the BIOS. Click BIOS Management from the HP website. 2. Updating the BIOS The next sections describe different ways of the hard drive, or the USB flash drive. 5. Click Run, and then click Cancel at the bottom of the hard drive, or the... USB flash drive. 6. To install BIOS updates from the HP website. 2. Locate the .bin file in the ROMpaq folder (for example, 68CDD.bin) and then copy it with the same prefix as the .bin file (...
HP Notebook Reference Guide
Page 78
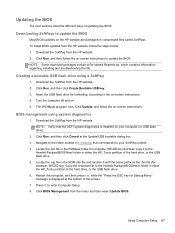
... Cancel at the bottom of the screen. 7. Navigate to the folder located in c:\swsetup that the UEFI system diagnostics is displayed at the Update/USB bootable dialog box. 3. BIOS version information (also known as the .bin file (for example, 68CDD.bin) and then copy it with the...-Packard\BIOS\New\ folder in either the HP_Tools partition of the hard drive, or the USB flash drive. 6. To exit Computer Setup without saving your SoftPaq number. 4. Download the SoftPaq from the HP website. Restart the computer, and then press esc while the "Press the ESC key for...
... Cancel at the bottom of the screen. 7. Navigate to the folder located in c:\swsetup that the UEFI system diagnostics is displayed at the Update/USB bootable dialog box. 3. BIOS version information (also known as the .bin file (for example, 68CDD.bin) and then copy it with the...-Packard\BIOS\New\ folder in either the HP_Tools partition of the hard drive, or the USB flash drive. 6. To exit Computer Setup without saving your SoftPaq number. 4. Download the SoftPaq from the HP website. Restart the computer, and then press esc while the "Press the ESC key for...
HP Notebook Reference Guide
Page 82
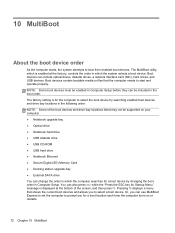
... a boot location each time the computer turns on your computer. ● Notebook upgrade bay ● Optical drive ● Notebook hard drive ● USB diskette drive ● USB CD-ROM ● USB hard drive ● Notebook Ethernet ● Secure Digital (SD) Memory Card ● Docking station upgrade bay ● External SATA drive You can...
... a boot location each time the computer turns on your computer. ● Notebook upgrade bay ● Optical drive ● Notebook hard drive ● USB diskette drive ● USB CD-ROM ● USB hard drive ● Notebook Ethernet ● Secure Digital (SD) Memory Card ● Docking station upgrade bay ● External SATA drive You can...
HP Notebook Reference Guide
Page 83
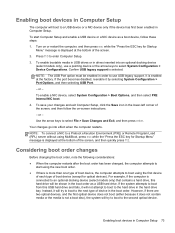
... of boot device (except for Startup Menu" message is connected to an optional docking device (select models only) that contains a hard drive, this USB hard drive and fails, it does not contain media or the media is displayed at the bottom of the screen. 2. To enable a NIC device...System Configuration > Boot Options, and then select PXE Internal NIC boot. 4. Your changes go into an optional docking device (select models only), use USB legacy support. However, if there are two optical devices, and the first optical device does not boot (either because it will not attempt to boot...
... of boot device (except for Startup Menu" message is connected to an optional docking device (select models only) that contains a hard drive, this USB hard drive and fails, it does not contain media or the media is displayed at the bottom of the screen. 2. To enable a NIC device...System Configuration > Boot Options, and then select PXE Internal NIC boot. 4. Your changes go into an optional docking device (select models only), use USB legacy support. However, if there are two optical devices, and the first optical device does not boot (either because it will not attempt to boot...
HP Notebook Reference Guide
Page 84
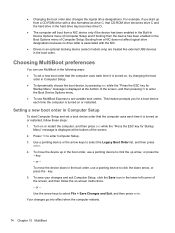
... Setup To start up from a CD-ROM drive with the NIC. ● Drives in an optional docking device (select models only) are treated like external USB devices in the lower-left corner of the screen, and then follow these steps: 1. Use a pointing device or the arrow keys to click the up...
... Setup To start up from a CD-ROM drive with the NIC. ● Drives in an optional docking device (select models only) are treated like external USB devices in the lower-left corner of the screen, and then follow these steps: 1. Use a pointing device or the arrow keys to click the up...
HP Notebook Reference Guide
Page 90
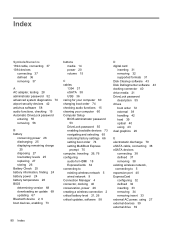
... 68 downloading an update 69 updating 67 Bluetooth device 2, 9 boot devices, enabling 73 buttons media 14 power 20 volume 15 C cables 1394 37 eSATA 38 USB 36 caring for your computer 60 changing boot order 74 checking audio functions 15 cleaning your computer 60 Computer Setup BIOS administrator password 53 DriveLock...
... 68 downloading an update 69 updating 67 Bluetooth device 2, 9 boot devices, enabling 73 buttons media 14 power 20 volume 15 C cables 1394 37 eSATA 38 USB 36 caring for your computer 60 changing boot order 74 checking audio functions 15 cleaning your computer 60 Computer Setup BIOS administrator password 53 DriveLock...
HP Notebook Reference Guide
Page 91
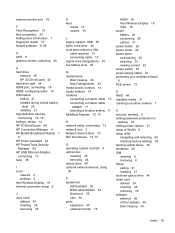
... 21 initiated during critical battery level 26 initiating 21 high-definition devices, connecting 18, 19 hotkeys, media 14 HP 3D DriveGuard 44 HP Connection Manager 4 HP Mobile Broadband Module 7, 8 HP Power Assistant 24 HP ProtectTools Security Manager 59 HP USB Ethernet Adapter, connecting 13 hubs 35 I icons network 2 wireless 2 Intel Wireless Display 19 Internet connection setup 6 J Java...
... 21 initiated during critical battery level 26 initiating 21 high-definition devices, connecting 18, 19 hotkeys, media 14 HP 3D DriveGuard 44 HP Connection Manager 4 HP Mobile Broadband Module 7, 8 HP Power Assistant 24 HP ProtectTools Security Manager 59 HP USB Ethernet Adapter, connecting 13 hubs 35 I icons network 2 wireless 2 Intel Wireless Display 19 Internet connection setup 6 J Java...
HP Notebook Reference Guide
Page 92
...HP Connection Manager 4 storing a battery 26 switch, power 20 switchable graphics 29 T temperature 26 testing an AC adapter 28 traveling with the computer 26, 76 tray-load optical drive 45 troubleshooting resources 78 turning off the computer 20 turning wireless devices on or off 4 U unresponsive system 20 USB... cable, connecting 36 USB devices connecting 36 description 35 removing 36 USB hubs 35 USB legacy support 65 user password 52 using external AC power 27 modem 9 power meter 22 power ...
...HP Connection Manager 4 storing a battery 26 switch, power 20 switchable graphics 29 T temperature 26 testing an AC adapter 28 traveling with the computer 26, 76 tray-load optical drive 45 troubleshooting resources 78 turning off the computer 20 turning wireless devices on or off 4 U unresponsive system 20 USB... cable, connecting 36 USB devices connecting 36 description 35 removing 36 USB hubs 35 USB legacy support 65 user password 52 using external AC power 27 modem 9 power meter 22 power ...


