HP ProtectTools Security Software 2010
Page 17
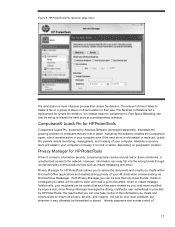
...remote monitoring, management, and tracking of your computer. File Sanitizer is instead meant to complement it is therefore not a replacement for HP ProtectTools allows you to secure the documents and emails you , and never modified by anyone else, since Privacy Manager ...Privacy Manager for HP ProtectTools Computrace LoJack Pro, powered by HP ProtectTools. Free Space Bleaching can be transmitted or stored. However, information can now take control of files is lost or stolen. Additionally, your recipients can also be able to bleach the hard drive at a predetermined ...
...remote monitoring, management, and tracking of your computer. File Sanitizer is instead meant to complement it is therefore not a replacement for HP ProtectTools allows you to secure the documents and emails you , and never modified by anyone else, since Privacy Manager ...Privacy Manager for HP ProtectTools Computrace LoJack Pro, powered by HP ProtectTools. Free Space Bleaching can be transmitted or stored. However, information can now take control of files is lost or stolen. Additionally, your recipients can also be able to bleach the hard drive at a predetermined ...

Getting Started HP Notebook - Windows 7
Page 6
... touch screen preferences 32 6 Maintenance ...33 Inserting or removing the battery ...33 Replacing or upgrading the hard drive 34 Removing the hard drive ...34 Installing a hard drive ...35 Adding or replacing memory modules 37 To add or replace the primary memory module 37 To add or replace the secondary memory module 43 Updating programs and drivers ...47 7 Backup and recovery...
... touch screen preferences 32 6 Maintenance ...33 Inserting or removing the battery ...33 Replacing or upgrading the hard drive 34 Removing the hard drive ...34 Installing a hard drive ...35 Adding or replacing memory modules 37 To add or replace the primary memory module 37 To add or replace the secondary memory module 43 Updating programs and drivers ...47 7 Backup and recovery...
Getting Started HP Notebook - Windows 7
Page 10
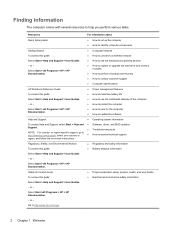
...components Getting Started To access this guide: Select Start > Help and Support > User Guides. - or - Select Start > All Programs > HP > HP Documentation. ● Computer features ● How to connect to a wireless network ● How to use the multimedia features of the computer ...perform various tasks. Select Start > All Programs > HP > HP Documentation. ● Power management features ● How to maximize battery life ● How to use the keyboard and pointing devices ● How to replace or upgrade the hard drive and memory modules ● How to perform a ...
...components Getting Started To access this guide: Select Start > Help and Support > User Guides. - or - Select Start > All Programs > HP > HP Documentation. ● Computer features ● How to connect to a wireless network ● How to use the multimedia features of the computer ...perform various tasks. Select Start > All Programs > HP > HP Documentation. ● Power management features ● How to maximize battery life ● How to use the keyboard and pointing devices ● How to replace or upgrade the hard drive and memory modules ● How to perform a ...
Getting Started HP Notebook - Windows 7
Page 22
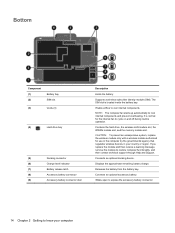
...bay SIM slot (3) Vents (3) (4) Hard drive bay (5) Docking connector (6) Charge level indicator (7) Battery release latch (8) Accessory battery connector (9) Accessory battery connector door Description Holds the battery. CAUTION: To prevent an unresponsive system, replace the wireless module only with a wireless...to expose the accessory battery connector. 14 Chapter 2 Getting to cool internal components and prevent overheating. Contains the hard drive, the wireless LAN module slot, the WWAN module slot, and the memory module slot. Supports a wireless subscriber...
...bay SIM slot (3) Vents (3) (4) Hard drive bay (5) Docking connector (6) Charge level indicator (7) Battery release latch (8) Accessory battery connector (9) Accessory battery connector door Description Holds the battery. CAUTION: To prevent an unresponsive system, replace the wireless module only with a wireless...to expose the accessory battery connector. 14 Chapter 2 Getting to cool internal components and prevent overheating. Contains the hard drive, the wireless LAN module slot, the WWAN module slot, and the memory module slot. Supports a wireless subscriber...
Getting Started HP Notebook - Windows 7
Page 41
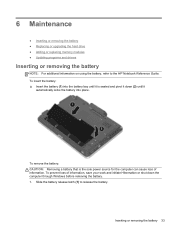
Inserting or removing the battery 33 Slide the battery release latch (1) to the HP Notebook Reference Guide. 6 Maintenance ● Inserting or removing the battery ● Replacing or upgrading the hard drive ● Adding or replacing memory modules ● Updating programs and drivers Inserting or removing the battery NOTE: For additional information on using the battery, refer...
Inserting or removing the battery 33 Slide the battery release latch (1) to the HP Notebook Reference Guide. 6 Maintenance ● Inserting or removing the battery ● Replacing or upgrading the hard drive ● Adding or replacing memory modules ● Updating programs and drivers Inserting or removing the battery NOTE: For additional information on using the battery, refer...
Getting Started HP Notebook - Windows 7
Page 42
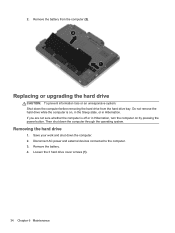
Replacing or upgrading the hard drive CAUTION: To prevent information loss or an unresponsive system: Shut down the computer before removing the hard drive from the computer (2). Disconnect AC power and external devices connected to the computer. 3. Remove the battery. 4. Save your work and shut down .... If you are not sure whether the computer is on by pressing the power button. Loosen the 3 hard drive cover screws (1). 34 Chapter 6 Maintenance Do not remove the hard drive while the computer is off or in Hibernation, turn the computer on , in the Sleep state, or in Hibernation. Then ...
Replacing or upgrading the hard drive CAUTION: To prevent information loss or an unresponsive system: Shut down the computer before removing the hard drive from the computer (2). Disconnect AC power and external devices connected to the computer. 3. Remove the battery. 4. Save your work and shut down .... If you are not sure whether the computer is on by pressing the power button. Loosen the 3 hard drive cover screws (1). 34 Chapter 6 Maintenance Do not remove the hard drive while the computer is off or in Hibernation, turn the computer on , in the Sleep state, or in Hibernation. Then ...
Getting Started HP Notebook - Windows 7
Page 43
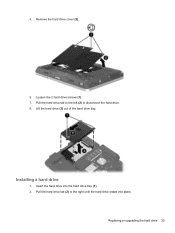
Lift the hard drive (3) out of the hard drive bay. Pull the hard drive tab (2) to disconnect the hard drive. 8. 5. Insert the hard drive into place. Remove the hard drive cover (2). 6. Replacing or upgrading the hard drive 35 Pull the hard drive tab to the left (2) to the right until the hard drive snaps into the hard drive bay (1). 2. Loosen the 2 hard drive screws (1). 7. Installing a hard drive 1.
Lift the hard drive (3) out of the hard drive bay. Pull the hard drive tab (2) to disconnect the hard drive. 8. 5. Insert the hard drive into place. Remove the hard drive cover (2). 6. Replacing or upgrading the hard drive 35 Pull the hard drive tab to the left (2) to the right until the hard drive snaps into the hard drive bay (1). 2. Loosen the 2 hard drive screws (1). 7. Installing a hard drive 1.
Getting Started HP Notebook - Windows 7
Page 44
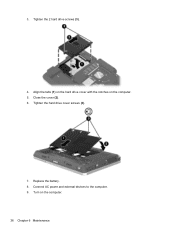
Connect AC power and external devices to the computer. 9. Close the cover (2). 6. Turn on the computer. 5. 3. Replace the battery. 8. Tighten the 2 hard drive screws (3). 4. Tighten the hard drive cover screws (3). 7. Align the tabs (1) on the hard drive cover with the notches on the computer. 36 Chapter 6 Maintenance
Connect AC power and external devices to the computer. 9. Close the cover (2). 6. Turn on the computer. 5. 3. Replace the battery. 8. Tighten the 2 hard drive screws (3). 4. Tighten the hard drive cover screws (3). 7. Align the tabs (1) on the hard drive cover with the notches on the computer. 36 Chapter 6 Maintenance
Getting Started HP Notebook - Windows 7
Page 45
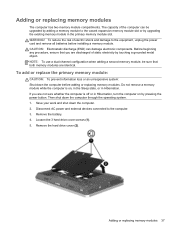
... unresponsive system: Shut down the computer before installing a memory module. Remove the battery. 4. Remove the hard drive cover (2). CAUTION: Electrostatic discharge (ESD) can be sure that you are discharged of electric shock and damage to the computer. 3. Loosen the 3 hard drive cover screws (1). 5. Adding or replacing memory modules The computer has two memory module compartments.
... unresponsive system: Shut down the computer before installing a memory module. Remove the battery. 4. Remove the hard drive cover (2). CAUTION: Electrostatic discharge (ESD) can be sure that you are discharged of electric shock and damage to the computer. 3. Loosen the 3 hard drive cover screws (1). 5. Adding or replacing memory modules The computer has two memory module compartments.
Getting Started HP Notebook - Windows 7
Page 50
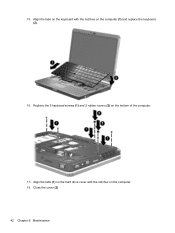
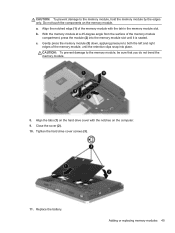
Align the tabs on the keyboard with the notches on the computer. 18. Replace the 5 keyboard screws (1) and 2 rubber covers (2) on the computer (1) and replace the keyboard (2). 16. 15. Align the tabs (1) on the hard drive cover with the notches on the bottom of the computer. 17. Close the cover (2). 42 Chapter 6 Maintenance
Align the tabs on the keyboard with the notches on the computer. 18. Replace the 5 keyboard screws (1) and 2 rubber covers (2) on the computer (1) and replace the keyboard (2). 16. 15. Align the tabs (1) on the hard drive cover with the notches on the bottom of the computer. 17. Close the cover (2). 42 Chapter 6 Maintenance
Getting Started HP Notebook - Windows 7
Page 51
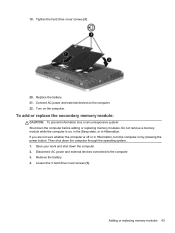
Remove the battery. 4. Loosen the 3 hard drive cover screws (1). Replace the battery. 21. If you are not sure whether the computer is on, in the Sleep state, or in Hibernation, turn the computer on the ... to the computer. 22. Do not remove a memory module while the computer is off or in Hibernation. Tighten the hard drive cover screws (3). 20. Adding or replacing memory modules 43 To add or replace the secondary memory module: CAUTION: To prevent information loss or an unresponsive system: Shut down the computer before adding or...
Remove the battery. 4. Loosen the 3 hard drive cover screws (1). Replace the battery. 21. If you are not sure whether the computer is on, in the Sleep state, or in Hibernation, turn the computer on the ... to the computer. 22. Do not remove a memory module while the computer is off or in Hibernation. Tighten the hard drive cover screws (3). 20. Adding or replacing memory modules 43 To add or replace the secondary memory module: CAUTION: To prevent information loss or an unresponsive system: Shut down the computer before adding or...
Getting Started HP Notebook - Windows 7
Page 52
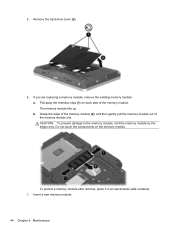
... the memory module out of the memory module. To protect a memory module after removal, place it in an electrostatic-safe container. 7. Remove the hard drive cover (2). 6. If you are replacing a memory module, remove the existing memory module: a. Pull away the retention clips (1) on the memory module. Do not touch the components on each...
... the memory module out of the memory module. To protect a memory module after removal, place it in an electrostatic-safe container. 7. Remove the hard drive cover (2). 6. If you are replacing a memory module, remove the existing memory module: a. Pull away the retention clips (1) on the memory module. Do not touch the components on each...
Getting Started HP Notebook - Windows 7
Page 53
...damage to the memory module, hold the memory module by the edges only. Align the tabs (1) on the hard drive cover with the tab in the memory module slot. Adding or replacing memory modules 45 a. With the memory module at a 45-degree angle from the surface of the memory module... compartment, press the module (2) into place. c. Replace the battery. Gently press the memory module (3) down, applying pressure to both the left and right edges of the memory module with the notches on the memory module. Tighten the hard drive cover screws (3). 11. CAUTION: To prevent damage to ...
...damage to the memory module, hold the memory module by the edges only. Align the tabs (1) on the hard drive cover with the tab in the memory module slot. Adding or replacing memory modules 45 a. With the memory module at a 45-degree angle from the surface of the memory module... compartment, press the module (2) into place. c. Replace the battery. Gently press the memory module (3) down, applying pressure to both the left and right edges of the memory module with the notches on the memory module. Tighten the hard drive cover screws (3). 11. CAUTION: To prevent damage to ...

Getting Started HP Notebook - Windows 7
Page 66
...identifying 10 B Backup and Restore 49 Backup and Restore Center 51, 52 battery bay 14, 56 battery light 6 battery release latch 14 battery, replacing 33 bluetooth compartment identifying 9 Bluetooth label 56 buttons left TouchPad 5 pointing stick 4 right TouchPad 5 volume down 7 volume mute 7 volume up ... changing assignments 32 creating assignments 32 fn key, identifying 8, 19, 21 function keys identifying 8 H hard drive installing 35 removing 34 hard drive bay, identifying 14 hard drive recovery 50, 53 headphone (audio-out) jack 10 hotkeys ambient light 20 battery charge 20 decrease screen...
...identifying 10 B Backup and Restore 49 Backup and Restore Center 51, 52 battery bay 14, 56 battery light 6 battery release latch 14 battery, replacing 33 bluetooth compartment identifying 9 Bluetooth label 56 buttons left TouchPad 5 pointing stick 4 right TouchPad 5 volume down 7 volume mute 7 volume up ... changing assignments 32 creating assignments 32 fn key, identifying 8, 19, 21 function keys identifying 8 H hard drive installing 35 removing 34 hard drive bay, identifying 14 hard drive recovery 50, 53 headphone (audio-out) jack 10 hotkeys ambient light 20 battery charge 20 decrease screen...

Getting Started HP Notebook - Windows 7
Page 67
... Windows applications 8 Windows logo 8 L labels Bluetooth 56 HP Mobile Broadband Module 56 Microsoft Certificate of Authenticity 56 regulatory 56 serial number 56 SIM 56 wireless certification 56 WLAN 56 latch, battery release 14 lights battery 6 caps lock 5 drive 6 mute 5 num lock 5 power 6 TouchPad 5 ...module replacing 37 Product Key 56 product name and number, computer 56 Q QuickWeb Home Screen 15 starting 15 QuickWeb button identifying 10 QuickWeb software 15 R recovery partition 50, 53 regulatory information regulatory label 56 wireless certification labels 56 restoring the hard drive 50...
... Windows applications 8 Windows logo 8 L labels Bluetooth 56 HP Mobile Broadband Module 56 Microsoft Certificate of Authenticity 56 regulatory 56 serial number 56 SIM 56 wireless certification 56 WLAN 56 latch, battery release 14 lights battery 6 caps lock 5 drive 6 mute 5 num lock 5 power 6 TouchPad 5 ...module replacing 37 Product Key 56 product name and number, computer 56 Q QuickWeb Home Screen 15 starting 15 QuickWeb button identifying 10 QuickWeb software 15 R recovery partition 50, 53 regulatory information regulatory label 56 wireless certification labels 56 restoring the hard drive 50...
HP Notebook Reference Guide - Windows 7
Page 79
... condition of the battery and calibrates the battery if necessary. If the battery fails the test, contact HP Customer Support to report the issue and purchase a replacement battery. ● System Tune-Up-This group of the hard drive. If no instructions are required to start the computer. ● Run-in test-This test repeats...
... condition of the battery and calibrates the battery if necessary. If the battery fails the test, contact HP Customer Support to report the issue and purchase a replacement battery. ● System Tune-Up-This group of the hard drive. If no instructions are required to start the computer. ● Run-in test-This test repeats...

HP Notebook Reference Guide - Windows 7
Page 85
... the following ways: ● Installing additional software applications after unbundling the preinstalled software image ● Using software deployment tools, such as Altiris Deployment Solutions, to replace the preinstalled software with a customized software image ● Using a disk-cloning process to copy the contents from one hard drive to be deployed (distributed) in a networked environment.
... the following ways: ● Installing additional software applications after unbundling the preinstalled software image ● Using software deployment tools, such as Altiris Deployment Solutions, to replace the preinstalled software with a customized software image ● Using a disk-cloning process to copy the contents from one hard drive to be deployed (distributed) in a networked environment.
HP EliteBook 2760p Tablet PC - Maintenance and Service Guide
Page 6
Component replacement procedures 38 Service tag ...38 Computer feet ...39 Pen ...40 Battery ...41 Service access cover ...42 Primary memory module ...43 SIM ...45 Hard drive ...46 WLAN module ...48 WWAN module ...51 Keyboard ...53 Secondary memory module 56 Top cover ...57 TouchPad board ...61 RTC battery ...62 Display assembly ...63 ... menus ...83 File menu ...83 Security menu ...84 System Configuration menu 85 6 Specifications ...89 Computer specifications ...89 30.7-cm (12.1-in), WXGA display specifications 90 Hard drive specifications ...90 vi
Component replacement procedures 38 Service tag ...38 Computer feet ...39 Pen ...40 Battery ...41 Service access cover ...42 Primary memory module ...43 SIM ...45 Hard drive ...46 WLAN module ...48 WWAN module ...51 Keyboard ...53 Secondary memory module 56 Top cover ...57 TouchPad board ...61 RTC battery ...62 Display assembly ...63 ... menus ...83 File menu ...83 Security menu ...84 System Configuration menu 85 6 Specifications ...89 Computer specifications ...89 30.7-cm (12.1-in), WXGA display specifications 90 Hard drive specifications ...90 vi
HP EliteBook 2760p Tablet PC - Maintenance and Service Guide
Page 13
Category Serviceability Description Microsoft WHQL Novell SuSE Linux End-user replaceable parts: AC adapter Battery Hard drive Memory module WLAN module WWAN module 5
Category Serviceability Description Microsoft WHQL Novell SuSE Linux End-user replaceable parts: AC adapter Battery Hard drive Memory module WLAN module WWAN module 5

HP EliteBook 2760p Tablet PC - Maintenance and Service Guide
Page 24
... agency that regulates wireless devices in your country or region. Contains the hard drive, the wireless LAN module slot, the WWAN module slot, and the memory module slot. If you replace the module and then receive a warning message, remove the module to ...battery charge. CAUTION: To prevent an unresponsive system, replace the wireless module only with a wireless module authorized for the internal fan to cycle on and off during routine operation. Bottom Component (1) (2) Battery bay SIM slot (3) Vents (3) (4) Hard drive bay (5) Docking connector (6) Charge level indicator (7)...
... agency that regulates wireless devices in your country or region. Contains the hard drive, the wireless LAN module slot, the WWAN module slot, and the memory module slot. If you replace the module and then receive a warning message, remove the module to ...battery charge. CAUTION: To prevent an unresponsive system, replace the wireless module only with a wireless module authorized for the internal fan to cycle on and off during routine operation. Bottom Component (1) (2) Battery bay SIM slot (3) Vents (3) (4) Hard drive bay (5) Docking connector (6) Charge level indicator (7)...


