HP ENVY TouchSmart 17-j141nr Research
View Results Below
Free HP ENVY TouchSmart 17-j141nr manuals!
Problems with HP ENVY TouchSmart 17-j141nr?
Ask a Question
Free HP ENVY TouchSmart 17-j141nr manuals!
Problems with HP ENVY TouchSmart 17-j141nr?
Ask a Question
Related Manual Pages


Similar Questions

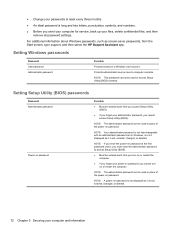
Will My Recover To Factory Setting Disks Remove A Locked Bios Password
(Posted by RAMHaam 9 years ago)
Where Can I Find The Best Price?
Looking for the cheapest place to purchase this laptop.
Looking for the cheapest place to purchase this laptop.
(Posted by Runangun 10 years ago)

Hi, Is Hp Envy Touchsmart 17-j173ca. A Wireless Intel Dualban...?
(Posted by vidalmikasa 10 years ago)

Accessing Bios To Boot From Flash Drive
i work from home and have a company flash drive i need to access bios to have boot from flash drive....
i work from home and have a company flash drive i need to access bios to have boot from flash drive....
(Posted by yvettemjms 10 years ago)
Related Terms
The following terms were also used when searching for HP ENVY TouchSmart 17-j141nr Research:- envy ts 17-j141nr
- hp envy touchsmart 17-j141nr touchscreen laptop
- hp envy touchsmart 17-j141nr touch screen laptop
- hp envy touchsmart 17-j141nr touch screen
- hp envy touchsmart 17-j141nr specs
- hp envy touchsmart 17-j141nr review
- hp envy touchsmart 17-j141nr notebook pc
- hp envy touchsmart 17-j141nr drivers
- hp envy touchsmart 17-j141nr best price
- hp envy touchsmart 17 j141nr touchscreen laptop
- hp envy touchsmart 17 j141nr signature
- hp envy touchsmart 17 j141nr review
- hp envy touchsmart 17 j141nr price
- hp envy touchsmart 17 j141nr manual
- envy touchsmart 17 j141nr manual
- envy touchsmart 17-j141nr touchscreen laptop
- envy touchsmart 17-j141nr touch screen laptop
- envy touchsmart 17-j141nr touch screen
- envy touchsmart 17-j141nr specs
- envy touchsmart 17-j141nr review
- envy touchsmart 17-j141nr notebook pc
- envy touchsmart 17-j141nr drivers
- envy touchsmart 17-j141nr best price
- envy touchsmart 17 j141nr touchscreen laptop
- envy touchsmart 17 j141nr signature
- envy touchsmart 17 j141nr review
- envy touchsmart 17 j141nr price