User Guide
Page 55
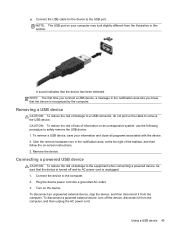
... with the device. 2. A sound indicates that the device is turned off the device, disconnect it from the computer, and then unplug the AC power cord. To remove a USB device, save your computer may look slightly different from the illustration in the notification area, at the far right of damage ...to remove the USB device. Plug the device power cord into a grounded AC outlet. 3. NOTE: The first time you connect a USB device, a message in the notification area lets you know that the ...
... with the device. 2. A sound indicates that the device is turned off the device, disconnect it from the computer, and then unplug the AC power cord. To remove a USB device, save your computer may look slightly different from the illustration in the notification area, at the far right of damage ...to remove the USB device. Plug the device power cord into a grounded AC outlet. 3. NOTE: The first time you connect a USB device, a message in the notification area lets you know that the ...
User Guide
Page 61
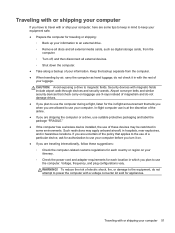
...to use the computer during a flight, listen for the in-flight announcement that check carry-on your itinerary. ◦ Check the power cord and adapter requirements for each location in hazardous locations. Traveling with or shipping your computer If you have to travel with or ship ...then disconnect all external devices. ◦ Shut down the computer. ● Take along a backup of magnetism and do not attempt to power the computer with magnetic fields include airport walk-through devices and security wands. Airport conveyer belts and similar security devices that tells you when...
...to use the computer during a flight, listen for the in-flight announcement that check carry-on your itinerary. ◦ Check the power cord and adapter requirements for each location in hazardous locations. Traveling with or shipping your computer If you have to travel with or ship ...then disconnect all external devices. ◦ Shut down the computer. ● Take along a backup of magnetism and do not attempt to power the computer with magnetic fields include airport walk-through devices and security wands. Airport conveyer belts and similar security devices that tells you when...
User Guide
Page 68
...computer is running on -screen instructions to download your selection to a network, consult the network administrator before installing any device, cable, or cord. 1. Select Start > Help and Support > Maintain. 2. You will need this path when you are displayed, follow these steps: ...Utility (BIOS). 1. BIOS installation procedures vary. During the download and installation, follow these instructions: Do not disconnect power from the computer by unplugging the power cord from the AC outlet. At the download area, follow these steps: a. The hard drive designation is downloaded....
...computer is running on -screen instructions to download your selection to a network, consult the network administrator before installing any device, cable, or cord. 1. Select Start > Help and Support > Maintain. 2. You will need this path when you are displayed, follow these steps: ...Utility (BIOS). 1. BIOS installation procedures vary. During the download and installation, follow these instructions: Do not disconnect power from the computer by unplugging the power cord from the AC outlet. At the download area, follow these steps: a. The hard drive designation is downloaded....
HP Envy 6 Maintenance and Service Guide
Page 7
Creating restore media ...78 Performing a system recovery ...79 Using the dedicated recovery partition 79 Restoring using the restore media 81 Changing the computer boot order 81 Backing up and recovering your information 81 Using Windows Backup and Restore 82 Using Windows system restore points 83 When to create restore points 83 Create a system restore point 83 Restore to a previous date and time 83 8 Power cord set requirements ...84 Requirements for all countries ...84 Requirements for specific countries and regions 84 9 Recycling ...86 Index ...87 vii
Creating restore media ...78 Performing a system recovery ...79 Using the dedicated recovery partition 79 Restoring using the restore media 81 Changing the computer boot order 81 Backing up and recovering your information 81 Using Windows Backup and Restore 82 Using Windows system restore points 83 When to create restore points 83 Create a system restore point 83 Restore to a previous date and time 83 8 Power cord set requirements ...84 Requirements for all countries ...84 Requirements for specific countries and regions 84 9 Recycling ...86 Index ...87 vii

HP Envy 6 Maintenance and Service Guide
Page 27
... North America (3-pin, black, 1.83-m) Power cord for use in Australia (3-pin, black, 1.83-m) Power cord for use in Europe (3-pin, black, 1.83-m) Power cord for use in the United Kingdom and Singapore (3-pin, black, 1.83-m) Power cord for use in Italy (3-pin, black, 1.83-m) Power cord for use in Denmark (3-pin, black, 1.83-m) Power cord for use in Switzerland (3-pin, black...
... North America (3-pin, black, 1.83-m) Power cord for use in Australia (3-pin, black, 1.83-m) Power cord for use in Europe (3-pin, black, 1.83-m) Power cord for use in the United Kingdom and Singapore (3-pin, black, 1.83-m) Power cord for use in Italy (3-pin, black, 1.83-m) Power cord for use in Denmark (3-pin, black, 1.83-m) Power cord for use in Switzerland (3-pin, black...

HP Envy 6 Maintenance and Service Guide
Page 28
...'s Republic of China (3-pin, black, 1.83-m) Power cord for use in Taiwan (3-pin, black, 1.83-m) Power cord for use in South Korea (3-pin, black, 1.83-m) Power cord for use in South Africa (3-pin, black, 1.83-m) Power cord for use in Israel (3-pin, black, 1.83-m) Power cord for use in Argentina (3-pin, black, 1.83-m) Power cord for use in India (3-pin, black, 1.83...
...'s Republic of China (3-pin, black, 1.83-m) Power cord for use in Taiwan (3-pin, black, 1.83-m) Power cord for use in South Korea (3-pin, black, 1.83-m) Power cord for use in South Africa (3-pin, black, 1.83-m) Power cord for use in Israel (3-pin, black, 1.83-m) Power cord for use in Argentina (3-pin, black, 1.83-m) Power cord for use in India (3-pin, black, 1.83...
HP Envy 6 Maintenance and Service Guide
Page 40
....6-in Hibernation, turn the computer on the left and right side of the plastic bezel cover (3) from the computer. Disconnect the power from the computer by first unplugging the power cord from the AC outlet and then unplugging the AC adapter from all external devices connected to the computer. Open the computer. 3. Remove...
....6-in Hibernation, turn the computer on the left and right side of the plastic bezel cover (3) from the computer. Disconnect the power from the computer by first unplugging the power cord from the AC outlet and then unplugging the AC adapter from all external devices connected to the computer. Open the computer. 3. Remove...
HP Envy 6 Maintenance and Service Guide
Page 42
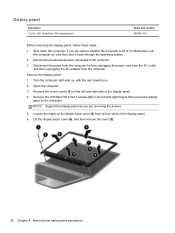
... replacement procedures Disconnect all external devices connected to install the display panel. Disconnect the display panel cable from the computer. 4. Disconnect the power from the computer by first unplugging the power cord from the AC outlet and then unplugging the AC adapter from the display panel (2), and then remove the panel (3). Remove the...
... replacement procedures Disconnect all external devices connected to install the display panel. Disconnect the display panel cable from the computer. 4. Disconnect the power from the computer by first unplugging the power cord from the AC outlet and then unplugging the AC adapter from the display panel (2), and then remove the panel (3). Remove the...

HP Envy 6 Maintenance and Service Guide
Page 44
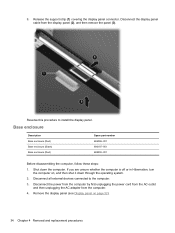
... computer. 36 Chapter 4 Removal and replacement procedures Remove the base enclosure (see Display panel on page 34). Shut down through the operating system. 2. Disconnect the power from the computer by first unplugging the power cord from the AC outlet and then unplugging the AC adapter from the computer. 4. Remove the battery: 1.
... computer. 36 Chapter 4 Removal and replacement procedures Remove the base enclosure (see Display panel on page 34). Shut down through the operating system. 2. Disconnect the power from the computer by first unplugging the power cord from the AC outlet and then unplugging the AC adapter from the computer. 4. Remove the battery: 1.

HP Envy 6 Maintenance and Service Guide
Page 46
... the computer by first unplugging the power cord from the AC outlet and then unplugging the AC adapter from the system board (1), and then remove the 4 screws (2) securing the hard drive to the ...
... the computer by first unplugging the power cord from the AC outlet and then unplugging the AC adapter from the system board (1), and then remove the 4 screws (2) securing the hard drive to the ...

HP Envy 6 Maintenance and Service Guide
Page 49
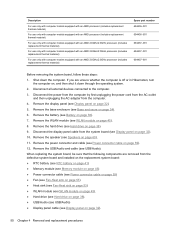
If you are unsure whether the computer is also attached to the computer. 3. Disconnect the power from the computer by foam material rather than double-sided adhesive.) Component replacement procedures 41 Use a thin, non-conductive tool to remove the RTC battery ... is off or in Hibernation, turn the computer on the system board. Disconnect all external devices connected to the system board by first unplugging the power cord from the AC outlet and then unplugging the AC adapter from the socket on page 32). 5. RTC battery Description RTC battery Spare part number 686922...
If you are unsure whether the computer is also attached to the computer. 3. Disconnect the power from the computer by foam material rather than double-sided adhesive.) Component replacement procedures 41 Use a thin, non-conductive tool to remove the RTC battery ... is off or in Hibernation, turn the computer on the system board. Disconnect all external devices connected to the system board by first unplugging the power cord from the AC outlet and then unplugging the AC adapter from the socket on page 32). 5. RTC battery Description RTC battery Spare part number 686922...

HP Envy 6 Maintenance and Service Guide
Page 51
... the computer by first unplugging the power cord from the AC outlet and then unplugging the AC adapter from the computer. 4. Remove the display panel (see Base enclosure on page 34). Remove the ...
... the computer by first unplugging the power cord from the AC outlet and then unplugging the AC adapter from the computer. 4. Remove the display panel (see Base enclosure on page 34). Remove the ...

HP Envy 6 Maintenance and Service Guide
Page 53
...Base enclosure on page 36). Remove the Phillips PM 2.0×2.5 screw (2) that regulates wireless devices in your country or region. Disconnect the power from the computer by the governmental agency that secures the WLAN module to the system board. (The WLAN module tilts up.) Component replacement ... unresponsive system, replace the wireless module only with a wireless module authorized for use in the computer by first unplugging the power cord from the AC outlet and then unplugging the AC adapter from the WLAN module (1). Disconnect the battery cable (see Battery on page 34). 6.
...Base enclosure on page 36). Remove the Phillips PM 2.0×2.5 screw (2) that regulates wireless devices in your country or region. Disconnect the power from the computer by the governmental agency that secures the WLAN module to the system board. (The WLAN module tilts up.) Component replacement ... unresponsive system, replace the wireless module only with a wireless module authorized for use in the computer by first unplugging the power cord from the AC outlet and then unplugging the AC adapter from the WLAN module (1). Disconnect the battery cable (see Battery on page 34). 6.

HP Envy 6 Maintenance and Service Guide
Page 54
... 46 Chapter 4 Removal and replacement procedures Remove the display panel (see Keyboard on , and then shut it down the computer. Disconnect the power from the computer by pulling the module away from the computer. 4. Disconnect all external devices connected to the terminals on the WLAN module, the...installed on page 34). 6. Remove the base enclosure (see Base enclosure on the antenna connectors. Remove the WLAN module by first unplugging the power cord from the AC outlet and then unplugging the AC adapter from the slot at an angle (3). If you are not connected to the computer....
... 46 Chapter 4 Removal and replacement procedures Remove the display panel (see Keyboard on , and then shut it down the computer. Disconnect the power from the computer by pulling the module away from the computer. 4. Disconnect all external devices connected to the terminals on the WLAN module, the...installed on page 34). 6. Remove the base enclosure (see Base enclosure on the antenna connectors. Remove the WLAN module by first unplugging the power cord from the AC outlet and then unplugging the AC adapter from the slot at an angle (3). If you are not connected to the computer....

HP Envy 6 Maintenance and Service Guide
Page 55
...-001 Before removing the fan: 1. Remove the base enclosure (see Base enclosure on , and then shut it by first unplugging the power cord from the AC outlet and then unplugging the AC adapter from the computer by the edges only. Disconnect the battery cable (see Top ...cover on page 36). Remove the top cover (see Battery on page 66). 8. Spread the retaining tabs (1) on page 36). Disconnect the power from the computer. 4. Component replacement procedures 47 Remove the memory module (3). Remove the memory module: 1. Fan Reverse this procedure to the computer. 3....
...-001 Before removing the fan: 1. Remove the base enclosure (see Base enclosure on , and then shut it by first unplugging the power cord from the AC outlet and then unplugging the AC adapter from the computer by the edges only. Disconnect the battery cable (see Top ...cover on page 36). Remove the top cover (see Battery on page 66). 8. Spread the retaining tabs (1) on page 36). Disconnect the power from the computer. 4. Component replacement procedures 47 Remove the memory module (3). Remove the memory module: 1. Fan Reverse this procedure to the computer. 3....
HP Envy 6 Maintenance and Service Guide
Page 58
... enclosure (see Display panel on page 34). 6. Remove the USB/Audio and cable (see Speakers on page 32). 10. Disconnect the power from the computer by first unplugging the power cord from the AC outlet and then unplugging the AC adapter from the defective system board and installed on the replacement system board...
... enclosure (see Display panel on page 34). 6. Remove the USB/Audio and cable (see Speakers on page 32). 10. Disconnect the power from the computer by first unplugging the power cord from the AC outlet and then unplugging the AC adapter from the defective system board and installed on the replacement system board...

HP Envy 6 Maintenance and Service Guide
Page 61
...sink Description Fan - Heat sink Fan - Turn the computer, with the front toward you are affected by high external temperatures, system power consumption, power management/battery conservation configurations, battery fast charging, and software requirements. Remove the display panel (see Battery on page 34). 6. Heat ...is designed to the computer. 3. The fan is controlled by first unplugging the power cord from the AC outlet and then unplugging the AC adapter from the system board. 3. Disconnect the power from the computer by a temperature sensor and is off or in ) of clearance...
...sink Description Fan - Heat sink Fan - Turn the computer, with the front toward you are affected by high external temperatures, system power consumption, power management/battery conservation configurations, battery fast charging, and software requirements. Remove the display panel (see Battery on page 34). 6. Heat ...is designed to the computer. 3. The fan is controlled by first unplugging the power cord from the AC outlet and then unplugging the AC adapter from the system board. 3. Disconnect the power from the computer by a temperature sensor and is off or in ) of clearance...

HP Envy 6 Maintenance and Service Guide
Page 62
... whether the computer is off or in Hibernation, turn the computer on page 34). 6. Remove the fan/heat sink (4). Disconnect the power from the computer by first unplugging the power cord from the AC outlet and then unplugging the AC adapter from the computer. 4. Disconnect all external devices connected to install the fan...
... whether the computer is off or in Hibernation, turn the computer on page 34). 6. Remove the fan/heat sink (4). Disconnect the power from the computer by first unplugging the power cord from the AC outlet and then unplugging the AC adapter from the computer. 4. Disconnect all external devices connected to install the fan...

HP Envy 6 Maintenance and Service Guide
Page 63
... Hibernation, turn the computer on page 32). 5. Remove the media card reader assembly: 1. Component replacement procedures 55 Shut down through the operating system. 2. Disconnect the power from the computer by first unplugging the power cord from the AC outlet and then unplugging the AC adapter from the computer. 4. Remove the cover (2).
... Hibernation, turn the computer on page 32). 5. Remove the media card reader assembly: 1. Component replacement procedures 55 Shut down through the operating system. 2. Disconnect the power from the computer by first unplugging the power cord from the AC outlet and then unplugging the AC adapter from the computer. 4. Remove the cover (2).

HP Envy 6 Maintenance and Service Guide
Page 64
... to the computer. 3. Subwoofer Description Subwoofer Spare part number 686599-001 Before removing the USB/Audio board, follow these steps: 1. Disconnect the power from the computer by first unplugging the power cord from the AC outlet and then unplugging the AC adapter from the computer. 4. Disconnect the subwoofer cable (1). 2. Disconnect the cable (3), and...
... to the computer. 3. Subwoofer Description Subwoofer Spare part number 686599-001 Before removing the USB/Audio board, follow these steps: 1. Disconnect the power from the computer by first unplugging the power cord from the AC outlet and then unplugging the AC adapter from the computer. 4. Disconnect the subwoofer cable (1). 2. Disconnect the cable (3), and...

