Setup Poster
Page 19
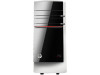
... laser printers, large format printers: 03-8304848 Inkjet printers, home laser printers, All-in-One products, cameras, scanners, HP Pavillion & Compaq Presario note books: 1-700-503-048 Italy 848 800 871 Jordan 0800 222 47 Kenya +27 11 234 5872 Kuwait +971 4 224 9189 Latvia... 800 8012 (Domestic, toll-free phone number) +371 7030721 (Internationalt telefonnummer. Der gælder almindelige telefontakster) Lebanon +971 4 224 ...
... laser printers, large format printers: 03-8304848 Inkjet printers, home laser printers, All-in-One products, cameras, scanners, HP Pavillion & Compaq Presario note books: 1-700-503-048 Italy 848 800 871 Jordan 0800 222 47 Kenya +27 11 234 5872 Kuwait +971 4 224 9189 Latvia... 800 8012 (Domestic, toll-free phone number) +371 7030721 (Internationalt telefonnummer. Der gælder almindelige telefontakster) Lebanon +971 4 224 ...
Setup Poster
Page 20
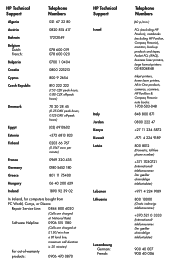
...if applicable) Switzerland Tunisia Turkey Istanbul, Ankara, Izmir, Bursa: Other cities in 2011 6 5 1 0 8 1 - Petersburg: Saudi Arabia Slovakia Slovenia South Africa Spain Sweden Telephone Numbers HP Technical Support Telephone Numbers 081 005 010 0900 2020 165 (01) 271 2320 0815 62 070 (kr 0.59 per call, plus kr 0.39 per each... United Arab Emirates 0 848 672 672 (0.08 CHF peak hours, 0.04 CHF off-peak hours) 23 927 000 444 0307 212 444 0307 (044) 230 51 06 600 54 47 47 0808 201 492 +971 42249189 0801 033 390 (+7) 095 777 3284 (+7) 812 332 4240 +(966) 800-897-1415 0850...
...if applicable) Switzerland Tunisia Turkey Istanbul, Ankara, Izmir, Bursa: Other cities in 2011 6 5 1 0 8 1 - Petersburg: Saudi Arabia Slovakia Slovenia South Africa Spain Sweden Telephone Numbers HP Technical Support Telephone Numbers 081 005 010 0900 2020 165 (01) 271 2320 0815 62 070 (kr 0.59 per call, plus kr 0.39 per each... United Arab Emirates 0 848 672 672 (0.08 CHF peak hours, 0.04 CHF off-peak hours) 23 927 000 444 0307 212 444 0307 (044) 230 51 06 600 54 47 47 0808 201 492 +971 42249189 0801 033 390 (+7) 095 777 3284 (+7) 812 332 4240 +(966) 800-897-1415 0850...

Upgrading and Servicing Guide
Page 2
Part Number: 655130-001 Version: 1.0 The information contained herein is subject to change without notice. Copyright © 2011 Hewlett-Packard Development Company, L.P.
Part Number: 655130-001 Version: 1.0 The information contained herein is subject to change without notice. Copyright © 2011 Hewlett-Packard Development Company, L.P.
Upgrading and Servicing Guide
Page 3
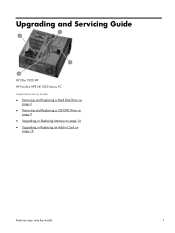
Upgrading and Servicing Guide HP Elite 7300 MT HP Pavilion HPE h8-1000 Series PC Computer features may vary by model. ● Removing and Replacing a Hard Disk Drive on page 2 ● Removing and Replacing a CD/DVD Drive on page 9 ● Upgrading or Replacing Memory on page 14 ● Upgrading or Replacing an Add-in Card on page 18 Features may vary by model. 1
Upgrading and Servicing Guide HP Elite 7300 MT HP Pavilion HPE h8-1000 Series PC Computer features may vary by model. ● Removing and Replacing a Hard Disk Drive on page 2 ● Removing and Replacing a CD/DVD Drive on page 9 ● Upgrading or Replacing Memory on page 14 ● Upgrading or Replacing an Add-in Card on page 18 Features may vary by model. 1
Upgrading and Servicing Guide
Page 4
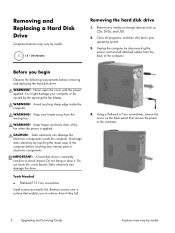
Never open the cover with the power applied. Keep your computer or be injured by the spinning the fan blades. Static electricity can damage the electronic components inside the computer. WARNING! Avoid touching sharp edge inside the computer. Do not bang or drop it. Do not touch the circuit board. Before you to the computer. 2 Upgrading and Servicing Guide Features may vary by model. You might damage your hands away from the back of the fan when the power is extremely sensitive to shock impact. WARNING! IMPORTANT: A hard disk drive is applied. Using a ...
Never open the cover with the power applied. Keep your computer or be injured by the spinning the fan blades. Static electricity can damage the electronic components inside the computer. WARNING! Avoid touching sharp edge inside the computer. Do not bang or drop it. Do not touch the circuit board. Before you to the computer. 2 Upgrading and Servicing Guide Features may vary by model. You might damage your hands away from the back of the fan when the power is extremely sensitive to shock impact. WARNING! IMPORTANT: A hard disk drive is applied. Using a ...
Upgrading and Servicing Guide
Page 5
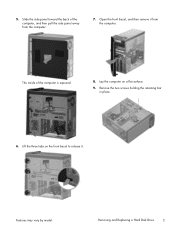
Remove the two screws holding the retaining bar in place. 6. Slide the side panel toward the back of the computer is exposed. 8. Open the front bezel, and then remove it . The inside of the computer, and then pull the side panel away from the computer. Features may vary by model. Lift the three tabs on a flat surface. 9. 5. Lay the computer on the front bezel to release it from the computer. 7. Removing and Replacing a Hard Disk Drive 3
Remove the two screws holding the retaining bar in place. 6. Slide the side panel toward the back of the computer is exposed. 8. Open the front bezel, and then remove it . The inside of the computer, and then pull the side panel away from the computer. Features may vary by model. Lift the three tabs on a flat surface. 9. 5. Lay the computer on the front bezel to release it from the computer. 7. Removing and Replacing a Hard Disk Drive 3
Upgrading and Servicing Guide
Page 6
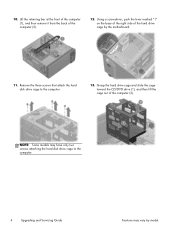
NOTE: Some models may have only two screws attaching the hard disk drive cage to the computer. 13. Grasp the hard drive cage and slide the cage toward the CD/DVD drive (1), and then lift the cage out of the computer (2). 12. Remove the three screws that attach the hard disk drive cage to the computer. 4 Upgrading and Servicing Guide Features may vary by the motherboard. 11. Using a screwdriver, push the lever marked "1" on the base of the right side of the hard drive cage by model. Lift the retaining bar at the front of the computer (1), and then remove it from the back of...
NOTE: Some models may have only two screws attaching the hard disk drive cage to the computer. 13. Grasp the hard drive cage and slide the cage toward the CD/DVD drive (1), and then lift the cage out of the computer (2). 12. Remove the three screws that attach the hard disk drive cage to the computer. 4 Upgrading and Servicing Guide Features may vary by the motherboard. 11. Using a screwdriver, push the lever marked "1" on the base of the right side of the hard drive cage by model. Lift the retaining bar at the front of the computer (1), and then remove it from the back of...
Upgrading and Servicing Guide
Page 7
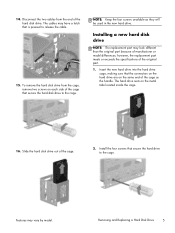
Insert the new hard drive into the hard drive cage, making sure that is pressed to the cage. The cables may have a latch that the connectors on the hard drive are on the same end of the original part. 1. however, the replacement part meets or exceeds the specifications of the cage as they will be used in the new hard drive. The hard drive rests on each side of the cage. 2. Disconnect the two cables from the cage, remove two screws on the metal tabs located inside the cage. 16. NOTE: Keep the four screws available as the handle. Installing a new hard disk drive NOTE: The ...
Insert the new hard drive into the hard drive cage, making sure that is pressed to the cage. The cables may have a latch that the connectors on the hard drive are on the same end of the original part. 1. however, the replacement part meets or exceeds the specifications of the cage as they will be used in the new hard drive. The hard drive rests on each side of the cage. 2. Disconnect the two cables from the cage, remove two screws on the metal tabs located inside the cage. 16. NOTE: Keep the four screws available as the handle. Installing a new hard disk drive NOTE: The ...
Upgrading and Servicing Guide
Page 8
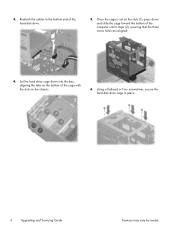
Once the cage is set on the slots (1), press down into the bay, aligning the tabs on the bottom of the cage with the slots on the chassis. 6. Using a flathead or Torx screwdriver, secure the hard disk drive cage in place. 6 Upgrading and Servicing Guide Features may vary by model. Set the hard drive cage down and slide the cage toward the bottom of the hard disk drive. 5. Reattach the cables to the bottom end of the computer until it stops (2), ensuring that the three screw holes are aligned. 4. 3.
Once the cage is set on the slots (1), press down into the bay, aligning the tabs on the bottom of the cage with the slots on the chassis. 6. Using a flathead or Torx screwdriver, secure the hard disk drive cage in place. 6 Upgrading and Servicing Guide Features may vary by model. Set the hard drive cage down and slide the cage toward the bottom of the hard disk drive. 5. Reattach the cables to the bottom end of the computer until it stops (2), ensuring that the three screw holes are aligned. 4. 3.
Upgrading and Servicing Guide
Page 9
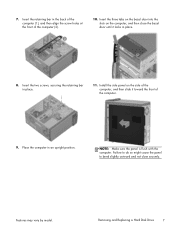
Insert the retaining bar in place. 8. Insert the three tabs on the bezel door into the slots on the side of the computer, and then slide it locks in the back of the computer (1), and then align the screw holes at the front of the computer. 9. Install the side panel on the computer, and then close securely. Place the computer in place. 11. Features may vary by model. NOTE: Make sure the panel is flush with the computer. Removing and Replacing a Hard Disk Drive 7 7. Insert the two screws, securing the retaining bar in an upright position. Failure to do so might cause the ...
Insert the retaining bar in place. 8. Insert the three tabs on the bezel door into the slots on the side of the computer, and then slide it locks in the back of the computer (1), and then align the screw holes at the front of the computer. 9. Install the side panel on the computer, and then close securely. Place the computer in place. 11. Features may vary by model. NOTE: Make sure the panel is flush with the computer. Removing and Replacing a Hard Disk Drive 7 7. Insert the two screws, securing the retaining bar in an upright position. Failure to do so might cause the ...
Upgrading and Servicing Guide
Page 10
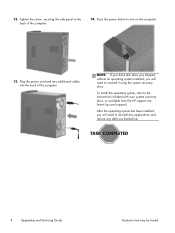
... installed, you backed up. 8 Upgrading and Servicing Guide Features may vary by model. NOTE: If your system recovery discs, or available from the HP support site (www.hp.com/support). Tighten the screw, securing the side panel to turn on the computer. 13. 12. To install the operating system, refer to reinstall...
... installed, you backed up. 8 Upgrading and Servicing Guide Features may vary by model. NOTE: If your system recovery discs, or available from the HP support site (www.hp.com/support). Tighten the screw, securing the side panel to turn on the computer. 13. 12. To install the operating system, refer to reinstall...
Upgrading and Servicing Guide
Page 11
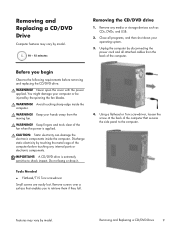
Remove any internal parts or electronic components. WARNING! Keep your hands away from the back of the fan when the power is extremely sensitive to shock impact. Keep fingers and tools clear of the computer. Removing and Replacing a CD/DVD Drive 9 Unplug the computer by disconnecting the power cord and all programs, and then shut down your computer or be injured by the spinning the fan blades. You might damage your operating system. 3. Discharge static electricity by touching the metal cage of the computer that enables you begin Observe the following requirements before...
Remove any internal parts or electronic components. WARNING! Keep your hands away from the back of the fan when the power is extremely sensitive to shock impact. Keep fingers and tools clear of the computer. Removing and Replacing a CD/DVD Drive 9 Unplug the computer by disconnecting the power cord and all programs, and then shut down your computer or be injured by the spinning the fan blades. You might damage your operating system. 3. Discharge static electricity by touching the metal cage of the computer that enables you begin Observe the following requirements before...
Upgrading and Servicing Guide
Page 12
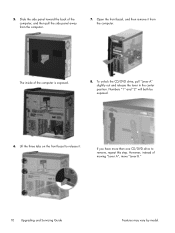
Numbers "1" and "2" will both be exposed. 6. Open the front bezel, and then remove it . 5. The inside of moving "Lever A", move "Lever B." 10 Upgrading and Servicing Guide Features may vary by model. Lift the three tabs on the front bezel to remove, repeat this step. However, instead of the computer is exposed. 8. Slide the side panel toward the back of the computer, and then pull the side panel away from the computer. If you have more than one CD/DVD drive to release it from the computer. 7. To unlock the CD/DVD drive, pull "Lever A" slightly out and release the ...
Numbers "1" and "2" will both be exposed. 6. Open the front bezel, and then remove it . 5. The inside of moving "Lever A", move "Lever B." 10 Upgrading and Servicing Guide Features may vary by model. Lift the three tabs on the front bezel to remove, repeat this step. However, instead of the computer is exposed. 8. Slide the side panel toward the back of the computer, and then pull the side panel away from the computer. If you have more than one CD/DVD drive to release it from the computer. 7. To unlock the CD/DVD drive, pull "Lever A" slightly out and release the ...
Upgrading and Servicing Guide
Page 13
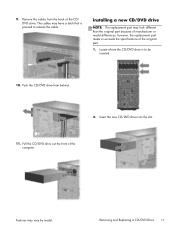
however, the replacement part meets or exceeds the specifications of the computer. Pull the CD/DVD drive out the front of the original part. 1. The cables may have a latch that is to release the cable. Insert the new CD/DVD drive into the slot. 11. Push the CD/DVD drive from the back of manufacturer or model differences; Features may look different than the original part because of the CD/ DVD drive. Removing and Replacing a CD/DVD Drive 11 9. Locate where the CD/DVD drive is pressed to be inserted. 10. Remove the cables from behind. 2. Installing a new CD/...
however, the replacement part meets or exceeds the specifications of the computer. Pull the CD/DVD drive out the front of the original part. 1. The cables may have a latch that is to release the cable. Insert the new CD/DVD drive into the slot. 11. Push the CD/DVD drive from the back of manufacturer or model differences; Features may look different than the original part because of the CD/ DVD drive. Removing and Replacing a CD/DVD Drive 11 9. Locate where the CD/DVD drive is pressed to be inserted. 10. Remove the cables from behind. 2. Installing a new CD/...
Upgrading and Servicing Guide
Page 14
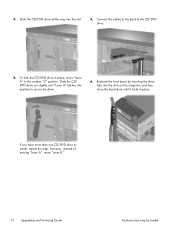
Slide the CD/ DVD drive out slightly until it locks in place, move "Lever B." 12 Upgrading and Servicing Guide Features may vary by inserting the three tabs into the slots on the computer, and then close the bezel door until "Lever A" latches into the slot. 5. 3. Connect the cables to the number "2" position. To lock the CD/DVD drive in place. However, instead of moving "Lever A", move "Lever A" to the back of the CD/DVD drive. 4. Reattach the front bezel by model. If you have more than one CD/DVD drive to secure the drive. 6. Slide the CD/DVD drive all the way into ...
Slide the CD/ DVD drive out slightly until it locks in place, move "Lever B." 12 Upgrading and Servicing Guide Features may vary by inserting the three tabs into the slots on the computer, and then close the bezel door until "Lever A" latches into the slot. 5. 3. Connect the cables to the number "2" position. To lock the CD/DVD drive in place. However, instead of moving "Lever A", move "Lever A" to the back of the CD/DVD drive. 4. Reattach the front bezel by model. If you have more than one CD/DVD drive to secure the drive. 6. Slide the CD/DVD drive all the way into ...
Upgrading and Servicing Guide
Page 15
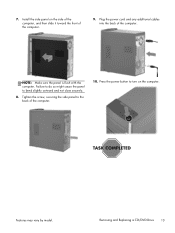
Failure to do so might cause the panel to turn on the side of the computer, and then slide it toward the front of the computer. Press the power button to bend slightly outward and not close securely. 8. Removing and Replacing a CD/DVD Drive 13 NOTE: Make sure the panel is flush with the computer. Plug the power cord and any additional cables into the back of the computer. 9. Install the side panel on the computer. Tighten the screw, securing the side panel to the back of the computer. 10. 7. Features may vary by model.
Failure to do so might cause the panel to turn on the side of the computer, and then slide it toward the front of the computer. Press the power button to bend slightly outward and not close securely. 8. Removing and Replacing a CD/DVD Drive 13 NOTE: Make sure the panel is flush with the computer. Plug the power cord and any additional cables into the back of the computer. 9. Install the side panel on the computer. Tighten the screw, securing the side panel to the back of the computer. 10. 7. Features may vary by model.
Upgrading and Servicing Guide
Page 16
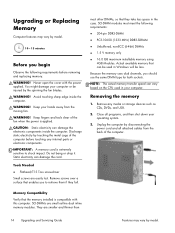
Avoid touching sharp edge inside the computer. most other DIMMs, so that enables you should use the same DIMM type for both sockets. Memory Compatibility Verify that can damage the electronic components inside the computer. WARNING! Never open the cover with this computer. WARNING! CAUTION: Static electricity can be used in the case. Static electricity can vary based on the CPU used in Windows will be injured by touching the metal cage of the computer before removing and replacing memory. Tools Needed ● Flathead/T15 Torx screwdriver Small screws are ...
Avoid touching sharp edge inside the computer. most other DIMMs, so that enables you should use the same DIMM type for both sockets. Memory Compatibility Verify that can damage the electronic components inside the computer. WARNING! Never open the cover with this computer. WARNING! CAUTION: Static electricity can be used in the case. Static electricity can vary based on the CPU used in Windows will be injured by touching the metal cage of the computer before removing and replacing memory. Tools Needed ● Flathead/T15 Torx screwdriver Small screws are ...
Upgrading and Servicing Guide
Page 17
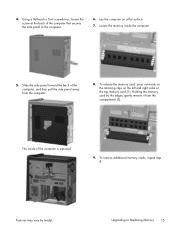
Locate the memory inside of the computer, and then pull the side panel away from the compartment (2). Holding the memory card by model. Slide the side panel toward the back of the computer is exposed. 9. To remove additional memory cards, repeat step 8. To release the memory card, press outwards on the retaining clips on a flat surface. 7. Features may vary by the edges, gently remove it from the computer. 8. Using a flathead or Torx screwdriver, loosen the screw at the back of the top memory card (1). The inside the computer. 5. 4. Lay the computer on the ...
Locate the memory inside of the computer, and then pull the side panel away from the compartment (2). Holding the memory card by model. Slide the side panel toward the back of the computer is exposed. 9. To remove additional memory cards, repeat step 8. To release the memory card, press outwards on the retaining clips on a flat surface. 7. Features may vary by the edges, gently remove it from the computer. 8. Using a flathead or Torx screwdriver, loosen the screw at the back of the top memory card (1). The inside the computer. 5. 4. Lay the computer on the ...

Upgrading and Servicing Guide
Page 18
Tighten the screw, securing the side panel to bend slightly outward and not close securely. 6. Make sure the memory card is flush with the tab in the memory card aligns with the computer. If you are replacing more than the original part because of the computer. Installing a new memory card NOTE: The replacement part may vary by the edges, press the card into the socket, and then gently push down on the side of the computer, and then slide it snaps in an upright position. 16 Upgrading and Servicing Guide Features may look different than one memory card, repeat step 2 for each...
Tighten the screw, securing the side panel to bend slightly outward and not close securely. 6. Make sure the memory card is flush with the tab in the memory card aligns with the computer. If you are replacing more than the original part because of the computer. Installing a new memory card NOTE: The replacement part may vary by the edges, press the card into the socket, and then gently push down on the side of the computer, and then slide it snaps in an upright position. 16 Upgrading and Servicing Guide Features may look different than one memory card, repeat step 2 for each...
Upgrading and Servicing Guide
Page 19
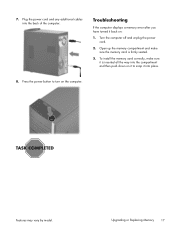
Plug the power cord and any additional cables into the compartment and then push down on it to turn on : 1. Troubleshooting If the computer displays a memory error after you have turned it into place. 8. Turn the computer off and unplug the power cord. 2. Features may vary by model. Open up the memory compartment and make sure it is firmly seated. 3. Press the power button to snap it back on the computer. To install the memory card correctly, make sure the memory card is inserted all the way into the back of the computer. Upgrading or Replacing Memory 17 7.
Plug the power cord and any additional cables into the compartment and then push down on it to turn on : 1. Troubleshooting If the computer displays a memory error after you have turned it into place. 8. Turn the computer off and unplug the power cord. 2. Features may vary by model. Open up the memory compartment and make sure it is firmly seated. 3. Press the power button to snap it back on the computer. To install the memory card correctly, make sure the memory card is inserted all the way into the back of the computer. Upgrading or Replacing Memory 17 7.