
User Guide
Page 4
... a mounting device 13 Routing the cables ...13 Connecting the cables...14 Connecting USB devices...16 Adjusting the monitor...16 Installing a security cable lock ...19 Turning on the monitor...19 HP watermark and image retention policy...20 2 Using the monitor ...21 Downloading software and utilities ...21 Downloading HP Display Center ...21 The Information file ...21 The Image Color Matching file ...21 Using the OSD menu ...22 Using the OSD function buttons ...22 Reassigning the function buttons ...23 Changing the Power Mode setting (select products only 23 Using Auto-Sleep Mode...
... a mounting device 13 Routing the cables ...13 Connecting the cables...14 Connecting USB devices...16 Adjusting the monitor...16 Installing a security cable lock ...19 Turning on the monitor...19 HP watermark and image retention policy...20 2 Using the monitor ...21 Downloading software and utilities ...21 Downloading HP Display Center ...21 The Information file ...21 The Image Color Matching file ...21 Using the OSD menu ...22 Using the OSD function buttons ...22 Reassigning the function buttons ...23 Changing the Power Mode setting (select products only 23 Using Auto-Sleep Mode...
User Guide
Page 5
... v Setting up Windows Hello facial recognition ...25 Using the computer camera for Windows Hello...25 Using the monitor camera for Windows Hello ...26 DisplayPort multistreaming (select models) ...26 3 USB Type-C mode and Display Only mode ...28 USB Type-C mode ...28 Display Only mode ...28 4 Support and troubleshooting ...29 Solving common issues ...29 Button lockouts...30 5 Maintaining the monitor ...31 Maintenance guidelines...31 Cleaning the monitor ...31 Shipping the monitor ...32 Appendix A Technical specifications ...33...
... v Setting up Windows Hello facial recognition ...25 Using the computer camera for Windows Hello...25 Using the monitor camera for Windows Hello ...26 DisplayPort multistreaming (select models) ...26 3 USB Type-C mode and Display Only mode ...28 USB Type-C mode ...28 Display Only mode ...28 4 Support and troubleshooting ...29 Solving common issues ...29 Button lockouts...30 5 Maintaining the monitor ...31 Maintenance guidelines...31 Cleaning the monitor ...31 Shipping the monitor ...32 Appendix A Technical specifications ...33...
User Guide
Page 7
... monitor. the power strip must be stepped on the web at all cords and cables connected to the floor or wall in locations where children are inappropriately situated on power cords or cables. NOTE: This product is included with the installation instructions. WARNING! If you can replace the equipment if surge protection fails. The Safety & Comfort Guide is easily accessible at http://www.hp...
... monitor. the power strip must be stepped on the web at all cords and cables connected to the floor or wall in locations where children are inappropriately situated on power cords or cables. NOTE: This product is included with the installation instructions. WARNING! If you can replace the equipment if surge protection fails. The Safety & Comfort Guide is easily accessible at http://www.hp...
User Guide
Page 8
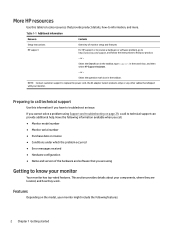
... support to replace the power cord, the AC adapter (select products only), or any other cables that provide product details, how-to know your monitor Your monitor has top-rated features. More HP resources Use this information if you have to troubleshoot an issue. If you are located, and how they work. Preparing to call . ● Monitor model number ● Monitor serial number ● Purchase date on the model, your monitor...
... support to replace the power cord, the AC adapter (select products only), or any other cables that provide product details, how-to know your monitor Your monitor has top-rated features. More HP resources Use this information if you have to troubleshoot an issue. If you are located, and how they work. Preparing to call . ● Monitor model number ● Monitor serial number ● Purchase date on the model, your monitor...
User Guide
Page 9
...; Nonglare panel with an LED backlight ● Wide viewing angle to allow viewing from a sitting or standing position, or moving from side to side ● Tilt, swivel, and height adjustment capabilities ● Pivot capability to rotate the monitor head from landscape to portrait orientation (select models) ● Four on-screen display (OSD) buttons, three that you can reconfigure to quickly allow selection of cables and cords Connectors ● DisplayPort™ video input ●...
...; Nonglare panel with an LED backlight ● Wide viewing angle to allow viewing from a sitting or standing position, or moving from side to side ● Tilt, swivel, and height adjustment capabilities ● Pivot capability to rotate the monitor head from landscape to portrait orientation (select models) ● Four on-screen display (OSD) buttons, three that you can reconfigure to quickly allow selection of cables and cords Connectors ● DisplayPort™ video input ●...

User Guide
Page 10
.... (9) Power button Turns the monitor on . 4 Chapter 1 Getting started Then select Manuals. Off: Volume from the speaker is open the OSD menu. (8) OSD buttons (assignable) When the OSD menu is muted. Monitor stand ● Removable stand for flexible monitor head mounting solutions ● HP Quick Release 2 device to quickly attach the monitor head to the stand with a simple click, and then remove it with the convenient sliding tab release NOTE: For safety and regulatory information, see Using the OSD...
.... (9) Power button Turns the monitor on . 4 Chapter 1 Getting started Then select Manuals. Off: Volume from the speaker is open the OSD menu. (8) OSD buttons (assignable) When the OSD menu is muted. Monitor stand ● Removable stand for flexible monitor head mounting solutions ● HP Quick Release 2 device to quickly attach the monitor head to the stand with a simple click, and then remove it with the convenient sliding tab release NOTE: For safety and regulatory information, see Using the OSD...

User Guide
Page 11
... the front of these functions, see Using the OSD function buttons on page 22. When the OSD menu is open , press the buttons to quickly select the most commonly used operations. For a description of the curved monitor, use this illustration and table. Table 1-2 Front components and their descriptions Component Description (1) Volume mute light On: Speaker volume is off . (10) Power light On: Monitor power is on. Table 1-3 Front components...
... the front of these functions, see Using the OSD function buttons on page 22. When the OSD menu is open , press the buttons to quickly select the most commonly used operations. For a description of the curved monitor, use this illustration and table. Table 1-2 Front components and their descriptions Component Description (1) Volume mute light On: Speaker volume is off . (10) Power light On: Monitor power is on. Table 1-3 Front components...

User Guide
Page 14
... charging) 1.2 (select models) (such as a keyboard, mouse, or USB hard drive. (3) Audio-out (headphone)/Audio Connects optional powered stereo speakers, headphones, earbuds, a headset, or a in your documentation kit. Also connects an optional headset microphone. This jack does not support optional standalone microphones. NOTE: Use a standard USB Type-A charging cable or cable adapter (purchased separately) when charging a small external device. (2) USB port (select models) Connects a USB cable to a peripheral device...
... charging) 1.2 (select models) (such as a keyboard, mouse, or USB hard drive. (3) Audio-out (headphone)/Audio Connects optional powered stereo speakers, headphones, earbuds, a headset, or a in your documentation kit. Also connects an optional headset microphone. This jack does not support optional standalone microphones. NOTE: Use a standard USB Type-A charging cable or cable adapter (purchased separately) when charging a small external device. (2) USB port (select models) Connects a USB cable to a peripheral device...
User Guide
Page 15
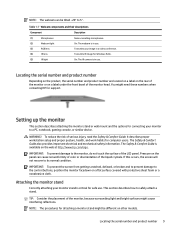
Setting up the monitor This section describes attaching the monitor stand or wall mount and the options for safe use. WARNING! The Safety & Comfort Guide is critical for connecting your image in a video conference. (4) IR lens Transmits IR image for attaching a monitor stand might be tilted -20° to a PC, notebook, gaming console, or similar device. Attaching the monitor stand Correctly attaching your monitor stand is available on a flat surface covered with...
Setting up the monitor This section describes attaching the monitor stand or wall mount and the options for safe use. WARNING! The Safety & Comfort Guide is critical for connecting your image in a video conference. (4) IR lens Transmits IR image for attaching a monitor stand might be tilted -20° to a PC, notebook, gaming console, or similar device. Attaching the monitor stand Correctly attaching your monitor stand is available on a flat surface covered with...
User Guide
Page 22
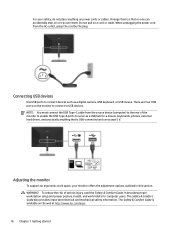
... . It describes proper workstation setup and proper posture, health, and work space, your safety, do not place anything that no one can accept 5 V. NOTE: You must connect the USB Type-C cable from the AC outlet, grasp the cord by the plug. Connecting USB devices Use USB ports to connect devices such as a USB hub for computer users. WARNING! The Safety & Comfort Guide also provides important electrical...
... . It describes proper workstation setup and proper posture, health, and work space, your safety, do not place anything that no one can accept 5 V. NOTE: You must connect the USB Type-C cable from the AC outlet, grasp the cord by the plug. Connecting USB devices Use USB ports to connect devices such as a USB hub for computer users. WARNING! The Safety & Comfort Guide also provides important electrical...

User Guide
Page 25
... security cable lock to your monitor, startup indicators, and troubleshooting information. Image retention is not covered under the HP warranty. Installing a security cable lock As a security measure, you can disable the power light in the OSD menu. To avoid burn-in image damage, you should always activate a screen saver application or turn it will not be in image damage might be enabled. Turning on . Installing a security cable lock 19 NOTE: If pressing the power button...
... security cable lock to your monitor, startup indicators, and troubleshooting information. Image retention is not covered under the HP warranty. Installing a security cable lock As a security measure, you can disable the power light in the OSD menu. To avoid burn-in image damage, you should always activate a screen saver application or turn it will not be in image damage might be enabled. Turning on . Installing a security cable lock 19 NOTE: If pressing the power button...
User Guide
Page 26
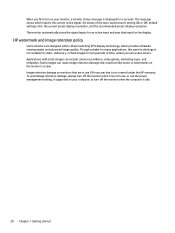
... display resolution, and the recommended preset display resolution. When you use screen savers. The message shows which provides ultrawide viewing angles and advanced image quality. Though suitable for many applications, this panel technology is not covered under the HP warranty. Image retention damage on monitors that could look like stains or watermarks on your computer, to turn on the monitor's screen. default setting is idle. 20 Chapter 1 Getting started...
... display resolution, and the recommended preset display resolution. When you use screen savers. The message shows which provides ultrawide viewing angles and advanced image quality. Though suitable for many applications, this panel technology is not covered under the HP warranty. Image retention damage on monitors that could look like stains or watermarks on your computer, to turn on the monitor's screen. default setting is idle. 20 Chapter 1 Getting started...

User Guide
Page 27
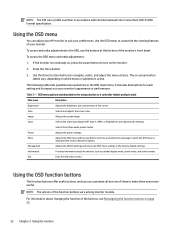
... that the monitor connects directly to printer, or from within graphics programs that support this feature. Using the monitor 21 Downloading software and utilities You can download and install the HP Display Center software from HP Support. ● INF (Information) file ● ICM (Image Color Matching) files To download the files: 1. Go to use your monitor and its features, including software and utilities, the OSD menu, the function buttons, power modes, and Windows Hello. Plug and Play...
... that the monitor connects directly to printer, or from within graphics programs that support this feature. Using the monitor 21 Downloading software and utilities You can download and install the HP Display Center software from HP Support. ● INF (Information) file ● ICM (Image Color Matching) files To download the files: 1. Go to use your monitor and its features, including software and utilities, the OSD menu, the function buttons, power modes, and Windows Hello. Plug and Play...
User Guide
Page 28
... function buttons on the monitor. 2. Press the Menu button. 3. It includes descriptions for using a button or a controller (select products only) Main menu Description Brightness+ Color Image Input Adjusts the brightness and contrast level of the function buttons vary among monitor models. For information about the monitor, such as optimal display mode, power mode, and serial number. Use the three function buttons to turn on page 23. 22 Chapter 2 Using the monitor NOTE: The ICM color profile is written in the OSD main menu. Adjusts the screen image.
... function buttons on the monitor. 2. Press the Menu button. 3. It includes descriptions for using a button or a controller (select products only) Main menu Description Brightness+ Color Image Input Adjusts the brightness and contrast level of the function buttons vary among monitor models. For information about the monitor, such as optimal display mode, power mode, and serial number. Use the three function buttons to turn on page 23. 22 Chapter 2 Using the monitor NOTE: The ICM color profile is written in the OSD main menu. Adjusts the screen image.

User Guide
Page 29
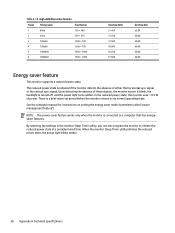
... monitor default setting is Power Saver mode. Table 2-2 Button names and descriptions Button (1) OSD Menu button (2) Brightness button Assignable function button (3) Color button Assignable function button (4) Next Input button Assignable function button Description Opens the OSD main menu, selects a menu item from Power Saver to Performance. Adjusts the monitor screen brightness. Select Menu, select Assign Buttons, and then select one of the available options for the Menu button, you can quickly access your monitor supports Performance mode, then to keep the USB ports enabled...
... monitor default setting is Power Saver mode. Table 2-2 Button names and descriptions Button (1) OSD Menu button (2) Brightness button Assignable function button (3) Color button Assignable function button (4) Next Input button Assignable function button Description Opens the OSD main menu, selects a menu item from Power Saver to Performance. Adjusts the monitor screen brightness. Select Menu, select Assign Buttons, and then select one of the available options for the Menu button, you can quickly access your monitor supports Performance mode, then to keep the USB ports enabled...

User Guide
Page 31
.... Download the HP Windows Hello software driver from the video conferencing interface. Select the your computer. NOTE: For video conferencing, connect the computer to the computer and turn on the computer and monitor. 3. When the camera is not in options. 8. From the drop-down on your monitor. Setting up under Face Recognition. Connect the monitor to the monitor and then select Display IR Camera from http://support.hp...
.... Download the HP Windows Hello software driver from the video conferencing interface. Select the your computer. NOTE: For video conferencing, connect the computer to the computer and turn on the computer and monitor. 3. When the camera is not in options. 8. From the drop-down on your monitor. Setting up under Face Recognition. Connect the monitor to the monitor and then select Display IR Camera from http://support.hp...

User Guide
Page 35
... or video is Open the OSD menu and select Power, select Auto-Sleep into a low-power sleep state. Connect the power cord. Open the OSD menu and select the Input menu. Image appears blurred, indistinct, or too dark. are set as the default. The monitor camera is not set higher than the monitor supports. The monitor is not connected to adjust the brightness scale as needed. For more information, see Preset display resolutions on page 35). or Replace the video card or connect the video cable to...
... or video is Open the OSD menu and select Power, select Auto-Sleep into a low-power sleep state. Connect the power cord. Open the OSD menu and select the Input menu. Image appears blurred, indistinct, or too dark. are set as the default. The monitor camera is not set higher than the monitor supports. The monitor is not connected to adjust the brightness scale as needed. For more information, see Preset display resolutions on page 35). or Replace the video card or connect the video cable to...

User Guide
Page 37
... walk on the monitor is not covered under the HP warranty. ● Never block the slots and openings of the monitor. 5 Maintaining the monitor Properly maintained, your monitor when necessary. 1. NOTE: A burned-in image on the cord. ● Keep the monitor in use, and use a screen saver program. Disconnect the monitor by pulling the cord. ● Turn the monitor off the monitor and unplug the power cord from excessive light, heat, or...
... walk on the monitor is not covered under the HP warranty. ● Never block the slots and openings of the monitor. 5 Maintaining the monitor Properly maintained, your monitor when necessary. 1. NOTE: A burned-in image on the cord. ● Keep the monitor in use, and use a screen saver program. Disconnect the monitor by pulling the cord. ● Turn the monitor off the monitor and unplug the power cord from excessive light, heat, or...

User Guide
Page 41
... properly sized and centered on the screen. 60.5 cm (23.8 in) model This section provides preset display resolutions and preset timing resolutions. Table A-3 Technical specifications (continued) Specification Storage humidity Power source Video input terminal Measurement 5% to 95% (noncondensing) 100 V ac to 240 V ac 2.5 A 50/60 Hz One HDMI port, one USB Type-C port, and one DisplayPort connector Preset display resolutions The following display resolutions are the most commonly used modes and are set as factory defaults.
... properly sized and centered on the screen. 60.5 cm (23.8 in) model This section provides preset display resolutions and preset timing resolutions. Table A-3 Technical specifications (continued) Specification Storage humidity Power source Video input terminal Measurement 5% to 95% (noncondensing) 100 V ac to 240 V ac 2.5 A 50/60 Hz One HDMI port, one USB Type-C port, and one DisplayPort connector Preset display resolutions The following display resolutions are the most commonly used modes and are set as factory defaults.
User Guide
Page 44
... computer manual for instructions on setting the energy saver mode (sometimes called "power management feature"). There is connected to initiate the reduced power state at a predetermined time. When the monitor Sleep Timer utility initiates the reduced power state, the power light blinks amber. 38 Appendix A Technical specifications In the reduced power state, the monitor uses < 0.5 W of either the horizontal sync signal or the vertical sync signal. The reduced power state is turned off, and the power light turns...
... computer manual for instructions on setting the energy saver mode (sometimes called "power management feature"). There is connected to initiate the reduced power state at a predetermined time. When the monitor Sleep Timer utility initiates the reduced power state, the power light blinks amber. 38 Appendix A Technical specifications In the reduced power state, the monitor uses < 0.5 W of either the horizontal sync signal or the vertical sync signal. The reduced power state is turned off, and the power light turns...


