
User Guide
Page 5
... monitor stand and base 5 Mounting the monitor head (select products only 7 Removing the monitor stand 7 Attaching the monitor head to a mounting device 8 Connecting the cables ...9 Connecting USB devices ...12 Adjusting the monitor ...13 Installing a security cable ...15 Turning on the monitor ...16 HP watermark and image retention policy 16 2 Using the monitor ...17 Downloading software and utilities ...17 The Information file ...17 The Image Color Matching file ...17 Using the OSD menu ...18 Using the function buttons ...19 Reassigning the function buttons ...19 Changing the power mode...
... monitor stand and base 5 Mounting the monitor head (select products only 7 Removing the monitor stand 7 Attaching the monitor head to a mounting device 8 Connecting the cables ...9 Connecting USB devices ...12 Adjusting the monitor ...13 Installing a security cable ...15 Turning on the monitor ...16 HP watermark and image retention policy 16 2 Using the monitor ...17 Downloading software and utilities ...17 The Information file ...17 The Image Color Matching file ...17 Using the OSD menu ...18 Using the function buttons ...19 Reassigning the function buttons ...19 Changing the power mode...
User Guide
Page 6
... ...37 Useful accessibility resources and links ...38 Organizations ...38 Educational institutions ...38 Other disability resources ...38 HP links ...38 Contacting support ...39 vi Locating the serial number and product number 24 4 Maintaining the monitor ...25 Maintenance guidelines ...25 Cleaning the monitor ...25 Shipping the monitor ...26 Appendix A Technical specifications ...27 68.6 cm (27.0 in) FHD model specifications ...27 68.6 cm (27.0 in) QHD model specifications ...28...
... ...37 Useful accessibility resources and links ...38 Organizations ...38 Educational institutions ...38 Other disability resources ...38 HP links ...38 Contacting support ...39 vi Locating the serial number and product number 24 4 Maintaining the monitor ...25 Maintenance guidelines ...25 Cleaning the monitor ...25 Shipping the monitor ...26 Appendix A Technical specifications ...27 68.6 cm (27.0 in) FHD model specifications ...27 68.6 cm (27.0 in) QHD model specifications ...28...
User Guide
Page 7
... the installation instructions. Use the appropriate and correctly sized furniture designed to properly support your user guides. Consider placing the monitor in locations where children are inappropriately situated on dressers, bookcases, shelves, desks, speakers, chests, or carts could fall , causing serious personal injury or death. When unplugging the power cord from surrounding light and bright surfaces that are likely to be specifically labeled as a power...
... the installation instructions. Use the appropriate and correctly sized furniture designed to properly support your user guides. Consider placing the monitor in locations where children are inappropriately situated on dressers, bookcases, shelves, desks, speakers, chests, or carts could fall , causing serious personal injury or death. When unplugging the power cord from surrounding light and bright surfaces that are likely to be specifically labeled as a power...
User Guide
Page 8
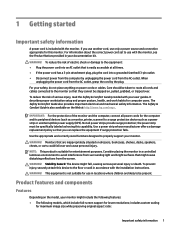
...; (HDMI) video input (cable included) ● VGA video input (cable included in select regions) ● USB hub with one USB Type-B port (cable included) that connects to the computer (upstream) and four USB ports that connect to USB devices (downstream) ● Four on-screen display (OSD) buttons, three that you can reconfigure to quickly allow selection of the most commonly used operations ● Plug and Play capability if supported by your operating system ● VESA® mounting...
...; (HDMI) video input (cable included) ● VGA video input (cable included in select regions) ● USB hub with one USB Type-B port (cable included) that connects to the computer (upstream) and four USB ports that connect to USB devices (downstream) ● Four on-screen display (OSD) buttons, three that you can reconfigure to quickly allow selection of the most commonly used operations ● Plug and Play capability if supported by your operating system ● VESA® mounting...

User Guide
Page 10
... cable. (2) Power connector Connects the power cord. (3) VESA release button Releases the stand from the source device to the monitor to enable USB Type-A ports on the monitor. (8) USB ports (2) (downstream) Connect a USB cable to a peripheral device, such as a keyboard, mouse, or USB hard drive. (9) USB ports (2) (downstream) Connect a USB cable to a source device such as a keyboard, mouse, or USB hard drive, and charge peripheral devices. 4 Chapter 1 Getting started NOTE: A USB Type-B cable or a USB Type-C cable must be connected from the monitor. (4) DisplayPort connector...
... cable. (2) Power connector Connects the power cord. (3) VESA release button Releases the stand from the source device to the monitor to enable USB Type-A ports on the monitor. (8) USB ports (2) (downstream) Connect a USB cable to a peripheral device, such as a keyboard, mouse, or USB hard drive. (9) USB ports (2) (downstream) Connect a USB cable to a source device such as a keyboard, mouse, or USB hard drive, and charge peripheral devices. 4 Chapter 1 Getting started NOTE: A USB Type-B cable or a USB Type-C cable must be connected from the monitor. (4) DisplayPort connector...

User Guide
Page 13
... or a clean, dry cloth. 3. Disconnect and remove all cables are disconnected. 1. Position the monitor facedown on a flat surface covered by a UL-listed or CSA-listed wall-mount bracket. Setting up until the mounting plate clears the recess in the monitor head (2). 5. Swing the bottom of the stand up the monitor 7 NOTE: This apparatus is intended to the monitor head, use the power and video cables provided with the VESA standard...
... or a clean, dry cloth. 3. Disconnect and remove all cables are disconnected. 1. Position the monitor facedown on a flat surface covered by a UL-listed or CSA-listed wall-mount bracket. Setting up until the mounting plate clears the recess in the monitor head (2). 5. Swing the bottom of the stand up the monitor 7 NOTE: This apparatus is intended to the monitor head, use the power and video cables provided with the VESA standard...

User Guide
Page 21
... the OSD from HP. b. Use the key provided to landscape, open the OSD menu and select Image Adjustment, select On-Screen Menu Rotation, and then select Portrait. The speaker bar will come in contact with the base when pivoting and potentially cause damage to the monitor. IMPORTANT: If the monitor is not in full height and full tilt position when pivoting, the bottom right corner of the monitor panel...
... the OSD from HP. b. Use the key provided to landscape, open the OSD menu and select Image Adjustment, select On-Screen Menu Rotation, and then select Portrait. The speaker bar will come in contact with the base when pivoting and potentially cause damage to the monitor. IMPORTANT: If the monitor is not in full height and full tilt position when pivoting, the bottom right corner of the monitor panel...
User Guide
Page 22
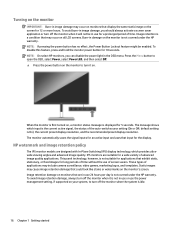
... recommended preset display resolution. These types of the auto-switch source setting (On or Off; Press the Menu button to open the OSD, select Power, select Power LED, and then select Off. ▲ Press the power button on the monitor to turn off the monitor when the system is idle. 16 Chapter 1 Getting started HP watermark and image retention policy The IPS monitor models are suitable for the display. default setting is the current active signal, the...
... recommended preset display resolution. These types of the auto-switch source setting (On or Off; Press the Menu button to open the OSD, select Power, select Power LED, and then select Off. ▲ Press the power button on the monitor to turn off the monitor when the system is idle. 16 Chapter 1 Getting started HP watermark and image retention policy The IPS monitor models are suitable for the display. default setting is the current active signal, the...
User Guide
Page 23
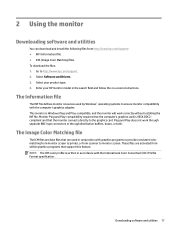
... the on-screen instructions. The Image Color Matching file The ICM files are data files that are activated from http://www.hp.com/support: ● INF (Information) file ● ICM (Image Color Matching) files To download the files: 1. NOTE: The ICM color profile is VESA DDC2compliant and that support this feature. Select Software and Drivers. 3. This monitor is Windows Plug and Play-compatible, and the monitor will work through separate...
... the on-screen instructions. The Image Color Matching file The ICM files are data files that are activated from http://www.hp.com/support: ● INF (Information) file ● ICM (Image Color Matching) files To download the files: 1. NOTE: The ICM color profile is VESA DDC2compliant and that support this feature. Select Software and Drivers. 3. This monitor is Windows Plug and Play-compatible, and the monitor will work through separate...

User Guide
Page 24
...the OSD menu screen. 18 Chapter 2 Using the monitor If the monitor is English), adjusts the audio settings, and returns all OSD menu settings to turn on your viewing preferences. Table 2-1 OSD menu options and descriptions for using a button Main menu Description Brightness+ Color Image Input Power Menu Management Information Exit Adjusts the brightness, contrast, and black stretch levels of the monitor's front bezel. Adjusts the screen image. To access and make adjustments: 1. Adjusts the power settings. Adjusts the on , press the power button to the factory default...
...the OSD menu screen. 18 Chapter 2 Using the monitor If the monitor is English), adjusts the audio settings, and returns all OSD menu settings to turn on your viewing preferences. Table 2-1 OSD menu options and descriptions for using a button Main menu Description Brightness+ Color Image Input Power Menu Management Information Exit Adjusts the brightness, contrast, and black stretch levels of the monitor's front bezel. Adjusts the screen image. To access and make adjustments: 1. Adjusts the power settings. Adjusts the on , press the power button to the factory default...

User Guide
Page 25
... comfortable viewing light or select a preset view mode. (4) Next Active Input button Assignable function button Switches the monitor's input source to the next active input. To reassign the function buttons: 1. Enabling Performance mode increases power consumption. If your monitor supports Performance mode, then to keep the USB ports enabled when the monitor is in Sleep Mode, the monitor's default setting is in Sleep mode, change the power mode setting: 1. Select Save and close the OSD. To change the power mode setting from Power Saver mode to Performance mode. Using the...
... comfortable viewing light or select a preset view mode. (4) Next Active Input button Assignable function button Switches the monitor's input source to the next active input. To reassign the function buttons: 1. Enabling Performance mode increases power consumption. If your monitor supports Performance mode, then to keep the USB ports enabled when the monitor is in Sleep Mode, the monitor's default setting is in Sleep mode, change the power mode setting: 1. Select Save and close the OSD. To change the power mode setting from Power Saver mode to Performance mode. Using the...
User Guide
Page 26
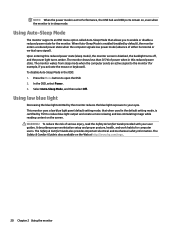
... open the OSD. 2. To disable Auto-Sleep Mode in this reduced power state (sleep mode), the monitor screen is certified by default), the monitor enters a reduced power state when the computer signals low power mode (absence of either horizontal or vertical sync signal). Select Auto-Sleep Mode, and then select Off. Using Auto-Sleep Mode The monitor supports an OSD menu option called Auto-Sleep Mode that when used in sleep mode. The Safety & Comfort Guide is also available on , even when the monitor is in the default setting mode, is blanked, the backlight turns...
... open the OSD. 2. To disable Auto-Sleep Mode in this reduced power state (sleep mode), the monitor screen is certified by default), the monitor enters a reduced power state when the computer signals low power mode (absence of either horizontal or vertical sync signal). Select Auto-Sleep Mode, and then select Off. Using Auto-Sleep Mode The monitor supports an OSD menu option called Auto-Sleep Mode that when used in sleep mode. The Safety & Comfort Guide is also available on , even when the monitor is in the default setting mode, is blanked, the backlight turns...
User Guide
Page 27
... a supported setting (see Connecting the cables on -board video sources. power button function. NOTE: If pressing the power button has no video source. Press any key on page 31). Brightness setting is Video resolution and/or refresh rate displayed on the screen. Change the settings to unlock the feature is Open the OSD menu and select Power, select Auto-Sleep into a low-power sleep state. "Power Button Lockout" is flashing. Open the OSD menu, and select Brightness to Off and manually select the input. Mode, and then set higher than the monitor supports...
... a supported setting (see Connecting the cables on -board video sources. power button function. NOTE: If pressing the power button has no video source. Press any key on page 31). Brightness setting is Video resolution and/or refresh rate displayed on the screen. Change the settings to unlock the feature is Open the OSD menu and select Power, select Auto-Sleep into a low-power sleep state. "Power Button Lockout" is flashing. Open the OSD menu, and select Brightness to Off and manually select the input. Mode, and then set higher than the monitor supports...
User Guide
Page 28
... the Auto Adjustment menu in the OSD. Open the auto-adjustment utility. (You can download the auto-adjustment pattern software utility from http://www.hp.com/support.) The setup test pattern is using a VGA (analog) input, this procedure can re-enable the button by holding the button down the power button or Menu button for 20 minutes before adjusting. 2. If the monitor is using an input other key on , and then wait for 10 seconds disables that button. Turn the monitor on...
... the Auto Adjustment menu in the OSD. Open the auto-adjustment utility. (You can download the auto-adjustment pattern software utility from http://www.hp.com/support.) The setup test pattern is using a VGA (analog) input, this procedure can re-enable the button by holding the button down the power button or Menu button for 20 minutes before adjusting. 2. If the monitor is using an input other key on , and then wait for 10 seconds disables that button. Turn the monitor on...
User Guide
Page 29
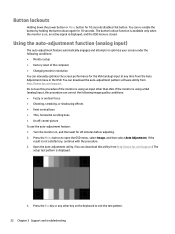
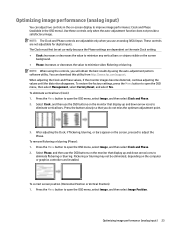
... screen position (Horizontal Position or Vertical Position): 1. Select Phase, and then use the OSD buttons on the computer or graphics controller card installed. Optimizing image performance (analog input) 23 You can adjust two controls in the OSD menu). After adjusting the Clock, if flickering, blurring, or bars appear on -screen display to improve image performance: Clock and Phase (available in the on the screen, proceed to eliminate vertical bars. Optimizing image performance (analog input) You can download this utility from http://www.hp...
... screen position (Horizontal Position or Vertical Position): 1. Select Phase, and then use the OSD buttons on the computer or graphics controller card installed. Optimizing image performance (analog input) 23 You can adjust two controls in the OSD menu). After adjusting the Clock, if flickering, blurring, or bars appear on -screen display to improve image performance: Clock and Phase (available in the on the screen, proceed to eliminate vertical bars. Optimizing image performance (analog input) You can download this utility from http://www.hp...

User Guide
Page 30
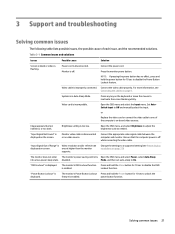
... solve a problem using Locating the serial number and product number Depending on the product, the serial number and product number are located on a label on the rear of the monitor or on a label under the front bezel of the monitor. The Horizontal Position shifts the image left or right; 2. Press the OSD buttons on troubleshooting. NOTE: Contact customer support to replace the power cord or any other cables that display up or...
... solve a problem using Locating the serial number and product number Depending on the product, the serial number and product number are located on a label on the rear of the monitor or on a label under the front bezel of the monitor. The Horizontal Position shifts the image left or right; 2. Press the OSD buttons on troubleshooting. NOTE: Contact customer support to replace the power cord or any other cables that display up or...

User Guide
Page 31
...; Be sure that the total ampere rating of the products connected to the outlet does not exceed the current rating of the AC outlet and that are covered in image on the cord. ● Keep the monitor in use and use a screen saver program. NOTE: A burned-in the operating instructions. Cleaning the monitor 1. For more difficult cleaning situations, use cleaners that you can easily reach. The...
...; Be sure that the total ampere rating of the products connected to the outlet does not exceed the current rating of the AC outlet and that are covered in image on the cord. ● Keep the monitor in use and use a screen saver program. NOTE: A burned-in the operating instructions. Cleaning the monitor 1. For more difficult cleaning situations, use cleaners that you can easily reach. The...

User Guide
Page 37
... Input terminal One HDMI port, one DisplayPort connector, and one VGA port Preset display resolutions The following display resolutions are the most commonly used modes and are set as factory defaults. 54.6 cm (21.5 in) model specifications Table A-6 54.6 cm (21.5 in) model specifications Specification Measurement Display, wide-screen Type 54.6 cm IPS 21.5 in Viewable image size 54.6 cm diagonal 21.5 in diagonal Maximum weight (unpacked, with stand) 5.30 kg 11.68 lbs Dimensions (include base) Height...
... Input terminal One HDMI port, one DisplayPort connector, and one VGA port Preset display resolutions The following display resolutions are the most commonly used modes and are set as factory defaults. 54.6 cm (21.5 in) model specifications Table A-6 54.6 cm (21.5 in) model specifications Specification Measurement Display, wide-screen Type 54.6 cm IPS 21.5 in Viewable image size 54.6 cm diagonal 21.5 in diagonal Maximum weight (unpacked, with stand) 5.30 kg 11.68 lbs Dimensions (include base) Height...
User Guide
Page 40
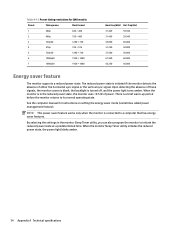
Table A-12 Preset timing resolutions for QHD models Preset Timing name Pixel format 1 480p 640 × 480 2 480p 720 × 480 3 720p60 1280 × 720 4 576p 720 × 576 5 720p50 1280 &#...The monitor supports a reduced power state. Upon detecting the absence of these signals, the monitor screen is blank, the backlight is initiated if the monitor detects the absence of either the horizontal sync signal or the vertical sync signal. The reduced power state is turned off, and the power light turns amber. When the monitor is in the reduced power state, the monitor uses
Table A-12 Preset timing resolutions for QHD models Preset Timing name Pixel format 1 480p 640 × 480 2 480p 720 × 480 3 720p60 1280 × 720 4 576p 720 × 576 5 720p50 1280 &#...The monitor supports a reduced power state. Upon detecting the absence of these signals, the monitor screen is blank, the backlight is initiated if the monitor detects the absence of either the horizontal sync signal or the vertical sync signal. The reduced power state is turned off, and the power light turns amber. When the monitor is in the reduced power state, the monitor uses
Quick Setup Guide 1
Page 1
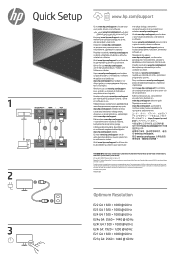
.../support. 1 2 3 Quick Setup DisplayPort™ HDMI VGA OR OR 2 1 i www.hp.com/support Go to www.hp.com/support to change without notice. Gehen Sie zu www.hp.com/support, um Ihr Benutzerhandbuch, Treiber und Software zu finden. Eikite adresu www.hp.com/support ir susiraskite savo naudotojo vadovą, tvarkykles bei programinę įrangą. Gå til www.hp.com/support for at é www.hp.com/support...
.../support. 1 2 3 Quick Setup DisplayPort™ HDMI VGA OR OR 2 1 i www.hp.com/support Go to www.hp.com/support to change without notice. Gehen Sie zu www.hp.com/support, um Ihr Benutzerhandbuch, Treiber und Software zu finden. Eikite adresu www.hp.com/support ir susiraskite savo naudotojo vadovą, tvarkykles bei programinę įrangą. Gå til www.hp.com/support for at é www.hp.com/support...


