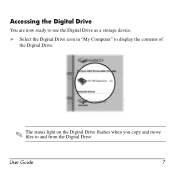
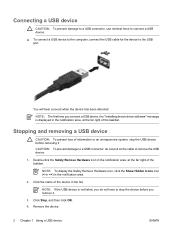
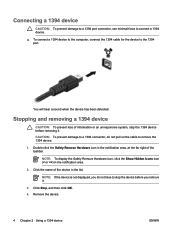
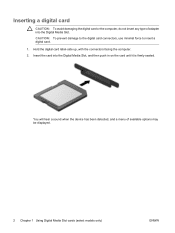
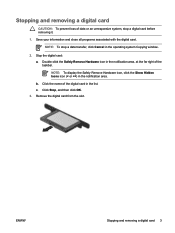
HP USB Digital Drive
Page 8
User Guide 7 Accessing the Digital Drive You are now ready to use the Digital Drive as a storage device. » Select the Digital Drive icon in "My Computer" to display the contents of the Digital Drive. ✎ The status light on the Digital Drive flashes when you copy and move files to and from the Digital Drive.
HP USB Digital Drive
Page 9
Disconnecting the Digital Drive ✎ Do not attempt to Remove Hardware" message appears on your taskbar. A dialog box displays a list of connected devices. 2. Gently unplug the Digital Drive from the USB port. ✎ If the USB connector cable is flashing. 1. Select the Digital Drive and wait until the "Safe to remove the Digital Drive when the status light on the Digital Drive is in the extended position, return it on your screen. 3. Select the "Safely Remove Hardware" icon on its track for safe storage. 8 User Guide
Bluetooth Wireless Technology Basics
Page 7
...documentation if you need help locating the wireless button and light. Enable BWT functionality If the wireless light (ICON) is displayed, select Next. 3. When you turn it by hp to enable the software for the first time, the Found New Hardware wizard opens. Table 1. Set up the BWT... Follow the instructions in the same box as the operating system CD. 7 When the Software Setup Welcome window is off, turn on HP notebook PCs; The Bluetooth icon provides easy access to restart the computer. Bluetooth status Disabled Enabled Connected Blue with red logo Blue with ...
Backup and Recovery - Windows Vista
Page 9
...; Save customized settings in a window, toolbar, or menu bar by taking a screen shot of your preferences. Open a word-processing document, and then select Edit > Paste. Display the screen. Copy the screen: To copy only the active window, press alt+fn+prt sc. c. Backup suggestions ● Create a set of recovery discs using...
Backup and Recovery - Windows Vista
Page 12
.... This restores the computer to recover using this procedure. Click System recovery, and then click Next. 4. Recovery discs have been included for recovery" message is displayed on the screen. Use these steps: 1. or - ● Restart the computer and press f11 while the "Press for computers that do not have a recovery partition...
Modem and Local Area Network - Windows Vista and Windows XP
Page 10
Select Start > Control Panel. 2. Click Regional and Language Options. 4. Your location is displayed under Location. 4 Chapter 1 Using the modem (select models only) Selecting a location setting Viewing the current location selection To view the current location setting for the modem, follow these steps: 1. Click Clock, Language, and Region. 3.
Modem and Local Area Network - Windows Vista and Windows XP
Page 11
...click OK. ● To select another location setting as the current location setting, select your new location setting. (The Phone and Modem Options window is displayed.) 9. CAUTION: To prevent losing your home country settings, do not delete your own country as well as "home" or "work") for USA or UK... is displayed by default.) 6. Enter the area code, a carrier code (if necessary), and the number to access an outside line. Adding new locations when traveling ...
Modem and Local Area Network - Windows Vista and Windows XP
Page 12
...; Check for the modem. 4. Click Modem. 6. To determine the dialing mode supported by the telephone line in which you purchased it does not dial and displays a "No Dial Tone" error message. Select Start > Control Panel > Hardware and Sound > Phone and Modem Options. 2. Click Properties. 5. The dialing mode option selected must match...
Backup and Recovery - Windows Vista
Page 9
...; Before you add or extensively modify software or hardware ● Periodically, whenever the system is repaired or restored ● Before you can reverse the restoration. Display the screen. Copy the screen: To copy only the active window, press alt+fn+prt sc. Open a word-processing document, and then select Edit > Paste...
Backup and Recovery - Windows Vista
Page 11
... discs To restore the system from the partition, follow these features, try them before using Recovery Manager. Recovery Manager opens. 2. Follow the on -screen instructions. HP recommends that you have not already tried these steps: 1. Back up . Insert the first recovery disc into the optical drive and restart the computer. 3. Follow... ways: ● Select Start > All Programs > Recovery Manager > Recovery Manager. -or- ● Restart the computer and press f11 while the "Press for recovery" message is displayed on the screen.
Drives - Windows Vista
Page 10
... is initiated during playback of a disc, you want to a CD or DVD. To prevent loss of the supported optical drives. If Sleep or Hibernation is displayed, click No. ● You may see a warning message asking if you may experience the following behaviors: ● Your playback may be supported by your computer...
Drives - Windows Vista
Page 15
... on by pressing the power button. Then shut down the computer through the operating system. 3. Turn the computer upside down the computer and close the display. If you are not sure whether the computer is off or in Hibernation, turn the computer on by pressing the power button. 5 Replacing the hard...
External Devices - Windows Vista
Page 8
You will hear a sound when the device has been detected. NOTE: The first time you connect a USB device, the "Installing device driver software" message is displayed in the notification area, at the far right of information or an unresponsive system, stop the USB device before removing it. Double-click the Safely ... connector, do not pull on the cable to the USB port. Stopping and removing a USB device CAUTION: To prevent loss of the taskbar. NOTE: To display the Safely Remove Hardware icon, click the Show Hidden Icons icon (< or
External Devices - Windows Vista
Page 10
CAUTION: To prevent damage to a 1394 connector, do not pull on the cable to the 1394 port. NOTE: To display the Safely Remove Hardware icon, click the Show Hidden Icons icon (< or Double-click the Safely Remove Hardware icon in the notification area, at the ...
External Media Cards - Windows Vista
Page 8
... a digital card. 1. Inserting a digital card CAUTION: To avoid damaging the digital card or the computer, do not insert any type of available options may be displayed. 2 Chapter 1 Using Digital Media Slot cards (select models only) ENWW You will hear a sound when the device has been detected, and a menu of adapter into...
External Media Cards - Windows Vista
Page 9
Double-click the Safely Remove Hardware icon in the notification area, at the far right of data or an unresponsive system, stop a data transfer, click Cancel in the operating system Copying window. 2. NOTE: To display the Safely Remove Hardware icon, click the Show Hidden Icons icon (< or Stop the digital card: a. Stopping and removing a digital card CAUTION: To prevent loss of the taskbar. Save your information and close all programs associated with the digital card. NOTE: To stop a digital card before removing it. 1.
External Media Cards - Windows Vista
Page 11
NOTE: An inserted ExpressCard uses power even when idle. Do not move or transport the computer when an ExpressCard is displayed in use . The ExpressCard slot may be displayed. To insert an ExpressCard: 1. NOTE: The first time you insert an ExpressCard, the "Installing device driver software" message is in the notification area, at...
External Media Cards - Windows Vista
Page 12
Stop the ExpressCard: a. NOTE: To display the Safely Remove Hardware icon, click the Show Hidden Icons icon (< or Stopping and removing an ExpressCard CAUTION: To prevent loss of the taskbar. NOTE: To stop a data transfer, click Cancel in the notification area, at the far right of data or an unresponsive system, stop an ExpressCard before removing it. 1. Double-click the Safely Remove Hardware icon in the operating system Copying window. 2. Save your information and close all programs associated with the ExpressCard.
Memory Modules - Windows Vista
Page 7
... of static electricity by upgrading the existing memory module in Hibernation, turn the computer on a flat surface. 7. To add or replace a memory module: 1. Close the display. 4. Remove the battery from the AC outlet. 6.
Security - Windows Vista
Page 8
... want to control access to your information. The following tips for a Windows security feature. For additional information about Windows passwords, such as they are not displayed as screen-saver passwords, select Start > Help and Support. 2 Chapter 2 Using passwords You can be set in the non-Windows Setup Utility preinstalled on the...