Backup and Recovery - Windows Vista
Page 5
... restore points allow you to reverse undesirable changes to your computer by the operating system and HP Recovery Manager software are used to recover your system on the hard drive or from recovery discs you experience system failure or instability. If the partition is present, ...an HP Recovery drive is as complete as your information and restoring it in case of a system failure: ● Creating a set...
... restore points allow you to reverse undesirable changes to your computer by the operating system and HP Recovery Manager software are used to recover your system on the hard drive or from recovery discs you experience system failure or instability. If the partition is present, ...an HP Recovery drive is as complete as your information and restoring it in case of a system failure: ● Creating a set...
Backup and Recovery - Windows Vista
Page 10
... date and time To revert to provide increased protection for which you want to reverse subsequent changes made to a restore point and then change your hard drive at a previous date and time), when the computer was functioning optimally, follow these steps: 1. Create a system restore point 1. In the left pane, click System protection...
... date and time To revert to provide increased protection for which you want to reverse subsequent changes made to a restore point and then change your hard drive at a previous date and time), when the computer was functioning optimally, follow these steps: 1. Create a system restore point 1. In the left pane, click System protection...
Backup and Recovery - Windows Vista
Page 11
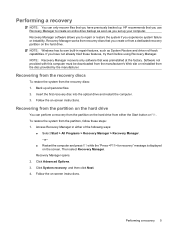
...you have a recovery partition. NOTE: Recovery Manager recovers only software that was preinstalled at the factory. HP recommends that you use HP Recovery Manager to create an entire drive backup as soon as System Restore and driver roll-back capabilities. If that is the case, recovery discs... discs: 1. However, if your operating system and software. Use these features, try them before using Recovery Manager. Follow the on the hard drive. 4 Performing a recovery NOTE: You can recover only files that you have been included with this computer must be downloaded from the manufacturer...
...you have a recovery partition. NOTE: Recovery Manager recovers only software that was preinstalled at the factory. HP recommends that you use HP Recovery Manager to create an entire drive backup as soon as System Restore and driver roll-back capabilities. If that is the case, recovery discs... discs: 1. However, if your operating system and software. Use these features, try them before using Recovery Manager. Follow the on the hard drive. 4 Performing a recovery NOTE: You can recover only files that you have been included with this computer must be downloaded from the manufacturer...
Backup and Recovery - Windows Vista
Page 12
... computers that do not have a recovery partition. Click Advanced Options. 3. Recovery Manager opens. 2. Recovery discs have been included for recovery" message is displayed on the hard drive from the partition, follow these discs to recover your computer includes an SSD, you can perform a recovery from the partition on the screen. You will...
... computers that do not have a recovery partition. Click Advanced Options. 3. Recovery Manager opens. 2. Recovery discs have been included for recovery" message is displayed on the hard drive from the partition, follow these discs to recover your computer includes an SSD, you can perform a recovery from the partition on the screen. You will...
Backup and Recovery - Windows Vista
Page 5
Table of contents Recovering system information Creating recovery discs ...2 Backing up your information ...3 When to back up ...3 Backup suggestions ...3 Using system restore points 3 When to create restore points 3 Create a system restore point 4 Restore to a previous date and time 4 Performing a recovery ...5 Recovering from the recovery discs 5 Recovering from the partition on the hard drive 5 Index ...6 v
Table of contents Recovering system information Creating recovery discs ...2 Backing up your information ...3 When to back up ...3 Backup suggestions ...3 Using system restore points 3 When to create restore points 3 Create a system restore point 4 Restore to a previous date and time 4 Performing a recovery ...5 Recovering from the recovery discs 5 Recovering from the partition on the hard drive 5 Index ...6 v
Backup and Recovery - Windows Vista
Page 7
... restoring the computer to an earlier state. ● Recovering a program or driver (Recovery Manager software feature). Recovery Manager works from a dedicated recovery partition on the hard drive or from recovery discs you reinstall a program or driver without performing a full system recovery. ● Performing a full system recovery (Recovery Manager software feature). With Recovery...
... restoring the computer to an earlier state. ● Recovering a program or driver (Recovery Manager software feature). Recovery Manager works from a dedicated recovery partition on the hard drive or from recovery discs you reinstall a program or driver without performing a full system recovery. ● Performing a full system recovery (Recovery Manager software feature). With Recovery...
Backup and Recovery - Windows Vista
Page 9
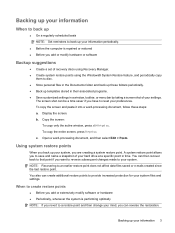
... you to save and name a snapshot of your system files and settings. You also can create additional restore points to provide increased protection for your hard drive at a specific point in time. Open a word-processing document, and then select Edit > Paste. Using system restore points When you back up your system, you...
... you to save and name a snapshot of your system files and settings. You also can create additional restore points to provide increased protection for your hard drive at a specific point in time. Open a word-processing document, and then select Edit > Paste. Using system restore points When you back up your system, you...
Backup and Recovery - Windows Vista
Page 11
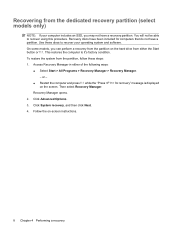
... 1. Follow the on the screen. Access Recovery Manager in repair features, such as you create or from a dedicated recovery partition on the hard drive from either of the following ways: ● Select Start > All Programs > Recovery Manager > Recovery Manager. -or- ● Restart ...previously backed up all personal files. 2. Insert the first recovery disc into the optical drive and restart the computer. 3. Then select Recovery Manager. Follow the on-screen instructions. HP recommends that was preinstalled at the factory. If you experience system failure or instability....
... 1. Follow the on the screen. Access Recovery Manager in repair features, such as you create or from a dedicated recovery partition on the hard drive from either of the following ways: ● Select Start > All Programs > Recovery Manager > Recovery Manager. -or- ● Restart ...previously backed up all personal files. 2. Insert the first recovery disc into the optical drive and restart the computer. 3. Then select Recovery Manager. Follow the on-screen instructions. HP recommends that was preinstalled at the factory. If you experience system failure or instability....
Drives - Windows Vista
Page 5
Table of contents 1 Identifying installed drives 2 Handling drives 3 Using an optical drive Inserting an optical disc ...5 Removing an optical disc when running on battery or external power 6 Removing an optical disc when no computer power is available 7 4 Improving hard drive performance Using Disk Defragmenter ...8 Using Disk Cleanup ...8 5 Replacing the hard drive Index ...12 v
Table of contents 1 Identifying installed drives 2 Handling drives 3 Using an optical drive Inserting an optical disc ...5 Removing an optical disc when running on battery or external power 6 Removing an optical disc when no computer power is available 7 4 Improving hard drive performance Using Disk Defragmenter ...8 Using Disk Cleanup ...8 5 Replacing the hard drive Index ...12 v
Drives - Windows Vista
Page 7
You may be assigned the next available drive letter. Refer to the system, such as installing applications, running utilities, or changing Windows settings. The next drive added to Windows online Help for your computer. NOTE: Windows® includes the User... to improve the security of your permission or password for tasks such as a new USB drive, will be prompted for more information. 1 On models with a secondary hard drive (drive D), the optical drive becomes drive E. 1 Identifying installed drives To view the drives installed on the computer, select Start > Computer.
You may be assigned the next available drive letter. Refer to the system, such as installing applications, running utilities, or changing Windows settings. The next drive added to Windows online Help for your computer. NOTE: Windows® includes the User... to improve the security of your permission or password for tasks such as a new USB drive, will be prompted for more information. 1 On models with a secondary hard drive (drive D), the optical drive becomes drive E. 1 Identifying installed drives To view the drives installed on the computer, select Start > Computer.
Drives - Windows Vista
Page 8
... with the procedures to magnetic fields. Avoid exposing a drive to which they apply. If a drive must be sure that check carry-on the keyboard or move a computer or external hard drive from a drive before handling drives. 2 Handling drives Drives are fragile computer components that must be mailed, place the drive in Hibernation, turn the computer on the computer. CAUTION...
... with the procedures to magnetic fields. Avoid exposing a drive to which they apply. If a drive must be sure that check carry-on the keyboard or move a computer or external hard drive from a drive before handling drives. 2 Handling drives Drives are fragile computer components that must be mailed, place the drive in Hibernation, turn the computer on the computer. CAUTION...
Drives - Windows Vista
Page 14
...Accessories > System Tools > Disk Defragmenter. 2. Click Defragment now. To run Disk Defragmenter: 1. Using Disk Cleanup Disk Cleanup searches the hard drive for more efficiently. Select Start > All Programs > Accessories > System Tools > Disk Cleanup. 2. Refer to Windows online Help for... for your computer. Disk Defragmenter consolidates the fragmented files and folders on the hard drive so that you use the computer, files on -screen instructions. 8 Chapter 4 Improving hard drive performance You may be prompted for tasks such as installing applications, running utilities...
...Accessories > System Tools > Disk Defragmenter. 2. Click Defragment now. To run Disk Defragmenter: 1. Using Disk Cleanup Disk Cleanup searches the hard drive for more efficiently. Select Start > All Programs > Accessories > System Tools > Disk Cleanup. 2. Refer to Windows online Help for... for your computer. Disk Defragmenter consolidates the fragmented files and folders on the hard drive so that you use the computer, files on -screen instructions. 8 Chapter 4 Improving hard drive performance You may be prompted for tasks such as installing applications, running utilities...
Drives - Windows Vista
Page 15
... the power button. Shut down the computer through the operating system. Unplug the power cord from the hard drive bay. Do not remove the hard drive while the computer is off or in Hibernation. If you are not sure whether the computer is marked...9 Turn the computer upside down on the inside of the hard drive compartment. Then shut down the computer before removing the hard drive from the AC outlet. 5. The following illustration identifies the primary hard drive bay (1) and the secondary hard drive bay (2) (select models only). CAUTION: To prevent information ...
... the power button. Shut down the computer through the operating system. Unplug the power cord from the hard drive bay. Do not remove the hard drive while the computer is off or in Hibernation. If you are not sure whether the computer is marked...9 Turn the computer upside down on the inside of the hard drive compartment. Then shut down the computer before removing the hard drive from the AC outlet. 5. The following illustration identifies the primary hard drive bay (1) and the secondary hard drive bay (2) (select models only). CAUTION: To prevent information ...
Drives - Windows Vista
Page 16
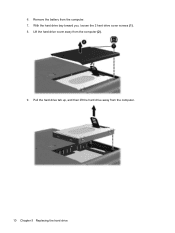
Pull the hard drive tab up, and then lift the hard drive away from the computer (2). 9. 6. Lift the hard drive cover away from the computer. 10 Chapter 5 Replacing the hard drive Remove the battery from the computer. 7. With the hard drive bay toward you, loosen the 2 hard drive cover screws (1). 8.
Pull the hard drive tab up, and then lift the hard drive away from the computer (2). 9. 6. Lift the hard drive cover away from the computer. 10 Chapter 5 Replacing the hard drive Remove the battery from the computer. 7. With the hard drive bay toward you, loosen the 2 hard drive cover screws (1). 8.
Drives - Windows Vista
Page 17
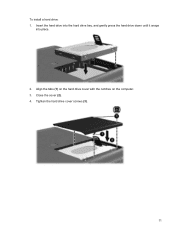
Close the cover (2). 4. Tighten the hard drive cover screws (3). 11 Align the tabs (1) on the hard drive cover with the notches on the computer. 3. To install a hard drive: 1. Insert the hard drive into the hard drive bay, and gently press the hard drive down until it snaps into place. 2.
Close the cover (2). 4. Tighten the hard drive cover screws (3). 11 Align the tabs (1) on the hard drive cover with the notches on the computer. 3. To install a hard drive: 1. Insert the hard drive into the hard drive bay, and gently press the hard drive down until it snaps into place. 2.
Drives - Windows Vista
Page 18
... Cleanup software 8 Disk Defragmenter software 8 disk performance 8 drives caring for 2 hard drive 9, 11 optical drive 3 See also hard drive; optical drive DVD inserting 5 removing, with power 6 removing, without power 7 DVD drive 3 O optical disc inserting 5 removing, with power 6 removing, without power 7 optical drive 3 S software Disk Cleanup 8 Disk Defragmenter 8 H hard disk drive installing 11 removing 9 replacing 9 hard drive installing 11 removing 9 replacing 9 M maintenance Disk Cleanup...
... Cleanup software 8 Disk Defragmenter software 8 disk performance 8 drives caring for 2 hard drive 9, 11 optical drive 3 See also hard drive; optical drive DVD inserting 5 removing, with power 6 removing, without power 7 DVD drive 3 O optical disc inserting 5 removing, with power 6 removing, without power 7 optical drive 3 S software Disk Cleanup 8 Disk Defragmenter 8 H hard disk drive installing 11 removing 9 replacing 9 hard drive installing 11 removing 9 replacing 9 M maintenance Disk Cleanup...
Notebook Tour - Windows Vista
Page 9
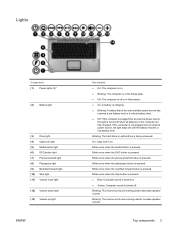
Blinks once when the next/fast forward button is on. Lights Component (1) Power lights (2)* (2) Battery light (3) Drive light (4) Caps lock light (5) Media button light (6) DVD button light (7) Previous/rewind light (8) Play/pause light (9) Next/fast forward light (10) ...available power source has reached a low battery level or a critical battery level. ● Off: If the computer is being accessed. Blinking: The hard drive or optical drive is turned off until the battery reaches a low battery level. Top components 3 Blinks once when the stop button is pressed. ● Blue:...
Blinks once when the next/fast forward button is on. Lights Component (1) Power lights (2)* (2) Battery light (3) Drive light (4) Caps lock light (5) Media button light (6) DVD button light (7) Previous/rewind light (8) Play/pause light (9) Next/fast forward light (10) ...available power source has reached a low battery level or a critical battery level. ● Off: If the computer is being accessed. Blinking: The hard drive or optical drive is turned off until the battery reaches a low battery level. Top components 3 Blinks once when the stop button is pressed. ● Blue:...
Notebook Tour - Windows Vista
Page 20
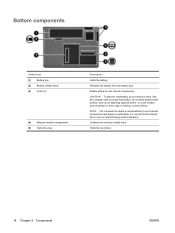
...bay (2) Battery release latch (3) Vents (5) (4) Memory module compartment (5) Hard drive bay Description Holds the battery. Releases the battery from the battery bay. Enable airflow to cycle on a hard, flat surface. Holds the hard drive. 14 Chapter 2 Components ENWW NOTE: The computer fan starts up ...automatically to block airflow. Do not allow another hard surface, such as an adjoining optional printer, or a...
...bay (2) Battery release latch (3) Vents (5) (4) Memory module compartment (5) Hard drive bay Description Holds the battery. Releases the battery from the battery bay. Enable airflow to cycle on a hard, flat surface. Holds the hard drive. 14 Chapter 2 Components ENWW NOTE: The computer fan starts up ...automatically to block airflow. Do not allow another hard surface, such as an adjoining optional printer, or a...
Notebook Tour - Windows Vista
Page 25
... power 17 D Digital Media Slot light, identifying 12 Digital Media Slot, identifying 12 display switch, identifying 15 drive light, identifying 3 drives hard drive 14 optical drive 11 DVD button light, identifying 3 DVD button, identifying 5 E esc key, identifying 7 expansion port, identifying ...identifying 11 external monitor port, identifying 12, 13 F fingerprint reader, identifying 5 fn key, identifying 7 function keys, identifying 7 H hard drive bay, identifying 14 HDMI port, identifying 12 I IEEE 1394 port, identifying 12 infrared lens, identifying 8, 9 integrated camera light, identifying...
... power 17 D Digital Media Slot light, identifying 12 Digital Media Slot, identifying 12 display switch, identifying 15 drive light, identifying 3 drives hard drive 14 optical drive 11 DVD button light, identifying 3 DVD button, identifying 5 E esc key, identifying 7 expansion port, identifying ...identifying 11 external monitor port, identifying 12, 13 F fingerprint reader, identifying 5 fn key, identifying 7 function keys, identifying 7 H hard drive bay, identifying 14 HDMI port, identifying 12 I IEEE 1394 port, identifying 12 infrared lens, identifying 8, 9 integrated camera light, identifying...
Setup Utility - Windows Vista
Page 8
... in Windows. 4 Chapter 2 Using the Setup Utility Then use the arrow keys to the menu display. The Setup Utility features available for advanced users include a hard drive self-test, a Network Service Boot, and settings for a Network Service Boot. The " to boot from the current session, use the f10 procedure, you press enter...
... in Windows. 4 Chapter 2 Using the Setup Utility Then use the arrow keys to the menu display. The Setup Utility features available for advanced users include a hard drive self-test, a Network Service Boot, and settings for a Network Service Boot. The " to boot from the current session, use the f10 procedure, you press enter...

