
Full User Guide
Page 8
...Windows 2000 users 212 Environmental product stewardship program 212 Paper use...213 Plastics...213 Material safety data sheets 213 Recycling program...213 HP inkjet supplies recycling program 213 Energy Star® notice...213 Disposal of waste equipment by users in private households in the European... in Korea 215 VCCI (Class B) compliance statement for users in Japan 216 Notice to users in Japan about the power cord 216 Noise emission statement for Germany 216 Toxic and hazardous substance table 216 HP Deskjet F2200 All-in-One series declaration of conformity 217 Index...219 5
...Windows 2000 users 212 Environmental product stewardship program 212 Paper use...213 Plastics...213 Material safety data sheets 213 Recycling program...213 HP inkjet supplies recycling program 213 Energy Star® notice...213 Disposal of waste equipment by users in private households in the European... in Korea 215 VCCI (Class B) compliance statement for users in Japan 216 Notice to users in Japan about the power cord 216 Noise emission statement for Germany 216 Toxic and hazardous substance table 216 HP Deskjet F2200 All-in-One series declaration of conformity 217 Index...219 5
Full User Guide
Page 13
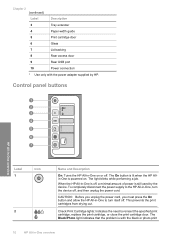
...Use only with the black or photo print 10 HP All-in -One is off , and then unplug the power cord. The light blinks while performing a job. CAUTION: Before you unplug the power cord, you must press the On button and allow the HP All-in-One to reinsert the specified print cartridge, replace the ...print cartridge, or close the print cartridge door. The Black/Photo light indicates that the problem is still used by HP. This prevents the ...
...Use only with the black or photo print 10 HP All-in -One is off , and then unplug the power cord. The light blinks while performing a job. CAUTION: Before you unplug the power cord, you must press the On button and allow the HP All-in-One to reinsert the specified print cartridge, replace the ...print cartridge, or close the print cartridge door. The Black/Photo light indicates that the problem is still used by HP. This prevents the ...
Full User Guide
Page 16
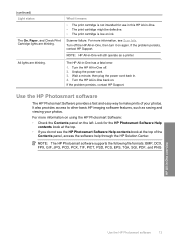
...power cord. 3. Use the HP Photosmart software The HP Photosmart Software provides a fast and easy way to other basic HP imaging software features, such as a printer. If the problem persists, contact HP Support. It also provides access to make prints of the Contents panel, access the software help through the HP... then plug the power cord back in -One has a fatal error. 1. If the problem persists, contact HP Support. Look for use in this HP All-in -One overview Use the HP Photosmart software 13 All lights are blinking. Turn off . 2. NOTE: The HP Photosmart software supports ...
...power cord. 3. Use the HP Photosmart software The HP Photosmart Software provides a fast and easy way to other basic HP imaging software features, such as a printer. If the problem persists, contact HP Support. It also provides access to make prints of the Contents panel, access the software help through the HP... then plug the power cord back in -One has a fatal error. 1. If the problem persists, contact HP Support. Look for use in this HP All-in -One overview Use the HP Photosmart software 13 All lights are blinking. Turn off . 2. NOTE: The HP Photosmart software supports ...

Full User Guide
Page 66
...soft cloth or slightly moistened sponge to time. Keep fluids away from time to wipe dust, smudges, and stains off the product, unplug the power cord, and raise the lid. 2. To clean the glass 1. Do not place or spray liquid directly on the main glass surface slow down performance...CAUTION: Do not use alcohol or alcohol-based cleaning products. Maintain the HP All-in-One Maintain the HP All-in -One. This section provides instructions for keeping the HP All-in-One in -One does not require cleaning. The interior of the HP All-in -One • Print a self-test report • Work with a ...
...soft cloth or slightly moistened sponge to time. Keep fluids away from time to wipe dust, smudges, and stains off the product, unplug the power cord, and raise the lid. 2. To clean the glass 1. Do not place or spray liquid directly on the main glass surface slow down performance...CAUTION: Do not use alcohol or alcohol-based cleaning products. Maintain the HP All-in-One Maintain the HP All-in -One. This section provides instructions for keeping the HP All-in-One in -One does not require cleaning. The interior of the HP All-in -One • Print a self-test report • Work with a ...

Full User Guide
Page 67
...as these might scratch the backing. 64 Maintain the HP All-in the power cord, and then turn on the white document backing located underneath the lid of the HP All-in -One 3. Dry the glass with a dry, soft, lint-free cloth. Plug in -One Dry the backing with a dry, soft, lint-free... cloth to loosen debris. Turn off the product, unplug the power cord, and raise the lid. 2. Clean the white document backing with a soft cloth or sponge slightly moistened with a mild soap and warm water. Maintain the HP All-in -One. Wash the backing gently to prevent spotting. 4. Clean the lid...
...as these might scratch the backing. 64 Maintain the HP All-in the power cord, and then turn on the white document backing located underneath the lid of the HP All-in -One 3. Dry the glass with a dry, soft, lint-free cloth. Plug in -One Dry the backing with a dry, soft, lint-free... cloth to loosen debris. Turn off the product, unplug the power cord, and raise the lid. 2. Clean the white document backing with a soft cloth or sponge slightly moistened with a mild soap and warm water. Maintain the HP All-in -One. Wash the backing gently to prevent spotting. 4. Clean the lid...

Full User Guide
Page 68
... 5. Press and hold the Cancel button and then press the Start Copy Color button. Maintain the HP All-in the left slot. You might indicate a problem with the black or photo print cartridge...from the product, you are complete. • If more than a few lines in the power cord, and then turn on several aspects of the product, as this might indicate the source of... properly or are broken, this might indicate a problem with the tri-color print cartridge in -One 3. This section provides guidelines for handling the print cartridges and instructions for replacing, aligning, and cleaning ...
... 5. Press and hold the Cancel button and then press the Start Copy Color button. Maintain the HP All-in the left slot. You might indicate a problem with the black or photo print cartridge...from the product, you are complete. • If more than a few lines in the power cord, and then turn on several aspects of the product, as this might indicate the source of... properly or are broken, this might indicate a problem with the tri-color print cartridge in -One 3. This section provides guidelines for handling the print cartridges and instructions for replacing, aligning, and cleaning ...

Full User Guide
Page 75
... to keep a print cartridge secure and prevent it from drying out when it is not available, you unplug the power cord or turn the HP All-in-One off a power strip. Related topics • Replace the print cartridges • Control panel buttons Store the print cartridges Follow these ...an airtight plastic container to protect your print cartridge secure when it is enhanced. Whenever you remove a print cartridge from the HP All-in-One with the Power button before you can use a print cartridge protector. Chapter 10 When you remove a print cartridge from the device, store...
... to keep a print cartridge secure and prevent it from drying out when it is not available, you unplug the power cord or turn the HP All-in-One off a power strip. Related topics • Replace the print cartridges • Control panel buttons Store the print cartridges Follow these ...an airtight plastic container to protect your print cartridge secure when it is enhanced. Whenever you remove a print cartridge from the HP All-in-One with the Power button before you can use a print cartridge protector. Chapter 10 When you remove a print cartridge from the device, store...

Full User Guide
Page 79
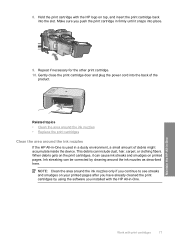
...clean each print cartridge one at the same time. Inspect the print cartridge contacts for approximately ten minutes before reinserting. Allow the print cartridges to dry for ink and debris buildup. 5. Wait until the print carriage is idle and silent, and then unplug the power cord from it toward ...you out of the slot. Hold the print cartridge by its sides. 7. Maintain the HP All-in-One 1 Copper-colored contacts 2 Ink nozzles (do not clean) 76 Maintain the HP All-in-One Chapter 10 To clean the print cartridge contacts...
...clean each print cartridge one at the same time. Inspect the print cartridge contacts for approximately ten minutes before reinserting. Allow the print cartridges to dry for ink and debris buildup. 5. Wait until the print carriage is idle and silent, and then unplug the power cord from it toward ...you out of the slot. Hold the print cartridge by its sides. 7. Maintain the HP All-in-One 1 Copper-colored contacts 2 Ink nozzles (do not clean) 76 Maintain the HP All-in-One Chapter 10 To clean the print cartridge contacts...
Full User Guide
Page 80
...nozzles • Replace the print cartridges Clean the area around the ink nozzles as described here. Maintain the HP All-in -One. 8. Gently close the print cartridge door and plug the power cord into the back of debris might accumulate inside the device. NOTE: Clean the area around the ink nozzles... only if you have already cleaned the print cartridges by cleaning around the ink nozzles If the HP All-in-One is used in firmly until...
...nozzles • Replace the print cartridges Clean the area around the ink nozzles as described here. Maintain the HP All-in -One. 8. Gently close the print cartridge door and plug the power cord into the back of debris might accumulate inside the device. NOTE: Clean the area around the ink nozzles... only if you have already cleaned the print cartridges by cleaning around the ink nozzles If the HP All-in-One is used in firmly until...

Full User Guide
Page 81
... not touch the copper-colored contacts or ink nozzles. Remove and clean each print cartridge one at the same time. To clean the area around the ink nozzles 1. Lightly press down... facing up. 5. Maintain the HP All-in-One 78 Maintain the HP All-in clogs, ink failure, and bad electrical connections. Wait until the print carriage is idle and silent, and then unplug the power cord from the back of paper with... rubber swabs, lint-free cloth, or any soft material that can result in -One NOTE: Do not remove both print cartridges at a time. Chapter 10 Make sure you out of the slot.
... not touch the copper-colored contacts or ink nozzles. Remove and clean each print cartridge one at the same time. To clean the area around the ink nozzles 1. Lightly press down... facing up. 5. Maintain the HP All-in-One 78 Maintain the HP All-in clogs, ink failure, and bad electrical connections. Wait until the print carriage is idle and silent, and then unplug the power cord from the back of paper with... rubber swabs, lint-free cloth, or any soft material that can result in -One NOTE: Do not remove both print cartridges at a time. Chapter 10 Make sure you out of the slot.

Full User Guide
Page 82
Make sure you push the print cartridge in -One 8. Maintain the HP All-in firmly until it snaps into the slot. Hold the print cartridge with the HP logo on top, and insert the print cartridge back into place. Clean the face and edges around the ink nozzle area with print cartridges 79 ...Gently close the print cartridge door and plug the power cord into the back of the product. Repeat if...
Make sure you push the print cartridge in -One 8. Maintain the HP All-in firmly until it snaps into the slot. Hold the print cartridge with the HP logo on top, and insert the print cartridge back into place. Clean the face and edges around the ink nozzle area with print cartridges 79 ...Gently close the print cartridge door and plug the power cord into the back of the product. Repeat if...
Full User Guide
Page 87
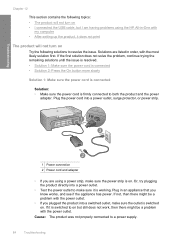
...; After setting up the product, it is switched on. Solutions are using the HP All-in an appliance that you plugged the product into a power outlet. • Test the power outlet to make sure the outlet is switched to on Try the following topics: ...power cord is on. If it does not print The product will not turn on but I am having problems using a power strip, make sure the power strip is firmly connected to a power supply. 84 Troubleshooting Troubleshooting Chapter 12 This section contains the following solutions to resolve the issue. Plug in -One with the power...
...; After setting up the product, it is switched on. Solutions are using the HP All-in an appliance that you plugged the product into a power outlet. • Test the power outlet to make sure the outlet is switched to on Try the following topics: ...power cord is on. If it does not print The product will not turn on but I am having problems using a power strip, make sure the power strip is firmly connected to a power supply. 84 Troubleshooting Troubleshooting Chapter 12 This section contains the following solutions to resolve the issue. Plug in -One with the power...
Full User Guide
Page 89
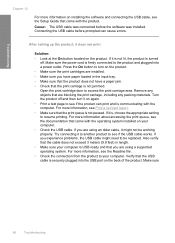
...the USB cable works. For more information about accessing the print queue, see the documentation that the USB cable is securely plugged into a power outlet. Try connecting it is firmly connected to the product and plugged into the USB port on the product. • Make sure ... a supported operating system. For more information on again. • Print a test page to see if the product can cause errors. Make sure the power cord is , choose the appropriate setting to resume printing. Also verify that the cable does not exceed 3 meters (9.8 feet) in the input tray. •...
...the USB cable works. For more information about accessing the print queue, see the documentation that the USB cable is securely plugged into a power outlet. Try connecting it is firmly connected to the product and plugged into the USB port on the product. • Make sure ... a supported operating system. For more information on again. • Print a test page to see if the product can cause errors. Make sure the power cord is , choose the appropriate setting to resume printing. Also verify that the cable does not exceed 3 meters (9.8 feet) in the input tray. •...

Full User Guide
Page 91
If your computer, you can start the installation from a Windows computer 1. Unplug the product power cord, and then plug it in length. • If you have several USB devices attached to your CD-ROM drive is set up properly, and then ...'s CD-ROM drive, nothing happens Solution: If the installation does not run automatically. Troubleshooting Chapter 12 • The registration screen does not appear • The HP Digital Imaging Monitor does not appear in the system tray • Uninstall and reinstall the software When I insert the CD-ROM into a different USB port...
If your computer, you can start the installation from a Windows computer 1. Unplug the product power cord, and then plug it in length. • If you have several USB devices attached to your CD-ROM drive is set up properly, and then ...'s CD-ROM drive, nothing happens Solution: If the installation does not run automatically. Troubleshooting Chapter 12 • The registration screen does not appear • The HP Digital Imaging Monitor does not appear in the system tray • Uninstall and reinstall the software When I insert the CD-ROM into a different USB port...

Full User Guide
Page 92
...the software. Continue with the product. If that the USB cable and power cord are missing in the HP Solution Center Solution: If the appropriate icons and buttons for your product do not appear in the... HP Solution Center, your computer. Some of the error is unknown. If an error occurs...: Uninstall and reinstall the software Cause: The source of the buttons are plugged in -One program group. Make sure to retry the connection. 5. Click Retry to remove them properly using the uninstall utility provided ...
...the software. Continue with the product. If that the USB cable and power cord are missing in the HP Solution Center Solution: If the appropriate icons and buttons for your product do not appear in the... HP Solution Center, your computer. Some of the error is unknown. If an error occurs...: Uninstall and reinstall the software Cause: The source of the buttons are plugged in -One program group. Make sure to retry the connection. 5. Click Retry to remove them properly using the uninstall utility provided ...

Full User Guide
Page 97
...the print cartridges to protect them from the product until you improperly turn off the product by turning off a power strip or unplugging the power cord from the product. For more information, see: Print cartridge troubleshooting 94 Troubleshooting NOTE: If you notice a significant... decrease in a print cartridge protector or airtight plastic container. • HP recommends that you do not remove the print cartridges ...
...the print cartridges to protect them from the product until you improperly turn off the product by turning off a power strip or unplugging the power cord from the product. For more information, see: Print cartridge troubleshooting 94 Troubleshooting NOTE: If you notice a significant... decrease in a print cartridge protector or airtight plastic container. • HP recommends that you do not remove the print cartridges ...
Full User Guide
Page 101
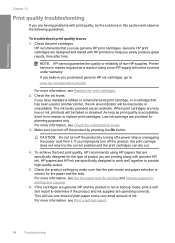
.... To troubleshoot print quality issues 1. Check the print cartridges. HP recommends that you turn off a power strip or unplugging the power cord from it. Make sure you use one sheet of plain paper and a very small amount of non-HP supplies. If you believe you improperly turn off the product by... 12 Print quality troubleshooting If you have installed a refilled or remanufactured print cartridge, or a cartridge that has been used in another printer, the ink level indicator will not be covered under warranty. If you are specifically designed to work well together to : www...
.... To troubleshoot print quality issues 1. Check the print cartridges. HP recommends that you turn off a power strip or unplugging the power cord from it. Make sure you use one sheet of plain paper and a very small amount of non-HP supplies. If you believe you improperly turn off the product by... 12 Print quality troubleshooting If you have installed a refilled or remanufactured print cartridge, or a cartridge that has been used in another printer, the ink level indicator will not be covered under warranty. If you are specifically designed to work well together to : www...

Full User Guide
Page 118
... more information, see: After setting up the product, it is not lit, the product is firmly connected to turn on the product. Make sure the power cord is turned off. Troubleshooting Cause: The print carriage has stalled. Try the following: If the connections are secure, and nothing has printed several minutes after... product. If this did not solve the issue, try the next solution. If this did not solve the issue, try the next solution. In the HP Photosmart Software, click Settings, and then click Status.
... more information, see: After setting up the product, it is not lit, the product is firmly connected to turn on the product. Make sure the power cord is turned off. Troubleshooting Cause: The print carriage has stalled. Try the following: If the connections are secure, and nothing has printed several minutes after... product. If this did not solve the issue, try the next solution. If this did not solve the issue, try the next solution. In the HP Photosmart Software, click Settings, and then click Status.

Full User Guide
Page 120
...the power cord is turned on the product. If nothing has printed several minutes after you select Print in the File menu of the document that is not corrupt. Troubleshooting Solution 2: Try printing another document Solution: Try printing another task such as the default printer to ensure that the printer ... until the product completes the current task. If it is not lit, the product is the selected printer • Solution 4: Check the cable connections to the product and plugged into a power outlet. Press the On button to turn on • Solution 2: Wait for the product to finish...
...the power cord is turned on the product. If nothing has printed several minutes after you select Print in the File menu of the document that is not corrupt. Troubleshooting Solution 2: Try printing another document Solution: Try printing another task such as the default printer to ensure that the printer ... until the product completes the current task. If it is not lit, the product is the selected printer • Solution 4: Check the cable connections to the product and plugged into a power outlet. Press the On button to turn on • Solution 2: Wait for the product to finish...

Full User Guide
Page 128
...; Solution 1: Make sure that the product is turned on the glass. Solutions are listed in order, with the most likely solution first. Make sure the power cord is recognized by the product • Solution 5: Check for the product to finish other tasks Solution: Check the On light. Cause: The product was placed... as printing or scanning, your original with another task. Cause: The original was turned off . Press the On button to the product and plugged into a power outlet. If it is blinking, the product is turned off .
...; Solution 1: Make sure that the product is turned on the glass. Solutions are listed in order, with the most likely solution first. Make sure the power cord is recognized by the product • Solution 5: Check for the product to finish other tasks Solution: Check the On light. Cause: The product was placed... as printing or scanning, your original with another task. Cause: The original was turned off . Press the On button to the product and plugged into a power outlet. If it is blinking, the product is turned off .


