HP Designjet 4500 Printhead Cleaner
Related Manual Pages


Similar Questions

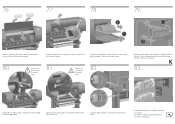
Replacing Hp Fb550 Printheads
how to replace hp fb550 printheads pkease
how to replace hp fb550 printheads pkease
(Posted by bunnysandhu 2 years ago)
Does The Hp Designjet 5500 Printhead Cleaner Run Automatically?
(Posted by ocdani 9 years ago)
