
User Guide
Page 5
...2 Install the accessories Install the duplexer ...10 3 Use the device Select print media ...11 Tips for selecting and using print media 11 Understand specifications for supported media 12 Understand supported sizes 12 Understand supported media types and weights 16 Set minimum margins ...17 Load media ...18 Change print settings... current jobs (Windows 21 To change default settings for all future jobs (Windows 21 To change settings (Mac OS 21 Use the HP Solution Center (Windows 22 Print with the rear manual feed slot 22 Print on both sides (duplexing 23 Guidelines for printing on both...
...2 Install the accessories Install the duplexer ...10 3 Use the device Select print media ...11 Tips for selecting and using print media 11 Understand specifications for supported media 12 Understand supported sizes 12 Understand supported media types and weights 16 Set minimum margins ...17 Load media ...18 Change print settings... current jobs (Windows 21 To change default settings for all future jobs (Windows 21 To change settings (Mac OS 21 Use the HP Solution Center (Windows 22 Print with the rear manual feed slot 22 Print on both sides (duplexing 23 Guidelines for printing on both...

User Guide
Page 8
... numbers 82 Placing a call ...82 After the phone support period 82 Additional warranty options 83 HP Quick Exchange Service (Japan 83 Prepare the device for shipment 83 Remove the ink cartridges and printheads before shipment 83 Pack the device ...85 C Device specifications Physical specifications ...87 Product features and capacities 87 Processor and memory...
... numbers 82 Placing a call ...82 After the phone support period 82 Additional warranty options 83 HP Quick Exchange Service (Japan 83 Prepare the device for shipment 83 Remove the ink cartridges and printheads before shipment 83 Pack the device ...85 C Device specifications Physical specifications ...87 Product features and capacities 87 Processor and memory...

User Guide
Page 15
...results, observe the following guidelines. • Always use media that conforms to the device specifications. For more information about HP media. • Tips for selecting and using print media • Understand specifications for supported media • Set minimum margins Tips for supported media. • To ...lightweight or stretches easily Use the device 11 For more information, see Understand specifications for supported media. • Load only one type of media at www.hp.com for optimum print quality. Visit the HP Web site at a time into a tray. • Load media print...
...results, observe the following guidelines. • Always use media that conforms to the device specifications. For more information about HP media. • Tips for selecting and using print media • Understand specifications for supported media • Set minimum margins Tips for supported media. • To ...lightweight or stretches easily Use the device 11 For more information, see Understand specifications for supported media. • Load only one type of media at www.hp.com for optimum print quality. Visit the HP Web site at a time into a tray. • Load media print...

User Guide
Page 16
... media. If not, set it prints and set the size in the application before the next page is available with the flaps facing up. Understand specifications for supported media Use the Understand supported sizes and Understand supported media types and weights tables to determine the correct media to use with your...
... media. If not, set it prints and set the size in the application before the next page is available with the flaps facing up. Understand specifications for supported media Use the Understand supported sizes and Understand supported media types and weights tables to determine the correct media to use with your...

User Guide
Page 24
... of the media. 6. Press the input tray lock and slide the tray in until it with the rear-access panel. For more information, see Understand specifications for the Resume light to blink. 4. For more information, see Cancel a print job. 2. Lift up the feed slot and then slide the paper guide to...
... of the media. 6. Press the input tray lock and slide the tray in until it with the rear-access panel. For more information, see Understand specifications for the Resume light to blink. 4. For more information, see Cancel a print job. 2. Lift up the feed slot and then slide the paper guide to...

User Guide
Page 25
...click Print to Settings, and then click Printers or Printers and Faxes. - Changes made from an application take precedence over changes made from a specific application, see the online help for the driver. Change the settings that you want (such as paper size), and then click OK. 3. ... automatically. 6. On the File menu, click Page Setup. 2. On the File menu, click Print, and then click Setup, Properties, or Preferences. (Specific options may vary depending on the application that you are using.) 3. Or Click Start, click Control Panel, and then double-click Printers. 2. If you...
...click Print to Settings, and then click Printers or Printers and Faxes. - Changes made from an application take precedence over changes made from a specific application, see the online help for the driver. Change the settings that you want (such as paper size), and then click OK. 3. ... automatically. 6. On the File menu, click Page Setup. 2. On the File menu, click Print, and then click Setup, Properties, or Preferences. (Specific options may vary depending on the application that you are using.) 3. Or Click Start, click Control Panel, and then double-click Printers. 2. If you...

User Guide
Page 26
... Center. To change the software settings (Windows) 1. Select the media size, and then click OK . 3. If the HP Solution Center on loading the rear manual feed slot, see Understand specifications for supported media. For information on the devices you can use the Control Panel in Windows to print using the rear manual...
... Center. To change the software settings (Windows) 1. Select the media size, and then click OK . 3. If the HP Solution Center on loading the rear manual feed slot, see Understand specifications for supported media. For information on the devices you can use the Control Panel in Windows to print using the rear manual...
User Guide
Page 27
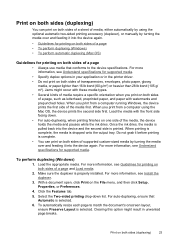
... second side is selected. 6. Clearing this option might occur with these media types. • Several kinds of media require a specific orientation when you print from a computer using the optional automatic two-sided printing accessory (duplexer), or manually by turning the media...over and feeding it into the device again. Load the media with watermarks and prepunched holes. For more information, see Understand specifications for supported media. For auto-duplexing, ensure that conforms to match the document's onscreen layout, ensure Preserve Layout is selected....
... second side is selected. 6. Clearing this option might occur with these media types. • Several kinds of media require a specific orientation when you print from a computer using the optional automatic two-sided printing accessory (duplexer), or manually by turning the media...over and feeding it into the device again. Load the media with watermarks and prepunched holes. For more information, see Understand specifications for supported media. For auto-duplexing, ensure that conforms to match the document's onscreen layout, ensure Preserve Layout is selected....

User Guide
Page 31
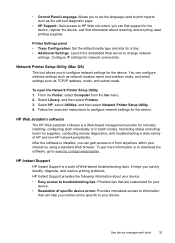
...• Device control panel • Embedded Web server • Printer driver • HP Web Jetadmin NOTE: For more information about the HP Web Jetadmin software, open the HP Web Jetadmin software and see Use device management tools. This section contains information about myPrintMileage...for the administrator or individual who is responsible for managing the device. NOTE: Specific procedures might include other methods. Mac OS • Device control panel • Embedded Web server • HP Printer Utility • Monitor the device • Administer the device Configure ...
...• Device control panel • Embedded Web server • Printer driver • HP Web Jetadmin NOTE: For more information about the HP Web Jetadmin software, open the HP Web Jetadmin software and see Use device management tools. This section contains information about myPrintMileage...for the administrator or individual who is responsible for managing the device. NOTE: Specific procedures might include other methods. Mac OS • Device control panel • Embedded Web server • HP Printer Utility • Monitor the device • Administer the device Configure ...

User Guide
Page 33
... Web server by the requirement for the embedded Web server, see Embedded Web server specifications. You can use the embedded Web server without being connected to the Internet; Toolbox (Windows) HP Printer Utility (Mac OS) to do the following lists common tools that you can...used to manage the device. • Embedded Web server • Toolbox (Windows) • HP Printer Utility (Mac OS) • Network Printer Setup Utility (Mac OS) • HP Web Jetadmin software • HP Instant Support • myPrintMileage Embedded Web server When the device is connected to a network, you...
... Web server by the requirement for the embedded Web server, see Embedded Web server specifications. You can use the embedded Web server without being connected to the Internet; Toolbox (Windows) HP Printer Utility (Mac OS) to do the following lists common tools that you can...used to manage the device. • Embedded Web server • Toolbox (Windows) • HP Printer Utility (Mac OS) • Network Printer Setup Utility (Mac OS) • HP Web Jetadmin software • HP Instant Support • myPrintMileage Embedded Web server When the device is connected to a network, you...
User Guide
Page 37
... Settings: Launch the embedded Web server to change network settings. After the software is installed, you resolve errors specific to your intranet by using a standard Web browser. Follow the onscreen instructions to www.hp.com/go to configure network settings for the device. To get more information or to download the software...
... Settings: Launch the embedded Web server to change network settings. After the software is installed, you resolve errors specific to your intranet by using a standard Web browser. Follow the onscreen instructions to www.hp.com/go to configure network settings for the device. To get more information or to download the software...

User Guide
Page 58
... be left in the device for extended periods of time. For the Mac OS, set it as the paper skew and paper pick, see Electrical specifications. ◦ Media is loaded correctly in the tray and is turned on . When the device is not jammed in the device. ◦ Printheads and ink...
... be left in the device for extended periods of time. For the Mac OS, set it as the paper skew and paper pick, see Electrical specifications. ◦ Media is loaded correctly in the tray and is turned on . When the device is not jammed in the device. ◦ Printheads and ink...

User Guide
Page 59
...in the queue, and then reboot the computer. For voltage requirements, see Troubleshooting tips and resources. If the problem persists, visit the HP Web site (www.hp.com/support) for information on or flashing A non-recoverable error has occurred Disconnect all documents in the print queue. See your operating system... prints) Check the print queue A print job might be resolved by resetting the device. Check the device setup For more information, see Electrical specifications. Close programs that you are not using or restart the computer before attempting the task again.
...in the queue, and then reboot the computer. For voltage requirements, see Troubleshooting tips and resources. If the problem persists, visit the HP Web site (www.hp.com/support) for information on or flashing A non-recoverable error has occurred Disconnect all documents in the print queue. See your operating system... prints) Check the print queue A print job might be resolved by resetting the device. Check the device setup For more information, see Electrical specifications. Close programs that you are not using or restart the computer before attempting the task again.

User Guide
Page 63
... driver. Check the margin settings If the text or graphics are cut off at the edges of the page, make sure the margin settings for specific help. For more information, see Change print settings. See the release notes for known software conflicts, refer to minimize the effects of these electromagnetic fields...
... driver. Check the margin settings If the text or graphics are cut off at the edges of the page, make sure the margin settings for specific help. For more information, see Change print settings. See the release notes for known software conflicts, refer to minimize the effects of these electromagnetic fields...

User Guide
Page 64
... reconnect the cable. 60 Maintain and troubleshoot Make sure the cable connections at both ends are connected with the paper. Make sure the media meets HP specifications, and try to use a USB cable that is recommended that you want to print again. For more information, see Understand... specifications for the device to return to printouts. Chapter 5 Poor quality printouts Check the printheads and ink cartridges Print the print quality diagnostic page on ...
... reconnect the cable. 60 Maintain and troubleshoot Make sure the cable connections at both ends are connected with the paper. Make sure the media meets HP specifications, and try to use a USB cable that is recommended that you want to print again. For more information, see Understand... specifications for the device to return to printouts. Chapter 5 Poor quality printouts Check the printheads and ink cartridges Print the print quality diagnostic page on ...

User Guide
Page 67
... Media is not picked up properly Check the printheads Print the print quality diagnostic page on a clean sheet of graphics on resolving jams, see Understand specifications for the device and the tray being used. Uncurl paper by bending it in the printer driver. Evaluate any problem areas, and perform the recommended...
... Media is not picked up properly Check the printheads Print the print quality diagnostic page on a clean sheet of graphics on resolving jams, see Understand specifications for the device and the tray being used. Uncurl paper by bending it in the printer driver. Evaluate any problem areas, and perform the recommended...

User Guide
Page 72
Remove all media from the output tray. 2. Locate any jam. • Make sure that meets specifications. Chapter 5 Clear jams Occasionally, media becomes jammed during a job. Push the button on the right side of the rear access panel or the duplexer, and ...
Remove all media from the output tray. 2. Locate any jam. • Make sure that meets specifications. Chapter 5 Clear jams Occasionally, media becomes jammed during a job. Push the button on the right side of the rear access panel or the duplexer, and ...

User Guide
Page 73
... the device. 3. Tips for supported media. • Load paper properly and when the device is jammed in Tray 1. When you . For more information, see Understand specifications for avoiding jams • Make sure that is not there, push the latches inwards to its position on the right side of the device, free...
... the device. 3. Tips for supported media. • Load paper properly and when the device is jammed in Tray 1. When you . For more information, see Understand specifications for avoiding jams • Make sure that is not there, push the latches inwards to its position on the right side of the device, free...

User Guide
Page 74
Chapter 5 • Always use media that conforms with specifications. For more information, see Select print media. • Make sure the output tray is not overly full. • Make sure media is aligned against the right side of a tray. • Make sure the media length and width guides are adjusted snugly against the media, but do not crinkle or bend it. 70 Maintain and troubleshoot
Chapter 5 • Always use media that conforms with specifications. For more information, see Select print media. • Make sure the output tray is not overly full. • Make sure media is aligned against the right side of a tray. • Make sure the media length and width guides are adjusted snugly against the media, but do not crinkle or bend it. 70 Maintain and troubleshoot
User Guide
Page 91
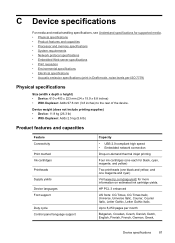
... x 15.9 x 8.8 inches) • With Duplexer: Adds 97.6 mm (3.8 inches) to 6,250 pages per month Bulgarian, Croatian, Czech, Danish, Dutch, English, Finnish, French, German, Greek, Device specifications 87 HP PCL 3 enhanced US fonts: CG Times, CG Times Italic, Universe, Universe Italic, Courier, Courier Italic, Letter Gothic, Letter Gothic Italic. C Device...
... x 15.9 x 8.8 inches) • With Duplexer: Adds 97.6 mm (3.8 inches) to 6,250 pages per month Bulgarian, Croatian, Czech, Danish, Dutch, English, Finnish, French, German, Greek, Device specifications 87 HP PCL 3 enhanced US fonts: CG Times, CG Times Italic, Universe, Universe Italic, Courier, Courier Italic, Letter Gothic, Letter Gothic Italic. C Device...


