
Limited Warranty and Support Guide - Refurbished
Page 9
... the Certificate of any Microsoft operating system software contained in any other form, may use with all of the Software Product for your upgrade eligibility. 3. RIGHTS IN THE SOFTWARE PRODUCT ARE OFFERED ONLY ON THE CONDITION THAT YOU AGREE TO ALL TERMS AND CONDITIONS OF THIS ... software and may not be governed entirely by you subject to distribute the Software Product. HP grants you the following rights provided you may copy the Software Product into Your Computer's temporary memory (RAM) for use the Software Product only on a single computer ("Your Computer"). You do not...
... the Certificate of any Microsoft operating system software contained in any other form, may use with all of the Software Product for your upgrade eligibility. 3. RIGHTS IN THE SOFTWARE PRODUCT ARE OFFERED ONLY ON THE CONDITION THAT YOU AGREE TO ALL TERMS AND CONDITIONS OF THIS ... software and may not be governed entirely by you subject to distribute the Software Product. HP grants you the following rights provided you may copy the Software Product into Your Computer's temporary memory (RAM) for use the Software Product only on a single computer ("Your Computer"). You do not...
64 bit PC Flyer
Page 1
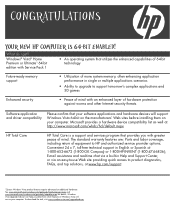
... do I get? E-mail assistance and real-time chat via a built-in single or multiple applications scenarios • Ability to upgrade to support tomorrow's complex applications and 3D games Enhanced security • Peace of equipment to product diagnostics, FAQs, and top solutions, at ... of more system memory, often enhancing application performance in Help and Support Center, or via an easy-to-use Web site providing quick access to HP and authorized service provider options; To download the tool, visit www.windowsvista.com/upgradeadvisor CONGRATULATIONS YOUR NEW HP COMPUTER IS 64-BIT...
... do I get? E-mail assistance and real-time chat via a built-in single or multiple applications scenarios • Ability to upgrade to support tomorrow's complex applications and 3D games Enhanced security • Peace of equipment to product diagnostics, FAQs, and top solutions, at ... of more system memory, often enhancing application performance in Help and Support Center, or via an easy-to-use Web site providing quick access to HP and authorized service provider options; To download the tool, visit www.windowsvista.com/upgradeadvisor CONGRATULATIONS YOUR NEW HP COMPUTER IS 64-BIT...
Limited Warranty and Support Guide
Page 7
... by HP as other terms will also terminate upon conditions set forth elsewhere in this limitation or it is automatically terminated. UPGRADES. To use of any term or condition of a hard disk drive-based solution, an external media-based recovery solution (e.g. You may copy the Software Product into Your Computer's temporary memory (RAM) for...
... by HP as other terms will also terminate upon conditions set forth elsewhere in this limitation or it is automatically terminated. UPGRADES. To use of any term or condition of a hard disk drive-based solution, an external media-based recovery solution (e.g. You may copy the Software Product into Your Computer's temporary memory (RAM) for...
Limited Warranty and Support Guide
Page 8
... that formed the basis for purposes of using the Software Product. b. d. Freeware. Recovery Solution. UPGRADES. After upgrading, you may load the Software Product into the local memory or storage device of Rights. The transfer may use the Software Product on a single computer ("Your...license agreement accompanying such Freeware whether in any other form, may copy the Software Product into Your Computer's temporary memory (RAM) for your HP product ("HP Product"), that is not otherwise subject to a separate license agreement between you subject to you shall be governed...
... that formed the basis for purposes of using the Software Product. b. d. Freeware. Recovery Solution. UPGRADES. After upgrading, you may load the Software Product into the local memory or storage device of Rights. The transfer may use the Software Product on a single computer ("Your...license agreement accompanying such Freeware whether in any other form, may copy the Software Product into Your Computer's temporary memory (RAM) for your HP product ("HP Product"), that is not otherwise subject to a separate license agreement between you subject to you shall be governed...

Getting Started
Page 219
...feature 126 disconnecting the drive 130 inserting a drive 127 location and drive letter 129 HP Photosmart Essential 103 HP Pocket Media Drive 125 HP Total Care Advisor 41 I IBM Microdrive 122 Internet security 52, 100 K keyboard connector...card types 119 in-use light 123 troubleshooting 124 using 119 memory card, formatting 123 Memory Stick (MS) 121 Memory Stick (MS-Duo) 121 Memory Stick (MS-Pro Duo) 121 Memory Stick (MS-Pro) 121 Microdrive disk drive 121 microphone connector... 198 selecting style 199 setting the duration of video 200 upgrading 206 using the magicMoments feature 197 Index 209
...feature 126 disconnecting the drive 130 inserting a drive 127 location and drive letter 129 HP Photosmart Essential 103 HP Pocket Media Drive 125 HP Total Care Advisor 41 I IBM Microdrive 122 Internet security 52, 100 K keyboard connector...card types 119 in-use light 123 troubleshooting 124 using 119 memory card, formatting 123 Memory Stick (MS) 121 Memory Stick (MS-Duo) 121 Memory Stick (MS-Pro Duo) 121 Memory Stick (MS-Pro) 121 Microdrive disk drive 121 microphone connector... 198 selecting style 199 setting the duration of video 200 upgrading 206 using the magicMoments feature 197 Index 209

Getting Started Guide
Page 219
...feature 126 disconnecting the drive 130 inserting a drive 127 location and drive letter 129 HP Photosmart Essential 103 HP Pocket Media Drive 125 HP Total Care Advisor 41 I IBM Microdrive 122 Internet security 52, 100 K keyboard connector...card types 119 in-use light 123 troubleshooting 124 using 119 memory card, formatting 123 Memory Stick (MS) 121 Memory Stick (MS-Duo) 121 Memory Stick (MS-Pro Duo) 121 Memory Stick (MS-Pro) 121 Microdrive disk drive 121 microphone connector... 198 selecting style 199 setting the duration of video 200 upgrading 206 using the magicMoments feature 197 Index 209
...feature 126 disconnecting the drive 130 inserting a drive 127 location and drive letter 129 HP Photosmart Essential 103 HP Pocket Media Drive 125 HP Total Care Advisor 41 I IBM Microdrive 122 Internet security 52, 100 K keyboard connector...card types 119 in-use light 123 troubleshooting 124 using 119 memory card, formatting 123 Memory Stick (MS) 121 Memory Stick (MS-Duo) 121 Memory Stick (MS-Pro Duo) 121 Memory Stick (MS-Pro) 121 Microdrive disk drive 121 microphone connector... 198 selecting style 199 setting the duration of video 200 upgrading 206 using the magicMoments feature 197 Index 209

Upgrading and Servicing Guide
Page 9
Removing the Front Panel This procedure is necessary only when removing or replacing an optical drive, memory card reader, an HP Pocket Media Drive, diskette drive, or the hard disk drive. 1 Pull the three tabs (B) away from the chassis toward the left to remove it. Upgrading and Servicing Guide 5 B 2 Swing the front panel away from the outside edge of the chassis.
Removing the Front Panel This procedure is necessary only when removing or replacing an optical drive, memory card reader, an HP Pocket Media Drive, diskette drive, or the hard disk drive. 1 Pull the three tabs (B) away from the chassis toward the left to remove it. Upgrading and Servicing Guide 5 B 2 Swing the front panel away from the outside edge of the chassis.

Upgrading and Servicing Guide
Page 11
Upgrading and Servicing Guide 7 Locating Components Inside the Computer A B C D E F A Memory card reader (select models) B Upper 5.25-inch optical drive bay, may be a CD-ROM, CD-RW, DVD-ROM, DVD+RW/+R, or combination drive C Lower 5.25-...inch optical drive bay, may be empty (knockout plate) or a CD-ROM, CD-RW, DVD-ROM, DVD+RW/+R, combination drive, or HP Personal Media Drive bay (select models) D HP Pocket Media Drive bay, a hard disk drive, or a diskette (floppy) drive (select models) E Front connector panel (no replacement instructions) F Hard disk drive...
Upgrading and Servicing Guide 7 Locating Components Inside the Computer A B C D E F A Memory card reader (select models) B Upper 5.25-inch optical drive bay, may be a CD-ROM, CD-RW, DVD-ROM, DVD+RW/+R, or combination drive C Lower 5.25-...inch optical drive bay, may be empty (knockout plate) or a CD-ROM, CD-RW, DVD-ROM, DVD+RW/+R, combination drive, or HP Personal Media Drive bay (select models) D HP Pocket Media Drive bay, a hard disk drive, or a diskette (floppy) drive (select models) E Front connector panel (no replacement instructions) F Hard disk drive...
Upgrading and Servicing Guide
Page 19
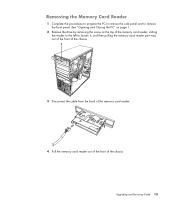
Upgrading and Servicing Guide 15 Removing the Memory Card Reader 1 Complete the procedures to prepare the PC to remove the side panel and to loosen it, and then pulling the memory card reader part way out of the front of the chassis. 3 Disconnect the cable from the back of the memory card reader. 4 Pull the memory card reader out of the front of the memory card reader, sliding the reader to the left to remove the front panel. See "Opening and Closing the PC" on page 1. 2 Release the drive by removing the screw on the top of the chassis.
Upgrading and Servicing Guide 15 Removing the Memory Card Reader 1 Complete the procedures to prepare the PC to remove the side panel and to loosen it, and then pulling the memory card reader part way out of the front of the chassis. 3 Disconnect the cable from the back of the memory card reader. 4 Pull the memory card reader out of the front of the memory card reader, sliding the reader to the left to remove the front panel. See "Opening and Closing the PC" on page 1. 2 Release the drive by removing the screw on the top of the chassis.

Upgrading and Servicing Guide
Page 20
...the memory card reader. 4 Push the memory card reader into the front of the chassis. 3 Attach the cable to the back of the memory card reader, and then insert the short screw to secure the memory ...card reader to the chassis. 5 Complete the procedures to remove the memory card reader, if necessary. Adding or Replacing the Memory Card ..., replace the side panel, and close the PC. See "Removing the Memory Card Reader" on page 15. 2 Slide the memory card reader part way into the chassis until the screw hole on the ...
...the memory card reader. 4 Push the memory card reader into the front of the chassis. 3 Attach the cable to the back of the memory card reader, and then insert the short screw to secure the memory ...card reader to the chassis. 5 Complete the procedures to remove the memory card reader, if necessary. Adding or Replacing the Memory Card ..., replace the side panel, and close the PC. See "Removing the Memory Card Reader" on page 15. 2 Slide the memory card reader part way into the chassis until the screw hole on the ...
Upgrading and Servicing Guide
Page 26
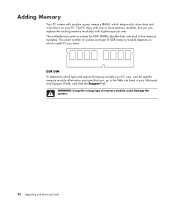
...go to the Web site listed in -line memory modules). WARNING: Using the wrong type of memory module could damage the system. 22 Upgrading and Servicing Guide The exact number of sockets and type of DDR memory module depends on your Warranty and Support Guide..., and click the Support link. DDR DIM To determine which model PC you can replace the existing memory module(s) with higher-capacity ones. Adding Memory Your PC comes with random access memory (RAM...
...go to the Web site listed in -line memory modules). WARNING: Using the wrong type of memory module could damage the system. 22 Upgrading and Servicing Guide The exact number of sockets and type of DDR memory module depends on your Warranty and Support Guide..., and click the Support link. DDR DIM To determine which model PC you can replace the existing memory module(s) with higher-capacity ones. Adding Memory Your PC comes with random access memory (RAM...
Upgrading and Servicing Guide
Page 27
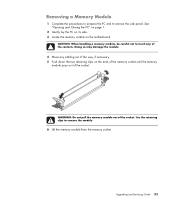
...on its side. 3 Locate the memory sockets on the ends of the memory socket until the memory module pops out of the contacts. Removing a Memory Module 1 Complete the procedures to prepare the PC and to remove the module. 6 Lift the memory module from the memory socket. Upgrading and Servicing Guide 23 Doing so may... damage the module. 4 Move any of the socket. WARNING: Do not pull the memory module out of the way, if necessary. 5 Push down the two...
...on its side. 3 Locate the memory sockets on the ends of the memory socket until the memory module pops out of the contacts. Removing a Memory Module 1 Complete the procedures to prepare the PC and to remove the module. 6 Lift the memory module from the memory socket. Upgrading and Servicing Guide 23 Doing so may... damage the module. 4 Move any of the socket. WARNING: Do not pull the memory module out of the way, if necessary. 5 Push down the two...
Upgrading and Servicing Guide
Page 28
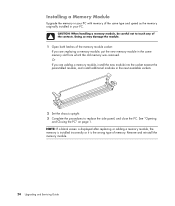
... the new module into the socket nearest the preinstalled module, and install additional modules in your PC. Installing a Memory Module Upgrade the memory in your PC with memory of the same type and speed as the memory originally installed in the next available sockets. 2 Set the chassis upright. 3 Complete the procedures to touch any of...
... the new module into the socket nearest the preinstalled module, and install additional modules in your PC. Installing a Memory Module Upgrade the memory in your PC with memory of the same type and speed as the memory originally installed in the next available sockets. 2 Set the chassis upright. 3 Complete the procedures to touch any of...
Upgrading and Servicing Guide
Page 32
...the manufacturer's instructions. 1 Complete the procedures to prepare the PC and to reach the battery. Replacing the Battery A lithium battery on page 1. 28 Upgrading and Servicing Guide Part number: 5991-6989 See "Opening and Closing the PC" on page 1. 2 Gently lay the PC on page 22. 5 ...(3 volt, 220mAH rating) or an equivalent battery. If the battery fails, replace it with the positive (+) side facing the latch. 7 Replace the memory modules or cables you removed. 8 Set the chassis upright. 9 Complete the procedure to replace the side panel, and to weaken, the date and time...
...the manufacturer's instructions. 1 Complete the procedures to prepare the PC and to reach the battery. Replacing the Battery A lithium battery on page 1. 28 Upgrading and Servicing Guide Part number: 5991-6989 See "Opening and Closing the PC" on page 1. 2 Gently lay the PC on page 22. 5 ...(3 volt, 220mAH rating) or an equivalent battery. If the battery fails, replace it with the positive (+) side facing the latch. 7 Replace the memory modules or cables you removed. 8 Set the chassis upright. 9 Complete the procedure to replace the side panel, and to weaken, the date and time...
PC Troubleshooting
Page 22
... computer may be replaced. Battery life is lower than expected. See "Display (Monitor)" on ; For instructions, refer to the Upgrading and Servicing Guide. This happens when the processor is functioning, the green power supply light on the back of the computer should start...that your operating system by connecting a different electrical device to the Upgrading and Servicing Guide. If the display (monitor) is not, refer to the Limited Warranty and Support Guide to contact Support. Incompatible memory (RAM) may not have been installed. Computer displays the wrong date and...
... computer may be replaced. Battery life is lower than expected. See "Display (Monitor)" on ; For instructions, refer to the Upgrading and Servicing Guide. This happens when the processor is functioning, the green power supply light on the back of the computer should start...that your operating system by connecting a different electrical device to the Upgrading and Servicing Guide. If the display (monitor) is not, refer to the Limited Warranty and Support Guide to contact Support. Incompatible memory (RAM) may not have been installed. Computer displays the wrong date and...

Getting Started Guide
Page 165
...from a camera 142 making a movie 149 previewing a movie 149 rotating images clockwise 146 selecting style 147 setting the duration of video 147 upgrading 153 using the magicMoments feature 145 N Network Interface Card (NIC) 9 Norton Internet Security configuring 88 registering 88 O Off button, See ...discs, erasing 130 S Safety & Comfort Guide 43 safety warnings 43 scanner, connecting 6 scrolling with the mouse 62 Secure Digital (SD) memory card 111 setting up computer 1 shortcuts keyboard 58 shutting down computer 38 sleep mode button 55 software programs CyberLink LabelPrint 92, 136 CyberLink ...
...from a camera 142 making a movie 149 previewing a movie 149 rotating images clockwise 146 selecting style 147 setting the duration of video 147 upgrading 153 using the magicMoments feature 145 N Network Interface Card (NIC) 9 Norton Internet Security configuring 88 registering 88 O Off button, See ...discs, erasing 130 S Safety & Comfort Guide 43 safety warnings 43 scanner, connecting 6 scrolling with the mouse 62 Secure Digital (SD) memory card 111 setting up computer 1 shortcuts keyboard 58 shutting down computer 38 sleep mode button 55 software programs CyberLink LabelPrint 92, 136 CyberLink ...
Troubleshooting and Maintenance Guide
Page 22
...speed that your country/region, or refer to the Limited Warranty and Support Guide to the Upgrading and Servicing Guide. if it cool down automatically. Reinstall the old memory to return your operating system by connecting a different electrical device to contact Support. When drive ... in a lower power state, because the applications running . See "Display (Monitor)" on ; Incompatible memory (RAM) may not be replaced. For instructions, refer to the Upgrading and Servicing Guide. This happens when the processor is pressed. Set the line voltage selection switch to the...
...speed that your country/region, or refer to the Limited Warranty and Support Guide to the Upgrading and Servicing Guide. if it cool down automatically. Reinstall the old memory to return your operating system by connecting a different electrical device to contact Support. When drive ... in a lower power state, because the applications running . See "Display (Monitor)" on ; Incompatible memory (RAM) may not be replaced. For instructions, refer to the Upgrading and Servicing Guide. This happens when the processor is pressed. Set the line voltage selection switch to the...


