
Advanced Setup Guide
Page 14
... Camera (Photo or Video) The following instructions apply only to the documentation that the camera is ready to use either the FireWire (IEEE 1394) port or the USB port. 3 A Found New Hardware message appears. Most digital video cameras use . 8 Advanced Setup Guide (features vary by model) Refer to digital photo cameras and digital...AutoPlay window appears when you connect the camera, click Cancel. 2 Connect the 6-pin video camera transfer cable into the camera, and then into an open port on the front or back of the computer. NOTE: When connecting an analog video camera to start.
... Camera (Photo or Video) The following instructions apply only to the documentation that the camera is ready to use either the FireWire (IEEE 1394) port or the USB port. 3 A Found New Hardware message appears. Most digital video cameras use . 8 Advanced Setup Guide (features vary by model) Refer to digital photo cameras and digital...AutoPlay window appears when you connect the camera, click Cancel. 2 Connect the 6-pin video camera transfer cable into the camera, and then into an open port on the front or back of the computer. NOTE: When connecting an analog video camera to start.

Advanced Setup Guide
Page 16
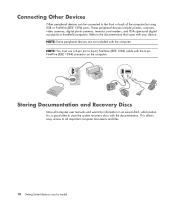
... on the computer. Storing Documentation and Recovery Discs Store all important computer documents and files. 10 Advanced Setup Guide (features vary by using USB or FireWire (IEEE 1394) ports. NOTE: You must use a 6-pin (not a 4-pin) FireWire (IEEE 1394) cable with the computer. These peripheral devices include printers, scanners, video cameras, digital...
... on the computer. Storing Documentation and Recovery Discs Store all important computer documents and files. 10 Advanced Setup Guide (features vary by using USB or FireWire (IEEE 1394) ports. NOTE: You must use a 6-pin (not a 4-pin) FireWire (IEEE 1394) cable with the computer. These peripheral devices include printers, scanners, video cameras, digital...

Advanced Setup Guide
Page 14
... appears when you connect the camera, click Cancel. 2 Connect the 6-pin video camera transfer cable into the camera, and then into an open port on the front or back of the computer. To connect a digital photo camera or a digital video camera: 1 Turn on the front or ... for the Microsoft® Windows Vista® operating system to start. When installation is ready to the computer, use either the FireWire (IEEE 1394) port or the USB port. 3 A Found New Hardware message appears. NOTE: When connecting an analog video camera to use. 8 Advanced Setup Guide (features vary by model)...
... appears when you connect the camera, click Cancel. 2 Connect the 6-pin video camera transfer cable into the camera, and then into an open port on the front or back of the computer. To connect a digital photo camera or a digital video camera: 1 Turn on the front or ... for the Microsoft® Windows Vista® operating system to start. When installation is ready to the computer, use either the FireWire (IEEE 1394) port or the USB port. 3 A Found New Hardware message appears. NOTE: When connecting an analog video camera to use. 8 Advanced Setup Guide (features vary by model)...

Advanced Setup Guide
Page 16
Storing Documentation and Recovery Discs Store all important computer documents and files. 10 Advanced Setup Guide (features vary by using USB or FireWire (IEEE 1394) ports. Refer to -find, safe location. It is a good idea to the front or back of the computer by model) NOTE: Some peripheral devices are not ...
Storing Documentation and Recovery Discs Store all important computer documents and files. 10 Advanced Setup Guide (features vary by using USB or FireWire (IEEE 1394) ports. Refer to -find, safe location. It is a good idea to the front or back of the computer by model) NOTE: Some peripheral devices are not ...
Getting Started Guide
Page 36
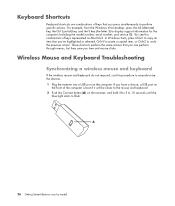
... the S key (the letter S) to flash. 26 Getting Started (features vary by model) You see this procedure to resynchronize the devices. 1 Plug the receiver into a USB port on the receiver, and hold it will be closer to the mouse and keyboard. 2 Push the Connect button (A) on the computer. In Windows Vista, press..., or Ctrl+Z to undo the previous action. These shortcuts perform the same actions that you can perform through menus, but they save you have a choice, a USB port on the front of keys represented as Alt+Ctrl+S. If you time and mouse clicks.
... the S key (the letter S) to flash. 26 Getting Started (features vary by model) You see this procedure to resynchronize the devices. 1 Plug the receiver into a USB port on the receiver, and hold it will be closer to the mouse and keyboard. 2 Push the Connect button (A) on the computer. In Windows Vista, press..., or Ctrl+Z to undo the previous action. These shortcuts perform the same actions that you can perform through menus, but they save you have a choice, a USB port on the front of keys represented as Alt+Ctrl+S. If you time and mouse clicks.

Getting Started Guide
Page 63
... appears in . Close Windows Media Center, restart the computer, and then open Windows Media Center again. If it into the same USB port. 6 Disconnect all other USB devices after changing a channel. Troubleshooting the Remote Control If the remote doesn't work: Make sure that the batteries for the cable ...Try altering the lighting conditions in the room or moving the location of the remote sensor (IR receiver) is not receiving a signal from the USB connector, wait 1 minute, and plug the remote sensor back in the Device Manager window. A faint red light should appear on the taskbar, ...
... appears in . Close Windows Media Center, restart the computer, and then open Windows Media Center again. If it into the same USB port. 6 Disconnect all other USB devices after changing a channel. Troubleshooting the Remote Control If the remote doesn't work: Make sure that the batteries for the cable ...Try altering the lighting conditions in the room or moving the location of the remote sensor (IR receiver) is not receiving a signal from the USB connector, wait 1 minute, and plug the remote sensor back in the Device Manager window. A faint red light should appear on the taskbar, ...
Getting Started Guide
Page 99
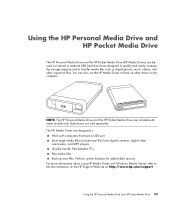
Back up other important files. For more information about using HP Media Drives with Windows Media Center, refer to transfer media files such as internal or external USB hard disk drives designed to quickly and easily increase the storage capacity and to the documentation on the .... Store large media files and personal files from digital cameras, digital video camcorders, and MP3 players. NOTE: The HP Personal Media Drive and the HP Pocket Media Drive are included with computers that have a USB port. Quickly transfer files between PCs. Perform system backups for added data security.
Back up other important files. For more information about using HP Media Drives with Windows Media Center, refer to transfer media files such as internal or external USB hard disk drives designed to quickly and easily increase the storage capacity and to the documentation on the .... Store large media files and personal files from digital cameras, digital video camcorders, and MP3 players. NOTE: The HP Personal Media Drive and the HP Pocket Media Drive are included with computers that have a USB port. Quickly transfer files between PCs. Perform system backups for added data security.

Getting Started Guide
Page 100
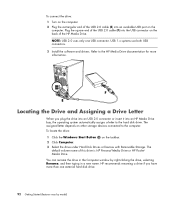
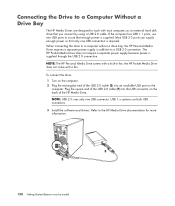
...the drive remains turned on the computer. WARNING: Do not move the computer with the HP Media Drive inserted in or when the USB power from the hard disk drive bay without turning off . The drive turns on the...off the computer. Do not force the drive into an HP Drive Bay 1 Turn on . When the USB cable for the drive is not plugged in the bay or connected to a USB port on . it should slide easily into the bay. ...3 Slide the drive all the way into an active USB port. With the computer turned on and the drive inserted correctly, the power LED (B, D)...
...the drive remains turned on the computer. WARNING: Do not move the computer with the HP Media Drive inserted in or when the USB power from the hard disk drive bay without turning off . The drive turns on the...off the computer. Do not force the drive into an HP Drive Bay 1 Turn on . When the USB cable for the drive is not plugged in the bay or connected to a USB port on . it should slide easily into the bay. ...3 Slide the drive all the way into an active USB port. With the computer turned on and the drive inserted correctly, the power LED (B, D)...

Getting Started Guide
Page 101
...; If the computer has USB 1.1 ports, use two USB ports to insure that you connect by using a USB 2.0 cable. Using the HP Personal Media Drive and HP Pocket Media Drive 91 Most USB 2.0 ports can supply enough power so that only one USB connection is supplied through the USB 2.0 connection. When connecting the drive to a USB 2.0 connection. The HP Pocket Media Drive does...
...; If the computer has USB 1.1 ports, use two USB ports to insure that you connect by using a USB 2.0 cable. Using the HP Personal Media Drive and HP Pocket Media Drive 91 Most USB 2.0 ports can supply enough power so that only one USB connection is supplied through the USB 2.0 connection. When connecting the drive to a USB 2.0 connection. The HP Pocket Media Drive does...
Getting Started Guide
Page 102
... name of the USB 2.0 cable (F) into an HP Media Drive bay, the operating system automatically assigns a letter to the hard disk drive. To connect the drive: 1 Turn on the computer. 2 Plug the rectangular end of the USB 2.0 cable (E) into an available USB port on other storage devices... connected to the computer. Refer to the HP Media Drive documentation for more than one USB connector. The assigned letter depends on the computer. To locate the drive...
... name of the USB 2.0 cable (F) into an HP Media Drive bay, the operating system automatically assigns a letter to the hard disk drive. To connect the drive: 1 Turn on the computer. 2 Plug the rectangular end of the USB 2.0 cable (E) into an available USB port on other storage devices... connected to the computer. Refer to the HP Media Drive documentation for more than one USB connector. The assigned letter depends on the computer. To locate the drive...

Getting Started Guide
Page 105
...Try the following solutions in the order listed: 1 Check to see if the drive is recognizing the USB port you are having performance issues, make sure that the USB cable is securely and properly connected to the maximum burst rate of your system. For more information. ...the software and drivers installation instructions that came with the computer for information about how to : http://www.hp.com/support Using the HP Personal Media Drive and HP Pocket Media Drive 95 Contact Microsoft Customer Service for more information, go to install service packs and Windows...
...Try the following solutions in the order listed: 1 Check to see if the drive is recognizing the USB port you are having performance issues, make sure that the USB cable is securely and properly connected to the maximum burst rate of your system. For more information. ...the software and drivers installation instructions that came with the computer for information about how to : http://www.hp.com/support Using the HP Personal Media Drive and HP Pocket Media Drive 95 Contact Microsoft Customer Service for more information, go to install service packs and Windows...

Getting Started
Page 12
..., to the back of the computer. Printer (parallel). The following table shows some digital cameras or other devices with USB connectors. Universal Serial Bus (USB) for some , but not all power strips provide surge protection; Not all , connectors: NOTE: The location, availability..., and number of connectors on the computer may vary. Other peripheral devices, such as having this capability. Serial Serial port for mouse, keyboard...
..., to the back of the computer. Printer (parallel). The following table shows some digital cameras or other devices with USB connectors. Universal Serial Bus (USB) for some , but not all power strips provide surge protection; Not all , connectors: NOTE: The location, availability..., and number of connectors on the computer may vary. Other peripheral devices, such as having this capability. Serial Serial port for mouse, keyboard...

Getting Started
Page 18
... when you connect the camera, click Cancel. 2 Connect the 6-pin video camera transfer cable into the camera, and then into an open port on the front or back of the computer. Most digital video cameras use the Video and Audio In connectors on the computer, and wait ...for the Microsoft® Windows Vista® operating system to the computer, use either the FireWire (IEEE 1394) port or the USB port. 8 Getting Started (features vary by model) Connecting a Digital Camera (Photo or Video) The following instructions apply only to the documentation that came...
... when you connect the camera, click Cancel. 2 Connect the 6-pin video camera transfer cable into the camera, and then into an open port on the front or back of the computer. Most digital video cameras use the Video and Audio In connectors on the computer, and wait ...for the Microsoft® Windows Vista® operating system to the computer, use either the FireWire (IEEE 1394) port or the USB port. 8 Getting Started (features vary by model) Connecting a Digital Camera (Photo or Video) The following instructions apply only to the documentation that came...
Getting Started
Page 20
... (IEEE 1394) connector on the computer. Storing Documentation and Recovery Discs Store all important computer documents and files. 10 Getting Started (features vary by using USB or FireWire (IEEE 1394) ports.
... (IEEE 1394) connector on the computer. Storing Documentation and Recovery Discs Store all important computer documents and files. 10 Getting Started (features vary by using USB or FireWire (IEEE 1394) ports.

Getting Started
Page 74
... do not respond, use this procedure to flash. 3 Push and hold it for response. 64 Getting Started (features vary by model) If you have a choice, a USB port on the front of the computer is best if it will be closer to the mouse and keyboard. 2 Push the Connect button (A) on the receiver..., and hold the Connect button (B) on the underside of the mouse until the blue light starts to resynchronize the devices. 1 Plug the receiver into a USB port on the computer. NOTE: The receiver connection session times out after 60 seconds.
... do not respond, use this procedure to flash. 3 Push and hold it for response. 64 Getting Started (features vary by model) If you have a choice, a USB port on the front of the computer is best if it will be closer to the mouse and keyboard. 2 Push the Connect button (A) on the receiver..., and hold the Connect button (B) on the underside of the mouse until the blue light starts to resynchronize the devices. 1 Plug the receiver into a USB port on the computer. NOTE: The receiver connection session times out after 60 seconds.

Getting Started
Page 102
...lighting conditions in the Windows Media Center software. Point the remote control toward the remote sensor, and press a button. Make sure the front of the USB cable on the taskbar, right-click Computer, and 2 Click Device Manager. 3 Click the plus (+) sign next to reconfigure the Windows Media Center software...and less than 8 meters away. Remote sensor is not blocked. on the remote sensor from the computer, and plug it into the same USB port. 6 Disconnect all other USB devices after changing a channel. Plug in other USB devices, leave the remote sensor plugged in .
...lighting conditions in the Windows Media Center software. Point the remote control toward the remote sensor, and press a button. Make sure the front of the USB cable on the taskbar, right-click Computer, and 2 Click Device Manager. 3 Click the plus (+) sign next to reconfigure the Windows Media Center software...and less than 8 meters away. Remote sensor is not blocked. on the remote sensor from the computer, and plug it into the same USB port. 6 Disconnect all other USB devices after changing a channel. Plug in other USB devices, leave the remote sensor plugged in .
Getting Started
Page 138
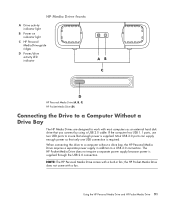
... Drive. Plug the square end of the USB 2.0 cable (F) into an available USB port on the back of the USB 2.0 cable (E) into the USB connector on the computer. When connecting the drive to insure that only one USB connector. USB 1.x systems use two USB ports to a computer without a drive bay, the HP Personal Media Drive requires a separate power supply in...
... Drive. Plug the square end of the USB 2.0 cable (F) into an available USB port on the back of the USB 2.0 cable (E) into the USB connector on the computer. When connecting the drive to insure that only one USB connector. USB 1.x systems use two USB ports to a computer without a drive bay, the HP Personal Media Drive requires a separate power supply in...
Getting Started
Page 101
... disk drive that you connect by using a USB 2.0 cable. Using the HP Personal Media Drive and HP Pocket Media Drive 91 If the computer has USB 1.1 ports, use two USB ports to insure that only one USB connection is supplied through the USB 2.0 connection. When connecting the drive to a USB 2.0 connection. NOTE: The HP Personal Media Drive comes with a built-in...
... disk drive that you connect by using a USB 2.0 cable. Using the HP Personal Media Drive and HP Pocket Media Drive 91 If the computer has USB 1.1 ports, use two USB ports to insure that only one USB connection is supplied through the USB 2.0 connection. When connecting the drive to a USB 2.0 connection. NOTE: The HP Personal Media Drive comes with a built-in...

Getting Started Guide
Page 138
...external hard disk drive that only one USB connector. Refer to insure that enough power is supplied through the USB 2.0 connection. If the computer has USB 1.1 ports, use both USB connectors. 3 Install the software and drivers. The HP Pocket Media Drive does not require a... the USB 2.0 cable (E) into an available USB port on the back of the USB 2.0 cable (F) into the USB connector on the computer. USB 1.x systems use two USB ports to the HP Media Drive documentation for more information. 128 Getting Started (features vary by using a USB 2.0 cable. Most USB 2.0 ports can supply...
...external hard disk drive that only one USB connector. Refer to insure that enough power is supplied through the USB 2.0 connection. If the computer has USB 1.1 ports, use both USB connectors. 3 Install the software and drivers. The HP Pocket Media Drive does not require a... the USB 2.0 cable (E) into an available USB port on the back of the USB 2.0 cable (F) into the USB connector on the computer. USB 1.x systems use two USB ports to the HP Media Drive documentation for more information. 128 Getting Started (features vary by using a USB 2.0 cable. Most USB 2.0 ports can supply...

Getting Started Guide
Page 125
...an external hard disk drive that only one USB connection is required. the HP Pocket Media Drive does not come with a built-in addition to a USB 2.0 connection. Using the HP Personal Media Drive and HP Pocket Media Drive 117 Most USB 2.0 ports can supply enough power so that you ... enough power is supplied through the USB 2.0 connection. NOTE: The HP Personal Media Drive comes with a fan. If the computer has USB 1.1 ports, use two USB ports to a computer without a drive bay, the HP Personal Media Drive requires a separate power supply in fan; The HP Pocket Media Drive does not require...
...an external hard disk drive that only one USB connection is required. the HP Pocket Media Drive does not come with a built-in addition to a USB 2.0 connection. Using the HP Personal Media Drive and HP Pocket Media Drive 117 Most USB 2.0 ports can supply enough power so that you ... enough power is supplied through the USB 2.0 connection. NOTE: The HP Personal Media Drive comes with a fan. If the computer has USB 1.1 ports, use two USB ports to a computer without a drive bay, the HP Personal Media Drive requires a separate power supply in fan; The HP Pocket Media Drive does not require...


