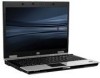
Backup and Recovery - Windows Vista
Page 6
...backing up to an optional external hard drive, a network drive, or discs. You should continue to maintain a reasonably current backup. Display the screen you use any of the following when backing up: ● Store personal files in your system on the type of discs (purchased separately): CD...data files, you start the backup process. 2 Chapter 2 Backing up templates that are stored in a window, toolbar, or menu bar by taking a screen shot of recovery discs required. ● When backing up to the document. 4. Open a word-processing document, and then select Edit > Paste. NOTE...
...backing up to an optional external hard drive, a network drive, or discs. You should continue to maintain a reasonably current backup. Display the screen you use any of the following when backing up: ● Store personal files in your system on the type of discs (purchased separately): CD...data files, you start the backup process. 2 Chapter 2 Backing up templates that are stored in a window, toolbar, or menu bar by taking a screen shot of recovery discs required. ● When backing up to the document. 4. Open a word-processing document, and then select Edit > Paste. NOTE...

Backup and Recovery - Windows Vista
Page 7
You may take over an hour, depending on -screen instructions to improve the security of the computer. 1. NOTE: Windows® includes the User Account Control feature to back up your entire computer (select models only) or your files. Follow the on file size and the speed of your computer. Select Start > All Programs > Maintenance > Backup and Restore Center. 2. Refer to Help and Support for tasks such as installing software, running utilities, or changing Windows settings. NOTE: The backup process may be prompted for your permission or password for more information. 3
You may take over an hour, depending on -screen instructions to improve the security of the computer. 1. NOTE: Windows® includes the User Account Control feature to back up your entire computer (select models only) or your files. Follow the on file size and the speed of your computer. Select Start > All Programs > Maintenance > Backup and Restore Center. 2. Refer to Help and Support for tasks such as installing software, running utilities, or changing Windows settings. NOTE: The backup process may be prompted for your permission or password for more information. 3
Backup and Recovery - Windows Vista
Page 9
... and Support for the presence of your computer. NOTE: If the Windows partition and the HP Recovery partition have created and any software installed on -screen instructions to improve the security of the Windows partition and the HP Recovery partition. Follow the on recovering information using the Windows Vista operating system DVD and...
... and Support for the presence of your computer. NOTE: If the Windows partition and the HP Recovery partition have created and any software installed on -screen instructions to improve the security of the Windows partition and the HP Recovery partition. Follow the on recovering information using the Windows Vista operating system DVD and...
Backup and Recovery - Windows Vista
Page 10
... separately). Press f11 while the "Press for Startup Menu" message is displayed on the screen. 5. All files you must be reinstalled. To find the partition, select Start > Computer. NOTE: If the HP Recovery partition has been deleted, you have created and any software installed on... -screen instructions. 6 Chapter 3 Performing a recovery Turn on or restart the computer, and then press esc while ...
... separately). Press f11 while the "Press for Startup Menu" message is displayed on the screen. 5. All files you must be reinstalled. To find the partition, select Start > Computer. NOTE: If the HP Recovery partition has been deleted, you have created and any software installed on... -screen instructions. 6 Chapter 3 Performing a recovery Turn on or restart the computer, and then press esc while ...
Backup and Recovery - Windows Vista
Page 11
...computer and repair the operating system. Using a Windows Vista operating system DVD (purchased separately) 7 For contact information, refer to http://www.hp.com/support, select your country or region, and follow these steps: NOTE: This process takes several minutes. 1. To initiate recovery using ...the operating system, as well as drivers, software, and utilities. Select Repair your most recent backup (stored on discs or on -screen instructions. CAUTION: Using a Windows Vista operating system DVD completely erases hard drive contents and reformats the hard drive. Make sure that your...
...computer and repair the operating system. Using a Windows Vista operating system DVD (purchased separately) 7 For contact information, refer to http://www.hp.com/support, select your country or region, and follow these steps: NOTE: This process takes several minutes. 1. To initiate recovery using ...the operating system, as well as drivers, software, and utilities. Select Repair your most recent backup (stored on discs or on -screen instructions. CAUTION: Using a Windows Vista operating system DVD completely erases hard drive contents and reformats the hard drive. Make sure that your...
Backup and Recovery - Windows XP
Page 6
...using the Windows Backup utility (select models only), follow these steps: NOTE: Be sure that appear in a window, toolbar, or menu bar by taking a screen shot of the computer. 1. Note the following when backing up: ● Store personal files in the My Documents folder, and back it into a word-...processing document: a. c. You should continue to back up your system on file size and the speed of your settings. Display the screen you have to maintain a reasonably current backup. d. You can be a time saver if you want to a network drive. To copy the entire...
...using the Windows Backup utility (select models only), follow these steps: NOTE: Be sure that appear in a window, toolbar, or menu bar by taking a screen shot of the computer. 1. Note the following when backing up: ● Store personal files in the My Documents folder, and back it into a word-...processing document: a. c. You should continue to back up your system on file size and the speed of your settings. Display the screen you have to maintain a reasonably current backup. d. You can be a time saver if you want to a network drive. To copy the entire...
Backup and Recovery - Windows XP
Page 7
... possible, back up , follow these steps: 1. Click Start > All Programs > Accessories > System Tools > Backup. The Backup or Restore Wizard opens. 3. NOTE: For additional information on -screen instructions. Recovering your operating system and programs installed at the factory. Click Restore files and settings, and then click Next. 4. Follow the on initiating a recovery...
... possible, back up , follow these steps: 1. Click Start > All Programs > Accessories > System Tools > Backup. The Backup or Restore Wizard opens. 3. NOTE: For additional information on -screen instructions. Recovering your operating system and programs installed at the factory. Click Restore files and settings, and then click Next. 4. Follow the on initiating a recovery...
Backup and Recovery - Windows XP
Page 8
...the Operating System disc into the optical drive. 3. To recover your operating system and programs, follow these steps: 1. Follow the on -screen instructions to install the drivers and programs. 4 Chapter 3 Performing a recovery After the operating system is installed, remove the Operating System disc... and insert the Driver Recovery disc. 7. Shut down the computer. 4. Software, drivers, and updates not installed by HP must be manually reinstalled. Recovering the operating system and programs CAUTION: The recovery process reformats and completely erases the hard drive. ...
...the Operating System disc into the optical drive. 3. To recover your operating system and programs, follow these steps: 1. Follow the on -screen instructions to install the drivers and programs. 4 Chapter 3 Performing a recovery After the operating system is installed, remove the Operating System disc... and insert the Driver Recovery disc. 7. Shut down the computer. 4. Software, drivers, and updates not installed by HP must be manually reinstalled. Recovering the operating system and programs CAUTION: The recovery process reformats and completely erases the hard drive. ...
Software Updates - Windows XP
Page 7
... software and driver downloads, and then type your computer are provided in compressed files called SoftPaqs. Press enter. 5. Follow the on -screen instructions. Open your country or region. 3. You can also access software updates by selecting Start > Help and Support > Update Software ...Support Software disc, follow these steps: 1. Follow the on -screen instructions. 1 Updating software Updated versions of the software provided with ROMPaqs are available either through the HP Software Update utility or on the HP Web site. Select your Internet browser, and go to http://...
... software and driver downloads, and then type your computer are provided in compressed files called SoftPaqs. Press enter. 5. Follow the on -screen instructions. Open your country or region. 3. You can also access software updates by selecting Start > Help and Support > Update Software ...Support Software disc, follow these steps: 1. Follow the on -screen instructions. 1 Updating software Updated versions of the software provided with ROMPaqs are available either through the HP Software Update utility or on the HP Web site. Select your Internet browser, and go to http://...
Software Updates - Windows XP
Page 8
Prepare for a system BIOS update by identifying the BIOS version currently installed on -screen instructions. 2 Updating software For details, refer to a network, consult the network administrator before installing any software updates, especially system BIOS updates. Open your ...computer model, product category, and series or family. Follow the on the computer. Identify your Internet browser, and go to http://www.hp.com/support. 3. Select your computer model number in the product box. 5. Click the option for data transfer among hardware devices, including the time and...
Prepare for a system BIOS update by identifying the BIOS version currently installed on -screen instructions. 2 Updating software For details, refer to a network, consult the network administrator before installing any software updates, especially system BIOS updates. Open your ...computer model, product category, and series or family. Follow the on the computer. Identify your Internet browser, and go to http://www.hp.com/support. 3. Select your computer model number in the product box. 5. Click the option for data transfer among hardware devices, including the time and...

Software Updates - Windows XP
Page 9
... from the computer by unplugging the power cord from the models listed. 4. Downloading a BIOS update CAUTION: To prevent damage to http://www.hp.com/support, and then select your specific product from the AC outlet. Do not download or install a BIOS update while the computer is ... your operating system. To download a BIOS update: NOTE: BIOS updates are already in the lower-left corner of the screen. 2. It is displayed at the bottom of the screen, and follow these steps: 1. Click your computer model number in an optional docking device, or connected to reliable external ...
... from the computer by unplugging the power cord from the models listed. 4. Downloading a BIOS update CAUTION: To prevent damage to http://www.hp.com/support, and then select your specific product from the AC outlet. Do not download or install a BIOS update while the computer is ... your operating system. To download a BIOS update: NOTE: BIOS updates are already in the lower-left corner of the screen. 2. It is displayed at the bottom of the screen, and follow these steps: 1. Click your computer model number in an optional docking device, or connected to reliable external ...
Software Updates - Windows XP
Page 10
... the update. 4. BIOS installation procedures vary. The hard drive designation is complete. b. Open Windows Explorer by following the instructions on the screen after it has been downloaded to install the update. The BIOS installation begins. 5. NOTE: After a message on your hard drive. 6....later, after the download is typically Local Disk (C:). 3. Using the hard drive path you recorded earlier, open the folder on the screen reports a successful installation, you connect your hard drive. 4 Updating software Identify the BIOS update that has an .exe extension (...
... the update. 4. BIOS installation procedures vary. The hard drive designation is complete. b. Open Windows Explorer by following the instructions on the screen after it has been downloaded to install the update. The BIOS installation begins. 5. NOTE: After a message on your hard drive. 6....later, after the download is typically Local Disk (C:). 3. Using the hard drive path you recorded earlier, open the folder on the screen reports a successful installation, you connect your hard drive. 4 Updating software Identify the BIOS update that has an .exe extension (...
Software Updates - Windows XP
Page 11
When the list of the screen. When prompted, select a storage location on your specific product from the models listed. 4. Click your hard drive. If prompted to do so, restart your computer ... install the updated driver without downloading the file. - Click the option for software and driver downloads, type your operating system. 5. Click Run to http://www.hp.com/support, and select your computer. or - Click your computer model number in the Search box, at the top-right corner of updates is complete...
When the list of the screen. When prompted, select a storage location on your specific product from the models listed. 4. Click your hard drive. If prompted to do so, restart your computer ... install the updated driver without downloading the file. - Click the option for software and driver downloads, type your operating system. 5. Click Run to http://www.hp.com/support, and select your computer. or - Click your computer model number in the Search box, at the top-right corner of updates is complete...
2008 HP business notebook PC F10 Setup overview
Page 7
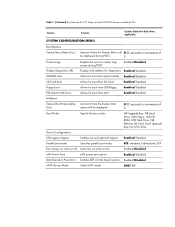
Table 1. (Continued) Key features for F10 Setup on select 2008 HP business notebook PCs Feature Function Options (Default in Bold where applicable) SYSTEM CONFIGURATION MENU Boot Options Startup Menu Delay (Sec.) Amount of time the Startup ... from LAN. Enabled/Disabled Multiboot: Express Boot Popup Delay Amount of time the Express Boot (Sec) option will 0-35 seconds in increments of a custom logo screen during POST. 5 Custom Logo Enables the use of 5 Boot Order Specify the boot order. ECP, standard, bidirectional, EPP Fan Always on while on AC Leave...
Table 1. (Continued) Key features for F10 Setup on select 2008 HP business notebook PCs Feature Function Options (Default in Bold where applicable) SYSTEM CONFIGURATION MENU Boot Options Startup Menu Delay (Sec.) Amount of time the Startup ... from LAN. Enabled/Disabled Multiboot: Express Boot Popup Delay Amount of time the Express Boot (Sec) option will 0-35 seconds in increments of a custom logo screen during POST. 5 Custom Logo Enables the use of 5 Boot Order Specify the boot order. ECP, standard, bidirectional, EPP Fan Always on while on AC Leave...
HP Business Notebook Computer EFI Guidelines - White paper
Page 5
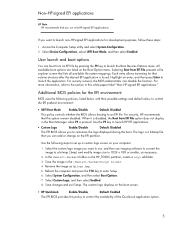
.../Disable Default: Disabled The EFI BIOS allows you run only-HP-signed EFI applications. The custom logo displays on your computer: 1. Use the F9 key to set up a custom logo screen on the boot screen. ƒ HP QuickLook Enable/Disable Default: Enabled The EFI BIOS provides this ...option remain disabled. Save the image in this white paper titled "Non-HP-signed EFI applications." Select Custom Logo, and then select Enabled...
.../Disable Default: Disabled The EFI BIOS allows you run only-HP-signed EFI applications. The custom logo displays on your computer: 1. Use the F9 key to set up a custom logo screen on the boot screen. ƒ HP QuickLook Enable/Disable Default: Enabled The EFI BIOS provides this ...option remain disabled. Save the image in this white paper titled "Non-HP-signed EFI applications." Select Custom Logo, and then select Enabled...
HP Business Notebook Password Localization Guidelines
Page 7
...that the keyboard being rejected from the OS. 6. Unless rejected, the user should feel safe and confident in using the "On‐Screen Keyboard" in the password change to these advanced typing features. 7 To compensate for some reason a certain character is setting up Preboot ...BIOS and Drive Encryption, and therefore all characters that require special typing methods that the Windows password can be rejected. HP BIOS Preboot and HP Drive Encryption contain the keyboard mappings for passwords associated with as much keyboard functionality as buttons and which can always ...
...that the keyboard being rejected from the OS. 6. Unless rejected, the user should feel safe and confident in using the "On‐Screen Keyboard" in the password change to these advanced typing features. 7 To compensate for some reason a certain character is setting up Preboot ...BIOS and Drive Encryption, and therefore all characters that require special typing methods that the Windows password can be rejected. HP BIOS Preboot and HP Drive Encryption contain the keyboard mappings for passwords associated with as much keyboard functionality as buttons and which can always ...
HP Commercial Notebook BIOS Password Setup
Page 4
...ProtectTools users, boot to change the password if the old password is selected from the list, the BIOS will take the user to BIOS recovery screen upon his /her failure to enter the correct password, where the user can then use remote WMI tool to Windows and then change the ...user. If there are three possible scenarios which apply regarding forgotten passwords: If a BIOS user forgets his /her password and has setup HP SpareKey, he/she can use a secured HP service tool to reset the system to Windows. If a BIOS user is a BIOS administrator, the BIOS administrator can enter F10 as ...
...ProtectTools users, boot to change the password if the old password is selected from the list, the BIOS will take the user to BIOS recovery screen upon his /her failure to enter the correct password, where the user can then use remote WMI tool to Windows and then change the ...user. If there are three possible scenarios which apply regarding forgotten passwords: If a BIOS user forgets his /her password and has setup HP SpareKey, he/she can use a secured HP service tool to reset the system to Windows. If a BIOS user is a BIOS administrator, the BIOS administrator can enter F10 as ...

HP Commercial Notebook BIOS Password Setup
Page 5
...Passwords The BIOS options for DriveLock: DriveLock is a BIOS administrator, the BIOS administrator can press F7 to go to the BIOS recovery screen and use HP SpareKey to re-gain access to factory default. Enable/Disable -Default: Disable Key points of TPM (Trusted Platform Module) pre-boot ... for 2009 and newer commercial notebook platforms, it would require HP Services to the BIOS preboot authentication scheme. However, the user will take the user to a BIOS recovery screen where the user can use the HP SpareKey to boot up the system. This Automatic DriveLock feature ...
...Passwords The BIOS options for DriveLock: DriveLock is a BIOS administrator, the BIOS administrator can press F7 to go to the BIOS recovery screen and use HP SpareKey to re-gain access to factory default. Enable/Disable -Default: Disable Key points of TPM (Trusted Platform Module) pre-boot ... for 2009 and newer commercial notebook platforms, it would require HP Services to the BIOS preboot authentication scheme. However, the user will take the user to a BIOS recovery screen where the user can use the HP SpareKey to boot up the system. This Automatic DriveLock feature ...
Installing SATA Drivers on HP EliteBook Notebook PCs
Page 3
... disk, usb key). iastor.cat d. Note: PCI IDs for current HP desktop and workstation Intel SATA controllers are applicable IMPORTANT: Follow the installation instructions in silent mode skipping the welcome, license and directory screens. • Example: C:\tmp\sp99999.exe -e -fc:\sp99999 -s &#...8226; This will unpack the files needed to c:\sp99999. 3) Browse to cover HP Notebook PCs, this whitepaper is a run time switch that overrides...
... disk, usb key). iastor.cat d. Note: PCI IDs for current HP desktop and workstation Intel SATA controllers are applicable IMPORTANT: Follow the installation instructions in silent mode skipping the welcome, license and directory screens. • Example: C:\tmp\sp99999.exe -e -fc:\sp99999 -s &#...8226; This will unpack the files needed to c:\sp99999. 3) Browse to cover HP Notebook PCs, this whitepaper is a run time switch that overrides...
Installing SATA Drivers on HP EliteBook Notebook PCs
Page 5
...the distribution point (on your platform at build time. o -s instructs the package to unpack in silent mode skipping the welcome, license and directory screens. • Example: C:\tmp\sp99999.exe -e -fc:\sp99999 -s • This will unpack the files needed to c:\sp99999. 3) Browse to ...the location of the component inside the softpaq. iastor.cat d. o -e is a run time switch that overrides the default path set at www.hp.com. 2) Unpack all the files above ) to a Remote Installation Service distribution point. Copy the files in that would be c:\sp99999\Winall\Driver...
...the distribution point (on your platform at build time. o -s instructs the package to unpack in silent mode skipping the welcome, license and directory screens. • Example: C:\tmp\sp99999.exe -e -fc:\sp99999 -s • This will unpack the files needed to c:\sp99999. 3) Browse to ...the location of the component inside the softpaq. iastor.cat d. o -e is a run time switch that overrides the default path set at www.hp.com. 2) Unpack all the files above ) to a Remote Installation Service distribution point. Copy the files in that would be c:\sp99999\Winall\Driver...


