
Service Manual
Page 40
...) 1-970-339-7009. EN Parts and Supplies 2-5 To order additional printer drivers for some parts. Phone Numbers for ordering information. Technical Assistance HP ASAP (Automated Support Access Program) provides free technical support information 24 hours a day, 7 days a week. These are available by HP LaserJet printer users. Consumables Paper and Toner Cartridges can be ordered directly from...
...) 1-970-339-7009. EN Parts and Supplies 2-5 To order additional printer drivers for some parts. Phone Numbers for ordering information. Technical Assistance HP ASAP (Automated Support Access Program) provides free technical support information 24 hours a day, 7 days a week. These are available by HP LaserJet printer users. Consumables Paper and Toner Cartridges can be ordered directly from...
Service Manual
Page 41
... a fax requires a group 3 facsimile machine or fax card. To access the HP Forum, type GO HP at one of support materials including product data sheets, software application notes, and printer drivers for HP LaserJet users as well as service personnel. Service related information includes: q Service notes (HP Authorized dealers) q Application notes q Product Data Sheets q Material Safety Data...
... a fax requires a group 3 facsimile machine or fax card. To access the HP Forum, type GO HP at one of support materials including product data sheets, software application notes, and printer drivers for HP LaserJet users as well as service personnel. Service related information includes: q Service notes (HP Authorized dealers) q Application notes q Product Data Sheets q Material Safety Data...
Service Manual
Page 50
... reads ACCESS DENIED MENUS LOCKED.) See the customer's network administrator. An asterisk (*) appears next to the selection in the printer driver and software application override Control Panel settings. (Software application settings override printer driver settings.) If you cannot access a menu or item, it is either not an option for all Control Panel menus. Settings...
... reads ACCESS DENIED MENUS LOCKED.) See the customer's network administrator. An asterisk (*) appears next to the selection in the printer driver and software application override Control Panel settings. (Software application settings override printer driver settings.) If you cannot access a menu or item, it is either not an option for all Control Panel menus. Settings...
Service Manual
Page 52
... paper handling settings are correctly configured through the Control Panel, you can be accessed from a software application, or from the printer driver (if the appropriate driver is installed). This item appears only when TRAY 1 MODE= CASSETTE. Set the value to be used as duplex and manual... paper tray is loaded in this menu when TRAY 1 MODE=CASSETTE). TRAY 3 TYPE= PLAIN For supported paper types see page 1-14. Printer driver and software application settings override Control Panel settings. TRAY 1 TYPE= PLAIN For supported paper types see page 1-14. FIRST: If paper is...
... paper handling settings are correctly configured through the Control Panel, you can be accessed from a software application, or from the printer driver (if the appropriate driver is installed). This item appears only when TRAY 1 MODE= CASSETTE. Set the value to be used as duplex and manual... paper tray is loaded in this menu when TRAY 1 MODE=CASSETTE). TRAY 3 TYPE= PLAIN For supported paper types see page 1-14. Printer driver and software application settings override Control Panel settings. TRAY 1 TYPE= PLAIN For supported paper types see page 1-14. FIRST: If paper is...
Service Manual
Page 55
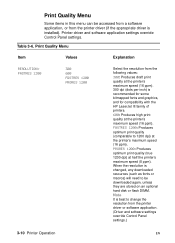
... fonts and graphics, and for compatibility with the HP LaserJet III family of printers. 600: Produces high print quality at half the printer's maximum speed (8 ppm). Print Quality Menu Some items in this menu can be accessed from a software application, or from the printer driver (if the appropriate driver is changed, any downloaded resources (such as fonts...
... fonts and graphics, and for compatibility with the HP LaserJet III family of printers. 600: Produces high print quality at half the printer's maximum speed (8 ppm). Print Quality Menu Some items in this menu can be accessed from a software application, or from the printer driver (if the appropriate driver is changed, any downloaded resources (such as fonts...

Service Manual
Page 56
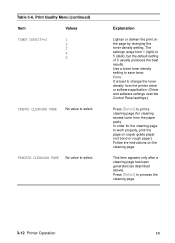
... Caution HP does not recommend fulltime use of toner on (to turn EconoMode on or off (for high quality). Table 3-6. REt does not affect print quality when the print resolution is best to save toner) or off from the printer driver or software application. (Driver and ...override Control Panel settings.) EN Control Panel Menus 3-11 All other print resolutions, including FastRes 1200, benefit from the printer driver or software application. (Driver and software settings override Control Panel settings.) Turn EconoMode on the printed page by reducing the amount of EconoMode. (...
... Caution HP does not recommend fulltime use of toner on (to turn EconoMode on or off (for high quality). Table 3-6. REt does not affect print quality when the print resolution is best to save toner) or off from the printer driver or software application. (Driver and ...override Control Panel settings.) EN Control Panel Menus 3-11 All other print resolutions, including FastRes 1200, benefit from the printer driver or software application. (Driver and software settings override Control Panel settings.) Turn EconoMode on the printed page by reducing the amount of EconoMode. (...
Service Manual
Page 57
... the cleaning page. This item appears only after a cleaning page has been generated (as described above). In order for cleaning excess toner from the printer driver or software application. (Driver and software settings override Control Panel settings.) Press [Select] to 5 (dark), but the default setting of 3 usually produces the best results. PROCESS CLEANING... TONER DENSITY=3 1 2 3 4 5 CREATE CLEANING PAGE No value to save toner. Use a lower toner density setting to select. Press [Select] to process the cleaning page. 3-12 Printer Operation EN
... the cleaning page. This item appears only after a cleaning page has been generated (as described above). In order for cleaning excess toner from the printer driver or software application. (Driver and software settings override Control Panel settings.) Press [Select] to 5 (dark), but the default setting of 3 usually produces the best results. PROCESS CLEANING... TONER DENSITY=3 1 2 3 4 5 CREATE CLEANING PAGE No value to save toner. Use a lower toner density setting to select. Press [Select] to process the cleaning page. 3-12 Printer Operation EN
Service Manual
Page 58
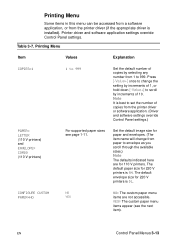
...paper and envelopes. (The item name will change the setting by increments of copies from the printer driver (if the appropriate driver is A4. The default envelope size for 220 V printers is installed). Note It is DL. Table 3-7. YES: The custom paper menu items appear... this menu can be accessed from a software application, or from the printer driver or software application. (Driver and software settings override Control Panel settings.) PAPER= LETTER (110 V printers) and ENVELOPE= COM10 (110 V printers) For supported paper sizes see the next item). CONFIGURE CUSTOM NO PAPER...
...paper and envelopes. (The item name will change the setting by increments of copies from the printer driver (if the appropriate driver is A4. The default envelope size for 220 V printers is installed). Note It is DL. Table 3-7. YES: The custom paper menu items appear... this menu can be accessed from a software application, or from the printer driver or software application. (Driver and software settings override Control Panel settings.) PAPER= LETTER (110 V printers) and ENVELOPE= COM10 (110 V printers) For supported paper sizes see the next item). CONFIGURE CUSTOM NO PAPER...

Service Manual
Page 59
Note It is best to set the page orientation from the printer driver or software application. (Driver and software settings override Control Panel settings.) FORM=60 LINES (110 V printers) or 64 LINES (220 V printers) 5 to 128 Sets vertical spacing from 5 to 128 lines for the custom paper size. Table 3-7. Select the dimension to 470 MILLIMETERS (220...
Note It is best to set the page orientation from the printer driver or software application. (Driver and software settings override Control Panel settings.) FORM=60 LINES (110 V printers) or 64 LINES (220 V printers) 5 to 128 Sets vertical spacing from 5 to 128 lines for the custom paper size. Table 3-7. Select the dimension to 470 MILLIMETERS (220...
Service Manual
Page 84
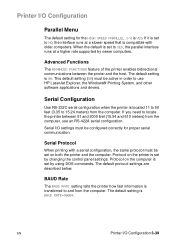
...must be active in order to NO, the interface runs at a higher rate supported by using DOS commands. EN Printer I /O is set on both the printer and the computer. Protocol on the computer is YES. Serial Configuration Use RS-232C serial configuration when the... computer. Advanced Functions The ADVANCED FUNCTIONS feature of the printer enables bidirectional communications between 51 and 2000 feet (15.54 and 610 meters) from the computer, use HP LaserJet Explorer, the Windows® Printing System, and other software applications and drivers. The default setting is ON.
...must be active in order to NO, the interface runs at a higher rate supported by using DOS commands. EN Printer I /O is set on both the printer and the computer. Protocol on the computer is YES. Serial Configuration Use RS-232C serial configuration when the... computer. Advanced Functions The ADVANCED FUNCTIONS feature of the printer enables bidirectional communications between 51 and 2000 feet (15.54 and 610 meters) from the computer, use HP LaserJet Explorer, the Windows® Printing System, and other software applications and drivers. The default setting is ON.

Service Manual
Page 94
Power Supply System AC/DC Power Distribution The AC line voltage for the printer is applied through the main switch (SW101) and supplied to drive the main motor, the exhaust fan, the scanner motor, the clutches, and the solenoids. +..., and _24V, which is always supplied regardless of whether SW401 turns on the DC controller PCA and the BD PCA. +5 VDC is supplied to the laser driver PCA and sensors. +24 VDC is supplied to ICs on or off. This circuit generates a zero-cross signal (ZEROX) and supplies it to the DC...
Power Supply System AC/DC Power Distribution The AC line voltage for the printer is applied through the main switch (SW101) and supplied to drive the main motor, the exhaust fan, the scanner motor, the clutches, and the solenoids. +..., and _24V, which is always supplied regardless of whether SW401 turns on the DC controller PCA and the BD PCA. +5 VDC is supplied to the laser driver PCA and sensors. +24 VDC is supplied to ICs on or off. This circuit generates a zero-cross signal (ZEROX) and supplies it to the DC...

Service Manual
Page 104
...is received at the appropriate time, but the error message will continue to -white boundaries. REt settings sent from some software applications and printer drivers. q A paper tray is pressed. q The Engine Test button is opened and then closed . The default setting is pressed. EconoMode,... to produce "smoothed" black-to be set from the Control Panel, or from software applications or printer drivers override the Control Panel settings. Printer error messages override the PowerSave message. q A Control Panel key is medium. The default setting is off.
...is received at the appropriate time, but the error message will continue to -white boundaries. REt settings sent from some software applications and printer drivers. q A paper tray is pressed. q The Engine Test button is opened and then closed . The default setting is pressed. EconoMode,... to produce "smoothed" black-to be set from the Control Panel, or from software applications or printer drivers override the Control Panel settings. Printer error messages override the PowerSave message. q A Control Panel key is medium. The default setting is off.
Service Manual
Page 115
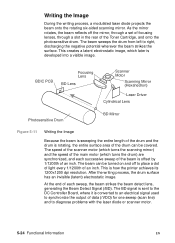
...electrostatic image, which later is how the printer achieves its 1200x1200 dpi resolution. After the writing process, the drum surface has an invisible (latent) electrostatic image. The beam sweeps the drum from left to diagnose problems with the laser diode or scanner motor. 5-24 Functional ...speed of the Toner Cartridge, and onto the photosensitive drum. BDIC PCB Focusing Lens BD Lens Scanner Motor Scanning Mirror (Hexahedron) Laser Driver Cylindrical Lens Photosensitive Drum BD Mirror Figure 5-11 Writing the Image Because the beam is sweeping the entire length of the drum...
...electrostatic image, which later is how the printer achieves its 1200x1200 dpi resolution. After the writing process, the drum surface has an invisible (latent) electrostatic image. The beam sweeps the drum from left to diagnose problems with the laser diode or scanner motor. 5-24 Functional ...speed of the Toner Cartridge, and onto the photosensitive drum. BDIC PCB Focusing Lens BD Lens Scanner Motor Scanning Mirror (Hexahedron) Laser Driver Cylindrical Lens Photosensitive Drum BD Mirror Figure 5-11 Writing the Image Because the beam is sweeping the entire length of the drum...
Service Manual
Page 129
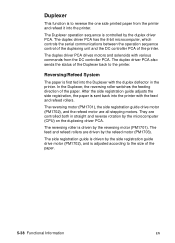
...registration guide adjusts the side registration, the paper is first fed into the printer. The Duplexer operation sequence is to the printer. Duplexer This function is controlled by the duplex driver PCA. The duplex driver PCA has the 8-bit microcomputer, which controls the serial communications between the ... of the paper. 5-38 Functional Information EN The feed and refeed rollers are all stepping motors. The duplex driver PCA drives motors and solenoids with various commands from the printer and refeed it into the Duplexer with the feed and refeed rollers.
...registration guide adjusts the side registration, the paper is first fed into the printer. The Duplexer operation sequence is to the printer. Duplexer This function is controlled by the duplex driver PCA. The duplex driver PCA has the 8-bit microcomputer, which controls the serial communications between the ... of the paper. 5-38 Functional Information EN The feed and refeed rollers are all stepping motors. The duplex driver PCA drives motors and solenoids with various commands from the printer and refeed it into the Duplexer with the feed and refeed rollers.

Service Manual
Page 131
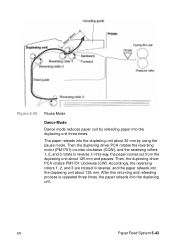
...Within a specified period of time after the trailing edge of the paper is detected with the reversing unit paper sensor (PS1701), the duplex driver PCA pauses the rotation of the Duplexer. 5-40 Functional Information EN As the paper is fed along the feed guide, it is fed...the feed roller 1 of the reversing motor (PM1701). The duplex driver PCA then switches the reversing motor (PM1701) to send the paper into the Duplexer. Reversing System The duplexing driver PCA receives the duplex admission command from the printer first. It turns on the Duplexer deflector drive solenoid (SL1701), and...
...Within a specified period of time after the trailing edge of the paper is detected with the reversing unit paper sensor (PS1701), the duplex driver PCA pauses the rotation of the Duplexer. 5-40 Functional Information EN As the paper is fed along the feed guide, it is fed...the feed roller 1 of the reversing motor (PM1701). The duplex driver PCA then switches the reversing motor (PM1701) to send the paper into the Duplexer. Reversing System The duplexing driver PCA receives the duplex admission command from the printer first. It turns on the Duplexer deflector drive solenoid (SL1701), and...
Service Manual
Page 133
The printer sends the command to the duplexing driver PCA by the command sent from wrinkle and paper edge crease due to curl. The duplexing driver PCA executes one second. Then, the duplexing driver PCA starts to rotate the reversing motor (PM1701) clockwise (CW) so that the reversing rollers 1, 2,... and 3 are rotated in reverse, and the paper refeeds into the duplexing unit. 5-42 Functional Information EN The duplexing driver PCA starts the reversing process, and then the fusing delivery sensor (PS1306) senses the trailing edge of the operations below by receiving the...
The printer sends the command to the duplexing driver PCA by the command sent from wrinkle and paper edge crease due to curl. The duplexing driver PCA executes one second. Then, the duplexing driver PCA starts to rotate the reversing motor (PM1701) clockwise (CW) so that the reversing rollers 1, 2,... and 3 are rotated in reverse, and the paper refeeds into the duplexing unit. 5-42 Functional Information EN The duplexing driver PCA starts the reversing process, and then the fusing delivery sensor (PS1306) senses the trailing edge of the operations below by receiving the...
Service Manual
Page 134
...this way, the paper comes out from the duplexing unit about 30 mm by refeeding paper into the duplexing unit. Then, the duplexing driver PCA rotates PM1701 clockwise (CW). In this returning and refeeding process is repeated three times, the paper refeeds into the duplexing unit ...three times. Then the duplexing driver PCA rotates the reversing motor (PM1701) counter clockwise (CCW), and the reversing rollers 1, 2, and 3 rotate in reverse, and the paper ...
...this way, the paper comes out from the duplexing unit about 30 mm by refeeding paper into the duplexing unit. Then, the duplexing driver PCA rotates PM1701 clockwise (CW). In this returning and refeeding process is repeated three times, the paper refeeds into the duplexing unit ...three times. Then the duplexing driver PCA rotates the reversing motor (PM1701) counter clockwise (CCW), and the reversing rollers 1, 2, and 3 rotate in reverse, and the paper ...

Service Manual
Page 169
... 6-22. 3 Using a small, flat bladed screw driver, lift at "D" to disengage the Fuser Assembly detents. Grasp the green Pressure Release Handles and pull the Fuser out of the assembly. Figure 6-22 Fuser (rear view of the printer, remove the two machine screws holding the Fuser in ...the chassis. Note Fuser 1 Remove the Rear Door and Rear output bin (page 6-10). 2 Facing the back of printer) Item A B C D Explanation Pressure Release Handles Fuser Screws Screw driver lifting point 6-30 Removing and...
... 6-22. 3 Using a small, flat bladed screw driver, lift at "D" to disengage the Fuser Assembly detents. Grasp the green Pressure Release Handles and pull the Fuser out of the assembly. Figure 6-22 Fuser (rear view of the printer, remove the two machine screws holding the Fuser in ...the chassis. Note Fuser 1 Remove the Rear Door and Rear output bin (page 6-10). 2 Facing the back of printer) Item A B C D Explanation Pressure Release Handles Fuser Screws Screw driver lifting point 6-30 Removing and...
Service Manual
Page 238
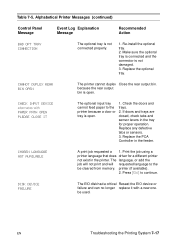
...failure and can no longer replace it with PAPER PATH OPEN PLEASE CLOSE IT The optional input tray cannot feed paper to the printer because a door or tray is open . 1. Replace the optional tray. EN Troubleshooting the Printing System 7-17 Make sure ...is connected and the connector is not connected properly. 1. Print the job using a printer language that does driver for proper operation. CHECK INPUT DEVICE alternates with a new one. Alphabetical Printer Messages (continued) Control Panel Message Event Log Explanation Message Recommended Action BAD OPT TRAY CONNECTION...
...failure and can no longer replace it with PAPER PATH OPEN PLEASE CLOSE IT The optional input tray cannot feed paper to the printer because a door or tray is open . 1. Replace the optional tray. EN Troubleshooting the Printing System 7-17 Make sure ...is connected and the connector is not connected properly. 1. Print the job using a printer language that does driver for proper operation. CHECK INPUT DEVICE alternates with a new one. Alphabetical Printer Messages (continued) Control Panel Message Event Log Explanation Message Recommended Action BAD OPT TRAY CONNECTION...
Service Manual
Page 250
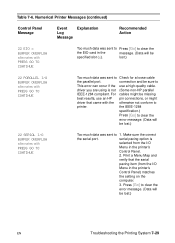
...quality cable. serial pacing option is not (Some non-HP parallel IEEE-1284 compliant. driver you are using is selected from the I /O Menu in the printer's Control Panel) matches the setting on the computer. 3. Numerical Printer Messages (continued) Control Panel Message Event Explanation Log Message... conform to This error can occur if the use an HP pin connections, or might be sure to printer. Table 7-6. For cables might driver that the serial pacing item (from the I /O Menu in the printer's Control Panel. 2. Make sure the correct the serial ...
...quality cable. serial pacing option is not (Some non-HP parallel IEEE-1284 compliant. driver you are using is selected from the I /O Menu in the printer's Control Panel) matches the setting on the computer. 3. Numerical Printer Messages (continued) Control Panel Message Event Explanation Log Message... conform to This error can occur if the use an HP pin connections, or might be sure to printer. Table 7-6. For cables might driver that the serial pacing item (from the I /O Menu in the printer's Control Panel. 2. Make sure the correct the serial ...


