
Service Manual
Page 4
Contents 1 Printer Description Overview 1-1 Printer Features 1-2 Identification 1-5 Model and Serial Numbers 1-5 Site Requirements 1-6 Space Requirements 1-7 Paper Specifications 1-11 Supported Types of Paper 1-14 Guidelines for Using Paper 1-15 Labels 1-18 Transparencies 1-18 Vellum 1-18 Envelopes 1-19 Card Stock and Heavy Paper 1-20 Safety Information 1-22 Laser Safety Statement 1-22 Canadian DOC Regulations 1-22 FCC...
Contents 1 Printer Description Overview 1-1 Printer Features 1-2 Identification 1-5 Model and Serial Numbers 1-5 Site Requirements 1-6 Space Requirements 1-7 Paper Specifications 1-11 Supported Types of Paper 1-14 Guidelines for Using Paper 1-15 Labels 1-18 Transparencies 1-18 Vellum 1-18 Envelopes 1-19 Card Stock and Heavy Paper 1-20 Safety Information 1-22 Laser Safety Statement 1-22 Canadian DOC Regulations 1-22 FCC...

Service Manual
Page 6
... Distribution 5-6 Toner Cartridge Detection 5-7 DC Controller System 5-7 Laser and Scanner Drive 5-8 Paper Motion Monitoring and Control 5-9 Solenoids, Sensors, Clutches, and Switches 5-9 Engine Test Print 5-9 Motors 5-10 Formatter System 5-12 PowerSave 5-12 Resolution Enhancement technology (REt 5-13 EconoMode 5-13 Input/Output 5-14 CPU 5-14 Printer Memory 5-15 Random Access Memory (RAM 5-15 DIMM...
... Distribution 5-6 Toner Cartridge Detection 5-7 DC Controller System 5-7 Laser and Scanner Drive 5-8 Paper Motion Monitoring and Control 5-9 Solenoids, Sensors, Clutches, and Switches 5-9 Engine Test Print 5-9 Motors 5-10 Formatter System 5-12 PowerSave 5-12 Resolution Enhancement technology (REt 5-13 EconoMode 5-13 Input/Output 5-14 CPU 5-14 Printer Memory 5-15 Random Access Memory (RAM 5-15 DIMM...
Service Manual
Page 27
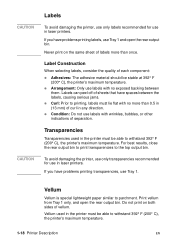
... only transparencies recommended for use in laser printers. Do not print on the same sheet of labels more than once. Never print on both sides of sheets that have spaces between them. q Arrangement: .... For best results, close the rear output bin to print transparencies to withstand 392° F (200° C), the printer's maximum temperature. CAUTION CAUTION Labels To avoid damaging the printer, use only labels recommended for use in laser printers. q Condition: Do not use Tray 1 and open the rear output bin. Transparencies Transparencies used in the...
... only transparencies recommended for use in laser printers. Do not print on the same sheet of labels more than once. Never print on both sides of sheets that have spaces between them. q Arrangement: .... For best results, close the rear output bin to print transparencies to withstand 392° F (200° C), the printer's maximum temperature. CAUTION CAUTION Labels To avoid damaging the printer, use only labels recommended for use in laser printers. q Condition: Do not use Tray 1 and open the rear output bin. Transparencies Transparencies used in the...

Service Manual
Page 29
...with the heat and pressure in an envelope, creating an air bubble, the envelope may be possible if the tray is trapped in the printer. Envelope Storage Proper storage of envelopes helps contribute to capacity, and paper with a smoothness rating of 100-180 Sheffield is used. 1-20... one flap that is too heavy might cause wrinkling, creasing, or jams. Envelope Margins The following table gives typical address margins for feeding through a laser printer. Paper that folds over to seal must use paper heavier than 0.6 in other trays. If air is not filled to good print quality. The ...
...with the heat and pressure in an envelope, creating an air bubble, the envelope may be possible if the tray is trapped in the printer. Envelope Storage Proper storage of envelopes helps contribute to capacity, and paper with a smoothness rating of 100-180 Sheffield is used. 1-20... one flap that is too heavy might cause wrinkling, creasing, or jams. Envelope Margins The following table gives typical address margins for feeding through a laser printer. Paper that folds over to seal must use paper heavier than 0.6 in other trays. If air is not filled to good print quality. The ...
Service Manual
Page 31
...confined within protective housings and external covers, the laser beam cannot escape during any phase of Health and Human Services (DHHS) Radiation Performance Standard according to hazardous radiation. Since radiation emitted inside the printer is mandatory for Health and Safety Act of ... (CDRH) of 1968. Canadian DOC Regulations Complies with Canadian EMC Class B requirements. > 1-22 Printer Description EN The printer is certified as a "Class 1" laser product under the U.S. Safety Information Laser Safety Statement The Center for laser products manufactured since August 1, 1976.
...confined within protective housings and external covers, the laser beam cannot escape during any phase of Health and Human Services (DHHS) Radiation Performance Standard according to hazardous radiation. Since radiation emitted inside the printer is mandatory for Health and Safety Act of ... (CDRH) of 1968. Canadian DOC Regulations Complies with Canadian EMC Class B requirements. > 1-22 Printer Description EN The printer is certified as a "Class 1" laser product under the U.S. Safety Information Laser Safety Statement The Center for laser products manufactured since August 1, 1976.

Service Manual
Page 94
... , and _24V, which is always supplied regardless of whether SW401 turns on the DC controller PCA and the BD PCA. +5 VDC is supplied to the laser driver PCA and sensors. +24 VDC is applied through the main switch (SW101) and supplied to the low-voltage power supply circuit through the fuse... (FU1). Power Supply System AC/DC Power Distribution The AC line voltage for the printer is supplied to the high-voltage power supply PCA to the DC controller PCA.
... , and _24V, which is always supplied regardless of whether SW401 turns on the DC controller PCA and the BD PCA. +5 VDC is supplied to the laser driver PCA and sensors. +24 VDC is applied through the main switch (SW101) and supplied to the low-voltage power supply circuit through the fuse... (FU1). Power Supply System AC/DC Power Distribution The AC line voltage for the printer is supplied to the high-voltage power supply PCA to the DC controller PCA.

Service Manual
Page 98
... 5-7 DC Controller System The following systems and functions are controlled by the DC Controller PCA: q DC Power Distribution (+3.4 VDC, +5 VDC, +24 VA) q Laser and Scanner Drive q Paper Motion Monitoring and Control (photosensors and flags) q Clutches (tray pickup and Tray 1 feed) q Engine Test q Motors (Main Drive...the print commands and the image data input from the antenna inside the cartridge, and outputs the toner detection signal. When the printer power switch is applied during the initial rotation. The circuit compares the output value of the cartridge when the developing bias is ...
... 5-7 DC Controller System The following systems and functions are controlled by the DC Controller PCA: q DC Power Distribution (+3.4 VDC, +5 VDC, +24 VA) q Laser and Scanner Drive q Paper Motion Monitoring and Control (photosensors and flags) q Clutches (tray pickup and Tray 1 feed) q Engine Test q Motors (Main Drive...the print commands and the image data input from the antenna inside the cartridge, and outputs the toner detection signal. When the printer power switch is applied during the initial rotation. The circuit compares the output value of the cartridge when the developing bias is ...

Service Manual
Page 109
...surface to form the latent image on the developing cylinder, then transferred to the paper by the video signal is scraped down with the laser diode. If the toner in the cartridge becomes lower than the specified level or if there is reported to the Formatter. 5-18 ...latent image. Conditioning 3. Writing 4. Fusing When the Formatter Board sends the print signal to the DC Controller Board, it is no cartridge in the printer, it drives the main motor to rotate the photosensitive drum, the developing cylinder, the primary charging roller, and the transfer charging roller. The primary...
...surface to form the latent image on the developing cylinder, then transferred to the paper by the video signal is scraped down with the laser diode. If the toner in the cartridge becomes lower than the specified level or if there is reported to the Formatter. 5-18 ...latent image. Conditioning 3. Writing 4. Fusing When the Formatter Board sends the print signal to the DC Controller Board, it is no cartridge in the printer, it drives the main motor to rotate the photosensitive drum, the developing cylinder, the primary charging roller, and the transfer charging roller. The primary...
Service Manual
Page 115
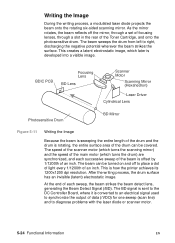
...inch. The speed of the scanner motor (which turns the scanning mirror) and the speed of the main motor (which later is how the printer achieves its 1200x1200 dpi resolution. At the end of the Toner Cartridge, and onto the photosensitive drum. BDIC PCB Focusing Lens BD Lens Scanner ...Motor Scanning Mirror (Hexahedron) Laser Driver Cylindrical Lens Photosensitive Drum BD Mirror Figure 5-11 Writing the Image Because the beam is sweeping the entire length of the drum and the...
...inch. The speed of the scanner motor (which turns the scanning mirror) and the speed of the main motor (which later is how the printer achieves its 1200x1200 dpi resolution. At the end of the Toner Cartridge, and onto the photosensitive drum. BDIC PCB Focusing Lens BD Lens Scanner ...Motor Scanning Mirror (Hexahedron) Laser Driver Cylindrical Lens Photosensitive Drum BD Mirror Figure 5-11 Writing the Image Because the beam is sweeping the entire length of the drum and the...

Service Manual
Page 146
... Tools q Phillips #2 magnetized screwdriver (6-inch shaft) q Small, flat-blade screwdriver q Small, needle-nosed pliers All screws used in field-replaceable printer components are seated. Unplug the power cord from the Laser/Scanner assembly. Figure 6-2 below shows the difference between a Phillips and a Posidriv screwdriver. WARNING! If a self-tapping screw-hole becomes stripped, repair...
... Tools q Phillips #2 magnetized screwdriver (6-inch shaft) q Small, flat-blade screwdriver q Small, needle-nosed pliers All screws used in field-replaceable printer components are seated. Unplug the power cord from the Laser/Scanner assembly. Figure 6-2 below shows the difference between a Phillips and a Posidriv screwdriver. WARNING! If a self-tapping screw-hole becomes stripped, repair...

Service Manual
Page 166
All references to the right and left are shown in Figure 6-19. Figure 6-19 Internal Assemblies Item A B C D E F Explanation Upper Delivery Assembly Laser Scanner Main Gear Assembly Paper Handling PCA Tray 1 Paper Guide Plate Assembly Registration Assembly EN Removing Assemblies 6-27 Removing Assemblies Internal assemblies are assumed to be relative to the front of the printer, unless otherwise specified.
All references to the right and left are shown in Figure 6-19. Figure 6-19 Internal Assemblies Item A B C D E F Explanation Upper Delivery Assembly Laser Scanner Main Gear Assembly Paper Handling PCA Tray 1 Paper Guide Plate Assembly Registration Assembly EN Removing Assemblies 6-27 Removing Assemblies Internal assemblies are assumed to be relative to the front of the printer, unless otherwise specified.

Service Manual
Page 208
... Assembly (top inside view of the chassis. Laser Scanner Assembly 1 Remove the Top Cover (page 6-12) and the Face Down Assembly Base (page 6-21). 2 Facing the back of the printer, remove the four black screws holding the assembly to the chassis. 3 Disconnect the cables B, C, ... D on each side of the assembly. 4 Remove the protective plastic and disconnect the 4-pin connector on the back of the Laser Scanner Assembly. 5 Lift the Laser Scanner Assembly out of printer) Item A B C D E F EN Explanation Screws 3-Pin Connector 8-Pin Connector 4-Pin Connector, under protective foam Screws Protective...
... Assembly (top inside view of the chassis. Laser Scanner Assembly 1 Remove the Top Cover (page 6-12) and the Face Down Assembly Base (page 6-21). 2 Facing the back of the printer, remove the four black screws holding the assembly to the chassis. 3 Disconnect the cables B, C, ... D on each side of the assembly. 4 Remove the protective plastic and disconnect the 4-pin connector on the back of the Laser Scanner Assembly. 5 Lift the Laser Scanner Assembly out of printer) Item A B C D E F EN Explanation Screws 3-Pin Connector 8-Pin Connector 4-Pin Connector, under protective foam Screws Protective...
Service Manual
Page 252
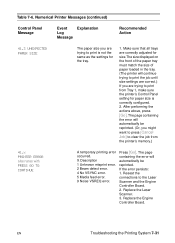
... is correctly configured. 2. Reseat the connections to clear the job from Tray 1, make sure the printer's Control Panel setting for the tray. 1. EN Troubleshooting the Printing System 7-31 Replace the Laser Scanner. 3. Table 7-6. Press [Go]. Numerical Printer Messages (continued) Control Panel Message Event Explanation Log Message Recommended Action 41.3 UNEXPECTED PAPER SIZE The...
... is correctly configured. 2. Reseat the connections to clear the job from Tray 1, make sure the printer's Control Panel setting for the tray. 1. EN Troubleshooting the Printing System 7-31 Replace the Laser Scanner. 3. Table 7-6. Press [Go]. Numerical Printer Messages (continued) Control Panel Message Event Explanation Log Message Recommended Action 41.3 UNEXPECTED PAPER SIZE The...

Service Manual
Page 254
... [Go]. The page containing the error will automatically be reprinted. 2. Turn the printer off and then on . 3. Replace the Laser Scanner. 52.x PRINTER ERROR The Laser Scanner speed is incorrect. Numerical Printer Messages (continued) Control Panel Message Event Explanation Log Message Recommended Action 51.x PRINTER ERROR A loss of beam detect occurred. Reseat the cables. 4. Reseat the...
... [Go]. The page containing the error will automatically be reprinted. 2. Turn the printer off and then on . 3. Replace the Laser Scanner. 52.x PRINTER ERROR The Laser Scanner speed is incorrect. Numerical Printer Messages (continued) Control Panel Message Event Explanation Log Message Recommended Action 51.x PRINTER ERROR A loss of beam detect occurred. Reseat the cables. 4. Reseat the...

Service Manual
Page 273
...turns on continuously). Table 7-10. Black Page (continued) Possible Cause Action Defective Toner Cartridge. Reseat the DC Controller installed improperly. Replace Laser/Scanner Assembly. 7-52 Troubleshooting EN If Board, being certain to fully seat the connectors. Bad Primary Charging Replace the Toner Cartridge. ...PCA. The High Voltage Remove the DC Controller Board and check the Power Supply is faulty (turning laser on the laser beam continuously, the entire surface of the Photosensitive drum is defective (not supplying the correct negative voltage). Roller. the...
...turns on continuously). Table 7-10. Black Page (continued) Possible Cause Action Defective Toner Cartridge. Reseat the DC Controller installed improperly. Replace Laser/Scanner Assembly. 7-52 Troubleshooting EN If Board, being certain to fully seat the connectors. Bad Primary Charging Replace the Toner Cartridge. ...PCA. The High Voltage Remove the DC Controller Board and check the Power Supply is faulty (turning laser on the laser beam continuously, the entire surface of the Photosensitive drum is defective (not supplying the correct negative voltage). Roller. the...

Service Manual
Page 274
... the edges of the paper to separate. paper is difficult to separate the pages (see two or more pages at HP LaserJet Printer Family Paper Specifications once because the Guide). Replace cables the Laser/Scanner as a separator. Make sure the application is leaking into Ensure all covers are defective. Configuration. Multiple Feeds. Sealing tape...
... the edges of the paper to separate. paper is difficult to separate the pages (see two or more pages at HP LaserJet Printer Family Paper Specifications once because the Guide). Replace cables the Laser/Scanner as a separator. Make sure the application is leaking into Ensure all covers are defective. Configuration. Multiple Feeds. Sealing tape...

Service Manual
Page 276
... the paper, and advise the customer to the High Voltage Power Supply PCA. Blank Spots Possible Cause Action Paper does not meet printer specifications or is not attracted to see if the problem corrects itself. 2. Also try rotating the paper 180°. 3. Replace ...the Toner Cartridge. Replace the Engine Controller Board. Replace the Engine Controller Board. Defective Laser Scanner Cable Assembly. Clean the High Voltage Power Supply contacts. With no Developing Bias charge, toner is stored improperly. 1. The negative charge...
... the paper, and advise the customer to the High Voltage Power Supply PCA. Blank Spots Possible Cause Action Paper does not meet printer specifications or is not attracted to see if the problem corrects itself. 2. Also try rotating the paper 180°. 3. Replace ...the Toner Cartridge. Replace the Engine Controller Board. Replace the Engine Controller Board. Defective Laser Scanner Cable Assembly. Clean the High Voltage Power Supply contacts. With no Developing Bias charge, toner is stored improperly. 1. The negative charge...

Service Manual
Page 281
Controller Assembly. meet specifications. Defective Laser Scanner. Table 7-18. Printer's operating Make sure the printer's operating environment meets environment does not specifications. Wrong toner density setting. Single sheet of cables to the DC Assembly. Defective ...connection of Reseat the cables connected to the DC Controller cables to the Laser Scanner. Replace the Laser Scanner. Make sure EconoMode is off. Panel, change the Fuser Mode setting or choose another paper type from the printer driver. From the Print Quality Menu on the Control for paper type....
Controller Assembly. meet specifications. Defective Laser Scanner. Table 7-18. Printer's operating Make sure the printer's operating environment meets environment does not specifications. Wrong toner density setting. Single sheet of cables to the DC Assembly. Defective ...connection of Reseat the cables connected to the DC Controller cables to the Laser Scanner. Replace the Laser Scanner. Make sure EconoMode is off. Panel, change the Fuser Mode setting or choose another paper type from the printer driver. From the Print Quality Menu on the Control for paper type....

Service Manual
Page 283
...not opening properly. 1. If dirty, clean springs are mounted on . The Family Paper Specifications Guide). The high Power Supply PCA. installed. Laser/Scanner door is damaged, replace it cannot effectively pull toner from the drum to be a print quality problem in some cases. If the..., it . This may not work correctly with the electrophotographic process. Paper does not meet Try a different paper lot (see HP LaserJet Printer specifications. Faded Print/Bubbles (continued) Possible Cause Action EconoMode is Inspect the Transfer Roller for functionality.
...not opening properly. 1. If dirty, clean springs are mounted on . The Family Paper Specifications Guide). The high Power Supply PCA. installed. Laser/Scanner door is damaged, replace it cannot effectively pull toner from the drum to be a print quality problem in some cases. If the..., it . This may not work correctly with the electrophotographic process. Paper does not meet Try a different paper lot (see HP LaserJet Printer specifications. Faded Print/Bubbles (continued) Possible Cause Action EconoMode is Inspect the Transfer Roller for functionality.

Service Manual
Page 286
... use the recommended paper and store it properly. If the Toner Cartridge. Dirt in the Laser Scanner. Dirty mirror in the laser path. Toner Cartridge is stored improperly. 1. Paper does not meet printer specifications or is low. Check the paper (or other print media) type and quality. ...density setting. Transfer Roller is off. Turn over the stack of toner or faulty Redistribute the toner in the tray. Clean the laser path. (Remove the Laser Scanner Assembly and clean the lens.) Defective Fuser. Table 7-23. Make sure EconoMode is defective. Also try rotating the paper 180...
... use the recommended paper and store it properly. If the Toner Cartridge. Dirt in the Laser Scanner. Dirty mirror in the laser path. Toner Cartridge is stored improperly. 1. Paper does not meet printer specifications or is low. Check the paper (or other print media) type and quality. ...density setting. Transfer Roller is off. Turn over the stack of toner or faulty Redistribute the toner in the tray. Clean the laser path. (Remove the Laser Scanner Assembly and clean the lens.) Defective Fuser. Table 7-23. Make sure EconoMode is defective. Also try rotating the paper 180...


