
Service Manual
Page 7
General timing chart ...58 Printer calibration ...59 5 Removal and replacement Overview...62 Service approach...63 Pre-service procedures...63 Removal and replacement procedures 64 Print cartridge replacement 64 ETB removal ......101 Jams inside the printer...102 Input jams...103 Tray 1...103 Tray 2...104 Output jams...104 Jams in the top bin 104 Pickup delay jam 105 Pickup stationary jam 105 Delivery delay jam 105 Wrapping jam...105 Delivery stationary jam...105 Start-up residual paper jam 105 Door open jam...106 Print problems...
General timing chart ...58 Printer calibration ...59 5 Removal and replacement Overview...62 Service approach...63 Pre-service procedures...63 Removal and replacement procedures 64 Print cartridge replacement 64 ETB removal ......101 Jams inside the printer...102 Input jams...103 Tray 1...103 Tray 2...104 Output jams...104 Jams in the top bin 104 Pickup delay jam 105 Pickup stationary jam 105 Delivery delay jam 105 Wrapping jam...105 Delivery stationary jam...105 Start-up residual paper jam 105 Door open jam...106 Print problems...
Service Manual
Page 19
... (continued) Feature Supplies Accessibility Expandability Memory HP Color LaserJet 2600n printer ■ A Supplies Status page with text screen-readers. ■ All doors and covers can be opened by using one additional 250-sheet tray can be installed on the printer. ■ 16 MB of DRAM. This 250-sheet universal tray reduces how often you have to add paper...
... (continued) Feature Supplies Accessibility Expandability Memory HP Color LaserJet 2600n printer ■ A Supplies Status page with text screen-readers. ■ All doors and covers can be opened by using one additional 250-sheet tray can be installed on the printer. ■ 16 MB of DRAM. This 250-sheet universal tray reduces how often you have to add paper...

Service Manual
Page 23
...Press (SELECT) to return the printer to navigate through the printer control panel menus. Ready light The Ready light is blinking, the front door has been opened and then closed. Control panel layout The printer contains the following lights and buttons on when the printer is ready to be printed by ...supply is on its own. The Attention light is empty. Understanding control panel layout This section provides information about using non-HP print cartridges, see HP policy on and one of paper, when a jam has occurred, or when other problems that prevent printing) and blinks ...
...Press (SELECT) to return the printer to navigate through the printer control panel menus. Ready light The Ready light is blinking, the front door has been opened and then closed. Control panel layout The printer contains the following lights and buttons on when the printer is ready to be printed by ...supply is on its own. The Attention light is empty. Understanding control panel layout This section provides information about using non-HP print cartridges, see HP policy on and one of paper, when a jam has occurred, or when other problems that prevent printing) and blinks ...

Service Manual
Page 29
... can be easily used during printing. Envelope storage Proper storage of envelopes helps contribute to ensure optimum printer performance. Envelopes should be stored at or near windows and doors that you are using from the edges of envelope that are not wrapped with a relative humidity of... paper. If air is trapped in sealed reams can remain stable for environmental damage, especially if they are frequently open. If the printer environment is subject ...
... can be easily used during printing. Envelope storage Proper storage of envelopes helps contribute to ensure optimum printer performance. Envelopes should be stored at or near windows and doors that you are using from the edges of envelope that are not wrapped with a relative humidity of... paper. If air is trapped in sealed reams can remain stable for environmental damage, especially if they are frequently open. If the printer environment is subject ...
Service Manual
Page 41
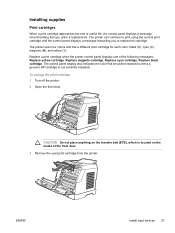
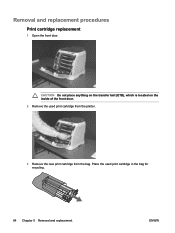
The printer uses four colors and has a different print cartridge for each color: black (K), cyan (C), magenta (M), and yellow (Y). The control panel display also indicates the color that you to print using the current print cartridge until the control panel displays a message instructing you order a ...life, the control panel displays a message recommending that should be replaced (unless a genuine HP cartridge is located on the inside of the front door. 3 Remove the used print cartridge from the printer. CAUTION Do not place anything on the transfer belt (ETB), which is not currently ...
The printer uses four colors and has a different print cartridge for each color: black (K), cyan (C), magenta (M), and yellow (Y). The control panel display also indicates the color that you to print using the current print cartridge until the control panel displays a message instructing you order a ...life, the control panel displays a message recommending that should be replaced (unless a genuine HP cartridge is located on the inside of the front door. 3 Remove the used print cartridge from the printer. CAUTION Do not place anything on the transfer belt (ETB), which is not currently ...
Service Manual
Page 53
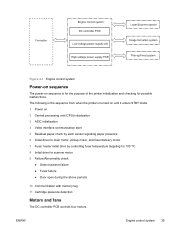
...;?C 8 Initial drive for possible malfunctions. The following is the sequence from when the printer is for the purpose of the printer initialization and checking for scanner motor 9 Failure/Abnormality check ● Detect scanner failure ● Fuser failure ● Door open during the above periods 10 Communication with memory tag 11 Cartridge presence detection Motors...
...;?C 8 Initial drive for possible malfunctions. The following is the sequence from when the printer is for the purpose of the printer initialization and checking for scanner motor 9 Failure/Abnormality check ● Detect scanner failure ● Fuser failure ● Door open during the above periods 10 Communication with memory tag 11 Cartridge presence detection Motors...
Service Manual
Page 78
CAUTION Do not place anything on the transfer belt (ETB), which is located on the inside of the front door. 2 Remove the used print cartridge in the bag for recycling. 64 Chapter 5 Removal and replacement ENWW Place the used print cartridge from the printer. 3 Remove the new print cartridge from the bag. Removal and replacement procedures Print cartridge replacement 1 Open the front door.
CAUTION Do not place anything on the transfer belt (ETB), which is located on the inside of the front door. 2 Remove the used print cartridge in the bag for recycling. 64 Chapter 5 Removal and replacement ENWW Place the used print cartridge from the printer. 3 Remove the new print cartridge from the bag. Removal and replacement procedures Print cartridge replacement 1 Open the front door.
Service Manual
Page 81
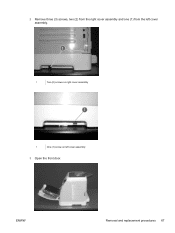
ENWW Removal and replacement procedures 67 2 Remove three (3) screws, two (2) from the right cover assembly and one (1) from the left cover assembly. 1 Two (2) screws on right cover assembly 1 One (1) screw on left cover assembly 3 Open the front door.
ENWW Removal and replacement procedures 67 2 Remove three (3) screws, two (2) from the right cover assembly and one (1) from the left cover assembly. 1 Two (2) screws on right cover assembly 1 One (1) screw on left cover assembly 3 Open the front door.

Service Manual
Page 103
ENWW Removal and replacement procedures 89 Paper pickup roller removal and replacement Use the following procedures to remove the paper pickup roller. 1 Open the front door. 2 Remove the print cartridges.
ENWW Removal and replacement procedures 89 Paper pickup roller removal and replacement Use the following procedures to remove the paper pickup roller. 1 Open the front door. 2 Remove the print cartridges.

Service Manual
Page 116
... remain in loose toner on the transfer belt, which is not obvious, first look inside of the front door. CAUTION Do not place anything on the page. Loose toner might result in the printer after a few sheets have been printed. Each section below corresponds to clear the jam. If you get...or hands, wash them in cold water. (Hot water will set the toner into the fabric.) 1 Open the front door. Find and remove the jam by both corners and pull slowly to clear jams from inside the printer Use the following procedures to an area where a paper jam could occur. Jams inside the...
... remain in loose toner on the transfer belt, which is not obvious, first look inside of the front door. CAUTION Do not place anything on the page. Loose toner might result in the printer after a few sheets have been printed. Each section below corresponds to clear the jam. If you get...or hands, wash them in cold water. (Hot water will set the toner into the fabric.) 1 Open the front door. Find and remove the jam by both corners and pull slowly to clear jams from inside the printer Use the following procedures to an area where a paper jam could occur. Jams inside the...

Service Manual
Page 118
Tray 2 Open the front door of the printer. If you get toner on your clothes or hands, wash them in loose toner on the page. Figure 6-3 Tray 2 input jam label Output jams Jams ... pull slowly to remove the paper from the top bin. 104 Chapter 6 Troubleshooting ENWW Input jams are indicated on the interior right side of the printer and remove paper as indicated on the jam instruction label, located on the label with the number 3.
Tray 2 Open the front door of the printer. If you get toner on your clothes or hands, wash them in loose toner on the page. Figure 6-3 Tray 2 input jam label Output jams Jams ... pull slowly to remove the paper from the top bin. 104 Chapter 6 Troubleshooting ENWW Input jams are indicated on the interior right side of the printer and remove paper as indicated on the jam instruction label, located on the label with the number 3.
Service Manual
Page 119
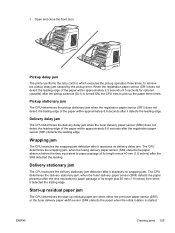
... sensor (SR4) detects the paper absence before the time equivalent to retrieve the pickup delay jam caused by the pickup error. Pickup delay jam The printer performs the retry control, which executes the pickup operation three times, to paper passage of its length minus 40 mm (1.6 inches) after the registration paper...
... sensor (SR4) detects the paper absence before the time equivalent to retrieve the pickup delay jam caused by the pickup error. Pickup delay jam The printer performs the retry control, which executes the pickup operation three times, to paper passage of its length minus 40 mm (1.6 inches) after the registration paper...

Service Manual
Page 120
Door open jam The CPU determines the door open jam, when either the pre-fuser paper sensor (SR5) or the fuser delivery paper width sensor (SR4) detects paper when a door open is detected. 106 Chapter 6 Troubleshooting ENWW
Door open jam The CPU determines the door open jam, when either the pre-fuser paper sensor (SR5) or the fuser delivery paper width sensor (SR4) detects paper when a door open is detected. 106 Chapter 6 Troubleshooting ENWW

Service Manual
Page 121
... error occurred in Tray 2. The printer door is open Engine comm. The door must be affected. Invalid data or response. Then press the (SELECT) button on the control panel. The HP Color LaserJet 2600n printer is empty. Alert and warning messages Control panel message Device error Press Door open . A paper jam has occurred in... 3. ENWW Print problems 107 The control-panel messages indicate the status of the display, if appropriate. Reselect the printer driver appropriate for your device. Open the door and clear the jam. Job output might require some action.
... error occurred in Tray 2. The printer door is open Engine comm. The door must be affected. Invalid data or response. Then press the (SELECT) button on the control panel. The HP Color LaserJet 2600n printer is empty. Alert and warning messages Control panel message Device error Press Door open . A paper jam has occurred in... 3. ENWW Print problems 107 The control-panel messages indicate the status of the display, if appropriate. Reselect the printer driver appropriate for your device. Open the door and clear the jam. Job output might require some action.

Service Manual
Page 146
... the output area. Recommended action Press (SELECT) to guide the user through typical operation. The door must be affected. Job output might require some action. The HP Color LaserJet 2600n printer is empty. A paper jam has occurred in the print path. Clear the jam, and then... press the (SELECT) button on the control panel. A paper jam has occurred in Tray 2. Open the door and clear the jam. Open the door and clear the...
... the output area. Recommended action Press (SELECT) to guide the user through typical operation. The door must be affected. Job output might require some action. The HP Color LaserJet 2600n printer is empty. A paper jam has occurred in the print path. Clear the jam, and then... press the (SELECT) button on the control panel. A paper jam has occurred in Tray 2. Open the door and clear the jam. Open the door and clear the...

Service Manual
Page 224
... Alphabetical parts list (continued) Description ARM, CST. PLATE RELEASE, LEFT ARM, MD. PAPER SENSING, 2 ARM, FRONT DOOR, LEFT ARM, FRONT DOOR, RIGHT ARM, INTERLOCK SWITCH ARM, LASER SHUTTER ARM, MD. PLATE RELEASE, RIGHT ARM, OPEN/CLOSE ARM, OPEN/CLOSE ARM, PAPER RETAINER, LEFT ARM, PAPER RETAINER, RIGHT ARM, PLATE LOCK RELEASE, MD ARM, PLATE LOCK...
... Alphabetical parts list (continued) Description ARM, CST. PLATE RELEASE, LEFT ARM, MD. PAPER SENSING, 2 ARM, FRONT DOOR, LEFT ARM, FRONT DOOR, RIGHT ARM, INTERLOCK SWITCH ARM, LASER SHUTTER ARM, MD. PLATE RELEASE, RIGHT ARM, OPEN/CLOSE ARM, OPEN/CLOSE ARM, PAPER RETAINER, LEFT ARM, PAPER RETAINER, RIGHT ARM, PLATE LOCK RELEASE, MD ARM, PLATE LOCK...
Service Manual
Page 284
...laser statement 267 firmware updates 148 formatter removal and replacement 82 fraud hotline 33 fuser cleaning page 132 removal and replacement 74 G general circuit diagram 208 general timing chart 58 gray background, troubleshooting 139 grayscale troubleshooting 142 H heavy paper specifications 17, 18 HP fraud hotline 33 HP Toolbox calibrating printer... parts list 162 J jams causes 100 causes of 99 delivery delay 105 delivery stationary 105 door open 106 input area 103 inside printer 102 output area 104 pickup delay 105 pickup stationary 105 start-up residual 105 troubleshooting 101 wrapping...
...laser statement 267 firmware updates 148 formatter removal and replacement 82 fraud hotline 33 fuser cleaning page 132 removal and replacement 74 G general circuit diagram 208 general timing chart 58 gray background, troubleshooting 139 grayscale troubleshooting 142 H heavy paper specifications 17, 18 HP fraud hotline 33 HP Toolbox calibrating printer... parts list 162 J jams causes 100 causes of 99 delivery delay 105 delivery stationary 105 door open 106 input area 103 inside printer 102 output area 104 pickup delay 105 pickup stationary 105 start-up residual 105 troubleshooting 101 wrapping...

Service Manual
Page 285
...pages per minute 4 paper curled, troubleshooting 141 jams 99 jams, delivery delay 105 jams, delivery stationary 105 jams, door open 106 jams, input areas 103 jams, inside the printer 102 jams, output area 104 jams, pickup delay 105 jams, pickup stationary 105 jams, start-up residual 105 jams,...32 part numbers 253 recycling 33 replacing 27, 33 status gauge 8 status page, printing 116 storage specifications 255 print modes extended 120 HP Toolbox 120 print quality identifying defects 122 improving 119 issues 138 menu 121 settings 121 specifications 4 troubleshooting 122, 132 print quality defects ...
...pages per minute 4 paper curled, troubleshooting 141 jams 99 jams, delivery delay 105 jams, delivery stationary 105 jams, door open 106 jams, input areas 103 jams, inside the printer 102 jams, output area 104 jams, pickup delay 105 jams, pickup stationary 105 jams, start-up residual 105 jams,...32 part numbers 253 recycling 33 replacing 27, 33 status gauge 8 status page, printing 116 storage specifications 255 print modes extended 120 HP Toolbox 120 print quality identifying defects 122 improving 119 issues 138 menu 121 settings 121 specifications 4 troubleshooting 122, 132 print quality defects ...
