
Memory Modules - Linux
Page 7
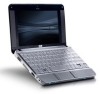
.... 7. Remove the battery from the AC outlet. 5. The memory capacity of static electricity by replacing the existing memory module in Hibernation, turn the computer on a flat surface. 6. WARNING! Before beginning any procedure, be upgraded by touching a grounded metal object. Save your work. 2.... Disconnect all batteries before installing a memory module. Turn the computer display-side up, with the front toward you are discharged of...
.... 7. Remove the battery from the AC outlet. 5. The memory capacity of static electricity by replacing the existing memory module in Hibernation, turn the computer on a flat surface. 6. WARNING! Before beginning any procedure, be upgraded by touching a grounded metal object. Save your work. 2.... Disconnect all batteries before installing a memory module. Turn the computer display-side up, with the front toward you are discharged of...
Memory Modules - Windows XP
Page 7
WARNING! If you are discharged of the computer. 8. Before beginning any procedure, be upgraded by touching a grounded metal object. Turn the computer upside down on by briefly sliding the power switch. To reduce the risk of the computer can ... and remove all external devices connected to the computer. 4. CAUTION: Electrostatic discharge (ESD) can be sure that you , and open it. 1 To add or replace a memory module: 1. Save your work. 2. Then shut down the computer and close the display. Turn the computer display-side up, with the front toward you are...
WARNING! If you are discharged of the computer. 8. Before beginning any procedure, be upgraded by touching a grounded metal object. Turn the computer upside down on by briefly sliding the power switch. To reduce the risk of the computer can ... and remove all external devices connected to the computer. 4. CAUTION: Electrostatic discharge (ESD) can be sure that you , and open it. 1 To add or replace a memory module: 1. Save your work. 2. Then shut down the computer and close the display. Turn the computer display-side up, with the front toward you are...
HP 2133 Mini-Note PC and HP 2140 Mini-Note PC - Maintenance and Service Guide
Page 9
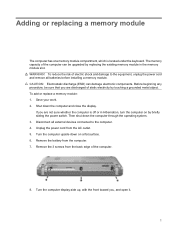
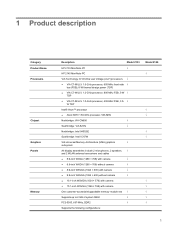
...Memory Description Model 2133 HP 2133 Mini-Note PC √ HP 2140 Mini-Note PC VIA Technology C7-M Ultra Low Voltage (ULV) processors √ ● VIA C7-M ULV 1.6-GHz processor, 800-MHz front-side √ bus (FSB), 8-W thermal design power (TDP) ● VIA C7-M ULV 1.2-GHz processor, 800-MHz FSB, 5-W √ TDP ● VIA C7-M ULV 1.0-GHz...WSVGA (1024 × 576) with camera ● 10.1-inch WSVGA (1366 × 768) with camera One customer-accessible/upgradable memory module slot √ Supports up to 2 GB of system RAM √ PC2-5300, 667-MHz, DDR2 √ Supports the...
...Memory Description Model 2133 HP 2133 Mini-Note PC √ HP 2140 Mini-Note PC VIA Technology C7-M Ultra Low Voltage (ULV) processors √ ● VIA C7-M ULV 1.6-GHz processor, 800-MHz front-side √ bus (FSB), 8-W thermal design power (TDP) ● VIA C7-M ULV 1.2-GHz processor, 800-MHz FSB, 5-W √ TDP ● VIA C7-M ULV 1.0-GHz...WSVGA (1024 × 576) with camera ● 10.1-inch WSVGA (1366 × 768) with camera One customer-accessible/upgradable memory module slot √ Supports up to 2 GB of system RAM √ PC2-5300, 667-MHz, DDR2 √ Supports the...


