HP 2000 Notebook PC - Maintenance and Service Guide
Page 11
... Customer-accessible √ √ Serial ATA √ √ 3 not supported on a 32-bit operating system) ● 4096-MB total system memory (4096×1 or 2048×2; not supported on a 64-bit operating system) Supports 6.35-cm (2.5-in) hard drives in 9.5- √ √...include 1 or 2 wireless local area network (WLAN) antenna cables Supports 16:9 ultra wide aspect ratio 2 customer-accessible/upgradable memory √ √ module slots Supports dual-channel memory √ √ Supports up to 8192 GB of system RAM √ √ DDR3/1333-MHz √...
... Customer-accessible √ √ Serial ATA √ √ 3 not supported on a 32-bit operating system) ● 4096-MB total system memory (4096×1 or 2048×2; not supported on a 64-bit operating system) Supports 6.35-cm (2.5-in) hard drives in 9.5- √ √...include 1 or 2 wireless local area network (WLAN) antenna cables Supports 16:9 ultra wide aspect ratio 2 customer-accessible/upgradable memory √ √ module slots Supports dual-channel memory √ √ Supports up to 8192 GB of system RAM √ √ DDR3/1333-MHz √...
Getting Started HP Notebook - Windows 7
Page 6
... only 24 Flicking (select models only 24 6 Maintenance ...25 Inserting or removing the battery ...25 Replacing or upgrading the hard drive 27 Removing the hard drive ...27 Installing a hard drive ...28 Adding or replacing memory modules 30 7 Backup and recovery ...35 Restore ...36 Creating restore media ...36 Performing a system restore ...37 Restoring... Restore to a previous date and time 41 8 Customer support ...42 Contacting customer support ...42 Labels ...43 9 Specifications ...44 Input power ...44 DC plug of external HP power supply 44 Operating environment ...45 Index ...46 vi
... only 24 Flicking (select models only 24 6 Maintenance ...25 Inserting or removing the battery ...25 Replacing or upgrading the hard drive 27 Removing the hard drive ...27 Installing a hard drive ...28 Adding or replacing memory modules 30 7 Backup and recovery ...35 Restore ...36 Creating restore media ...36 Performing a system restore ...37 Restoring... Restore to a previous date and time 41 8 Customer support ...42 Contacting customer support ...42 Labels ...43 9 Specifications ...44 Input power ...44 DC plug of external HP power supply 44 Operating environment ...45 Index ...46 vi
Getting Started HP Notebook - Windows 7
Page 8
... - or region-specific support, go to a wireless network ◦ Using the keyboard and pointing devices ◦ Replacing or upgrading the hard drive and memory modules ◦ Performing a backup and a recovery ◦ Contacting customer support ● Computer specifications HP Notebook Reference Guide ● Power management features To access this guide: Select Start > All Programs...
... - or region-specific support, go to a wireless network ◦ Using the keyboard and pointing devices ◦ Replacing or upgrading the hard drive and memory modules ◦ Performing a backup and a recovery ◦ Contacting customer support ● Computer specifications HP Notebook Reference Guide ● Power management features To access this guide: Select Start > All Programs...
Getting Started HP Notebook - Windows 7
Page 31
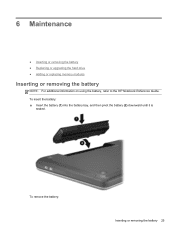
6 Maintenance ● Inserting or removing the battery ● Replacing or upgrading the hard drive ● Adding or replacing memory modules Inserting or removing the battery NOTE: For additional information on using the battery, refer to the HP Notebook Reference Guide. To insert the battery: ▲ Insert the battery (1) into the battery bay, and then pivot the battery (2) downward until it is seated. To remove the battery: Inserting or removing the battery 25
6 Maintenance ● Inserting or removing the battery ● Replacing or upgrading the hard drive ● Adding or replacing memory modules Inserting or removing the battery NOTE: For additional information on using the battery, refer to the HP Notebook Reference Guide. To insert the battery: ▲ Insert the battery (1) into the battery bay, and then pivot the battery (2) downward until it is seated. To remove the battery: Inserting or removing the battery 25

Getting Started HP Notebook - Windows 7
Page 33
... whether the computer is on, in the Sleep state, or in Hibernation, turn the computer on by pressing the power button. Replacing or upgrading the hard drive CAUTION: To prevent information loss or an unresponsive system: Shut down the computer before removing the hard drive from the AC ...outlet and remove the battery. 4. Unplug the power cord from the hard drive bay. Then shut down the computer. 2. Loosen the memory module compartment cover screw (1). 5. Replacing or upgrading the hard drive 27 Save your work and shut down the computer through the operating system.
... whether the computer is on, in the Sleep state, or in Hibernation, turn the computer on by pressing the power button. Replacing or upgrading the hard drive CAUTION: To prevent information loss or an unresponsive system: Shut down the computer before removing the hard drive from the AC ...outlet and remove the battery. 4. Unplug the power cord from the hard drive bay. Then shut down the computer. 2. Loosen the memory module compartment cover screw (1). 5. Replacing or upgrading the hard drive 27 Save your work and shut down the computer through the operating system.

Getting Started HP Notebook - Windows 7
Page 35
Close the cover (2). 6. Align the tabs on the hard drive cover (1) with the notches on the computer. 5. Align the tabs on the memory module compartment cover (1) with the notches on the computer. 8. Replacing or upgrading the hard drive 29 3. Close the cover (2). Slide the cable under the plastic notches. 4. Tighten the hard drive cover screw (3). 7. Connect the hard drive cable (3) to the computer.
Close the cover (2). 6. Align the tabs on the hard drive cover (1) with the notches on the computer. 5. Align the tabs on the memory module compartment cover (1) with the notches on the computer. 8. Replacing or upgrading the hard drive 29 3. Close the cover (2). Slide the cable under the plastic notches. 4. Tighten the hard drive cover screw (3). 7. Connect the hard drive cable (3) to the computer.

Getting Started HP Notebook - Windows 7
Page 36
... battery. 11. The capacity of static electricity by upgrading the existing memory module in the primary memory module slot. NOTE: To use a dual-channel configuration when adding a second memory module, be upgraded by adding a memory module to the equipment, unplug the power cord and... remove all batteries before installing a memory module. Before beginning any procedure, ensure that both memory modules are discharged of the computer can ...
... battery. 11. The capacity of static electricity by upgrading the existing memory module in the primary memory module slot. NOTE: To use a dual-channel configuration when adding a second memory module, be upgraded by adding a memory module to the equipment, unplug the power cord and... remove all batteries before installing a memory module. Before beginning any procedure, ensure that both memory modules are discharged of the computer can ...

