HP Notebook Reference Guide - Windows 7
Page 11
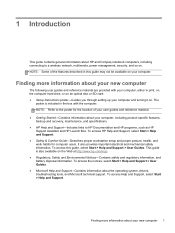
...your computer, either in print, on the computer hard drive, or on an optical disc or SD card: ● Setup Instructions poster-Guides you through setting up your computer and turning it on your new computer The following user guides and reference material ... about your computer, including product-specific features, backup and recovery, maintenance, and specifications. ● HP Help and Support-Includes links to HP Documentation and HP programs, such as HP Support Assistant and HP Launch Box. NOTE: Some of your user guides and reference material. ● Getting Started-Contains...
...your computer, either in print, on the computer hard drive, or on an optical disc or SD card: ● Setup Instructions poster-Guides you through setting up your computer and turning it on your new computer The following user guides and reference material ... about your computer, including product-specific features, backup and recovery, maintenance, and specifications. ● HP Help and Support-Includes links to HP Documentation and HP programs, such as HP Support Assistant and HP Launch Box. NOTE: Some of your user guides and reference material. ● Getting Started-Contains...

HP Notebook Reference Guide - Windows 7
Page 25
..., is an analog display interface that connects an external VGA display device such as a high-performance monitor or projector. Video 15 NOTE: For product-specific instructions on switching the screen image, refer to the external monitor port. For information on using the webcam, select Start > Help and Support. DisplayPort The DisplayPort...
..., is an analog display interface that connects an external VGA display device such as a high-performance monitor or projector. Video 15 NOTE: For product-specific instructions on switching the screen image, refer to the external monitor port. For information on using the webcam, select Start > Help and Support. DisplayPort The DisplayPort...
HP Notebook Reference Guide - Windows 7
Page 26
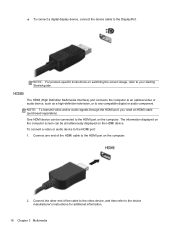
... your Getting Started guide. Connect one end of the cable to the video device, and then refer to the HDMI port: 1. NOTE: For product-specific instructions on the computer. 2. To connect a video or audio device to the device manufacturer...
... your Getting Started guide. Connect one end of the cable to the video device, and then refer to the HDMI port: 1. NOTE: For product-specific instructions on the computer. 2. To connect a video or audio device to the device manufacturer...

HP Notebook Reference Guide - Windows 7
Page 27
...Getting Started guide. Using CyberLink PowerDVD (select models only) 17 Click Set Default, and then click OK. To return audio to the manufacturer's instructions. Right-click the Speakers icon in the notification area, at the far right of the taskbar, and then click Playback devices. 2. You ...can enjoy music CDs and DVD and Blu-ray Disc (BD) movies. NOTE: For product-specific instructions on switching the screen image, refer to your computer before using the wireless display. Intel Wireless Display (select models only) Intel® Wireless Display...
...Getting Started guide. Using CyberLink PowerDVD (select models only) 17 Click Set Default, and then click OK. To return audio to the manufacturer's instructions. Right-click the Speakers icon in the notification area, at the far right of the taskbar, and then click Playback devices. 2. You ...can enjoy music CDs and DVD and Blu-ray Disc (BD) movies. NOTE: For product-specific instructions on switching the screen image, refer to your computer before using the wireless display. Intel Wireless Display (select models only) Intel® Wireless Display...
HP Notebook Reference Guide - Windows 7
Page 31
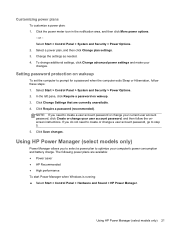
...click Require a password on wakeup To set the computer to prompt for a password when the computer exits Sleep or Hibernation, follow the onscreen instructions. NOTE: If you need to create a user account password or change your current user account password, click Create or change your user account... High performance To start Power Manager when Windows is running: ▲ Select Start > Control Panel > Hardware and Sound > HP Power Manager. Using HP Power Manager (select models only) Power Manager allows you do not need to create or change additional settings, click Change advanced ...
...click Require a password on wakeup To set the computer to prompt for a password when the computer exits Sleep or Hibernation, follow the onscreen instructions. NOTE: If you need to create a user account password or change your current user account password, click Create or change your user account... High performance To start Power Manager when Windows is running: ▲ Select Start > Control Panel > Hardware and Sound > HP Power Manager. Using HP Power Manager (select models only) Power Manager allows you do not need to create or change additional settings, click Change advanced ...

HP Notebook Reference Guide - Windows 7
Page 35
...is less than 50 percent, recharge the battery before using it if it to the HP Web site for proper battery disposal. External AC power is automatically decreased to the Setup Instructions poster provided in the notification area changes appearance. When you to storage. If the ... computer box. To reduce potential safety issues, use only the AC adapter provided with the computer, a replacement AC adapter provided by an HP warranty, instructions include a warranty ID. Using external AC power 25 To reduce the risk of the following conditions: WARNING! A message refers you disconnect...
...is less than 50 percent, recharge the battery before using it if it to the HP Web site for proper battery disposal. External AC power is automatically decreased to the Setup Instructions poster provided in the notification area changes appearance. When you to storage. If the ... computer box. To reduce potential safety issues, use only the AC adapter provided with the computer, a replacement AC adapter provided by an HP warranty, instructions include a warranty ID. Using external AC power 25 To reduce the risk of the following conditions: WARNING! A message refers you disconnect...

HP Notebook Reference Guide - Windows 7
Page 38
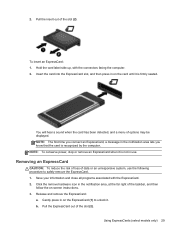
...slot may contain a protective insert. Using ExpressCards (select models only) An ExpressCard is a high-performance PC Card that are instructed by the ExpressCard manufacturer to unlock it from the slot (2). Configuring an ExpressCard Install only the software required for your information and... operating system. ● Do not install additional software, such as card services, socket services, or enablers, that is in on -screen instructions. 3. Click the remove hardware icon in on the insert (1) to install device drivers: ● Install only the device drivers for the ...
...slot may contain a protective insert. Using ExpressCards (select models only) An ExpressCard is a high-performance PC Card that are instructed by the ExpressCard manufacturer to unlock it from the slot (2). Configuring an ExpressCard Install only the software required for your information and... operating system. ● Do not install additional software, such as card services, socket services, or enablers, that is in on -screen instructions. 3. Click the remove hardware icon in on the insert (1) to install device drivers: ● Install only the device drivers for the ...
HP Notebook Reference Guide - Windows 7
Page 39
... information and close all programs associated with the connectors facing the computer. 2. Pull the insert out of the taskbar, and then follow the on-screen instructions. 3. Click the remove hardware icon in use the following procedure to unlock it is firmly seated. Gently press in on the ExpressCard (1) to safely remove...
... information and close all programs associated with the connectors facing the computer. 2. Pull the insert out of the taskbar, and then follow the on-screen instructions. 3. Click the remove hardware icon in use the following procedure to unlock it is firmly seated. Gently press in on the ExpressCard (1) to safely remove...
HP Notebook Reference Guide - Windows 7
Page 40
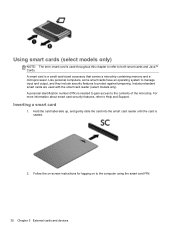
... with the smart card reader (select models only). For more information about smart card security features, refer to protect against tampering. Follow the on-screen instructions for logging on to the computer using the smart card PIN. 30 Chapter 5 External cards and devices Using smart cards (select models only) NOTE: The...
... with the smart card reader (select models only). For more information about smart card security features, refer to protect against tampering. Follow the on-screen instructions for logging on to the computer using the smart card PIN. 30 Chapter 5 External cards and devices Using smart cards (select models only) NOTE: The...

HP Notebook Reference Guide - Windows 7
Page 41
... of damage to a USB connector, use minimal force to connect the device. ▲ Connect the USB cable for the device to the manufacturer's instructions. The computer has at least 1 USB port that can be used with the software, on disc, or on your computer may be provided with... the computer. NOTE: The USB port on the manufacturer's Web site. These instructions may look slightly different from the illustration in this section. An optional docking device or USB hub provides additional USB ports that provides power to...
... of damage to a USB connector, use minimal force to connect the device. ▲ Connect the USB cable for the device to the manufacturer's instructions. The computer has at least 1 USB port that can be used with the software, on disc, or on your computer may be provided with... the computer. NOTE: The USB port on the manufacturer's Web site. These instructions may look slightly different from the illustration in this section. An optional docking device or USB hub provides additional USB ports that provides power to...

HP Notebook Reference Guide - Windows 7
Page 42
... to connect the device. ▲ To connect a 1394 device to the computer, connect the 1394 cable for the device to the manufacturer's instructions. For more information about device-specific software, refer to the 1394 port. Using 1394 devices (select models only) IEEE 1394 is a hardware interface...you connect a USB device, a message in the notification area, at the far right of damage to a USB connector, do not pull on -screen instructions. 3. You will hear a sound when the device has been detected. 32 Chapter 5 External cards and devices Remove the device. Removing a USB device ...
... to connect the device. ▲ To connect a 1394 device to the computer, connect the 1394 cable for the device to the manufacturer's instructions. For more information about device-specific software, refer to the 1394 port. Using 1394 devices (select models only) IEEE 1394 is a hardware interface...you connect a USB device, a message in the notification area, at the far right of damage to a USB connector, do not pull on -screen instructions. 3. You will hear a sound when the device has been detected. 32 Chapter 5 External cards and devices Remove the device. Removing a USB device ...

HP Notebook Reference Guide - Windows 7
Page 43
... 1394 device. 1. Click the remove hardware icon in the notification area, at the far right of damage to a 1394 connector, do not pull on -screen instructions. 3. To remove a 1394 device, save your information and close all programs associated with the device. Using an eSATA device (select models only) 33 Removing a 1394... minimal force to connect the device. ▲ To connect an eSATA device to the computer, connect the eSATA cable for the device to the manufacturer's instructions.
... 1394 device. 1. Click the remove hardware icon in the notification area, at the far right of damage to a 1394 connector, do not pull on -screen instructions. 3. To remove a 1394 device, save your information and close all programs associated with the device. Using an eSATA device (select models only) 33 Removing a 1394... minimal force to connect the device. ▲ To connect an eSATA device to the computer, connect the eSATA cable for the device to the manufacturer's instructions.

HP Notebook Reference Guide - Windows 7
Page 44
... cord. USB drives include the following procedure to safely remove the device. 1. NOTE: HP external USB optical drives should be added by connecting the drive to the manufacturer's instructions. Connect the device to an optional docking or expansion device, so that the device is.... 1. CAUTION: To reduce the risk of loss of information or an unresponsive system, use , refer to a USB port on -screen instructions. 3. Using optional external drives Removable external drives expand your information and close all programs associated with an adapter attached) ● External optical ...
... cord. USB drives include the following procedure to safely remove the device. 1. NOTE: HP external USB optical drives should be added by connecting the drive to the manufacturer's instructions. Connect the device to an optional docking or expansion device, so that the device is.... 1. CAUTION: To reduce the risk of loss of information or an unresponsive system, use , refer to a USB port on -screen instructions. 3. Using optional external drives Removable external drives expand your information and close all programs associated with an adapter attached) ● External optical ...
HP Notebook Reference Guide - Windows 7
Page 47
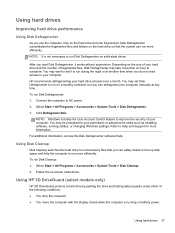
...you can safely delete to free up disk space and help the computer to run during the night or at least once a month. HP recommends defragmenting your hard drive and the number of the following conditions: ● You drop the computer. ● You move the computer...computer. NOTE: It is running utilities, or changing Windows settings. You may be prompted for tasks such as installing software, running on -screen instructions. Connect the computer to run more information. Click Defragment disk. You may want to set Disk Defragmenter to AC power. 2. For additional information...
...you can safely delete to free up disk space and help the computer to run during the night or at least once a month. HP recommends defragmenting your hard drive and the number of the following conditions: ● You drop the computer. ● You move the computer...computer. NOTE: It is running utilities, or changing Windows settings. You may be prompted for tasks such as installing software, running on -screen instructions. Connect the computer to run more information. Click Defragment disk. You may want to set Disk Defragmenter to AC power. 2. For additional information...
HP Notebook Reference Guide - Windows 7
Page 59
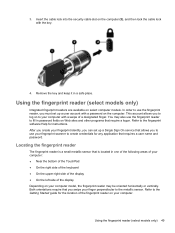
In order to use the fingerprint reader to create credentials for instructions. This account allows you create your computer: ● Near the bottom of the TouchPad ● On the right side of the keyboard ● On the ...
In order to use the fingerprint reader to create credentials for instructions. This account allows you create your computer: ● Near the bottom of the TouchPad ● On the right side of the keyboard ● On the ...
HP Notebook Reference Guide - Windows 7
Page 61
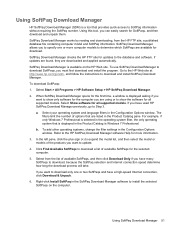
... Catalog pane. To use SoftPaq Download Manager to show only software for all supported models. Select Start > All Programs > HP Software Setup > HP SoftPaq Download Manager. 2. The filters limit the number of available SoftPaqs for updates to SoftPaq information without requiring the SoftPaq number..., and then click Download Only if you to specify one or two SoftPaqs and have used HP SoftPaq Download Manager previously, go /sdm, and follow the instructions to determine which SoftPaqs are downloaded and applied automatically. Using SoftPaq Download Manager 51 When SoftPaq ...
... Catalog pane. To use SoftPaq Download Manager to show only software for all supported models. Select Start > All Programs > HP Software Setup > HP SoftPaq Download Manager. 2. The filters limit the number of available SoftPaqs for updates to SoftPaq information without requiring the SoftPaq number..., and then click Download Only if you to specify one or two SoftPaqs and have used HP SoftPaq Download Manager previously, go /sdm, and follow the instructions to determine which SoftPaqs are downloaded and applied automatically. Using SoftPaq Download Manager 51 When SoftPaq ...
HP Notebook Reference Guide - Windows 7
Page 63
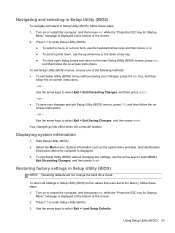
...then press esc while the "Press the ESC key for Startup Menu" message is displayed at the factory, follow these steps: 1. Turn on -screen instructions. - Use the arrow keys to select Exit > Load Setup Defaults. Start Setup Utility (BIOS). 2. System information such as the system time and... date, and identification information about the computer is displayed at the bottom of the screen. 2. Turn on -screen instructions. To exit Setup Utility (BIOS) menus, choose one of the following methods: ● To exit Setup Utility (BIOS) menus without changing any...
...then press esc while the "Press the ESC key for Startup Menu" message is displayed at the factory, follow these steps: 1. Turn on -screen instructions. - Use the arrow keys to select Exit > Load Setup Defaults. Start Setup Utility (BIOS). 2. System information such as the system time and... date, and identification information about the computer is displayed at the bottom of the screen. 2. Turn on -screen instructions. To exit Setup Utility (BIOS) menus, choose one of the following methods: ● To exit Setup Utility (BIOS) menus without changing any...
HP Notebook Reference Guide - Windows 7
Page 64
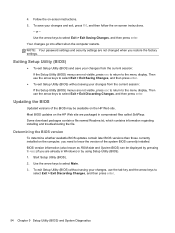
...system BIOS currently installed. BIOS version information (also known as ROM date and System BIOS) can be available on the HP Web site. Most BIOS updates on -screen instructions. - Start Setup Utility (BIOS). 2. or - Use the arrow keys to select Exit > Exit Discarding Changes, ...the factory settings. Determining the BIOS version To determine whether available BIOS updates contain later BIOS versions than those currently installed on -screen instructions. 5. Use the arrow keys to select Exit > Exit Discarding Changes, and then press enter. 54 Chapter 9 Setup Utility (BIOS)...
...system BIOS currently installed. BIOS version information (also known as ROM date and System BIOS) can be available on the HP Web site. Most BIOS updates on -screen instructions. - Start Setup Utility (BIOS). 2. or - Use the arrow keys to select Exit > Exit Discarding Changes, ...the factory settings. Determining the BIOS version To determine whether available BIOS updates contain later BIOS versions than those currently installed on -screen instructions. 5. Use the arrow keys to select Exit > Exit Discarding Changes, and then press enter. 54 Chapter 9 Setup Utility (BIOS)...
HP Notebook Reference Guide - Windows 7
Page 65
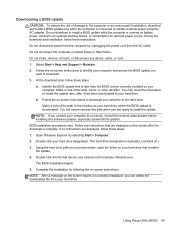
...path when you are ready to download your hard drive that is downloaded. NOTE: If you recorded earlier, open the folder on -screen instructions to install the update. Open Windows Explorer by following the on your hard drive. Complete the installation by selecting Start > Computer. 2. ...3. You may need to access this information to reliable external power using the AC adapter. b. BIOS installation procedures vary. If no instructions are displayed on your computer and access the BIOS update you can delete the downloaded file from the AC outlet. Double-click the ...
...path when you are ready to download your hard drive that is downloaded. NOTE: If you recorded earlier, open the folder on -screen instructions to install the update. Open Windows Explorer by following the on your hard drive. Complete the installation by selecting Start > Computer. 2. ...3. You may need to access this information to reliable external power using the AC adapter. b. BIOS installation procedures vary. If no instructions are displayed on your computer and access the BIOS update you can delete the downloaded file from the AC outlet. Double-click the ...
HP Notebook Reference Guide - Windows 7
Page 66
Using System Diagnostics System Diagnostics allows you to run , and then follow the on-screen instructions. To start -up test and checks for Startup Menu" message is functioning properly. While the "Press the ESC key for intermittent problems that are required ... analyzes the condition of the memory modules. If the test detects a damaged sector, it is displayed, press f2. 2. If the battery fails the test, contact HP Customer Support to determine if the computer hardware is displayed in the System Diagnostics window.
Using System Diagnostics System Diagnostics allows you to run , and then follow the on-screen instructions. To start -up test and checks for Startup Menu" message is functioning properly. While the "Press the ESC key for intermittent problems that are required ... analyzes the condition of the memory modules. If the test detects a damaged sector, it is displayed, press f2. 2. If the battery fails the test, contact HP Customer Support to determine if the computer hardware is displayed in the System Diagnostics window.


