Innovative technologies in HP ProLiant Gen8 servers
Page 7
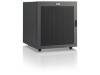
... blades. HP Power Advisor utility The HP Power Advisor utility helps you calculate the power requirements for an HP BladeSystem Enclosure by adjusting cap levels on -motherboard was to provide essential connectivity without sacrificing any of Sensors 3D, FlexibleNetwork Adapters for BladeSystem enclosures. It lets you calculate the expected power use of servers. Networking HP FlexibleNetwork Adapters include features that if new connectivity...
... blades. HP Power Advisor utility The HP Power Advisor utility helps you calculate the power requirements for an HP BladeSystem Enclosure by adjusting cap levels on -motherboard was to provide essential connectivity without sacrificing any of Sensors 3D, FlexibleNetwork Adapters for BladeSystem enclosures. It lets you calculate the expected power use of servers. Networking HP FlexibleNetwork Adapters include features that if new connectivity...

Innovative technologies in HP ProLiant Gen8 servers
Page 12
... Server Support Guide for each SPP release. After the update, HP SUM removes all HP ProLiant SL, ML, and DL 300-, 500-, 700-, and 900-series servers and BL series servers, as wells as hot fixes. We are addressing this industry-wide need to release firmware, software components, or both with the release of HP Service Pack for specific users, so...
... Server Support Guide for each SPP release. After the update, HP SUM removes all HP ProLiant SL, ML, and DL 300-, 500-, 700-, and 900-series servers and BL series servers, as wells as hot fixes. We are addressing this industry-wide need to release firmware, software components, or both with the release of HP Service Pack for specific users, so...

HP 10000 Series Rack Airflow Optimization Kit Installation Instructions
Page 2
... rail gasket must be installed into a rack that have a baying kit installed, the baying bracket must be removed before inserting it is flush with the vertical frame. Position the racks side by side. 2. Depending on the size of the rack. 5. (Optional) See the HP Baying Rack Option Kit for specific information on baying racks, see the HP Baying Rack Option Kit. baying bracket. If installing the foam rail gasket...
... rail gasket must be installed into a rack that have a baying kit installed, the baying bracket must be removed before inserting it is flush with the vertical frame. Position the racks side by side. 2. Depending on the size of the rack. 5. (Optional) See the HP Baying Rack Option Kit for specific information on baying racks, see the HP Baying Rack Option Kit. baying bracket. If installing the foam rail gasket...

Plinth Rack Option Kit Installation Instructions
Page 2
... injury or damage to the equipment, this rack option kit must be installed, contact your building supervisor. Failure to these instructions. For information on the plinth assembly to mount the rack to the floor, contact your building supervisor. Installing the Eyebolts To install the eyebolts, screw each plinth assembly stud, securing the plinth assembly pieces together using a M8 hex wrench with internal serrated lock...
... injury or damage to the equipment, this rack option kit must be installed, contact your building supervisor. Failure to these instructions. For information on the plinth assembly to mount the rack to the floor, contact your building supervisor. Installing the Eyebolts To install the eyebolts, screw each plinth assembly stud, securing the plinth assembly pieces together using a M8 hex wrench with internal serrated lock...
10000 Series Rack Reference Guide
Page 6
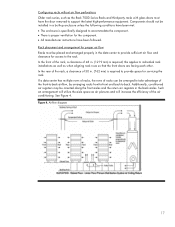
About This Guide This guide provides step-by-step instructions for installation, and reference information for operation for specific details. Important Safety Information Before installing this enclosure. Symbols on Equipment The following symbols may be placed on equipment... the server. Refer all maintenance, upgrades, and servicing to qualified personnel. Consult your documentation for the HP 10000 Series Rack. HP 10000 Series Rack Reference Guide vii The potential for injury exists if warnings are not observed. Refer all servicing to qualified personnel. WARNING: To ...
About This Guide This guide provides step-by-step instructions for installation, and reference information for operation for specific details. Important Safety Information Before installing this enclosure. Symbols on Equipment The following symbols may be placed on equipment... the server. Refer all maintenance, upgrades, and servicing to qualified personnel. Consult your documentation for the HP 10000 Series Rack. HP 10000 Series Rack Reference Guide vii The potential for injury exists if warnings are not observed. Refer all servicing to qualified personnel. WARNING: To ...

10000 Series Rack Reference Guide
Page 14
... Guide." 1-4 HP 10000 Series Rack Reference Guide For the name of the nearest HP authorized reseller, see the HP website at www.hp.com. Overview Table 1-1: Rack Options continued Option Cable Management D-Ring Rack Option Kit 25-inch Rail Adapter Option Kit 1U Keyboard Drawer Option Kit 100 Kilo Sliding Shelf Rack Option Kit TFT5600 Rackmount Keyboard and Monitor (RKM) TFT5000R Flat Panel Monitor Rackmount Depth Adjustable Fixed Rail Kit Shock Pallet Spares Kit Rack...
... Guide." 1-4 HP 10000 Series Rack Reference Guide For the name of the nearest HP authorized reseller, see the HP website at www.hp.com. Overview Table 1-1: Rack Options continued Option Cable Management D-Ring Rack Option Kit 25-inch Rail Adapter Option Kit 1U Keyboard Drawer Option Kit 100 Kilo Sliding Shelf Rack Option Kit TFT5600 Rackmount Keyboard and Monitor (RKM) TFT5000R Flat Panel Monitor Rackmount Depth Adjustable Fixed Rail Kit Shock Pallet Spares Kit Rack...

10000 Series Rack Reference Guide
Page 16
..., being sure to adhere to have your rack system installed by qualified guaranteed service providers. Power up and configure the system. Installation Service In the United States, HP can make arrangements to all cautions and warnings. 13. For more information on HP support, see "About This Guide." 1-6 HP 10000 Series Rack Reference Guide Reinstall any doors and panels. 15. Overview 9. Attach a cable management arm...
..., being sure to adhere to have your rack system installed by qualified guaranteed service providers. Power up and configure the system. Installation Service In the United States, HP can make arrangements to all cautions and warnings. 13. For more information on HP support, see "About This Guide." 1-6 HP 10000 Series Rack Reference Guide Reinstall any doors and panels. 15. Overview 9. Attach a cable management arm...

10000 Series Rack Reference Guide
Page 19
... into one rack- HP 10000 Series Rack Reference Guide 2-3 Be sure to balance the weight load between racks and place the heaviest components at the bottom of rack-mountable components is installed, do not exceed its output rating. When you are configuring your specific rack configuration: • Power-If a UPS is measured in the bottom positions of a Monitor/Utility Shelf Rack Option Kit unless...
... into one rack- HP 10000 Series Rack Reference Guide 2-3 Be sure to balance the weight load between racks and place the heaviest components at the bottom of rack-mountable components is installed, do not exceed its output rating. When you are configuring your specific rack configuration: • Power-If a UPS is measured in the bottom positions of a Monitor/Utility Shelf Rack Option Kit unless...

10000 Series Rack Reference Guide
Page 27
Lift the handle up and out to all sides of the rack while you are installing the various components, first remove the rack doors. Preparing the Rack for Component Installation Removing the Rack Doors To provide access to open the door (3). 3 1 2 Figure 3-1: Opening the front door HP 10000 Series Rack Reference Guide 3-3 Unlock the door (1) and press the handle release button (2). The handle pops out. 2. If your rack has side panels, also remove them before installing mounting brackets and other hardware. To remove the rack front door: 1.
Lift the handle up and out to all sides of the rack while you are installing the various components, first remove the rack doors. Preparing the Rack for Component Installation Removing the Rack Doors To provide access to open the door (3). 3 1 2 Figure 3-1: Opening the front door HP 10000 Series Rack Reference Guide 3-3 Unlock the door (1) and press the handle release button (2). The handle pops out. 2. If your rack has side panels, also remove them before installing mounting brackets and other hardware. To remove the rack front door: 1.

10000 Series Rack Reference Guide
Page 71
... of 2-4 configuring 2-3 CRT monitor 2-3 flat panel monitor 2-3 height 2-3 keyboard 2-3 monitor 2-3 PDU 2-3 power 2-3 side panels 2-4 stabilizing feet 2-4 switch box 2-3 weight 2-3 components installation 4-18 weight distribution/in rack 4-3 configuration factors 2-1 Rack Builder Online 4-3 server/storage vs. Index component placement considerations balance 2-3 baying option kits, number of damage from A-1 expedited delivery service B-3 F fan rack option kit 1-3 features cable access panel 1-2 color 1-2 HP 10000 Series racks 1-2 interchangeable doors 1-2 perforated front door 1-2 perforated...
... of 2-4 configuring 2-3 CRT monitor 2-3 flat panel monitor 2-3 height 2-3 keyboard 2-3 monitor 2-3 PDU 2-3 power 2-3 side panels 2-4 stabilizing feet 2-4 switch box 2-3 weight 2-3 components installation 4-18 weight distribution/in rack 4-3 configuration factors 2-1 Rack Builder Online 4-3 server/storage vs. Index component placement considerations balance 2-3 baying option kits, number of damage from A-1 expedited delivery service B-3 F fan rack option kit 1-3 features cable access panel 1-2 color 1-2 HP 10000 Series racks 1-2 interchangeable doors 1-2 perforated front door 1-2 perforated...

10000 Series Rack Reference Guide
Page 72
... delivery service B-2 installation cable management arm 4-20 cable management arm bracket 4-17 cage nuts 4-6 components 4-18 overview 4-4 fixed rails 4-8 guidelines 4-2 service 1-6 sliding rails 4-14 tools needed for 3-2 zero U devices 4-4 Index interchangeable front and split rear doors 1-2 J joining racks 2-4 K keyboard rack configuration consideration 2-3 required parts 2-3 kit components list 3-2 L labeling, Rack Builder Online 2-2 land transport of rack B-2 leveling feet 3-8 M Maximum Recommended Ambient Operating Temperature 2-7 measurements 2-3 model specifications...
... delivery service B-2 installation cable management arm 4-20 cable management arm bracket 4-17 cage nuts 4-6 components 4-18 overview 4-4 fixed rails 4-8 guidelines 4-2 service 1-6 sliding rails 4-14 tools needed for 3-2 zero U devices 4-4 Index interchangeable front and split rear doors 1-2 J joining racks 2-4 K keyboard rack configuration consideration 2-3 required parts 2-3 kit components list 3-2 L labeling, Rack Builder Online 2-2 land transport of rack B-2 leveling feet 3-8 M Maximum Recommended Ambient Operating Temperature 2-7 measurements 2-3 model specifications...

10842 Rack Reference Guide
Page 14
... HP also offers several rack-mountable power products. Contact the nearest HP authorized reseller or service provider for information about these products, see the HP website, www.hp.com. Overview Table 1-1: Rack Options continued Option Cable Management D-Ring Rack Option Kit 25-inch Rail Adapter Option Kit 1U Keyboard Drawer Option Kit 100 Kilo Sliding Shelf Rack Option Kit TFT5600 Rackmount Keyboard and Monitor (RKM) Kit TFT5000R Flat Panel Monitor Rackmount Kit Depth Adjustable...
... HP also offers several rack-mountable power products. Contact the nearest HP authorized reseller or service provider for information about these products, see the HP website, www.hp.com. Overview Table 1-1: Rack Options continued Option Cable Management D-Ring Rack Option Kit 25-inch Rail Adapter Option Kit 1U Keyboard Drawer Option Kit 100 Kilo Sliding Shelf Rack Option Kit TFT5600 Rackmount Keyboard and Monitor (RKM) Kit TFT5000R Flat Panel Monitor Rackmount Kit Depth Adjustable...

10842 Rack Reference Guide
Page 19
... specific rack configuration. • Power-If a UPS is measured in U increments. HP 10842 Rack Reference Guide 2-3 Be sure to review the installation instructions provided with each rack. • Server Console Switch-Position the switch box on your rack installation, remember that the total U measurement of the components you want to install cannot exceed the stated U height of the rack. • Keyboard-The rack keyboard requires prior installation of a 1U Keyboard Drawer Rack...
... specific rack configuration. • Power-If a UPS is measured in U increments. HP 10842 Rack Reference Guide 2-3 Be sure to review the installation instructions provided with each rack. • Server Console Switch-Position the switch box on your rack installation, remember that the total U measurement of the components you want to install cannot exceed the stated U height of the rack. • Keyboard-The rack keyboard requires prior installation of a 1U Keyboard Drawer Rack...

10842 Rack Reference Guide
Page 27
If your rack has side panels, also remove them before installing mounting brackets and other hardware. Preparing the Rack Removing the Rack Doors To provide access to open the door (3). 3 1 2 Figure 3-1: Opening the rack front door HP 10842 Rack Reference Guide 3-3 Unlock the door (1) and press the handle release button down (2) until the handle pops out. 2. To remove the rack front door: 1. Lift the handle up and out to all sides of the rack while you are installing the various components, first remove the rack doors.
If your rack has side panels, also remove them before installing mounting brackets and other hardware. Preparing the Rack Removing the Rack Doors To provide access to open the door (3). 3 1 2 Figure 3-1: Opening the rack front door HP 10842 Rack Reference Guide 3-3 Unlock the door (1) and press the handle release button down (2) until the handle pops out. 2. To remove the rack front door: 1. Lift the handle up and out to all sides of the rack while you are installing the various components, first remove the rack doors.

10842 Rack Reference Guide
Page 37
... the rack. 5. Prepare and install the adjustable fixed rails, sliding rails, or both. 4. HP 10842 Rack Reference Guide 4-3 Use the template to measure and mark the rack for correct placement of the rack to provide adequate access for detailed instructions on . 1. Attach the cable management arm to the rack and then to balance the weight load between the wall and the rear of the installation hardware...
... the rack. 5. Prepare and install the adjustable fixed rails, sliding rails, or both. 4. HP 10842 Rack Reference Guide 4-3 Use the template to measure and mark the rack for correct placement of the rack to provide adequate access for detailed instructions on . 1. Attach the cable management arm to the rack and then to balance the weight load between the wall and the rear of the installation hardware...
Best practices for HP 10000 Series and HP 10000 G2 Series Racks
Page 4
... to aid in the installation of -use. Table 1. 10000 G2 Series rack key features Component Front door Rear doors Features The front door is the look; The major change in favor of high value and high volume customers. Grounding kit New universal grounding kit supports the 9000, 10000, and 10000 G2 Series racks. An optional rear extension is based on the 10000 Series...
... to aid in the installation of -use. Table 1. 10000 G2 Series rack key features Component Front door Rear doors Features The front door is the look; The major change in favor of high value and high volume customers. Grounding kit New universal grounding kit supports the 9000, 10000, and 10000 G2 Series racks. An optional rear extension is based on the 10000 Series...
Best practices for HP 10000 Series and HP 10000 G2 Series Racks
Page 19
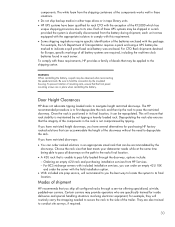
...to individual rack installations as well as air plenums and will increase the efficiency of 48 in a built-up enclosure unless the following conditions have been met: • The enclosure is specifically designed to accommodate the component. • There is required to support the latest .... • All manufacturer instructions have the door removed to provide space for proper air flow Racks must have been followed. See Figure 4. Configuring racks without air flow perforations Older rack series, such as the Rack 7000 Series Racks and third-party racks with glass doors must be...
...to individual rack installations as well as air plenums and will increase the efficiency of 48 in a built-up enclosure unless the following conditions have been met: • The enclosure is specifically designed to accommodate the component. • There is required to support the latest .... • All manufacturer instructions have the door removed to provide space for proper air flow Racks must have been followed. See Figure 4. Configuring racks without air flow perforations Older rack series, such as the Rack 7000 Series Racks and third-party racks with glass doors must be...
Best practices for HP 10000 Series and HP 10000 G2 Series Racks
Page 32
components. To prevent rotation of shipment HP recommends that the front panel mounting screws are specifically trained for inside deliveries and special handling situations involving electronic equipment; This will ensure that is unable to pass fully loaded through a service offering specialized, air-ride, padded-van carriers. Ordering an empty 42U rack and purchasing installation services from the battery during shipment; Modes...
components. To prevent rotation of shipment HP recommends that the front panel mounting screws are specifically trained for inside deliveries and special handling situations involving electronic equipment; This will ensure that is unable to pass fully loaded through a service offering specialized, air-ride, padded-van carriers. Ordering an empty 42U rack and purchasing installation services from the battery during shipment; Modes...
side panels rack option kit installation instructions
Page 1
... side panel to the floor. • The full weight of the rack rests on the leveling jacks. • The stabilizing feet are extended. Hewlett-Packard Company shall not be sure that: • The leveling jacks are extended to the hangers bolted onto the rack frame. The information in this option kit. hp side panels rack option kit installation instructions Second Edition (December 2002) Part Number 246441...
... side panel to the floor. • The full weight of the rack rests on the leveling jacks. • The stabilizing feet are extended. Hewlett-Packard Company shall not be sure that: • The leveling jacks are extended to the hangers bolted onto the rack frame. The information in this option kit. hp side panels rack option kit installation instructions Second Edition (December 2002) Part Number 246441...

Baying Rack Option Kit Installation Instructions
Page 2
... according to the rack frame. c. Place the side panels in an unstable installation. 1. Installing the Baying Rack Option Kit WARNING: To reduce the risk of each rack set. 2. Use either a 24-inch or 600-mm baying bracket, depending on solid flooring (no cracks or openings). 4. a. Bay any additional racks. 6. b. Remove the front and rear doors. 3. Attach three baying brackets to remove it from damage. Installation is complete. Failure...
... according to the rack frame. c. Place the side panels in an unstable installation. 1. Installing the Baying Rack Option Kit WARNING: To reduce the risk of each rack set. 2. Use either a 24-inch or 600-mm baying bracket, depending on solid flooring (no cracks or openings). 4. a. Bay any additional racks. 6. b. Remove the front and rear doors. 3. Attach three baying brackets to remove it from damage. Installation is complete. Failure...


