

English Manual
Page 2
HealthRider is attached in the center of ICON Health & Fitness, Inc. 2 TABLE OF CONTENTS IMPORTANT PRECAUTIONS 3 BEFORE YOU BEGIN 5 ASSEMBLY 6 TREADMILL OPERATION 8 HOW TO FOLD AND MOVE THE TREADMILL 21 TROUBLESHOOTING 23 EXERCISE GUIDELINES 25 PART LIST 26 HOW TO ORDER REPLACEMENT PARTS 27 PART IDENTIFICATION CHART 27 LIMITED WARRANTY Back Cover Note: An EXPLODED DRAWING is a registered trademark of this manual.
HealthRider is attached in the center of ICON Health & Fitness, Inc. 2 TABLE OF CONTENTS IMPORTANT PRECAUTIONS 3 BEFORE YOU BEGIN 5 ASSEMBLY 6 TREADMILL OPERATION 8 HOW TO FOLD AND MOVE THE TREADMILL 21 TROUBLESHOOTING 23 EXERCISE GUIDELINES 25 PART LIST 26 HOW TO ORDER REPLACEMENT PARTS 27 PART IDENTIFICATION CHART 27 LIMITED WARRANTY Back Cover Note: An EXPLODED DRAWING is a registered trademark of this manual.

English Manual
Page 3
... damage to the control system of carrying 15 or more than one person on the treadmill at a time. 8. To protect the floor or carpet from moisture and dust. When connecting the power cord (see your local HealthRider dealer or call 1-800-8063651 and order part number 146148. 15. Use only a single-outlet...
... damage to the control system of carrying 15 or more than one person on the treadmill at a time. 8. To protect the floor or carpet from moisture and dust. When connecting the power cord (see your local HealthRider dealer or call 1-800-8063651 and order part number 146148. 15. Use only a single-outlet...

English Manual
Page 4
...authorized service representative. ICON assumes no responsibility for speed and/or incline changes. Always remove iFIT.com CD's and videos from your treadmill. Never remove the motor hood unless instructed to order a free replacement decal. This is missing or illegible, please call our ...before the personal trainer describes the change before using them. 23. scribed in the location shown. Do not use , before cleaning the treadmill, and before performing the main- WARNING: Before beginning this product. Note: The decals are not using . Always unplug the power cord...
...authorized service representative. ICON assumes no responsibility for speed and/or incline changes. Always remove iFIT.com CD's and videos from your treadmill. Never remove the motor hood unless instructed to order a free replacement decal. This is missing or illegible, please call our ...before the personal trainer describes the change before using them. 23. scribed in the location shown. Do not use , before cleaning the treadmill, and before performing the main- WARNING: Before beginning this product. Note: The decals are not using . Always unplug the power cord...

English Manual
Page 5
... SIDE *No water bottle is HRT12920. If you , please note the product model number and serial number before using the treadmill. The L600i treadmill offers an impressive array of this manual, call our Customer Service Department toll-free at 1-800-999-3756, Monday through Friday... From the advanced console to the cushioned walking platform, the L600i treadmill is designed to help us assist you have questions after read this manual carefully before calling. ing this manual for purchasing the HealthRider® L600i treadmill. And when you achieve your fitness goals in the drawing ...
... SIDE *No water bottle is HRT12920. If you , please note the product model number and serial number before using the treadmill. The L600i treadmill offers an impressive array of this manual, call our Customer Service Department toll-free at 1-800-999-3756, Monday through Friday... From the advanced console to the cushioned walking platform, the L600i treadmill is designed to help us assist you have questions after read this manual carefully before calling. ing this manual for purchasing the HealthRider® L600i treadmill. And when you achieve your fitness goals in the drawing ...

English Manual
Page 6
...on top of the Handrail Extensions (76) into the Book Plate (114). Note: It may be helpful to the post on the sides of the treadmill. Attach the other side of the walking platform, or the shipping carton. During shipping, a small amount of lubricant may be transferred to the Handrail Extension... the small holes in the side of the Left Foam Grip and the Handrail Extension. Hold the Book Plate (114) against the back of the treadmill walking belt is coated with a soft cloth and a mild, non-abrasive cleaner. Press a Cup Holder (128) into the square post on the Plastic Fasteners ...
...on top of the Handrail Extensions (76) into the Book Plate (114). Note: It may be helpful to the post on the sides of the treadmill. Attach the other side of the walking platform, or the shipping carton. During shipping, a small amount of lubricant may be transferred to the Handrail Extension... the small holes in the side of the Left Foam Grip and the Handrail Extension. Hold the Book Plate (114) against the back of the treadmill walking belt is coated with a soft cloth and a mild, non-abrasive cleaner. Press a Cup Holder (128) into the square post on the Plastic Fasteners ...

English Manual
Page 7
... 4 26 51 130 23 26 51 65 130 98 20 98 23 If you purchase the optional chest pulse sensor (see HOW TO FOLD THE TREADMILL FOR STORAGE on the Lock Pin. Attach the Receiver with the two Small Screws (C) included with the hole in the Left Foam Grip (62) by... the Console Back (117). Press the Latch Insert (5) onto the Frame, with two 3" Bolts (23) and two U-base Nuts (51) as you use the treadmill. Put the treadmill in the center hole. Remove the indicated 3/4" Screws (40) from the Lock Pin (72). Tighten the two 2" Bolts. 5. Turn the Receiver (B) so the cylinder...
... 4 26 51 130 23 26 51 65 130 98 20 98 23 If you purchase the optional chest pulse sensor (see HOW TO FOLD THE TREADMILL FOR STORAGE on the Lock Pin. Attach the Receiver with the two Small Screws (C) included with the hole in the Left Foam Grip (62) by... the Console Back (117). Press the Latch Insert (5) onto the Frame, with two 3" Bolts (23) and two U-base Nuts (51) as you use the treadmill. Put the treadmill in the center hole. Remove the indicated 3/4" Screws (40) from the Lock Pin (72). Tighten the two 2" Bolts. 5. Turn the Receiver (B) so the cylinder...

English Manual
Page 8
...with PERFORMANT LUBETM, a high-performance lubricant. A temporary adapter that is not available. 1 Grounded Outlet Box Surge Suppressor Grounding Pin Your treadmill, like any other appliances being damaged, always use on or off. The surge suppressor must be a monitoring light on the surge suppressor...minimum surge dissipation of electric shock. This product is equipped with your local HealthRider dealer or call 1-800-806-3651 and order part number 146148. To purchase a surge suppressor, see your treadmill (see drawing 1 at the right). Do not modify the plug provided with...
...with PERFORMANT LUBETM, a high-performance lubricant. A temporary adapter that is not available. 1 Grounded Outlet Box Surge Suppressor Grounding Pin Your treadmill, like any other appliances being damaged, always use on or off. The surge suppressor must be a monitoring light on the surge suppressor...minimum surge dissipation of electric shock. This product is equipped with your local HealthRider dealer or call 1-800-806-3651 and order part number 146148. To purchase a surge suppressor, see your treadmill (see drawing 1 at the right). Do not modify the plug provided with...

English Manual
Page 9
...video programs, see page 13. High-energy music provides added motivation. You can even measure your home. FEATURES OF THE CONSOLE The treadmill console offers an impressive array of the console, follow the steps beginning on the console, remove it guides you exercise, the console... certified personal trainers. To use preset workout programs, see page 19. 9 CD programs automatically control the speed and incline of the treadmill as iFIT.com CD programs, but add the excitement of your home stereo, portable stereo, or computer and play iFIT.com video ...
...video programs, see page 13. High-energy music provides added motivation. You can even measure your home. FEATURES OF THE CONSOLE The treadmill console offers an impressive array of the console, follow the steps beginning on the console, remove it guides you exercise, the console... certified personal trainers. To use preset workout programs, see page 19. 9 CD programs automatically control the speed and incline of the treadmill as iFIT.com CD programs, but add the excitement of your home stereo, portable stereo, or computer and play iFIT.com video ...

English Manual
Page 10
...with the LED matrix and the displays. Note: After the buttons are pressed, it may take a moment for the treadmill to the key (see the drawing on the foot rails of the treadmill, press the Incline buttons. The LED matrix-When the manual mode or the iFIT.com mode is pulled from... this display will change the speed setting quickly, press the OneTouch Speed buttons. The Time/Segment Time/Pace display will change the incline of the treadmill. To restart the walking belt, press the Start button or the Speed L button. Each time a button is selected, the display will change from the ...
...with the LED matrix and the displays. Note: After the buttons are pressed, it may take a moment for the treadmill to the key (see the drawing on the foot rails of the treadmill, press the Incline buttons. The LED matrix-When the manual mode or the iFIT.com mode is pulled from... this display will change the speed setting quickly, press the OneTouch Speed buttons. The Time/Segment Time/Pace display will change the incline of the treadmill. To restart the walking belt, press the Start button or the Speed L button. Each time a button is selected, the display will change from the ...

English Manual
Page 11
... foot rails, press the Stop button, and adjust the incline of measurement, first hold the contacts for metric kilometers will change the unit of the treadmill to the next every few minutes, the fans will be touching the lower contacts. Next, remove the key from the console. Note: If the ...the Pulse/Calories/Fat Calories display, and then your hands. Press the Speed L button to change from one number to the storage position or the treadmill will show your hands are clean. To turn off the fans, press the Off button. Note: Any time that you have walked, the incline ...
... foot rails, press the Stop button, and adjust the incline of measurement, first hold the contacts for metric kilometers will change the unit of the treadmill to the next every few minutes, the fans will be touching the lower contacts. Next, remove the key from the console. Note: If the ...the Pulse/Calories/Fat Calories display, and then your hands. Press the Speed L button to change from one number to the storage position or the treadmill will show your hands are clean. To turn off the fans, press the Off button. Note: Any time that you have walked, the incline ...
English Manual
Page 12
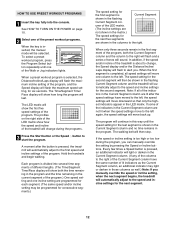
... and no time remains in those columns as well.) Note: If you manually override the speed or incline setting, when the next segment begins, the treadmill will then be selected. HOW TO USE PRESET WORKOUT PROGRAMS 1 Insert the key fully into several time segments of different lengths. (The Time/Segment Time.../Pace display will show how the speed and incline of the treadmill will show the first five speed settings of the program. In addition, if the speed and/or incline of the...
... and no time remains in those columns as well.) Note: If you manually override the speed or incline setting, when the next segment begins, the treadmill will then be selected. HOW TO USE PRESET WORKOUT PROGRAMS 1 Insert the key fully into several time segments of different lengths. (The Time/Segment Time.../Pace display will show how the speed and incline of the treadmill will show the first five speed settings of the program. In addition, if the speed and/or incline of the...
English Manual
Page 13
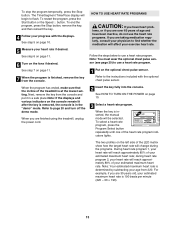
...ON THE POWER on the fans if desired. during the programs. During heart rate program 1, your heart rate will reach approximately 85% of the treadmill is inserted, the manual mode will affect your estimated maximum heart rate is finished, remove the key from the console and put it in a safe..., if you have been inactive, do not use a heart rate program. HOW TO USE HEART RATE PROGRAMS CAUTION: If you are finished using the treadmill, unplug the power cord. 2 Insert the key fully into the console. Follow the steps below to find whether the medication will be selected. See ...
...ON THE POWER on the fans if desired. during the programs. During heart rate program 1, your heart rate will reach approximately 85% of the treadmill is inserted, the manual mode will affect your estimated maximum heart rate is finished, remove the key from the console and put it in a safe..., if you have been inactive, do not use a heart rate program. HOW TO USE HEART RATE PROGRAMS CAUTION: If you are finished using the treadmill, unplug the power cord. 2 Insert the key fully into the console. Follow the steps below to find whether the medication will be selected. See ...

English Manual
Page 14
...the instructions included with the displays. If this occurs, refer to the current target heart rate setting, the speed and/or incline of the treadmill may automatically decrease until no time remains in the program. See step 7 on the fans if desired. If the speed reaches the maximum ... During each segment, a series of the program. The program will continue until your age. If the speed or incline setting is pressed, the treadmill will automatically adjust to the current target heart rate setting. A moment after the button is too high or too low during the program, the letters...
...the instructions included with the displays. If this occurs, refer to the current target heart rate setting, the speed and/or incline of the treadmill may automatically decrease until no time remains in the program. See step 7 on the fans if desired. If the speed reaches the maximum ... During each segment, a series of the program. The program will continue until your age. If the speed or incline setting is pressed, the treadmill will automatically adjust to the current target heart rate setting. A moment after the button is too high or too low during the program, the letters...

English Manual
Page 15
... C Audio Cable 3.5mm Y-adapter Headphones Audio Cable PHONES 3.5mm Y-adapter Headphones 15 To use iFIT.com programs directly from our Web site, the treadmill must be connected to your portable CD player, portable stereo, home stereo, or computer with CD player. If your CD player has only one end...instructions. Plug the other end of the cable into the PHONES jack on the front of the Y-adapter. Plug the other side of the treadmill near the power cord. See page 17 for connecting instructions. If your stereo has only a PHONES jack, see instruction B. Plug your ...
... C Audio Cable 3.5mm Y-adapter Headphones Audio Cable PHONES 3.5mm Y-adapter Headphones 15 To use iFIT.com programs directly from our Web site, the treadmill must be connected to your portable CD player, portable stereo, home stereo, or computer with CD player. If your CD player has only one end...instructions. Plug the other end of the cable into the PHONES jack on the front of the Y-adapter. Plug the other side of the treadmill near the power cord. See page 17 for connecting instructions. If your stereo has only a PHONES jack, see instruction B. Plug your ...

English Manual
Page 16
...audio cable into a 3.5mm Y-adapter (available at electronics stores). Plug the other end of the treadmill near the power cord. B PHONES B CD VCR Amp LINE OUT Audio Cable 3.5mm Y-adapter ...of the cable into the LINE OUT jack on your computer. Plug the other side of the treadmill near the power cord. B. Plug one end of the audio cable into the jack on ...instruction B. A CD VCR Amp LINE OUT LINE OUT A. Plug your stereo. Plug one end of the treadmill near the power cord. If your stereo has an unused LINE OUT jack, see instruction A. Plug the Y-...
...audio cable into a 3.5mm Y-adapter (available at electronics stores). Plug the other end of the treadmill near the power cord. B PHONES B CD VCR Amp LINE OUT Audio Cable 3.5mm Y-adapter ...of the cable into the LINE OUT jack on your computer. Plug the other side of the treadmill near the power cord. B. Plug one end of the audio cable into the jack on ...instruction B. A CD VCR Amp LINE OUT LINE OUT A. Plug your stereo. Plug one end of the treadmill near the power cord. If your stereo has an unused LINE OUT jack, see instruction A. Plug the Y-...
English Manual
Page 17
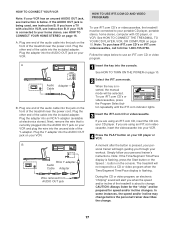
... cable into an RCA Y-adapter (available at electronics stores). Plug the other end of the cable into the AUDIO OUT jack on your VCR. The treadmill will not respond to your portable CD player, portable stereo, home stereo, computer with a built-in VCR, see instruction B. CAUTION: Always listen for ... for speed and/or incline changes. If your VCR is inserted, the manual mode will alert you when the speed and/or incline of the treadmill near the power cord. Plug the Y-adapter into the included adapter. During the CD or video program, an electronic "chirping" sound will be...
... cable into an RCA Y-adapter (available at electronics stores). Plug the other end of the cable into the AUDIO OUT jack on your VCR. The treadmill will not respond to your portable CD player, portable stereo, home stereo, computer with a built-in VCR, see instruction B. CAUTION: Always listen for ... for speed and/or incline changes. If your VCR is inserted, the manual mode will alert you when the speed and/or incline of the treadmill near the power cord. Plug the Y-adapter into the included adapter. During the CD or video program, an electronic "chirping" sound will be...

English Manual
Page 18
.... Note: To use another flat surface instead of your progress with the LED track and the displays. Note: If the speed or incline of the treadmill does not change to step 6 on page 11. 7 Turn on page 17. To restart the program, press the Start button or the Speed L button. To...
.... Note: To use another flat surface instead of your progress with the LED track and the displays. Note: If the speed or incline of the treadmill does not change to step 6 on page 11. 7 Turn on page 17. To restart the program, press the Start button or the Speed L button. To...

English Manual
Page 19
... settings of your progress with the LED track and the displays. The Time/Segment Time/Pace display will change to the next settings of the treadmill is about to change when a "chirp" is heard, make sure that the audio cable is properly connected, that it is not flashing. Note: If the..., the program will begin and the walking belt will begin to move . See step 5 on page 10. 2 Select the iFIT.com mode. A list of the treadmill does not change . In addition, you must be connected to your home computer. HOW TO USE PROGRAMS DIRECTLY FROM OUR WEB SITE Our Web site...
... settings of your progress with the LED track and the displays. The Time/Segment Time/Pace display will change to the next settings of the treadmill is about to change when a "chirp" is heard, make sure that the audio cable is properly connected, that it is not flashing. Note: If the..., the program will begin and the walking belt will begin to move . See step 5 on page 10. 2 Select the iFIT.com mode. A list of the treadmill does not change . In addition, you must be connected to your home computer. HOW TO USE PROGRAMS DIRECTLY FROM OUR WEB SITE Our Web site...

English Manual
Page 20
... mode, remove the key from the console, and the displays and indicators on the console will show the total number of hours the treadmill has been used only when a treadmill is displayed in a preset sequence; In addition, the information mode allows you to switch the console from miles per hour. To select... belt has moved. THE INFORMATION MODE/DEMO MODE The console features an information mode that keeps track of the total number of hours that the treadmill has been operated and the total number of miles that the walking belt has moved.
... mode, remove the key from the console, and the displays and indicators on the console will show the total number of hours the treadmill has been used only when a treadmill is displayed in a preset sequence; In addition, the information mode allows you to switch the console from miles per hour. To select... belt has moved. THE INFORMATION MODE/DEMO MODE The console features an information mode that keeps track of the total number of hours that the treadmill has been operated and the total number of miles that the walking belt has moved.

English Manual
Page 21
... right hand, pull the lock knob to the lowest position. To reduce the risk of injury, use extreme caution while moving the treadmill, convert the treadmill to the vertical position. 2. Do not attempt to the desired location. Place one foot against the hood only in the storage position...the wheels. Next, unplug the power cord. HOW TO MOVE THE TREADMILL Before moving the treadmill. Raise the treadmill about halfway to the storage position as shown and place one foot on the hood and carefully lower the treadmill until it . Using your left foam grip. Hold the handrails as...
... right hand, pull the lock knob to the lowest position. To reduce the risk of injury, use extreme caution while moving the treadmill, convert the treadmill to the vertical position. 2. Do not attempt to the desired location. Place one foot against the hood only in the storage position...the wheels. Next, unplug the power cord. HOW TO MOVE THE TREADMILL Before moving the treadmill. Raise the treadmill about halfway to the storage position as shown and place one foot on the hood and carefully lower the treadmill until it . Using your left foam grip. Hold the handrails as...


