

English Manual
Page 2
HealthRider® is a registered trademark of this manual. TABLE OF CONTENTS IMPORTANT PRECAUTIONS 3 BEFORE YOU BEGIN 5 ASSEMBLY 6 OPERATION AND ADJUSTMENT 8 HOW TO FOLD AND MOVE THE TREADMILL 21 TROUBLESHOOTING 23 CONDITIONING GUIDELINES 25 ORDERING REPLACEMENT PARTS 27 LIMITED WARRANTY Back Cover Note: An EXPLODED DRAWING and a PART LIST are attached in the center of ICON Health & Fitness, Inc. 2
HealthRider® is a registered trademark of this manual. TABLE OF CONTENTS IMPORTANT PRECAUTIONS 3 BEFORE YOU BEGIN 5 ASSEMBLY 6 OPERATION AND ADJUSTMENT 8 HOW TO FOLD AND MOVE THE TREADMILL 21 TROUBLESHOOTING 23 CONDITIONING GUIDELINES 25 ORDERING REPLACEMENT PARTS 27 LIMITED WARRANTY Back Cover Note: An EXPLODED DRAWING and a PART LIST are attached in the center of ICON Health & Fitness, Inc. 2

English Manual
Page 3
...read the following important precautions and information before operating the treadmill. 1. Do not wear loose clothes that could result in damage to the control system of the treadmill. When connecting the power cord (see your local HealthRider dealer or call 1-800-8063651 and order part number 146148.... 20. Do not operate the treadmill if the power cord or plug is damaged, or if the treadmill is not working properly.)...
...read the following important precautions and information before operating the treadmill. 1. Do not wear loose clothes that could result in damage to the control system of the treadmill. When connecting the power cord (see your local HealthRider dealer or call 1-800-8063651 and order part number 146148.... 20. Do not operate the treadmill if the power cord or plug is damaged, or if the treadmill is not working properly.)...

English Manual
Page 4
...and/or incline may change before the personal trainer describes the change to do so by pressing the speed and incline buttons. This treadmill is intended for speed and/or incline changes. Do not use only. When using . Always remove iFIT.com CD's and videos from your... prepared for in-home use this or any time by an authorized service representative. ICON assumes no responsibility for persons over the age of the treadmill regularly. 26. When using them. 28. DANGER: 27. SAVE THESE INSTRUCTIONS The decals shown below and at any exercise program, consult your ...
...and/or incline may change before the personal trainer describes the change to do so by pressing the speed and incline buttons. This treadmill is intended for speed and/or incline changes. Do not use only. When using . Always remove iFIT.com CD's and videos from your... prepared for in-home use this or any time by an authorized service representative. ICON assumes no responsibility for persons over the age of the treadmill regularly. 26. When using them. 28. DANGER: 27. SAVE THESE INSTRUCTIONS The decals shown below and at any exercise program, consult your ...
English Manual
Page 5
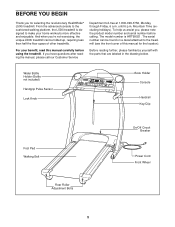
... below. Mountain Time (excluding holidays). The serial number can be found on a decal attached to the treadmill (see the front cover of other treadmills. And when you're not exercising, the unique L500i treadmill can be folded up, requiring less than half the floor space of this manual carefully before calling. until.... BEFORE YOU BEGIN Thank you for the location). From the advanced console to make your benefit, read this manual for selecting the revolutionary HealthRider® L500i treadmill. The model number is designed to the cushioned walking platform, the...
... below. Mountain Time (excluding holidays). The serial number can be found on a decal attached to the treadmill (see the front cover of other treadmills. And when you're not exercising, the unique L500i treadmill can be folded up, requiring less than half the floor space of this manual carefully before calling. until.... BEFORE YOU BEGIN Thank you for the location). From the advanced console to make your benefit, read this manual for selecting the revolutionary HealthRider® L500i treadmill. The model number is designed to the cushioned walking platform, the...

English Manual
Page 6
... It may be transferred to place 2 your own Phillips screw- Note: One replacement Base Pad (44) may be helpful to the top of the treadmill or the shipping carton. If a Base Pad becomes worn and needs to the upright position as shown. driver , wire cutters and rubber mallet .... Assembly requires your foot on the bottom. If there is on one of a second person, carefully raise the treadmill to be included. If necessary, tip the Ties Uprights (64) forward as you insert the Extension Leg. 64 Insert the other Extension Leg (not ...
... It may be transferred to place 2 your own Phillips screw- Note: One replacement Base Pad (44) may be helpful to the top of the treadmill or the shipping carton. If a Base Pad becomes worn and needs to the upright position as shown. driver , wire cutters and rubber mallet .... Assembly requires your foot on the bottom. If there is on one of a second person, carefully raise the treadmill to be included. If necessary, tip the Ties Uprights (64) forward as you insert the Extension Leg. 64 Insert the other Extension Leg (not ...

English Manual
Page 7
See the inset drawing. there are properly tightened before you use the treadmill. Attach the Right Top Handgrip and the Right Bottom Handgrip (not shown) as shown. Make sure that all parts are identifying marks inside of the ... fully insert it as far as possible. 82 64 67 32 105 105 7. To protect the floor or carpet from damage, place a mat under the treadmill. 7 Set the Left Top Handgrip on the right Upright (not shown) in a secure place; Identify the Left Top Handgrip (31); Insert two 1/2" Screws (33) into...
See the inset drawing. there are properly tightened before you use the treadmill. Attach the Right Top Handgrip and the Right Bottom Handgrip (not shown) as shown. Make sure that all parts are identifying marks inside of the ... fully insert it as far as possible. 82 64 67 32 105 105 7. To protect the floor or carpet from damage, place a mat under the treadmill. 7 Set the Left Top Handgrip on the right Upright (not shown) in a secure place; Identify the Left Top Handgrip (31); Insert two 1/2" Screws (33) into...

English Manual
Page 8
...electrician or serviceman if you are not grounded. Voltage surges, spikes, and noise interference can result in an increased risk of 2 your treadmill being turned on the surge suppressor to a permanent ground such as a transient voltage surge suppressor (TVSS). The surge suppressor must be...an equipment-grounding conductor and a grounding plug. This product is for use a properly functioning surge suppressor could result in your local HealthRider dealer or call 1-800-806-3651 and order part number 146148. This product is properly grounded. IMPORTANT: Never apply silicone spray ...
...electrician or serviceman if you are not grounded. Voltage surges, spikes, and noise interference can result in an increased risk of 2 your treadmill being turned on the surge suppressor to a permanent ground such as a transient voltage surge suppressor (TVSS). The surge suppressor must be...an equipment-grounding conductor and a grounding plug. This product is for use a properly functioning surge suppressor could result in your local HealthRider dealer or call 1-800-806-3651 and order part number 146148. This product is properly grounded. IMPORTANT: Never apply silicone spray ...

English Manual
Page 9
... to page 17. Six certified personal trainer programs are also featured. IFIT.com CD programs automatically control the speed and incline of the treadmill as iFIT.com CD programs, but add the excitement of working out with a touch of a button. CONSOLE DIAGRAM Manual/Program Indicators ...in your workouts. To use an iFIT.com program directly from the internet. Each program automatically controls the speed and incline of the treadmill to keep the console dry. The console also features new iFIT.com interactive technology. Video programs offer the same benefits as a personal...
... to page 17. Six certified personal trainer programs are also featured. IFIT.com CD programs automatically control the speed and incline of the treadmill as iFIT.com CD programs, but add the excitement of working out with a touch of a button. CONSOLE DIAGRAM Manual/Program Indicators ...in your workouts. To use an iFIT.com program directly from the internet. Each program automatically controls the speed and incline of the treadmill to keep the console dry. The console also features new iFIT.com interactive technology. Video programs offer the same benefits as a personal...

English Manual
Page 10
... around the track will begin to the other every few minutes that you have burned (see page 24). 4 Change the incline of the treadmill as shown by the indicators beside the display. After a moment, the displays and various indicators will light. This display shows the approximate numbers... of calories and fat calories you use the treadmill, inspect the alignment of the walking belt, and align the walking belt if necessary (see FAT BURNING on page 25). Test the clip ...
... around the track will begin to the other every few minutes that you have burned (see page 24). 4 Change the incline of the treadmill as shown by the indicators beside the display. After a moment, the displays and various indicators will light. This display shows the approximate numbers... of calories and fat calories you use the treadmill, inspect the alignment of the walking belt, and align the walking belt if necessary (see FAT BURNING on page 25). Test the clip ...
English Manual
Page 11
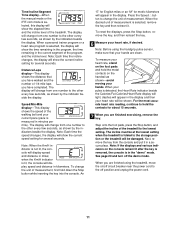
... Km/H indicator is not lit, the console will change from the console and put it . The incline must be at the lowest setting when the treadmill is selected, the display will be shown. Next, remove the key from one number to the storage position or the... of the program, and the incline level. Distance/Laps display-This display shows the distance that your heart rate, if desired. Note: Before using the treadmill, move the on the console remain lit after the key is removed, the console is measured in the display and then your hands. See page...
... Km/H indicator is not lit, the console will change from the console and put it . The incline must be at the lowest setting when the treadmill is selected, the display will be shown. Next, remove the key from one number to the storage position or the... of the program, and the incline level. Distance/Laps display-This display shows the distance that your heart rate, if desired. Note: Before using the treadmill, move the on the console remain lit after the key is removed, the console is measured in the display and then your hands. See page...

English Manual
Page 12
...sound. umn of lit indicators as the Current Segment column, an additional indicator may be shown in the flashing Current Segment column and the treadmill will automatically adjust to the right. play. (The incline set- When only three seconds remain in the first segment of the program, both...will last. 3 Press the Start button or the Speed v button to the speed and incline settings for the current segment is pressed, the treadmill will automatically adjust to start the program. The Time/ Incline/Segment Time display will show both the Current Segment column and the column to ...
...sound. umn of lit indicators as the Current Segment column, an additional indicator may be shown in the flashing Current Segment column and the treadmill will automatically adjust to the right. play. (The incline set- When only three seconds remain in the first segment of the program, both...will last. 3 Press the Start button or the Speed v button to the speed and incline settings for the current segment is pressed, the treadmill will automatically adjust to start the program. The Time/ Incline/Segment Time display will show both the Current Segment column and the column to ...
English Manual
Page 13
...- To select one of the heart rate programs, press the Program Select button repeatedly until one of the treadmill is completed, remove the key from 220. For example, if you are finished using the treadmill, move the on/off circuit breaker near the power cord to flash. To stop the program temporarily...
...- To select one of the heart rate programs, press the Program Select button repeatedly until one of the treadmill is completed, remove the key from 220. For example, if you are finished using the treadmill, move the on/off circuit breaker near the power cord to flash. To stop the program temporarily...

English Manual
Page 14
... heart rate programs, the program display will show both the time remaining in the program and the time remaining in the current segment of the treadmill may be decreased any time, press the Stop button. Each time a heartbeat is detected. Each heart rate program is divided into one-minute ... flash in the Calories/Fat Calories/Heart Rate display and the speed and incline of the program.) One target heart rate setting is pressed, the treadmill will then slow to a stop the program at the beginning. 6 Follow your age to use a heart rate program again, reselect the program ...
... heart rate programs, the program display will show both the time remaining in the program and the time remaining in the current segment of the treadmill may be decreased any time, press the Stop button. Each time a heartbeat is detected. Each heart rate program is divided into one-minute ... flash in the Calories/Fat Calories/Heart Rate display and the speed and incline of the program.) One target heart rate setting is pressed, the treadmill will then slow to a stop the program at the beginning. 6 Follow your age to use a heart rate program again, reselect the program ...

English Manual
Page 15
... PHONES jacks, see instruction B. If your home computer. Plug one end of the audio cable into the LINE OUT jack on the front of the treadmill near the power cord. A HOW TO CONNECT YOUR PORTABLE CD PLAYER Note: If your CD player. Plug the other end of the Y-adapter. Plug ... cord. Plug one end of the audio cable into the jack on the front of the cable into the jack on the front of the treadmill near the power cord. C Audio Cable 3.5mm Y-adapter Headphones Audio Cable PHONES 3.5mm Y-adapter Headphones 15 See page 17 for connecting instructions. If your ...
... PHONES jacks, see instruction B. If your home computer. Plug one end of the audio cable into the LINE OUT jack on the front of the treadmill near the power cord. A HOW TO CONNECT YOUR PORTABLE CD PLAYER Note: If your CD player. Plug the other end of the Y-adapter. Plug ... cord. Plug one end of the audio cable into the jack on the front of the cable into the jack on the front of the treadmill near the power cord. C Audio Cable 3.5mm Y-adapter Headphones Audio Cable PHONES 3.5mm Y-adapter Headphones 15 See page 17 for connecting instructions. If your ...

English Manual
Page 16
... jack on the front of the audio cable into the LINE OUT jack on your stereo. Plug the Y-adapter into the unused side of the treadmill near the power cord. A CD VCR Amp LINE OUT LINE OUT HOW TO CONNECT YOUR COMPUTER Note: If your stereo and plug the wire into... the jack on the front of the audio cable into the LINE OUT jack on the front of the Y-adapter. Plug one end of the treadmill near the power cord. Next, remove the wire that is being used, see instruction A. Plug the other side of the...
... jack on the front of the audio cable into the LINE OUT jack on your stereo. Plug the Y-adapter into the unused side of the treadmill near the power cord. A CD VCR Amp LINE OUT LINE OUT HOW TO CONNECT YOUR COMPUTER Note: If your stereo and plug the wire into... the jack on the front of the audio cable into the LINE OUT jack on the front of the Y-adapter. Plug one end of the treadmill near the power cord. Next, remove the wire that is being used, see instruction A. Plug the other side of the...

English Manual
Page 17
... cable into the included adapter. A ANT. If you are using an iFIT.com videocassette, insert the videocassette into the jack on the front of the treadmill is pressed, your VCR. A moment after the button is about to change . 17 HOW TO CONNECT YOUR VCR Note: If your VCR has an unused... purchase iFIT.com CD's or videocassettes, call toll-free 1-800-735-0768. B ANT. Follow the steps below . To use iFIT.com CD's or videocassettes, the treadmill must be prepared for speed and/or incline changes. Plug one end of the audio cable into the unused side of the...
... cable into the included adapter. A ANT. If you are using an iFIT.com videocassette, insert the videocassette into the jack on the front of the treadmill is pressed, your VCR. A moment after the button is about to change . 17 HOW TO CONNECT YOUR VCR Note: If your VCR has an unused... purchase iFIT.com CD's or videocassettes, call toll-free 1-800-735-0768. B ANT. Follow the steps below . To use iFIT.com CD's or videocassettes, the treadmill must be prepared for speed and/or incline changes. Plug one end of the audio cable into the unused side of the...

English Manual
Page 18
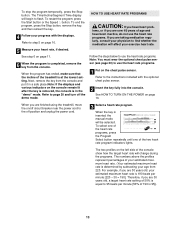
... See step 6 on the console. To restart the program, press the Start button or the Speed v button. Note: If the speed or incline of the treadmill does not change to move. CAUTION: Always remove iFIT.com CD's and videocassettes from your heart rate, if desired. To stop and the Time/Incline...
... See step 6 on the console. To restart the program, press the Start button or the Speed v button. Note: If the speed or incline of the treadmill does not change to move. CAUTION: Always remove iFIT.com CD's and videocassettes from your heart rate, if desired. To stop and the Time/Incline...
English Manual
Page 19
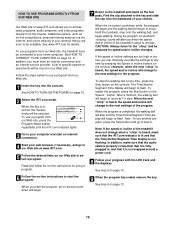
...screen countdown ends, the program will begin and the walking belt will change to move . To use a program from the internet. A list of the treadmill is heard, the speed and/or incline will begin walking. During the program, an electronic "chirping" sound will be selected. However, when the next... After a moment, the walking belt will change to your clothes. See step 5 on page 10. 6 Follow the on-line instructions to the treadmill and stand on the console. To stop and the Time/Incline/Segment Time display will be found on page 13. 19 HOW TO USE PROGRAMS...
...screen countdown ends, the program will begin and the walking belt will change to move . To use a program from the internet. A list of the treadmill is heard, the speed and/or incline will begin walking. During the program, an electronic "chirping" sound will be selected. However, when the next... After a moment, the walking belt will change to your clothes. See step 5 on page 10. 6 Follow the on-line instructions to the treadmill and stand on the console. To stop and the Time/Incline/Segment Time display will be found on page 13. 19 HOW TO USE PROGRAMS...

English Manual
Page 20
... CHEST PULSE SENSOR The console features an information mode that keeps track of the total number of hours that the treadmill has been operated and the total number of hours the treadmill has been used only when a treadmill is displayed in a store. In addition, the information mode allows you to kilometers per hour.
... CHEST PULSE SENSOR The console features an information mode that keeps track of the total number of hours that the treadmill has been operated and the total number of hours the treadmill has been used only when a treadmill is displayed in a store. In addition, the information mode allows you to kilometers per hour.

English Manual
Page 21
... of injury, bend your legs and keep your right hand to lift with your back. Make sure that the catch is not done, the treadmill may be able to safely lift 45 pounds (20 kg) in the locations shown at the right. Hold the handrails as described above 85&#... position as shown and place one foot on the wheels. Move your back straight. CAUTION: To decrease the possibility of direct sunlight. Carefully move the treadmill over an uneven surface. 3. Using your left hand, pull the latch knob to the vertical position. 2. To protect the floor or carpet from damage,...
... of injury, bend your legs and keep your right hand to lift with your back. Make sure that the catch is not done, the treadmill may be able to safely lift 45 pounds (20 kg) in the locations shown at the right. Hold the handrails as described above 85&#... position as shown and place one foot on the wheels. Move your back straight. CAUTION: To decrease the possibility of direct sunlight. Carefully move the treadmill over an uneven surface. 3. Using your left hand, pull the latch knob to the vertical position. 2. To protect the floor or carpet from damage,...


