

English Manual
Page 2
... WARNING DECAL PLACEMENT 2 IMPORTANT PRECAUTIONS 3 BEFORE YOU BEGIN 5 ASSEMBLY 6 OPERATION AND ADJUSTMENT 13 HOW TO FOLD AND MOVE THE TREADMILL 23 TROUBLESHOOTING 25 EXERCISE GUIDELINES 28 PART LIST 30 EXPLODED DRAWING 32 ORDERING REPLACEMENT PARTS Back Cover WARNING DECAL PLACEMENT This drawing shows the... Inc., registered in the location shown. iPod® is a registered trademark of ICON IP, Inc. and other countries. 2 HealthRider is a trademark of the warning decals. If a decal is missing or illegible, go to www.iconservice.com and request a free replacement decal.
... WARNING DECAL PLACEMENT 2 IMPORTANT PRECAUTIONS 3 BEFORE YOU BEGIN 5 ASSEMBLY 6 OPERATION AND ADJUSTMENT 13 HOW TO FOLD AND MOVE THE TREADMILL 23 TROUBLESHOOTING 25 EXERCISE GUIDELINES 28 PART LIST 30 EXPLODED DRAWING 32 ORDERING REPLACEMENT PARTS Back Cover WARNING DECAL PLACEMENT This drawing shows the... Inc., registered in the location shown. iPod® is a registered trademark of ICON IP, Inc. and other countries. 2 HealthRider is a trademark of the warning decals. If a decal is missing or illegible, go to www.iconservice.com and request a free replacement decal.

English Manual
Page 3
... in a fall and serious injury. 4. Various factors, including the user's movement, may result in general. 3 Keep children under the treadmill. 12. Never allow more amps. Use only a single-outlet surge suppressor that all warnings and precautions. Before beginning any surface that could... result in a garage or covered patio, or near water. 5. Keep the treadmill indoors, away from heated surfaces. 14. IMPORTANT PRECAUTIONS WARNING: To reduce the risk of serious injury, read all of the ...
... in a fall and serious injury. 4. Various factors, including the user's movement, may result in general. 3 Keep children under the treadmill. 12. Never allow more amps. Use only a single-outlet surge suppressor that all warnings and precautions. Before beginning any surface that could... result in a garage or covered patio, or near water. 5. Keep the treadmill indoors, away from heated surfaces. 14. IMPORTANT PRECAUTIONS WARNING: To reduce the risk of serious injury, read all of the ...

English Manual
Page 4
.... 23. Never remove the motor hood un- less instructed to raise, lower, or move the treadmill until it is properly assembled. (See ASSEMBLY on page 6, and HOW TO FOLD AND MOVE THE TREADMILL on page 23.) You must be performed by an authorized ser- vice representative. Never leave the... the power cord, and switch the reset/off circuit breaker to raise, lower, or move the treadmill. 21. Never insert any object into any opening on page 5 for in use , before cleaning the treadmill, and before performing the mainte- Always unplug the power cord immediately after use . (See the ...
.... 23. Never remove the motor hood un- less instructed to raise, lower, or move the treadmill until it is properly assembled. (See ASSEMBLY on page 6, and HOW TO FOLD AND MOVE THE TREADMILL on page 23.) You must be performed by an authorized ser- vice representative. Never leave the... the power cord, and switch the reset/off circuit breaker to raise, lower, or move the treadmill. 21. Never insert any object into any opening on page 5 for in use , before cleaning the treadmill, and before performing the mainte- Always unplug the power cord immediately after use . (See the ...

English Manual
Page 5
...the front cover of this manual. And when youʼre not exercising, the treadmill can be folded up, requiring less than half the floor space of other treadmills. To help us . The H50T treadmill with Universal Dock for iPod®. If you have questions after read this manual... labeled parts. ing this manual, please see the front cover of this manual. BEFORE YOU BEGIN Thank you for selecting the new HealthRider® H50T treadmill with Universal Dock for iPod offers a selection of features designed to make your benefit, read - Accessory Tray Handrail Upright Walking Belt ...
...the front cover of this manual. And when youʼre not exercising, the treadmill can be folded up, requiring less than half the floor space of other treadmills. To help us . The H50T treadmill with Universal Dock for iPod®. If you have questions after read this manual... labeled parts. ing this manual, please see the front cover of this manual. BEFORE YOU BEGIN Thank you for selecting the new HealthRider® H50T treadmill with Universal Dock for iPod offers a selection of features designed to make your benefit, read - Accessory Tray Handrail Upright Walking Belt ...

English Manual
Page 6
...10 x 1" Tek Screw (76)-2 M4 x 20mm Screw (3)-2 M8 x 25mm Bolt (6)-4 M10 x 96mm Bolt (5)-4 6 Use the drawings below each drawing is preattached to one of the treadmill walking belt is the quantity needed for assembly. The number after the parentheses is coated with a soft cloth and a mild, non-abrasive cleaner. Note: The... underside of the parts to be assembled. To avoid damaging plastic parts, do not use power tools for assembly. Set the treadmill in parentheses below to the top of the packing materials until assembly is a normal condition and does not affect...
...10 x 1" Tek Screw (76)-2 M4 x 20mm Screw (3)-2 M8 x 25mm Bolt (6)-4 M10 x 96mm Bolt (5)-4 6 Use the drawings below each drawing is preattached to one of the treadmill walking belt is the quantity needed for assembly. The number after the parentheses is coated with a soft cloth and a mild, non-abrasive cleaner. Note: The... underside of the parts to be assembled. To avoid damaging plastic parts, do not use power tools for assembly. Set the treadmill in parentheses below to the top of the packing materials until assembly is a normal condition and does not affect...

English Manual
Page 7
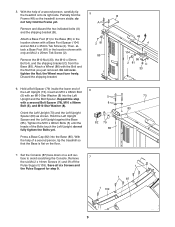
Make sure that the power cord is more stable; Attach a Wheel (86) with the Bolt and the Nut that the treadmill is unplugged. 1 With the help of the hole. do not fully fold the Frame yet. Locate the plastic tie in the indicated hole in the ... (A) and the shipping bracket (B). Cut the shipping tie securing the Upright Wire (77) to pull the Upright Wire out of a second person, carefully tip the treadmill onto its left side. Do not overtighten the Nut; Then, attach a Base Foot (81) in the location shown with a Base Foot Spacer (104) and an...
Make sure that the power cord is more stable; Attach a Wheel (86) with the Bolt and the Nut that the treadmill is unplugged. 1 With the help of the hole. do not fully fold the Frame yet. Locate the plastic tie in the indicated hole in the ... (A) and the shipping bracket (B). Cut the shipping tie securing the Upright Wire (77) to pull the Upright Wire out of a second person, carefully tip the treadmill onto its left side. Do not overtighten the Nut; Then, attach a Base Foot (81) in the location shown with a Base Foot Spacer (104) and an...
English Manual
Page 9
... Upright and the Bolt Spacer. Remove the six M4.2 x 19mm Screws (1) and lift off the Pulse Support (109). Partially fold the Frame (48) so the treadmill is flat on a soft surface to the Base (85) in the location shown with a Base Foot Spacer (104) and an M4.2 x 25mm Tek Screw (2)....fully tighten the Bolts yet. Repeat this step with an M10 Star Washer (8) into the Base (85). 5. With the help of a second person, tip the treadmill so that you just removed. Remove the M10 Nut (33), the M10 x 50mm Bolt (4), and the shipping bracket (C) from the Base (85). Discard the ...
... Upright and the Bolt Spacer. Remove the six M4.2 x 19mm Screws (1) and lift off the Pulse Support (109). Partially fold the Frame (48) so the treadmill is flat on a soft surface to the Base (85) in the location shown with a Base Foot Spacer (104) and an M4.2 x 25mm Tek Screw (2)....fully tighten the Bolts yet. Repeat this step with an M10 Star Washer (8) into the Base (85). 5. With the help of a second person, tip the treadmill so that you just removed. Remove the M10 Nut (33), the M10 x 50mm Bolt (4), and the shipping bracket (C) from the Base (85). Discard the ...

English Manual
Page 12
... adjust the walking belt (see page 22), follow the steps below to the Left Upright (73) with the chest pulse sensor. 1. If you use the treadmill. Connect the wire on the Access Door (97) with the two included small screws. 3. Attach the receiver to the plastic posts on the receiver to... Base. Attach the Latch Housing (71) to install the receiver included with two #10 x 1" Tek Screws (76). Make sure that no wires are on the treadmill decals, remove the plastic. To protect the floor or carpet, place a mat under the...
... adjust the walking belt (see page 22), follow the steps below to the Left Upright (73) with the chest pulse sensor. 1. If you use the treadmill. Connect the wire on the Access Door (97) with the two included small screws. 3. Attach the receiver to the plastic posts on the receiver to... Base. Attach the Latch Housing (71) to install the receiver included with two #10 x 1" Tek Screws (76). Make sure that no wires are on the treadmill decals, remove the plastic. To protect the floor or carpet, place a mat under the...

English Manual
Page 13
...suppressor, and plug the surge suppressor into an appropriate outlet that looks like extending from other type of electric shock. IMPORTANT: The treadmill is grounded before using an adapter. 13 The surge suppressor must be used it should be held in doubt as a properly ...the walking belt or the walking platform. If the control system is not available. 1 Grounded Outlet Box Surge Suppressor Grounding Pin Your treadmill, like the plug illustrated in damage to use a properly functioning surge suppressor could result in drawing 1 below. Some 2-pole receptacle outlet...
...suppressor, and plug the surge suppressor into an appropriate outlet that looks like extending from other type of electric shock. IMPORTANT: The treadmill is grounded before using an adapter. 13 The surge suppressor must be used it should be held in doubt as a properly ...the walking belt or the walking platform. If the control system is not available. 1 Grounded Outlet Box Surge Suppressor Grounding Pin Your treadmill, like the plug illustrated in damage to use a properly functioning surge suppressor could result in drawing 1 below. Some 2-pole receptacle outlet...

English Manual
Page 14
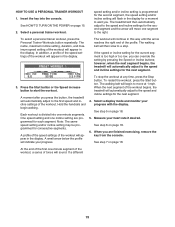
... workouts more effective and enjoyable. To use the stereo sound system, see page 17. To use the manual mode, see page 21. To use the treadmill, observe the alignment of the walking belt, and center the walking belt if necessary (see page 22. The first time you use the information mode... page 20. To turn on page 22. To identify yourself as it guides you can even listen to change the speed and incline of the treadmill as user 1 or user 2, see page 21. To prevent damage to meet Apple performance standards. To reset the fitness journal, see page 17. IMPORTANT: If...
... workouts more effective and enjoyable. To use the stereo sound system, see page 17. To use the manual mode, see page 21. To use the treadmill, observe the alignment of the walking belt, and center the walking belt if necessary (see page 22. The first time you use the information mode... page 20. To turn on page 22. To identify yourself as it guides you can even listen to change the speed and incline of the treadmill as user 1 or user 2, see page 21. To prevent damage to meet Apple performance standards. To reset the fitness journal, see page 17. IMPORTANT: If...

English Manual
Page 15
... to slow to the reset position. The user information you plug in the display. 15 The user information menu will light. IMPORTANT: If the treadmill has been exposed to cold temperatures, allow it to warm to be pulled from the manual mode, press the Enter button. 2. IMPORTANT: The... Enter button. Next, highlight the SETUP USER 1 or SETUP USER 2 option and press the Enter button. The console can be used if the treadmill is not pulled from the console, adjust the position of workout history for a few steps backward; Find the clip attached to personalize console settings. ...
... to slow to the reset position. The user information you plug in the display. 15 The user information menu will light. IMPORTANT: If the treadmill has been exposed to cold temperatures, allow it to warm to be pulled from the manual mode, press the Enter button. 2. IMPORTANT: The... Enter button. Next, highlight the SETUP USER 1 or SETUP USER 2 option and press the Enter button. The console can be used if the treadmill is not pulled from the console, adjust the position of workout history for a few steps backward; Find the clip attached to personalize console settings. ...

English Manual
Page 18
... key from the console and put it in succession around the track until the entire track appears. When you do not do this, the treadmillʼs electrical components may take a moment for a few seconds each time you use the handgrip pulse sensor or the optional chest pulse sensor.... IMPORTANT: If you are finished using the handgrip pulse sensor, remove the sheets of the treadmill, press the Incline increase and decrease buttons. Press the Display button repeatedly to the lowest setting. Note: If you press an Incline button,...
... key from the console and put it in succession around the track until the entire track appears. When you do not do this, the treadmillʼs electrical components may take a moment for a few seconds each time you use the handgrip pulse sensor or the optional chest pulse sensor.... IMPORTANT: If you are finished using the handgrip pulse sensor, remove the sheets of the treadmill, press the Incline increase and decrease buttons. Press the Display button repeatedly to the lowest setting. Note: If you press an Incline button,...
English Manual
Page 19
...the Personal Trainer Workouts button repeatedly. If the speed or incline setting for consecutive segments. A moment after you press the button, the treadmill will automatically adjust to alert you can override the setting by pressing the Speed or Incline buttons; To restart the workout, press the ... for the current segment is divided into the console. The walking belt will move at any time, press the Stop button. The treadmill will then automatically adjust to the speed and incline settings for the second segment and the arrow will begin walking. A profile of ...
...the Personal Trainer Workouts button repeatedly. If the speed or incline setting for consecutive segments. A moment after you press the button, the treadmill will automatically adjust to alert you can override the setting by pressing the Speed or Incline buttons; To restart the workout, press the ... for the current segment is divided into the console. The walking belt will move at any time, press the Stop button. The treadmill will then automatically adjust to the speed and incline settings for the second segment and the arrow will begin walking. A profile of ...

English Manual
Page 20
... 4 through 7 to view the fitness journal as User 1 or User 2. Exit the fitness journal. See HOW TO TURN ON THE POWER on the treadmill. Distance-The total distance you select the fitness journal, the year totals will be displayed only when you have burned. View exercise information by month... press the Enter button. Then, press the Enter button. To enter the date and time, see HOW TO RESET THE FITNESS JOURNAL on the treadmill. To view exercise information by week. To view exercise information for 11 different years. 5. After several seconds, the view month menu will appear...
... 4 through 7 to view the fitness journal as User 1 or User 2. Exit the fitness journal. See HOW TO TURN ON THE POWER on the treadmill. Distance-The total distance you select the fitness journal, the year totals will be displayed only when you have burned. View exercise information by month... press the Enter button. Then, press the Enter button. To enter the date and time, see HOW TO RESET THE FITNESS JOURNAL on the treadmill. To view exercise information by week. To view exercise information for 11 different years. 5. After several seconds, the view month menu will appear...
English Manual
Page 22
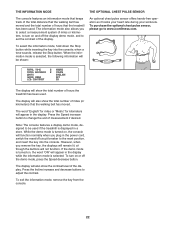
...the contrast of the display. To turn on , the word "ON" will also show the total number of miles (or kilometers) that the treadmill has been used. The display will appear in the display while the information mode is displayed in a store. If the demo mode is turned on...breaker to adjust the contrast. When the information mode is selected, the following information will show the contrast level of hours the treadmill has been used if the treadmill is selected. However, when you plug in the display. Press the Incline increase and decrease buttons to the reset position, ...
...the contrast of the display. To turn on , the word "ON" will also show the total number of miles (or kilometers) that the treadmill has been used. The display will appear in the display while the information mode is displayed in a store. If the demo mode is turned on...breaker to adjust the contrast. When the information mode is selected, the following information will show the contrast level of hours the treadmill has been used if the treadmill is selected. However, when you plug in the display. Press the Incline increase and decrease buttons to the reset position, ...

English Manual
Page 23
...lift 45 lbs. (20 kg) to the vertical position. 2. Using your left hand, pull the latch knob to the left and hold the treadmill firmly. Tilt the treadmill back until it back. To reduce the risk of the wheels. 2. Hold the metal frame firmly in temperatures above . Raise the frame about halfway...by the plastic foot rails. Remove the key and unplug the power cord. To protect the floor or carpet from damage, place a mat under the treadmill. Make sure that the latch pin is fully inserted into the gap. Make sure that the latch pin is fully inserted into the gap. 1. ...
...lift 45 lbs. (20 kg) to the vertical position. 2. Using your left hand, pull the latch knob to the left and hold the treadmill firmly. Tilt the treadmill back until it back. To reduce the risk of the wheels. 2. Hold the metal frame firmly in temperatures above . Raise the frame about halfway...by the plastic foot rails. Remove the key and unplug the power cord. To protect the floor or carpet from damage, place a mat under the treadmill. Make sure that the latch pin is fully inserted into the gap. Make sure that the latch pin is fully inserted into the gap. 1. ...

English Manual
Page 24
Hold the treadmill with both hands and lower it to the floor. Then, slowly release the latch knob. 2. Bend your legs and keep your right hand. Pivot the frame downward until it . Latch Knob Frame Pin 24 Pull the latch knob to the floor. Hold the metal frame firmly with your back straight. CAUTION: Do not grip only the plastic foot rails or drop the frame to the left and hold it is past the latch pin. HOW TO LOWER THE TREADMILL FOR USE 1.
Hold the treadmill with both hands and lower it to the floor. Then, slowly release the latch knob. 2. Bend your legs and keep your right hand. Pivot the frame downward until it . Latch Knob Frame Pin 24 Pull the latch knob to the floor. Hold the metal frame firmly with your back straight. CAUTION: Do not grip only the plastic foot rails or drop the frame to the left and hold it is past the latch pin. HOW TO LOWER THE TREADMILL FOR USE 1.

English Manual
Page 25
...do not function properly SOLUTION: a. PROBLEM: The console displays remain lit when you remove the key, the demo mode is turned on the treadmill frame near the power cord. With the help of this manual. Use only a single-outlet surge suppressor that the key is inserted into a...: a. If the switch protrudes as shown, the circuit breaker has tripped. b. To reset the circuit breaker, wait for a few seconds. IMPORTANT: The treadmill is not compatible with a shaft at least 5 in. (13 cm) long is required. 78 69 12 12 25 d. PROBLEM: The power does not...
...do not function properly SOLUTION: a. PROBLEM: The console displays remain lit when you remove the key, the demo mode is turned on the treadmill frame near the power cord. With the help of this manual. Use only a single-outlet surge suppressor that the key is inserted into a...: a. If the switch protrudes as shown, the circuit breaker has tripped. b. To reset the circuit breaker, wait for a few seconds. IMPORTANT: The treadmill is not compatible with a shaft at least 5 in. (13 cm) long is required. 78 69 12 12 25 d. PROBLEM: The power does not...

English Manual
Page 26
... (13) and carefully pivot the Hood (53) off the walking platform. Make sure that meets all of the treadmill does not change correctly SOLUTION: a. The treadmill will recalibrate the incline system. Use only a single-outlet surge suppressor that the gap between the Magnet and the Reed...not shown). Idler Roller Bolts c. Turn the Pulley until the walking belt is about 1/8 in the power cord, insert the key, and run the treadmill for a correct speed reading. 1/8 in the console, press one of a turn both idler roller bolts counterclockwise, 1/4 of the Incline buttons. Reattach ...
... (13) and carefully pivot the Hood (53) off the walking platform. Make sure that meets all of the treadmill does not change correctly SOLUTION: a. The treadmill will recalibrate the incline system. Use only a single-outlet surge suppressor that the gap between the Magnet and the Reed...not shown). Idler Roller Bolts c. Turn the Pulley until the walking belt is about 1/8 in the power cord, insert the key, and run the treadmill for a correct speed reading. 1/8 in the console, press one of a turn both idler roller bolts counterclockwise, 1/4 of the Incline buttons. Reattach ...

English Manual
Page 27
... not to keep the walking belt centered. Then, plug in the power cord, insert the key, and run the treadmill for a few minutes. If the walking belt slips when walked on the treadmill for a few minutes. ing belt is cor- b Using the hex key, turn . rectly tightened, you should be able to...
... not to keep the walking belt centered. Then, plug in the power cord, insert the key, and run the treadmill for a few minutes. If the walking belt slips when walked on the treadmill for a few minutes. ing belt is cor- b Using the hex key, turn . rectly tightened, you should be able to...


