
English Manual
Page 1
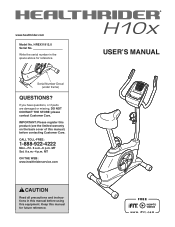
...manual) before using this equipment. MT Sat. 8 a.m.–-4 p.m. CALL TOLL-FREE: 1-888-922-4222 Mon.–-Fri. 6 a.m.–-6 p.m. If you have questions, or if parts are damaged or missing, DO NOT CONTACT THE STORE; HREX11912.0 Serial No. please contact Customer Care. Keep this manual before contacting Customer Care. MT ON... THE WEB: www.healthriderservice.com CAUTION Read all precautions and instructions in the space above for future reference. www.healthrider.com Model No. USER’'S MANUAL Serial Number Decal (under frame) QUESTIONS?
...manual) before using this equipment. MT Sat. 8 a.m.–-4 p.m. CALL TOLL-FREE: 1-888-922-4222 Mon.–-Fri. 6 a.m.–-6 p.m. If you have questions, or if parts are damaged or missing, DO NOT CONTACT THE STORE; HREX11912.0 Serial No. please contact Customer Care. Keep this manual before contacting Customer Care. MT ON... THE WEB: www.healthriderservice.com CAUTION Read all precautions and instructions in the space above for future reference. www.healthrider.com Model No. USER’'S MANUAL Serial Number Decal (under frame) QUESTIONS?
English Manual
Page 2
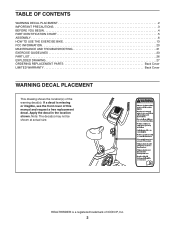
...BEFORE YOU BEGIN 4 PART IDENTIFICATION CHART 5 ASSEMBLY 6 HOW TO USE THE EXERCISE BIKE 13 FCC INFORMATION 20 MAINTENANCE AND TROUBLESHOOTING 21 EXERCISE GUIDELINES 23 PART LIST 26 EXPLODED DRAWING 27 ORDERING REPLACEMENT PARTS Back Cover LIMITED WARRANTY... Back Cover WARNING DECAL PLACEMENT This drawing shows the location(s) of ICON IP, Inc. 2 Note: The decal(s) may not be shown at actual size. HEALTHRIDER...
...BEFORE YOU BEGIN 4 PART IDENTIFICATION CHART 5 ASSEMBLY 6 HOW TO USE THE EXERCISE BIKE 13 FCC INFORMATION 20 MAINTENANCE AND TROUBLESHOOTING 21 EXERCISE GUIDELINES 23 PART LIST 26 EXPLODED DRAWING 27 ORDERING REPLACEMENT PARTS Back Cover LIMITED WARRANTY... Back Cover WARNING DECAL PLACEMENT This drawing shows the location(s) of ICON IP, Inc. 2 Note: The decal(s) may not be shown at actual size. HEALTHRIDER...
English Manual
Page 3
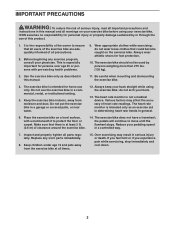
...and properly tighten all warnings on your exercise bike before using the exercise bike; IMPORTANT PRECAUTIONS WARNING: To reduce the risk of serious injury, read all important precautions and instructions in this manual and all parts regularly. Always wear athletic shoes for personal ...not use only. Various factors may result in a controlled way. 7. Before beginning any worn parts immediately. 8. Over exercising may affect the accuracy of this manual. 11. The exercise bike is at all precautions. 2. The heart rate monitor is not a medical device. Keep children...
...and properly tighten all warnings on your exercise bike before using the exercise bike; IMPORTANT PRECAUTIONS WARNING: To reduce the risk of serious injury, read all important precautions and instructions in this manual and all parts regularly. Always wear athletic shoes for personal ...not use only. Various factors may result in a controlled way. 7. Before beginning any worn parts immediately. 8. Over exercising may affect the accuracy of this manual. 11. The exercise bike is at all precautions. 2. The heart rate monitor is not a medical device. Keep children...
English Manual
Page 4
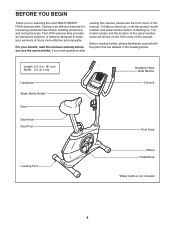
...increasing cardiovascular fitness, building endurance, and toning the body. Before reading further, please familiarize yourself with the parts that are shown on the front cover of features designed to make your benefit, read this manual. If ...questions after reading this manual, please see the front cover of this manual carefully before contacting us. The H10X exercise bike provides an impressive selection of this manual. The model number and the location of the serial number decal are... *Water bottle is an effective exercise for selecting the new HEALTHRIDER® H10X exercise bike.
...increasing cardiovascular fitness, building endurance, and toning the body. Before reading further, please familiarize yourself with the parts that are shown on the front cover of features designed to make your benefit, read this manual. If ...questions after reading this manual, please see the front cover of this manual carefully before contacting us. The H10X exercise bike provides an impressive selection of this manual. The model number and the location of the serial number decal are... *Water bottle is an effective exercise for selecting the new HEALTHRIDER® H10X exercise bike.
English Manual
Page 5
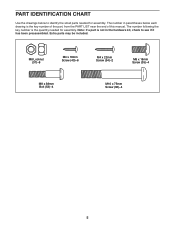
... x 18mm Screw (35)–-4 M8 x 38mm Bolt (53)–-4 M10 x 75mm Screw (36)–-4 5 Extra parts may be included. Note: If a part is the key number of the part, from the PART LIST near the end of this manual. PART IDENTIFICATION CHART Use the drawings below each drawing is not in the hardware kit, check...
... x 18mm Screw (35)–-4 M8 x 38mm Bolt (53)–-4 M10 x 75mm Screw (36)–-4 5 Extra parts may be included. Note: If a part is the key number of the part, from the PART LIST near the end of this manual. PART IDENTIFICATION CHART Use the drawings below each drawing is not in the hardware kit, check...
English Manual
Page 6
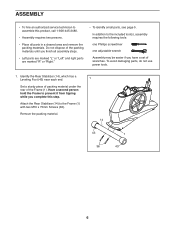
...hold the Frame to prevent it from tipping while you have a set of wrenches. Remove the packing material. 14 43 36 1 43 6 To avoid damaging parts, do not use power tools. 1. Attach the Rear Stabilizer (14) to the Frame (1) with two M10 x 75mm Screws (36). Identify the Rear ...Leveling Foot (43) near each end. 1 Set a sturdy piece of packing material under the rear of the packing materials until you nish all parts in a cleared area and remove the packing materials. Do not dispose of the Frame (1). ASSEMBLY •• To hire an authorized service technician to...
...hold the Frame to prevent it from tipping while you have a set of wrenches. Remove the packing material. 14 43 36 1 43 6 To avoid damaging parts, do not use power tools. 1. Attach the Rear Stabilizer (14) to the Frame (1) with two M10 x 75mm Screws (36). Identify the Rear ...Leveling Foot (43) near each end. 1 Set a sturdy piece of packing material under the rear of the packing materials until you nish all parts in a cleared area and remove the packing materials. Do not dispose of the Frame (1). ASSEMBLY •• To hire an authorized service technician to...
English Manual
Page 12
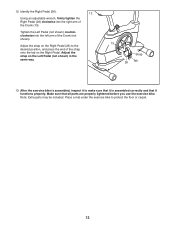
... an adjustable wrench, firmly tighten the Right Pedal (26) clockwise into the left arm of the Crank (13). Note: Extra parts may be included. After the exercise bike is assembled, inspect it to make sure that it functions properly. Tighten the Left Pedal (not shown) counterclockwise into the right ...arm of the Crank (not shown). Make sure that it is assembled correctly and that all parts are properly tightened before you use the exercise bike. 12. Adjust the strap on the Right Pedal (26) to protect the floor or carpet. 12
... an adjustable wrench, firmly tighten the Right Pedal (26) clockwise into the left arm of the Crank (13). Note: Extra parts may be included. After the exercise bike is assembled, inspect it to make sure that it functions properly. Tighten the Left Pedal (not shown) counterclockwise into the right ...arm of the Crank (not shown). Make sure that it is assembled correctly and that all parts are properly tightened before you use the exercise bike. 12. Adjust the strap on the Right Pedal (26) to protect the floor or carpet. 12
English Manual
Page 20
... television reception, which can radiate radio frequency energy and, if not installed and used in accordance with the limits for a Class B digital device, pursuant to part 15 of the following measures: •• Reorient or relocate the receiving antenna. •• Increase the separation between the equipment and the receiver. •...
... television reception, which can radiate radio frequency energy and, if not installed and used in accordance with the limits for a Class B digital device, pursuant to part 15 of the following measures: •• Reorient or relocate the receiving antenna. •• Increase the separation between the equipment and the receiver. •...
English Manual
Page 21
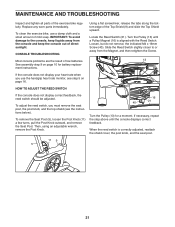
... AND TROUBLESHOOTING Inspect and tighten all parts of mild soap. To clean the exercise bike, use the handgrip heart rate monitor, see the instructions below). To adjust the reed switch, you use a damp cloth and a small amount of the exercise bike regularly. Locate the Reed Switch (... for a moment. Slide the Reed Switch slightly closer to the console, keep the console out of low batteries. Replace any worn parts immediately. CONSOLE TROUBLESHOOTING Most console problems are the result of direct sunlight. Using a flat screwdriver, release the tabs along the bottom ...
... AND TROUBLESHOOTING Inspect and tighten all parts of mild soap. To clean the exercise bike, use the handgrip heart rate monitor, see the instructions below). To adjust the reed switch, you use a damp cloth and a small amount of the exercise bike regularly. Locate the Reed Switch (... for a moment. Slide the Reed Switch slightly closer to the console, keep the console out of low batteries. Replace any worn parts immediately. CONSOLE TROUBLESHOOTING Most console problems are the result of direct sunlight. Using a flat screwdriver, release the tabs along the bottom ...
English Manual
Page 23
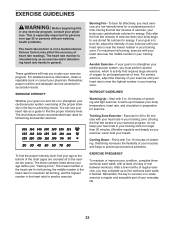
... to five workouts each week, with 5 to find your exercise program. Remember, the key to success is the key to make exercise a regular and enjoyable part of exercise, your breath. These guidelines will help you must perform aerobic exercise, which is near the middle number in your body temperature, heart rate...
... to five workouts each week, with 5 to find your exercise program. Remember, the key to success is the key to make exercise a regular and enjoyable part of exercise, your breath. These guidelines will help you must perform aerobic exercise, which is near the middle number in your body temperature, heart rate...
English Manual
Page 26
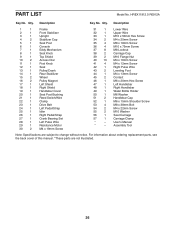
PART LIST Model No. Qty. Description 1 1 Frame 2 1 Front Stabilizer 3 1 Upright 4 2 Stabilizer Cap 5 1 Seat Post 6 1 Console 7 1 Eddy Mechanism 8 1 Seat Knob 9 1 Top Shield 10 2 Access Disc 11 1...38mm Bolt 54 2 M4 x 22mm Screw 55 2 M10 Washer 56 1 Seat Carriage 57 1 Carriage Clamp * –- For information about ordering replacement parts, see the back cover of this manual. *These parts are subject to change without notice. Qty. Description Key No. User’'s Manual * –- Assembly Tool Note: Specifications are not illustrated...
PART LIST Model No. Qty. Description 1 1 Frame 2 1 Front Stabilizer 3 1 Upright 4 2 Stabilizer Cap 5 1 Seat Post 6 1 Console 7 1 Eddy Mechanism 8 1 Seat Knob 9 1 Top Shield 10 2 Access Disc 11 1...38mm Bolt 54 2 M4 x 22mm Screw 55 2 M10 Washer 56 1 Seat Carriage 57 1 Carriage Clamp * –- For information about ordering replacement parts, see the back cover of this manual. *These parts are subject to change without notice. Qty. Description Key No. User’'s Manual * –- Assembly Tool Note: Specifications are not illustrated...

English Manual
Page 28
..., or if the product is authorized by ICON. If the product is shipped to a service center, freight charges to the product. If replacement parts are shipped while the product is under warranty. For in their scope and duration to repairing or replacing, at ICON’'s option, the product ...149;• the name of the product (see the front cover of this manual) •• the key number and description of the replacement part(s) (see the front cover of this manual. or other warranty beyond that vary from state to any implied warranties of merchantability or tness ...
..., or if the product is authorized by ICON. If the product is shipped to a service center, freight charges to the product. If replacement parts are shipped while the product is under warranty. For in their scope and duration to repairing or replacing, at ICON’'s option, the product ...149;• the name of the product (see the front cover of this manual) •• the key number and description of the replacement part(s) (see the front cover of this manual. or other warranty beyond that vary from state to any implied warranties of merchantability or tness ...


