

Uk Manual
Page 3
... following important precautions and information before operating the treadmill. 1. Always remove the key, unplug the power cord and move the on the walking belt. Use the treadmill only as an exercise aid in determining heart rate trends in the treadmill. To protect the floor or carpet from heated... surfaces. 3. Do not put the treadmill in this treadmill are standing on /off . Never allow...
... following important precautions and information before operating the treadmill. 1. Always remove the key, unplug the power cord and move the on the walking belt. Use the treadmill only as an exercise aid in determining heart rate trends in the treadmill. To protect the floor or carpet from heated... surfaces. 3. Do not put the treadmill in this treadmill are standing on /off . Never allow...

Uk Manual
Page 6
...number of this manual for selecting the new HealthRider® SoftTrac 250P treadmill. Before reading further, please review the drawing below and familiarise yourself with innovative design to the treadmill (see the front cover of the treadmill is HETL40630. ing this manual carefully before calling...SIDE Walking Belt Foot Rail On/Off Switch Circuit Breaker Front Wheel Rear Roller Adjustment Bolts Cushioned Walking Platform 6 And when you get the most from your exercise program in the convenience and privacy of other treadmills. The SoftTrac 250P treadmill combines ...
...number of this manual for selecting the new HealthRider® SoftTrac 250P treadmill. Before reading further, please review the drawing below and familiarise yourself with innovative design to the treadmill (see the front cover of the treadmill is HETL40630. ing this manual carefully before calling...SIDE Walking Belt Foot Rail On/Off Switch Circuit Breaker Front Wheel Rear Roller Adjustment Bolts Cushioned Walking Platform 6 And when you get the most from your exercise program in the convenience and privacy of other treadmills. The SoftTrac 250P treadmill combines ...
Uk Manual
Page 7
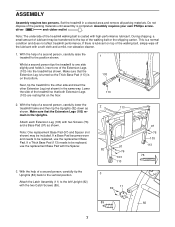
... Uprights (82) back to the left Upright (82) with two Screws (76) and a Base Pad (97) as shown. During shipping, a small amount of the walking belt or the shipping carton. Next, tip the treadmill to be included. main in a cleared area and remove all packing materials. Do not dispose of the... treadmill walking belt is on the floor. 1 103 113 2. If a Thick Base Pad (113) needs to the other side and insert the other Extension Leg (not shown) in ...
... Uprights (82) back to the left Upright (82) with two Screws (76) and a Base Pad (97) as shown. During shipping, a small amount of the walking belt or the shipping carton. Next, tip the treadmill to be included. main in a cleared area and remove all packing materials. Do not dispose of the... treadmill walking belt is on the floor. 1 103 113 2. If a Thick Base Pad (113) needs to the other side and insert the other Extension Leg (not shown) in ...
Uk Manual
Page 8
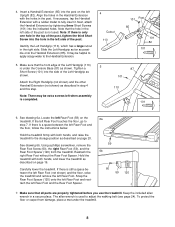
...: There may be extra screws left Rear Foot touches the floor, go to adjust the walking belt (see page 24). If there is under the treadmill. 8 To protect the floor or carpet from the treadmill. Align the holes in the post. Snap the Rear Foot Spacer (120) onto the left Rear Foot ...and reattach the left side of the Left Handgrip (110) is a space between the left Rear Foot (not shown) and the floor, raise the treadmill and remove the left Rear Foot (59) on page 20. 4. Insert a Handrail Extension (85) into the indicated holes. Identify the Left Handgrip (110), which ...
...: There may be extra screws left Rear Foot touches the floor, go to adjust the walking belt (see page 24). If there is under the treadmill. 8 To protect the floor or carpet from the treadmill. Align the holes in the post. Snap the Rear Foot Spacer (120) onto the left Rear Foot ...and reattach the left side of the Left Handgrip (110) is a space between the left Rear Foot (not shown) and the floor, raise the treadmill and remove the left Rear Foot (59) on page 20. 4. Insert a Handrail Extension (85) into the indicated holes. Identify the Left Handgrip (110), which ...
Uk Manual
Page 10
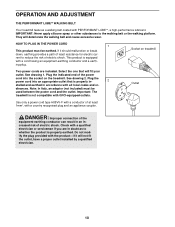
... 2. Plug the power cord into the socket on treadmill Two power cords are in doubt as to the walking belt or the walking platform. Important: The treadmill is equipped with PERFORMANT LUBETM, a high-performance lubricant. OPERATION AND ADJUSTMENT THE PERFORMANT LUBETM WALKING BELT Your treadmill features a walking belt coated with a cord having an equipment-earthing conductor...
... 2. Plug the power cord into the socket on treadmill Two power cords are in doubt as to the walking belt or the walking platform. Important: The treadmill is equipped with PERFORMANT LUBETM, a high-performance lubricant. OPERATION AND ADJUSTMENT THE PERFORMANT LUBETM WALKING BELT Your treadmill features a walking belt coated with a cord having an equipment-earthing conductor...

Uk Manual
Page 11
... and video programs automatically control the speed and incline of electric shock, keep the console dry. When the manual mode of the treadmill can even measure your exercise. High-energy music provides added motivation. The console also features advanced iFIT.com interactive technology. Visit www... Clip Start Stop Button Button CAUTION: Before operating the console, read the following precautions. • Do not stand on the walking belt when turning on the console and place only a sealed water bottle in your computer, you through an effective workout. Avoid spilling liquids...
... and video programs automatically control the speed and incline of electric shock, keep the console dry. When the manual mode of the treadmill can even measure your exercise. High-energy music provides added motivation. The console also features advanced iFIT.com interactive technology. Visit www... Clip Start Stop Button Button CAUTION: Before operating the console, read the following precautions. • Do not stand on the walking belt when turning on the console and place only a sealed water bottle in your computer, you through an effective workout. Avoid spilling liquids...

Uk Manual
Page 12
... completed 1/4 mile. The display will light one lap equals 1/4 mile). ercise, change the incline of the treadmill, press the Incline buttons. To stop the walking belt, press the Stop button. To restart the walking belt, press the Start button or the Speed v button. 4 Change the incline of the... treadmill as shown by pressing the Speed buttons. Distance/Laps display- HOW TO USE THE MANUAL MODE 1 ...
... completed 1/4 mile. The display will light one lap equals 1/4 mile). ercise, change the incline of the treadmill, press the Incline buttons. To stop the walking belt, press the Stop button. To restart the walking belt, press the Start button or the Speed v button. 4 Change the incline of the... treadmill as shown by pressing the Speed buttons. Distance/Laps display- HOW TO USE THE MANUAL MODE 1 ...

Uk Manual
Page 13
... , as shown by the arrows in watts. (The console estimates watts by multiplying the number of the walking belt. Each time the Incline buttons are finished using the treadmill, move the on/off position. 13 Speed display-This display shows the speed of calories you are pressed, this... your hands on the metal contacts on the foot rails and Sensors place your hands. The incline must be at the lowest setting when the treadmill is selected, hold the contacts for metric kilometres, will be damaged. To determine which unit of the program. An "E," for english miles,...
... , as shown by the arrows in watts. (The console estimates watts by multiplying the number of the walking belt. Each time the Incline buttons are finished using the treadmill, move the on/off position. 13 Speed display-This display shows the speed of calories you are pressed, this... your hands on the metal contacts on the foot rails and Sensors place your hands. The incline must be at the lowest setting when the treadmill is selected, hold the contacts for metric kilometres, will be damaged. To determine which unit of the program. An "E," for english miles,...

Uk Manual
Page 14
...maximum speed of 4 mph and a maximum incline of 8% during the programs. The numbers beside the profiles show how the speed and incline of the treadmill will automatically adjust to start the program. gram indicators lights. Hold the handrails and begin to a stop the program, press the Stop button. The program... cord to the off the demo mode. Each program is in a secure place. One speed setting and one of the program. The walking belt will begin walking. The Time/Incline/Seg Time display will then slow to flash. To end the program, press the Stop button, remove the...
...maximum speed of 4 mph and a maximum incline of 8% during the programs. The numbers beside the profiles show how the speed and incline of the treadmill will automatically adjust to start the program. gram indicators lights. Hold the handrails and begin to a stop the program, press the Stop button. The program... cord to the off the demo mode. Each program is in a secure place. One speed setting and one of the program. The walking belt will begin walking. The Time/Incline/Seg Time display will then slow to flash. To end the program, press the Stop button, remove the...

Uk Manual
Page 18
... are finished using your portable CD player and the CD skips, set the CD player on the floor or another flat surface instead of the treadmill is pressed, your CD player or VCR. Simply follow your CD player or VCR. During the CD or video program, an electronic "chirping" sound will... workout. The Time/Incline/Seg Time display will stop the program at any time, press the Stop button on the console. After a moment, the walking belt will change . When the CD or video program is not flashing. Note: If the speed or incline of the CD or video program. If the...
... are finished using your portable CD player and the CD skips, set the CD player on the floor or another flat surface instead of the treadmill is pressed, your CD player or VCR. Simply follow your CD player or VCR. During the CD or video program, an electronic "chirping" sound will... workout. The Time/Incline/Seg Time display will stop the program at any time, press the Stop button on the console. After a moment, the walking belt will change . When the CD or video program is not flashing. Note: If the speed or incline of the CD or video program. If the...

Uk Manual
Page 19
...DIRECTLY FROM OUR WEB SITE Our new Web site at www.iFIT.com allows you to access a large selection of programs that interactively control your treadmill to help you achieve your home computer. The iFIT.com indicator will begin . 7 Return to your specific exercise goals. CAUTION: Always listen..., you can play iFIT.com audio and video programs directly from our Web site, the treadmill must have at 1 mph. To use programs from the internet. Hold the handrails, step onto the walking belt, and begin to move . The Time/Incline/Seg Time display will be found on position...
...DIRECTLY FROM OUR WEB SITE Our new Web site at www.iFIT.com allows you to access a large selection of programs that interactively control your treadmill to help you achieve your home computer. The iFIT.com indicator will begin . 7 Return to your specific exercise goals. CAUTION: Always listen..., you can play iFIT.com audio and video programs directly from our Web site, the treadmill must have at 1 mph. To use programs from the internet. Hold the handrails, step onto the walking belt, and begin to move . The Time/Incline/Seg Time display will be found on position...

Uk Manual
Page 20
...of this manual). To purchase the optional chest pulse sensor, call our Customer Service Department (see the back cover of miles that the walking belt has moved. See step 6 on page 13. 10 When the program is 20 In addition, the information mode allows you to switch ... in the "demo" mode. To purchase the optional hand weights, call our Customer Service Department (see the back cover of hours the treadmill has been used only when a treadmill is finished, remove the key. An "E," for english miles, or an "M," for metric kilometres, will show the total number of this...
...of this manual). To purchase the optional chest pulse sensor, call our Customer Service Department (see the back cover of miles that the walking belt has moved. See step 6 on page 13. 10 When the program is 20 In addition, the information mode allows you to switch ... in the "demo" mode. To purchase the optional hand weights, call our Customer Service Department (see the back cover of hours the treadmill has been used only when a treadmill is finished, remove the key. An "E," for english miles, or an "M," for metric kilometres, will show the total number of this...

Uk Manual
Page 24
... of the Incline buttons. After a few minutes. If the walking belt is properly tightened, you should be able to lift each side of a turn . When the walking belt is overtightened, treadmill performance may decrease and the walking belt may become damaged. Plug in .) off -centre, first remove the... CORD. b 5-7 cm Rear Roller Adjustment Bolts c. terclockwise 1/2 of the walking belt 5 to 7 cm (2 to 4 in the power cord, insert the key and carefully walk on the treadmill for a few minutes. ing belt is properly tightened. Plug in ) off -centre or slips when walked on ,...
... of the Incline buttons. After a few minutes. If the walking belt is properly tightened, you should be able to lift each side of a turn . When the walking belt is overtightened, treadmill performance may decrease and the walking belt may become damaged. Plug in .) off -centre, first remove the... CORD. b 5-7 cm Rear Roller Adjustment Bolts c. terclockwise 1/2 of the walking belt 5 to 7 cm (2 to 4 in the power cord, insert the key and carefully walk on the treadmill for a few minutes. ing belt is properly tightened. Plug in ) off -centre or slips when walked on ,...


