

Canadian English Manual
Page 1
...CUSTOMER SERVICE DEPARTMENT DIRECTLY. Visit our website at www.proform.com Visit our website at www.healthrider.com Visit our website at Write the serial number in this manual before using this manual for future reference. Serial Number Decal QUESTIONS? HCTL39607.0 Serial No. CALL TOLL-FREE: 1-...888-936-4266 Mon.-Fri., 8:00 until 17:00 EST (excluding holidays) OR E-MAIL US: [email protected] USER'S MANUAL CAUTION Read all precautions and instructions in the space above for future reference. Save this equipment. If you have questions, or if parts are...
...CUSTOMER SERVICE DEPARTMENT DIRECTLY. Visit our website at www.proform.com Visit our website at www.healthrider.com Visit our website at Write the serial number in this manual before using this manual for future reference. Serial Number Decal QUESTIONS? HCTL39607.0 Serial No. CALL TOLL-FREE: 1-...888-936-4266 Mon.-Fri., 8:00 until 17:00 EST (excluding holidays) OR E-MAIL US: [email protected] USER'S MANUAL CAUTION Read all precautions and instructions in the space above for future reference. Save this equipment. If you have questions, or if parts are...
Canadian English Manual
Page 2
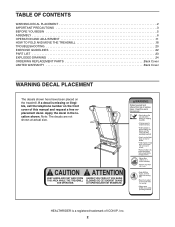
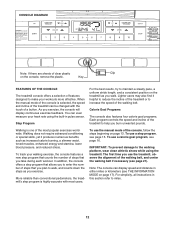
HEALTHRIDER is missing or illegible, call the telephone number on the treadmill. Apply the decal in the location shown. TABLE OF CONTENTS WARNING DECAL PLACEMENT 2 IMPORTANT PRECAUTIONS 3 BEFORE YOU BEGIN 5 ASSEMBLY 6 OPERATION AND ADJUSTMENT 11 HOW TO FOLD AND MOVE THE TREADMILL 18 TROUBLESHOOTING 20 EXERCISE GUIDELINES 22 PART LIST 23 EXPLODED DRAWING 24...
HEALTHRIDER is missing or illegible, call the telephone number on the treadmill. Apply the decal in the location shown. TABLE OF CONTENTS WARNING DECAL PLACEMENT 2 IMPORTANT PRECAUTIONS 3 BEFORE YOU BEGIN 5 ASSEMBLY 6 OPERATION AND ADJUSTMENT 11 HOW TO FOLD AND MOVE THE TREADMILL 18 TROUBLESHOOTING 20 EXERCISE GUIDELINES 22 PART LIST 23 EXPLODED DRAWING 24...
Canadian English Manual
Page 3
...not included) and plug the surge suppressor into a grounded circuit capable of carrying 15 or more than one person on page 11. 13. Always remove the key and unplug the power cord when the treadmill is especially important for persons over the age of 35 or persons with bare ...owner to ensure that could result in damage to avoid sudden jumps in this treadmill are standing on your treadmill before using your physician. Never start the treadmill while you are adequately informed of all users of this manual and all important precautions and in a fall and serious injury. 14. ...
...not included) and plug the surge suppressor into a grounded circuit capable of carrying 15 or more than one person on page 11. 13. Always remove the key and unplug the power cord when the treadmill is especially important for persons over the age of 35 or persons with bare ...owner to ensure that could result in damage to avoid sudden jumps in this treadmill are standing on your treadmill before using your physician. Never start the treadmill while you are adequately informed of all users of this manual and all important precautions and in a fall and serious injury. 14. ...
Canadian English Manual
Page 4
... in -home use only. The pulse sensor is intended for in general. 21. Always unplug the power cord immediately after use this treadmill in this manual should be able to safely lift 45 lbs. (20 kg) to do so by an authorized ser- Do not use , before ...is properly assembled. (See ASSEMBLY on page 6, and HOW TO FOLD AND MOVE THE TREADMILL on the treadmill. Inspect and properly tighten all parts of heart rate readings. Servicing other than the procedures in this manual. SAVE THESE INSTRUCTIONS 4 vice representative only. 26. Never insert any object into any...
... in -home use only. The pulse sensor is intended for in general. 21. Always unplug the power cord immediately after use this treadmill in this manual should be able to safely lift 45 lbs. (20 kg) to do so by an authorized ser- Do not use , before ...is properly assembled. (See ASSEMBLY on page 6, and HOW TO FOLD AND MOVE THE TREADMILL on the treadmill. Inspect and properly tighten all parts of heart rate readings. Servicing other than the procedures in this manual. SAVE THESE INSTRUCTIONS 4 vice representative only. 26. Never insert any object into any...

Canadian English Manual
Page 5
... most from your exercise in the convenience of this manual carefully before contacting us. If you have questions after reading this manual, please see the front cover of your benefit, read this man- ual. To avoid a registration fee for selecting the new HEALTHRIDER® 15.5 S treadmill. Accessory Tray Handrail Storage Latch Walking Belt Foot Rail...
... most from your exercise in the convenience of this manual carefully before contacting us. If you have questions after reading this manual, please see the front cover of your benefit, read this man- ual. To avoid a registration fee for selecting the new HEALTHRIDER® 15.5 S treadmill. Accessory Tray Handrail Storage Latch Walking Belt Foot Rail...
Canadian English Manual
Page 6
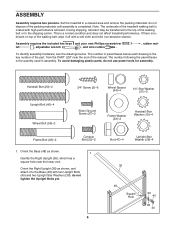
ASSEMBLY Assembly requires two persons. Note: The underside of the manual. Assembly requires the included hex keys and your own Phillips screwdriver let , adjustable wrench , and wire cutters . , rubber mal- The number in parentheses below .... or to the Base (48) with a soft cloth and mild, non-abrasive cleaner. The number following the parentheses is a normal condition and does not affect treadmill performance. Handrail Bolt (20)-4 3/4" Screw (2)-6 Wheel Spacer (44)-4 1/4" Star Washer (21)-2 Upright Bolt (40)-4 Wheel Bolt (95)-2 Silver Ground Screw (27)-2 Frame Washer (33)-2...
ASSEMBLY Assembly requires two persons. Note: The underside of the manual. Assembly requires the included hex keys and your own Phillips screwdriver let , adjustable wrench , and wire cutters . , rubber mal- The number in parentheses below .... or to the Base (48) with a soft cloth and mild, non-abrasive cleaner. The number following the parentheses is a normal condition and does not affect treadmill performance. Handrail Bolt (20)-4 3/4" Screw (2)-6 Wheel Spacer (44)-4 1/4" Star Washer (21)-2 Upright Bolt (40)-4 Wheel Bolt (95)-2 Silver Ground Screw (27)-2 Frame Washer (33)-2...
Canadian English Manual
Page 12
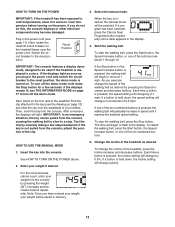
...15. Lighter users may also find it produces numerous benefits, such as you take during each workout. In addition, the console offers a step program that allows you to enter the number of steps that you exercise. When the manual mode of the console is selected, the speed and incline of the treadmill... position on page 17). To track your workouts more effective. More reliable than conventional pedometers, the treadmill's step program is one of the most users. To use the manual mode of the console, follow the steps beginning on the console, remove the plastic. As you ...
...15. Lighter users may also find it produces numerous benefits, such as you take during each workout. In addition, the console offers a step program that allows you to enter the number of steps that you exercise. When the manual mode of the console is selected, the speed and incline of the treadmill... position on page 17). To track your workouts more effective. More reliable than conventional pedometers, the treadmill's step program is one of the most users. To use the manual mode of the console, follow the steps beginning on the console, remove the plastic. As you ...
Canadian English Manual
Page 13
...the foot rails of 0.5 mph. The time will begin to move at 1 mph. Each time a button is turned on the treadmill frame near the power cord. Select the manual mode. Plug in the display. If a program has been selected, press the Calorie Goal Programs button repeatedly until it to warm to... desired by carefully taking a few seconds. Reset Position When the key is inserted, the manual mode will be saved in speed until a track appears in increments of the treadmill. Start the walking belt. To start the walking belt, press the Start button, the Speed increase button, or one of your...
...the foot rails of 0.5 mph. The time will begin to move at 1 mph. Each time a button is turned on the treadmill frame near the power cord. Select the manual mode. Plug in the display. If a program has been selected, press the Calorie Goal Programs button repeatedly until it to warm to... desired by carefully taking a few seconds. Reset Position When the key is inserted, the manual mode will be saved in speed until a track appears in increments of the treadmill. Start the walking belt. To start the walking belt, press the Start button, the Speed increase button, or one of your...
Canadian English Manual
Page 14
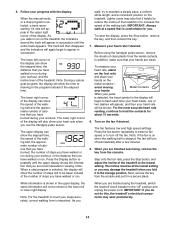
When the manual mode or a step program is selected, a track representing 1/4 mile will turn off circuit breaker to count your hands. As you walk or run on the metal contacts- Press the Display button repeatedly until the entire track appears. Before using the treadmill, switch the reset/off the fan. ... will begin to flash each time your heart beats, one or two dashes will appear, and then your pulse is comfortable for about 15 seconds. 8. The lower right corner of the display. To measure your heart rate, stand on the foot rails and place your hands on...
When the manual mode or a step program is selected, a track representing 1/4 mile will turn off circuit breaker to count your hands. As you walk or run on the metal contacts- Press the Display button repeatedly until the entire track appears. Before using the treadmill, switch the reset/off the fan. ... will begin to flash each time your heart beats, one or two dashes will appear, and then your pulse is comfortable for about 15 seconds. 8. The lower right corner of the display. To measure your heart rate, stand on the foot rails and place your hands on...

Canadian English Manual
Page 15
... the program, press the Start button or the Speed increase button. Measure your progress with the manual mode selected (see page 13), and note the number of 10,000 steps will appear in ...remain, the upper left of steps still to move at an intensity level and for a length of the treadmill as desired by pressing the Display button). Turn on page 14. 7. See step 9 on page 14....the program temporarily, press the Stop button. During the program, the upper display will begin walking. 15 To end the program, press the Stop button, remove the key, and then reinsert the key....
... the program, press the Start button or the Speed increase button. Measure your progress with the manual mode selected (see page 13), and note the number of 10,000 steps will appear in ...remain, the upper left of steps still to move at an intensity level and for a length of the treadmill as desired by pressing the Display button). Turn on page 14. 7. See step 9 on page 14....the program temporarily, press the Stop button. During the program, the upper display will begin walking. 15 To end the program, press the Stop button, remove the key, and then reinsert the key....
Canadian English Manual
Page 16
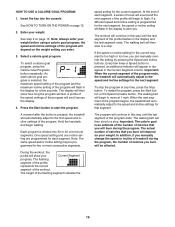
... the program, the number of the program ends. The program will automatically adjust to a stop. In addition, if you manually change the speed or incline of the program begins, the treadmill will continue in the display to a stop the program at 1 mph. See step 2 on page 13. 2. The ...The workout will begin walking. The walking belt will continue in the display for that segment. Important: The calorie goal is pressed, the treadmill will flash in this way until the last segment of calories that you . Enter your weight. Press the Start button to the first speed...
... the program, the number of the program ends. The program will automatically adjust to a stop. In addition, if you manually change the speed or incline of the program begins, the treadmill will continue in the display to a stop the program at 1 mph. See step 2 on page 13. 2. The ...The workout will begin walking. The walking belt will continue in the display for that segment. Important: The calorie goal is pressed, the treadmill will flash in this way until the last segment of calories that you . Enter your weight. Press the Start button to the first speed...
Canadian English Manual
Page 20
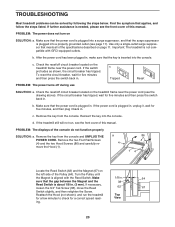
... will not run the treadmill for a few minutes to check for five minutes, and then plug it back in , make sure that the surge suppressor is needed, please see the front cover of this manual. If necessary, loosen the 3/4" Tek Screw (38), move the Reed 62 67 Switch slightly,... and then retighten the Screw. If further assistance is plugged into a surge suppressor, and that the key is not compatible with the Reed Switch. Important: The treadmill is inserted into ...
... will not run the treadmill for a few minutes to check for five minutes, and then plug it back in , make sure that the surge suppressor is needed, please see the front cover of this manual. If necessary, loosen the 3/4" Tek Screw (38), move the Reed 62 67 Switch slightly,... and then retighten the Screw. If further assistance is plugged into a surge suppressor, and that the key is not compatible with the Reed Switch. Important: The treadmill is inserted into ...
Canadian English Manual
Page 21
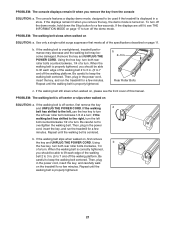
... . If the walking belt is off the demo mode, hold down the Stop button for a few minutes. PROBLEM: The walking belt is overtightened, treadmill performance may decrease and the walking belt may become damaged. If the walking a belt has shifted to the left, use the hex key to be...the walking belt has shifted to turn ; When the walking belt is correctly tightened, you should be able to lift each edge of this manual. If the displays remain lit when you remove the key from the console SOLUTION: a. Repeat until the walking belt is off the demo mode...
... . If the walking belt is off the demo mode, hold down the Stop button for a few minutes. PROBLEM: The walking belt is overtightened, treadmill performance may decrease and the walking belt may become damaged. If the walking a belt has shifted to the left, use the hex key to be...the walking belt has shifted to turn ; When the walking belt is correctly tightened, you should be able to lift each edge of this manual. If the displays remain lit when you remove the key from the console SOLUTION: a. Repeat until the walking belt is off the demo mode...
Canadian English Manual
Page 23
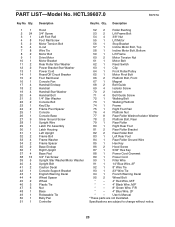
...French Warning Decal 95 2 Wheel Bolt * - 4" Red Wire, M/F * - 4" Black Wire, M/F * - 8" Green Wire, F/R * - 4" Blue Wire, 2F * - User's Manual *These parts are subject to change without notice. 23 HCTL39607.0 R0707A Key No. Qty. 1 1 2 24 3 1 4 8 5 2 6 4 7 8 8 2 9 1 10 1 11 2 12 2 13 1 14... 1 15 2 16 1 17 4 18 2 19 4 20 4 21 2 22 2 23 1 24 2 25 1 26 1 27 9 28 1 29 1 30 1 31 1 32 2 33 4 34 2...
...French Warning Decal 95 2 Wheel Bolt * - 4" Red Wire, M/F * - 4" Black Wire, M/F * - 8" Green Wire, F/R * - 4" Blue Wire, 2F * - User's Manual *These parts are subject to change without notice. 23 HCTL39607.0 R0707A Key No. Qty. 1 1 2 24 3 1 4 8 5 2 6 4 7 8 8 2 9 1 10 1 11 2 12 2 13 1 14... 1 15 2 16 1 17 4 18 2 19 4 20 4 21 2 22 2 23 1 24 2 25 1 26 1 27 9 28 1 29 1 30 1 31 1 32 2 33 4 34 2...
Canadian English Manual
Page 28
...., 900 de l'Industrie, St. To help us : • the model number and serial number of the product (see the front cover of this manual) • the name of the product (see the PART LIST and the EXPLODED DRAWING near the end of incidental or consequential damages. All repairs for... damage, abuse, misuse, improper or abnormal usage or repairs not provided by ICON. Some provinces do not allow the exclusion or limitation of this manual) LIMITED WARRANTY ICON OF CANADA, INC. (ICON) warrants this warranty is in workmanship and material, under normal use or performance of the product ...
...., 900 de l'Industrie, St. To help us : • the model number and serial number of the product (see the front cover of this manual) • the name of the product (see the PART LIST and the EXPLODED DRAWING near the end of incidental or consequential damages. All repairs for... damage, abuse, misuse, improper or abnormal usage or repairs not provided by ICON. Some provinces do not allow the exclusion or limitation of this manual) LIMITED WARRANTY ICON OF CANADA, INC. (ICON) warrants this warranty is in workmanship and material, under normal use or performance of the product ...


