

Canadian English Manual
Page 2
... 246723 210124 209490 HEALTHRIDER is missing or illegible, call the telephone number on the front cover of ICON IP, Inc. 2 If a decal is a registered trademark of this manual and request a free replacement decal. TABLE OF CONTENTS WARNING DECAL PLACEMENT 2 IMPORTANT PRECAUTIONS 3 BEFORE YOU BEGIN 4 ASSEMBLY 5 HOW TO USE THE ELLIPTICAL EXERCISER 10 MAINTENANCE...
... 246723 210124 209490 HEALTHRIDER is missing or illegible, call the telephone number on the front cover of ICON IP, Inc. 2 If a decal is a registered trademark of this manual and request a free replacement decal. TABLE OF CONTENTS WARNING DECAL PLACEMENT 2 IMPORTANT PRECAUTIONS 3 BEFORE YOU BEGIN 4 ASSEMBLY 5 HOW TO USE THE ELLIPTICAL EXERCISER 10 MAINTENANCE...

Canadian English Manual
Page 5
... M10 x 27mm Patch Screw (40)-2 M10 x 74mm Button Bolt (7)-2 M8 x 45mm Button Bolt (50)-4 M10 x 75mm Carriage Bolt (34)-4 M10 Bolt Set (25)-2 5 As you assemble the elliptical exerciser, use the drawings below each drawing is not in a cleared area and remove all parts of the... elliptical exerciser in the parts bag, check to identify small parts. If a part is the key number of the part, from the PART LIST near the end of the packing materials until assembly is the quantity needed for assembly. The number following the parentheses is completed...
... M10 x 27mm Patch Screw (40)-2 M10 x 74mm Button Bolt (7)-2 M8 x 45mm Button Bolt (50)-4 M10 x 75mm Carriage Bolt (34)-4 M10 Bolt Set (25)-2 5 As you assemble the elliptical exerciser, use the drawings below each drawing is not in a cleared area and remove all parts of the... elliptical exerciser in the parts bag, check to identify small parts. If a part is the key number of the part, from the PART LIST near the end of the packing materials until assembly is the quantity needed for assembly. The number following the parentheses is completed...
Canadian English Manual
Page 6
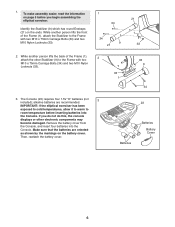
...to the Frame with two M10 x 75mm Carriage Bolts (34) and two M10 Nylon Locknuts (33). 2. If you begin assembling the elliptical exerciser. alkaline batteries are oriented as shown by the markings on the battery cover. Make sure that the batteries are recommended. To ...make assembly easier, read the information on the ends. Remove the battery cover from the Console, and insert four batteries into ...
...to the Frame with two M10 x 75mm Carriage Bolts (34) and two M10 Nylon Locknuts (33). 2. If you begin assembling the elliptical exerciser. alkaline batteries are oriented as shown by the markings on the battery cover. Make sure that the batteries are recommended. To ...make assembly easier, read the information on the ends. Remove the battery cover from the Console, and insert four batteries into ...

Canadian English Manual
Page 8
... hexagonal holes. Insert the Left Handlebar into the Upright (2), and center the Pivot Axle. Attach the Left Handlebar to the Left Pedal Leg with a sticker. Assemble the Right Handlebar (8) and the other Handlebar Leg (5) in the same way. 7 13 11 71 28 71 28 27 8 Attach the Right Pedal (not shown...
... hexagonal holes. Insert the Left Handlebar into the Upright (2), and center the Pivot Axle. Attach the Left Handlebar to the Left Pedal Leg with a sticker. Assemble the Right Handlebar (8) and the other Handlebar Leg (5) in the same way. 7 13 11 71 28 71 28 27 8 Attach the Right Pedal (not shown...
Canadian English Manual
Page 9
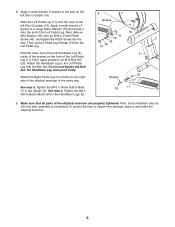
... grease to a Large Wave Washer (76) and press it onto the end of the elliptical exerciser are properly tightened. Make sure that all parts of the Left Pedal Leg. Attach... To protect the floor or carpet from damage, place a mat under the elliptical exerciser. 9 See step 6. Note: Some hardware may be left Handlebar Leg (5) inside of the elliptical exerciser in the same way. 5 25 Grease See step 5. Then, press ...Pedal Leg. 74 Hold the lower end of the left over after assembly is completed. Tighten the M10 x 74mm Button Bolts (7) in the Handlebar Legs (5). 25 11 9.
... grease to a Large Wave Washer (76) and press it onto the end of the elliptical exerciser are properly tightened. Make sure that all parts of the Left Pedal Leg. Attach... To protect the floor or carpet from damage, place a mat under the elliptical exerciser. 9 See step 6. Note: Some hardware may be left Handlebar Leg (5) inside of the elliptical exerciser in the same way. 5 25 Grease See step 5. Then, press ...Pedal Leg. 74 Hold the lower end of the left over after assembly is completed. Tighten the M10 x 74mm Button Bolts (7) in the Handlebar Legs (5). 25 11 9.

Canadian English Manual
Page 11
... four 1.5V "D" batteries (see step 4 on page 6). As you have pedaled. Increase Button Decrease Button HOW TO USE THE CONSOLE 3. Follow your heart rate (see assembly step 3 on page 12). 11 Note: After a button is a sheet of clear plastic on the face of the pedals as desired.
... four 1.5V "D" batteries (see step 4 on page 6). As you have pedaled. Increase Button Decrease Button HOW TO USE THE CONSOLE 3. Follow your heart rate (see assembly step 3 on page 12). 11 Note: After a button is a sheet of clear plastic on the face of the pedals as desired.

Canadian English Manual
Page 13
...pedals slip while you must first remove the Right Pedal Leg (12), the right Pedal Disc (15), and the Side Shields (3, 4). See assembly step 3 on page 9 and remove the Right Pedal Leg. 15 34 70 41 41 70 64 64 12 52 64 51 52 Next, remove the four Screws .... When the 62 19 Drive Belt is correctly adjusted, reattach the Side Shields (3, 4), the right Pedal Disc (15), and the Right Pedal Leg (12). Remove all parts of the elliptical exerciser regularly. Retighten the Screw. Replace any worn parts immediately. MAINTENANCE AND TROUBLESHOOTING Inspect and tighten all Screws (52...
...pedals slip while you must first remove the Right Pedal Leg (12), the right Pedal Disc (15), and the Side Shields (3, 4). See assembly step 3 on page 9 and remove the Right Pedal Leg. 15 34 70 41 41 70 64 64 12 52 64 51 52 Next, remove the four Screws .... When the 62 19 Drive Belt is correctly adjusted, reattach the Side Shields (3, 4), the right Pedal Disc (15), and the Right Pedal Leg (12). Remove all parts of the elliptical exerciser regularly. Retighten the Screw. Replace any worn parts immediately. MAINTENANCE AND TROUBLESHOOTING Inspect and tighten all Screws (52...

