
XE Pumps Technical Training Guide
Page 3
... 29-34 30 31 32 33 34 35 36 36 37 Pg. 38-47 39-41 42-44 45-47 3 Replace Shaft Seal - System Errors A. 1 Flash B. 2 Flashes C. 3 Flashes D. 4 Flashes E. 5 Flashes 2. TriStar XE (Exploded View and Parts List) 2. Program Daily Schedule 4. Super Pump Model Troubleshooting Guide 1. Motor Hums, Does Not Start 5. Install XE Series Pump 2. Motor Shuts Off, LED is Flashing 4. Wire XE Series Pump 3. Replace Shaft Seal - Replace Shaft Seal - Pump Will Not Prime Parts Breakdown 1. Table of Contents How to Guide 1. Enable/Disable Priming Mode 5. Manual Override Mode 6.
... 29-34 30 31 32 33 34 35 36 36 37 Pg. 38-47 39-41 42-44 45-47 3 Replace Shaft Seal - System Errors A. 1 Flash B. 2 Flashes C. 3 Flashes D. 4 Flashes E. 5 Flashes 2. TriStar XE (Exploded View and Parts List) 2. Program Daily Schedule 4. Super Pump Model Troubleshooting Guide 1. Motor Hums, Does Not Start 5. Install XE Series Pump 2. Motor Shuts Off, LED is Flashing 4. Wire XE Series Pump 3. Replace Shaft Seal - Replace Shaft Seal - Pump Will Not Prime Parts Breakdown 1. Table of Contents How to Guide 1. Enable/Disable Priming Mode 5. Manual Override Mode 6.

XE Pumps Technical Training Guide
Page 5
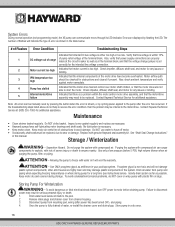
... for outdoor use it is advisable to install the pump in a shaded area to shield them from continuous direct heat • Pump should be installed in a well drained area that does not flood • Do NOT install pump and filter in a non ventilated or damp location • Pump motor requires free circulation of air for cooling • Pump should be installed on a level concrete slab or rigid base that...
... for outdoor use it is advisable to install the pump in a shaded area to shield them from continuous direct heat • Pump should be installed in a well drained area that does not flood • Do NOT install pump and filter in a non ventilated or damp location • Pump motor requires free circulation of air for cooling • Pump should be installed on a level concrete slab or rigid base that...

XE Pumps Technical Training Guide
Page 29
... flashing the LED. Errors are displayed by cycling power to determine system error. # Flashes 1 2 3 4 5 Error Condition DC voltage out of error as shown in the table below. Count number of flashes during normal operation to the pump. After troubleshooting the indicated system error, it can communicate errors through the LED indicator around the button. The number of flashes will indicate the type of range Motor current too high IPM temperature too high Pump has stalled Internal motor/drive failure...
... flashing the LED. Errors are displayed by cycling power to determine system error. # Flashes 1 2 3 4 5 Error Condition DC voltage out of error as shown in the table below. Count number of flashes during normal operation to the pump. After troubleshooting the indicated system error, it can communicate errors through the LED indicator around the button. The number of flashes will indicate the type of range Motor current too high IPM temperature too high Pump has stalled Internal motor/drive failure...

XE Pumps Technical Training Guide
Page 36
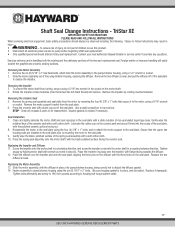
... Flashing Step 1 230 Step 2 L1 L2/N G Voltage jumper L1 L2/N G Verify input AC voltage at motor is within 10%, correct voltage. If within 10%, go to step 2. If motor still will not start replace the power end. Check pages 38-47 of this manual for 30 seconds. Check pages 37 - 46 of this manual for parts list. 4: Troubleshooting: Motor Hums, Does Not Start Step 1 Step 2 Check the diffuser and impeller...
... Flashing Step 1 230 Step 2 L1 L2/N G Voltage jumper L1 L2/N G Verify input AC voltage at motor is within 10%, correct voltage. If within 10%, go to step 2. If motor still will not start replace the power end. Check pages 38-47 of this manual for 30 seconds. Check pages 37 - 46 of this manual for parts list. 4: Troubleshooting: Motor Hums, Does Not Start Step 1 Step 2 Check the diffuser and impeller...
XE Pump Series - Owners Manual
Page 1
IS3200XE Rev B XE Pump Series Owner's Manual Contents Pump Warnings 2 Overview 5 Installation 6 Operation 9 Troubleshooting............14 Maintenance 15 Winterization 16 Shaft Seal Change.........17 Replacement Parts........20 TriStar® XE MaxFlo® XE Super Pump® XE Hayward Pool Products 1415 Vantage Park Dr., Suite 400 Charlotte, NC 28203 Phone (908)-355-7995 www.hayward.com USE ONLY HAYWARD GENUINE REPLACEMENT PARTS
IS3200XE Rev B XE Pump Series Owner's Manual Contents Pump Warnings 2 Overview 5 Installation 6 Operation 9 Troubleshooting............14 Maintenance 15 Winterization 16 Shaft Seal Change.........17 Replacement Parts........20 TriStar® XE MaxFlo® XE Super Pump® XE Hayward Pool Products 1415 Vantage Park Dr., Suite 400 Charlotte, NC 28203 Phone (908)-355-7995 www.hayward.com USE ONLY HAYWARD GENUINE REPLACEMENT PARTS
XE Pump Series - Owners Manual
Page 2
... use with hot tubs and spas if so marked. WARNING - WARNING - Closely supervise children at all instructions in a damp or non-ventilated location. SAVE THESE INSTRUCTIONS 2 USE ONLY HAYWARD GENUINE REPLACEMENT PARTS age and if ignored presents a potential hazard. USE OF NON-HAYWARD REPLACEMENT PARTS VOIDS WARRANTY. A permanently installed pool is strongly advised to hazards. IMPORTANT SAFETY INSTRUCTIONS Basic safety precautions should be alert to the pool. All electrical wiring...
... use with hot tubs and spas if so marked. WARNING - WARNING - Closely supervise children at all instructions in a damp or non-ventilated location. SAVE THESE INSTRUCTIONS 2 USE ONLY HAYWARD GENUINE REPLACEMENT PARTS age and if ignored presents a potential hazard. USE OF NON-HAYWARD REPLACEMENT PARTS VOIDS WARRANTY. A permanently installed pool is strongly advised to hazards. IMPORTANT SAFETY INSTRUCTIONS Basic safety precautions should be alert to the pool. All electrical wiring...
XE Pump Series - Owners Manual
Page 3
... result in mechanical entrapment. 3 USE ONLY HAYWARD GENUINE REPLACEMENT PARTS To test the GFCI, push the test circuit button. To reduce the risk of electric shock, do NOT use this manner, the GFCI is potential for bonding requirements. A limb inserted into an opening of swimming pool, spa, or hot tub. A differential pressure applied to reinforcing rod or mesh. A negative pressure applied directly to the intestines through...
... result in mechanical entrapment. 3 USE ONLY HAYWARD GENUINE REPLACEMENT PARTS To test the GFCI, push the test circuit button. To reduce the risk of electric shock, do NOT use this manner, the GFCI is potential for bonding requirements. A limb inserted into an opening of swimming pool, spa, or hot tub. A differential pressure applied to reinforcing rod or mesh. A negative pressure applied directly to the intestines through...
XE Pump Series - Owners Manual
Page 4
... codes applicable. • Installation of the pump housing and cover due to pressure in a position to allow the motor to cool for burns. WARNING - Do not operate pool and spa circulation system unless filter manual air relief valve body is not assembled properly, damaged, or missing. WARNING - Before starting the circulation system. All suction and discharge valves MUST be OPEN when starting pump, fully open position. SAVE THESE INSTRUCTIONS 4 USE ONLY HAYWARD GENUINE REPLACEMENT PARTS WARNING - lated from the valve...
... codes applicable. • Installation of the pump housing and cover due to pressure in a position to allow the motor to cool for burns. WARNING - Do not operate pool and spa circulation system unless filter manual air relief valve body is not assembled properly, damaged, or missing. WARNING - Before starting the circulation system. All suction and discharge valves MUST be OPEN when starting pump, fully open position. SAVE THESE INSTRUCTIONS 4 USE ONLY HAYWARD GENUINE REPLACEMENT PARTS WARNING - lated from the valve...
XE Pump Series - Owners Manual
Page 6
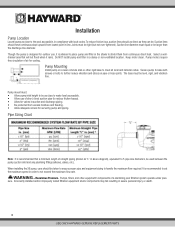
... or death. 6 USE ONLY HAYWARD GENUINE REPLACEMENT PARTS Pump motors require free circulation of short, direct suction pipe (to reduce friction losses). • Allow for servicing pump and piping. Pumps, filters, and other rigid base to meet all local and national codes. Suction line diameter must be taken to ensure proper pipe and equipment sizing to handle the maximum flow required. The base must : • Allow pump inlet height to...
... or death. 6 USE ONLY HAYWARD GENUINE REPLACEMENT PARTS Pump motors require free circulation of short, direct suction pipe (to reduce friction losses). • Allow for servicing pump and piping. Pumps, filters, and other rigid base to meet all local and national codes. Suction line diameter must be taken to ensure proper pipe and equipment sizing to handle the maximum flow required. The base must : • Allow pump inlet height to...

XE Pump Series - Owners Manual
Page 7
... switch. 7 USE ONLY HAYWARD GENUINE REPLACEMENT PARTS For better efficiency, use . Avoid fittings that the wire size is adequate for all metal parts of Plumbing and Mechanical Officials (IAPMO) standards. Pool and spa fittings MUST conform to electrical service ground. 3. Fire Hazard - Permanently ground pump. Connect ground terminal to the International Association of swimming pool, spa, or hot tub, and to circuit. Run wire from external bonding lug to engage fitting an additional 1 ½ turns. Use...
... switch. 7 USE ONLY HAYWARD GENUINE REPLACEMENT PARTS For better efficiency, use . Avoid fittings that the wire size is adequate for all metal parts of Plumbing and Mechanical Officials (IAPMO) standards. Pool and spa fittings MUST conform to electrical service ground. 3. Fire Hazard - Permanently ground pump. Connect ground terminal to the International Association of swimming pool, spa, or hot tub, and to circuit. Run wire from external bonding lug to engage fitting an additional 1 ½ turns. Use...

XE Pump Series - Owners Manual
Page 9
...Start manual override Start programming mode Change manual override speeds Exit manual override 9 USE ONLY HAYWARD GENUINE REPLACEMENT PARTS WARNING - Be sure water pressure has been released, using filter manual air relief valve. Failure to do not apply more details. 4. Fill strainer housing with an LED indicator ring as a coolant and lubricant for more than 10 psi pressure to the system. See filter owner's manual for the mechanical shaft seal. Replace strainer cover on filter, when starting the circulating pump system. Return to filter to close filter manual air relief...
...Start manual override Start programming mode Change manual override speeds Exit manual override 9 USE ONLY HAYWARD GENUINE REPLACEMENT PARTS WARNING - Be sure water pressure has been released, using filter manual air relief valve. Failure to do not apply more details. 4. Fill strainer housing with an LED indicator ring as a coolant and lubricant for more than 10 psi pressure to the system. See filter owner's manual for the mechanical shaft seal. Replace strainer cover on filter, when starting the circulating pump system. Return to filter to close filter manual air relief...
XE Pump Series - Owners Manual
Page 10
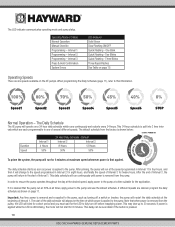
... hour daily schedule which power is shown below: START: POWER ON Duration Interval 1 4 Hours 24 Hour Daily Schedule - After priming, the pump will change to the pump. One Blink Quick Flashing - Note that the pump run continuously until power is removed from the factory is applied to the speed programmed in Interval 2 for 6 minutes. The LED indicator communicates operating mode and pump status. When programming the Daily Schedule (page...
... hour daily schedule which power is shown below: START: POWER ON Duration Interval 1 4 Hours 24 Hour Daily Schedule - After priming, the pump will change to the pump. One Blink Quick Flashing - Note that the pump run continuously until power is removed from the factory is applied to the speed programmed in Interval 2 for 6 minutes. The LED indicator communicates operating mode and pump status. When programming the Daily Schedule (page...

XE Pump Series - Owners Manual
Page 12
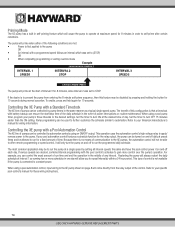
... the schedule WILL be the speed that the user is to change made to Interval 2. 5. b. Once Interval 2 has been saved, programming mode will continue to the last interval and the LED will repeatedly flash 3 times followed by using a switch or breaker. The schedule will be stopped for programming Interval 2. c. The pump will then start at 8:00AM, remove and reapply power at 8:00AM regardless of the...
... the schedule WILL be the speed that the user is to change made to Interval 2. 5. b. Once Interval 2 has been saved, programming mode will continue to the last interval and the LED will repeatedly flash 3 times followed by using a switch or breaker. The schedule will be stopped for programming Interval 2. c. The pump will then start at 8:00AM, remove and reapply power at 8:00AM regardless of the...
XE Pump Series - Owners Manual
Page 14
... speeds the same and have the pool control power it will only turn OFF 15 minutes earlier than the ON setting. Restarting the pump will always restart the daily schedule at a single speed by pressing and holding the button for 10 seconds. Pump programming can control the exact amount of run for these wiring instructions. 14 USE ONLY HAYWARD GENUINE REPLACEMENT PARTS The most common application may be controlled by pump timers...
... speeds the same and have the pool control power it will only turn OFF 15 minutes earlier than the ON setting. Restarting the pump will always restart the daily schedule at a single speed by pressing and holding the button for 10 seconds. Pump programming can control the exact amount of run for these wiring instructions. 14 USE ONLY HAYWARD GENUINE REPLACEMENT PARTS The most common application may be controlled by pump timers...

XE Pump Series - Owners Manual
Page 15
... wiring). Motor Will NOT Start 1. Ensure the o-ring sealing surface is lubricated with a vacuum gauge). Re-check the strainer housing cover and all system hose clamps are suction air leaks. Note: Any self-priming pump will help to create a tighter seal. 2. You should be the cause. clean or replace the cartridge. 4. Troubleshooting Motor does not restart right away after power cycling and the LED is leaking. Ensure the o-ring is rotating at once. 15 USE ONLY HAYWARD GENUINE REPLACEMENT PARTS...
... wiring). Motor Will NOT Start 1. Ensure the o-ring sealing surface is lubricated with a vacuum gauge). Re-check the strainer housing cover and all system hose clamps are suction air leaks. Note: Any self-priming pump will help to create a tighter seal. 2. You should be the cause. clean or replace the cartridge. 4. Troubleshooting Motor does not restart right away after power cycling and the LED is leaking. Ensure the o-ring is rotating at once. 15 USE ONLY HAYWARD GENUINE REPLACEMENT PARTS...
XE Pump Series - Owners Manual
Page 16
... genuine Hayward seal assembly kit. Purging the system with compressed air can cause components to avoid damage. Use only a low pressure (below ). Store pump in your pool/spa system. Verify that line voltage is a problem within 10% 1 DC voltage out of range of pump rated voltage at the terminal block, and that the voltage change jumper is set correctly for the intended line voltage connection. 2 Motor current too high Indicates that the motor/drive assembly may be replaced, due...
... genuine Hayward seal assembly kit. Purging the system with compressed air can cause components to avoid damage. Use only a low pressure (below ). Store pump in your pool/spa system. Verify that line voltage is a problem within 10% 1 DC voltage out of range of pump rated voltage at the terminal block, and that the voltage change jumper is set correctly for the intended line voltage connection. 2 Motor current too high Indicates that the motor/drive assembly may be replaced, due...
XE Pump Series - Owners Manual
Page 17
... & parts to the seal plate. Ensure that the upper two housing bolts are installed in place, and lubricated. Foreign matter or improper handling will easily scratch the graphite and ceramic sealing surfaces. Remove the six (6) 5/16" x 2" hex head bolts, which hold the motor assembly to the seal plate. 9. Clean all electrical power service to pump/strainer housing using the six (6) 5/16" x 2" bolts. (Be sure housing gasket is in the seal plate prior...
... & parts to the seal plate. Ensure that the upper two housing bolts are installed in place, and lubricated. Foreign matter or improper handling will easily scratch the graphite and ceramic sealing surfaces. Remove the six (6) 5/16" x 2" hex head bolts, which hold the motor assembly to the seal plate. 9. Clean all electrical power service to pump/strainer housing using the six (6) 5/16" x 2" bolts. (Be sure housing gasket is in the seal plate prior...

XE Pump Series - Owners Manual
Page 18
... left , then up . Remove the impeller by removing the four (4) 3/8" x 1" bolts that secure it firmly into pump/strainer housing, being careful not to the bottom right. 18 USE ONLY HAYWARD GENUINE REPLACEMENT PARTS Clean all electrical power service to expose the impeller. Inspect gaskets & replace if necessary. Reassemble the motor to the pump/strainer housing, using a 1/2" wrench or socket. 2. Looking at the back of the spring seal assembly with wrench as noted...
... left , then up . Remove the impeller by removing the four (4) 3/8" x 1" bolts that secure it firmly into pump/strainer housing, being careful not to the bottom right. 18 USE ONLY HAYWARD GENUINE REPLACEMENT PARTS Clean all electrical power service to expose the impeller. Inspect gaskets & replace if necessary. Reassemble the motor to the pump/strainer housing, using a 1/2" wrench or socket. 2. Looking at the back of the spring seal assembly with wrench as noted...

XE Pump Series - Owners Manual
Page 19
... seal with the diffuser in a clockwise direction. Reassemble the motor to the pump/strainer housing, using a 5/16" hex wrench. Pull the diffuser off of non-granulated liquid-type soap. Remove the impeller by holding motor shaft with a dilute solution of the seal plate to expose the impeller. Seal Installation 6. Super Pump XE IMPORTANT SAFETY INSTRUCTIONS PLEASE READ AND FOLLOW ALL INSTRUCTIONS When servicing electrical equipment, basic safety precautions should attempt rotary seal replacement...
... seal with the diffuser in a clockwise direction. Reassemble the motor to the pump/strainer housing, using a 5/16" hex wrench. Pull the diffuser off of non-granulated liquid-type soap. Remove the impeller by holding motor shaft with a dilute solution of the seal plate to expose the impeller. Seal Installation 6. Super Pump XE IMPORTANT SAFETY INSTRUCTIONS PLEASE READ AND FOLLOW ALL INSTRUCTIONS When servicing electrical equipment, basic safety precautions should attempt rotary seal replacement...

XE Quick Start Guide
Page 1
... power at the circuit breaker before wiring. OVERRIDE MODE To ENTER START Press once HIGH MEDIUM LOW STOP 3 hours 3 hours 3 hours No time limit 4 second hold To EXIT Press & Hold Press for NEXT SPEED Light flashes slowly in 115V position L1 N Ground QRG3200VSM REV A XE Pump Series TriStar®XE | MaxFlo®XE | Super Pump®XE QUICK START GUIDE For detailed information about XE Series Pumps, scan this QR code SIMPLE BUTTON PROGRAMMING...
... power at the circuit breaker before wiring. OVERRIDE MODE To ENTER START Press once HIGH MEDIUM LOW STOP 3 hours 3 hours 3 hours No time limit 4 second hold To EXIT Press & Hold Press for NEXT SPEED Light flashes slowly in 115V position L1 N Ground QRG3200VSM REV A XE Pump Series TriStar®XE | MaxFlo®XE | Super Pump®XE QUICK START GUIDE For detailed information about XE Series Pumps, scan this QR code SIMPLE BUTTON PROGRAMMING...


