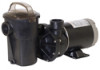
Models: SP1575LXTL SP1580TL and SP1580X15TL
Page 3
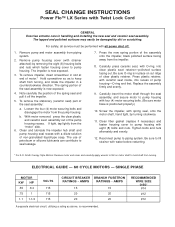
...motor shaft through the seat assembly, and secure motor to seal leakage. 7. Screw the impeller, with four (4) motor securing bolts. (Be sure motor base is positioned properly.) 10. SINGLE PHASE MOTOR KW HP .55 3/4 .75 1 1.1 1-1/2 VOLTS 115 115 115 CIRCUIT BREAKER BRANCH FUSETRON RATINGS -...hold shaft from turning, and rotate the impeller in slot at end of the seal assembly: a. AMPS RATINGS - SEAL CHANGE INSTRUCTIONS Power Flo™ LX Series with Twist Lock Cord GENERAL Exercise extreme care in place on motor shaft to piping system. To remove the stationary (ceramic ...
...motor shaft through the seat assembly, and secure motor to seal leakage. 7. Screw the impeller, with four (4) motor securing bolts. (Be sure motor base is positioned properly.) 10. SINGLE PHASE MOTOR KW HP .55 3/4 .75 1 1.1 1-1/2 VOLTS 115 115 115 CIRCUIT BREAKER BRANCH FUSETRON RATINGS -...hold shaft from turning, and rotate the impeller in slot at end of the seal assembly: a. AMPS RATINGS - SEAL CHANGE INSTRUCTIONS Power Flo™ LX Series with Twist Lock Cord GENERAL Exercise extreme care in place on motor shaft to piping system. To remove the stationary (ceramic ...
SP1575X15
Page 3
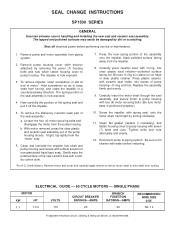
Note carefully the position of the spring seal and pull it off electrical power before restarting. *For A.O. Replace the assembly firmly and evenly. 9. b. With motor removed, press the clear plastic and ceramic seat assembly out of the seal ...insert screwdriver in handling and installing the new seal and ceramic seat assembly. Press plastic retainer, with four (4) motor securing bolts. (Be sure motor base is positioned properly.) 5. Carefully insert the motor shaft through the seal assembly, and secure motor to pump housing with ceramic seat inside, into clear plastic...
Note carefully the position of the spring seal and pull it off electrical power before restarting. *For A.O. Replace the assembly firmly and evenly. 9. b. With motor removed, press the clear plastic and ceramic seat assembly out of the seal ...insert screwdriver in handling and installing the new seal and ceramic seat assembly. Press plastic retainer, with four (4) motor securing bolts. (Be sure motor base is positioned properly.) 5. Carefully insert the motor shaft through the seal assembly, and secure motor to pump housing with ceramic seat inside, into clear plastic...

Owners Manual
Page 4
...Though the pump is designed for servicing pump and piping. Pump Mounting Fasten pump to base or pad with one to two additional layers of the plastic components. level - Piping ... plastic fittings must be new or thoroughly cleaned before use 1-1/2" reinforced hose. USE ONLY HAYWARD GENUINE REPLACEMENT PARTS 4 Plumbing Use TFE tape to seal threaded connections on ALL models, ... for outdoor use 1-1/2" PVC pipe or reinforced hose. Installation Instructions Pump Location The PowerFlo LX™ and EP series pumps MUST be installed up to four (4) feet above the pool...
...Though the pump is designed for servicing pump and piping. Pump Mounting Fasten pump to base or pad with one to two additional layers of the plastic components. level - Piping ... plastic fittings must be new or thoroughly cleaned before use 1-1/2" reinforced hose. USE ONLY HAYWARD GENUINE REPLACEMENT PARTS 4 Plumbing Use TFE tape to seal threaded connections on ALL models, ... for outdoor use 1-1/2" PVC pipe or reinforced hose. Installation Instructions Pump Location The PowerFlo LX™ and EP series pumps MUST be installed up to four (4) feet above the pool...
Owners Manual
Page 6
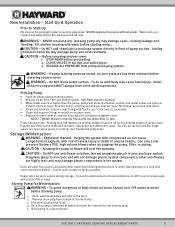
... drain system as far as a coolant and lubricant for the mechanical shaft seal. To avoid dangerous or fatal electrical shock hazard, turn OFF power to anyone nearby. Store pump in your pool/spa system. Start-Up & Operation Prior to pool/spa system directly in front of water...; Use only a low pressure (below all water from pump and piping system. other anti-freezes are opened. Remove drain plug from base. 4. USE ONLY HAYWARD GENUINE REPLACEMENT PARTS 6 re-install on strainer cover. Replace strainer cover on vertical length of suction lift and horizontal length of...
... drain system as far as a coolant and lubricant for the mechanical shaft seal. To avoid dangerous or fatal electrical shock hazard, turn OFF power to anyone nearby. Store pump in your pool/spa system. Start-Up & Operation Prior to pool/spa system directly in front of water...; Use only a low pressure (below all water from pump and piping system. other anti-freezes are opened. Remove drain plug from base. 4. USE ONLY HAYWARD GENUINE REPLACEMENT PARTS 6 re-install on strainer cover. Replace strainer cover on vertical length of suction lift and horizontal length of...
Owners Manual
Page 7
... shaft seal replacement. Hand-tighten the impeller in injury. Re-assemble strainer by disengaging and removing the strainer cover. Open all electrical power service to seal leakage. 10. Remove the strainer by sliding strainer housing onto pump cover. Rotate the impeller ina a counterclockwise direction ...screws and remove pump cover, exposing the impeller. 4. Start-Up for damage or deterioration over the shutdown period. Contact your local authorized Hayward Dealer or service center if you have any questions. Be sure motor base and pump discharge port are positioned properly.
... shaft seal replacement. Hand-tighten the impeller in injury. Re-assemble strainer by disengaging and removing the strainer cover. Open all electrical power service to seal leakage. 10. Remove the strainer by sliding strainer housing onto pump cover. Rotate the impeller ina a counterclockwise direction ...screws and remove pump cover, exposing the impeller. 4. Start-Up for damage or deterioration over the shutdown period. Contact your local authorized Hayward Dealer or service center if you have any questions. Be sure motor base and pump discharge port are positioned properly.
Owners Manual
Page 9
... to wear or damage. All seal leaks should be cause, remove any joint, low water level in pump housing. Equipment base vibrating. Maintenance Clean strainer basket regularly. See "Shaft Seal Change Instructions" in pump. 2. Inspect strainer cover gasket regularly ...Keep motor clean. DATE OF INSTALLATION INITIAL PRESSURE GAUGE READING (CLEAN FILTER PUMP MODEL HORSEPOWER FILTER MODEL SERIAL NUMBER USE ONLY HAYWARD GENUINE REPLACEMENT PARTS 9 Loose stones/debris hitting impeller could be replaced at any of chemicals causing seal damage which will ...
... to wear or damage. All seal leaks should be cause, remove any joint, low water level in pump housing. Equipment base vibrating. Maintenance Clean strainer basket regularly. See "Shaft Seal Change Instructions" in pump. 2. Inspect strainer cover gasket regularly ...Keep motor clean. DATE OF INSTALLATION INITIAL PRESSURE GAUGE READING (CLEAN FILTER PUMP MODEL HORSEPOWER FILTER MODEL SERIAL NUMBER USE ONLY HAYWARD GENUINE REPLACEMENT PARTS 9 Loose stones/debris hitting impeller could be replaced at any of chemicals causing seal damage which will ...


