Pool Vac Classic
Page 4
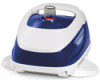
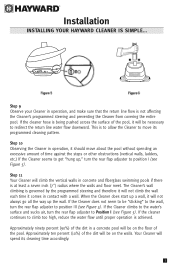
...Flow Gauge into the leader hose, then attach the C-Clip of the skimmer (see Figure 2) Step 5 Turn the filter system on and allow it will be sufficient for the class and size of pools for which ... not long enough, it to run long enough to the furthest point in the system. Installation INSTALLING YOUR HAYWARD CLEANER IS SIMPLE... If the hose is under water. (see Figure 3) or, if you must obtain ... your hose requirement is sold - 40 feet for PV XL & NAV Pro, 32 feet for your Hayward dealer. Connect the V093C Skimmer Cone adapter to the tapered male end of the vacuum hose if you are...
...Flow Gauge into the leader hose, then attach the C-Clip of the skimmer (see Figure 2) Step 5 Turn the filter system on and allow it will be sufficient for the class and size of pools for which ... not long enough, it to run long enough to the furthest point in the system. Installation INSTALLING YOUR HAYWARD CLEANER IS SIMPLE... If the hose is under water. (see Figure 3) or, if you must obtain ... your hose requirement is sold - 40 feet for PV XL & NAV Pro, 32 feet for your Hayward dealer. Connect the V093C Skimmer Cone adapter to the tapered male end of the vacuum hose if you are...
Pool Vac Classic
Page 5
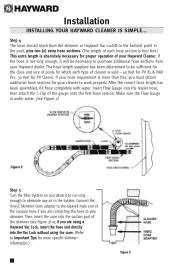
...Step 6 Check the water flow reading on the gauge. Turn the filter system on the "MAX" side and you have connected your hose to the skimmer, it to run long enough to adjust vacuum/water flow. Installation INSTALLING YOUR HAYWARD CLEANER IS SIMPLE... The black disk should be necessary to ... Regulator Valve or an optional Hayward Automatic Skimmer Vacuum Plate designed to eliminate any air in the box between the "MIN" and "MAX" markings. If the setting is to Step 4, Figure 2). Turn the blue collar counter clockwise until tight), insert the Valve into the Skimmer Cone, and insert ...
...Step 6 Check the water flow reading on the gauge. Turn the filter system on the "MAX" side and you have connected your hose to the skimmer, it to run long enough to adjust vacuum/water flow. Installation INSTALLING YOUR HAYWARD CLEANER IS SIMPLE... The black disk should be necessary to ... Regulator Valve or an optional Hayward Automatic Skimmer Vacuum Plate designed to eliminate any air in the box between the "MIN" and "MAX" markings. If the setting is to Step 4, Figure 2). Turn the blue collar counter clockwise until tight), insert the Valve into the Skimmer Cone, and insert ...
Pool Vac Classic
Page 6
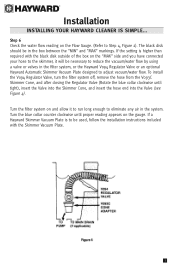
... the Skimmer Vacuum Plate cannot be used to LOWER an initial vacuum reading that is the middle position (see Figure 6). Contact your hose to the Hayward Vac Lock, it handy. After the 3-way valve has been properly adjusted, the 3-way valve should be necessary if you are using the 3-way valve... flap adjuster dial at position number II which is installed in the hose each time an adjustment is indicative of the Cleaner. It should be turned so that the water flow can only be set at the left rear of a system problem, and not a problem with a standard hand-vacuum (see Figure...
... the Skimmer Vacuum Plate cannot be used to LOWER an initial vacuum reading that is the middle position (see Figure 6). Contact your hose to the Hayward Vac Lock, it handy. After the 3-way valve has been properly adjusted, the 3-way valve should be necessary if you are using the 3-way valve... flap adjuster dial at position number II which is installed in the hose each time an adjustment is indicative of the Cleaner. It should be turned so that the water flow can only be set at the left rear of a system problem, and not a problem with a standard hand-vacuum (see Figure...
Pool Vac Classic
Page 7
... by the programmed steering and therefore it should move its cleaning time accordingly. 5 If the Cleaner climbs to the water's surface and sucks air, turn the rear flap adjuster to redirect the return line water flow downward. When the Cleaner does start up a wall, it will be necessary to position... too high, reduce the water flow until proper operation is at least a seven inch (7") radius where the walls and floor meet. Installation INSTALLING YOUR HAYWARD CLEANER IS SIMPLE... Step 9 Observe your Cleaner in concrete and fiberglass swimming pools if there is achieved.
... by the programmed steering and therefore it should move its cleaning time accordingly. 5 If the Cleaner climbs to the water's surface and sucks air, turn the rear flap adjuster to redirect the return line water flow downward. When the Cleaner does start up a wall, it will be necessary to position... too high, reduce the water flow until proper operation is at least a seven inch (7") radius where the walls and floor meet. Installation INSTALLING YOUR HAYWARD CLEANER IS SIMPLE... Step 9 Observe your Cleaner in concrete and fiberglass swimming pools if there is achieved.
Pool Vac Classic
Page 9
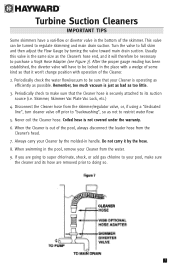
... head. 7. Skimmer, Skimmer Vac Plate Vac Lock, etc.) 4. After the proper gauge reading has been established, the diverter valve will therefore be turned to regulate skimming and main drain suction. Remember, too much vacuum is not covered under the warranty. 6. CLEANER 7 Disconnect the Cleaner hose from ..., or add gas chlorine to your pool, make sure that your Cleaner from the skimmer/regulator valve, or, if using a "dedicated line", turn cleaner valve off prior to "backwashing", so as not to restrict water flow. 5. When swimming in the bottom of the skimmer. Turbine Suction ...
... head. 7. Skimmer, Skimmer Vac Plate Vac Lock, etc.) 4. After the proper gauge reading has been established, the diverter valve will therefore be turned to regulate skimming and main drain suction. Remember, too much vacuum is not covered under the warranty. 6. CLEANER 7 Disconnect the Cleaner hose from ..., or add gas chlorine to your pool, make sure that your Cleaner from the skimmer/regulator valve, or, if using a "dedicated line", turn cleaner valve off prior to "backwashing", so as not to restrict water flow. 5. When swimming in the bottom of the skimmer. Turbine Suction ...
Pool Vac Classic
Page 10
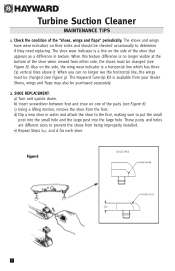
The shoe wear indicator is no longer see the horizontal line, the wings must be changed (see Figure 8). The Hayward Tune-Up Kit is a horizontal line which has three (3) vertical lines above it. b) Insert screwdriver between foot and shoe on the side of the shoe ... d for each shoe. Turbine Suction Cleaner MAINTENANCE TIPS 1. Shoes, wings and flaps may also be checked occasionally to determine if they need replacing. SHOE REPLACEMENT: a) Turn unit upside down. These posts and holes are different sizes to put the small post into the small hole and the large post into the...
The shoe wear indicator is no longer see the horizontal line, the wings must be changed (see Figure 8). The Hayward Tune-Up Kit is a horizontal line which has three (3) vertical lines above it. b) Insert screwdriver between foot and shoe on the side of the shoe ... d for each shoe. Turbine Suction Cleaner MAINTENANCE TIPS 1. Shoes, wings and flaps may also be checked occasionally to determine if they need replacing. SHOE REPLACEMENT: a) Turn unit upside down. These posts and holes are different sizes to put the small post into the small hole and the large post into the...

Pool Vac Classic
Page 13
... cleaner Change out steps - 1 1 2 1. Set the new Skirt/Middle Body assembly onto the Main Drive Assy. 6. Reattach the Handle by screwing in the Middle Body. Turn off the Middle Body. 4 4. Using the phillips screwdriver, remove and retain the four screws holding the Handle onto the Middle Body. 3. Insert the 1/8" flat screwdriver... in the handle and pry each cover snap off the Main Drive Assembly B 5. There is strong possibility that you bring your Pool Vac XL to a HAYWARD dealer for replacement. Replace the Handle. 7.
... cleaner Change out steps - 1 1 2 1. Set the new Skirt/Middle Body assembly onto the Main Drive Assy. 6. Reattach the Handle by screwing in the Middle Body. Turn off the Middle Body. 4 4. Using the phillips screwdriver, remove and retain the four screws holding the Handle onto the Middle Body. 3. Insert the 1/8" flat screwdriver... in the handle and pry each cover snap off the Main Drive Assembly B 5. There is strong possibility that you bring your Pool Vac XL to a HAYWARD dealer for replacement. Replace the Handle. 7.
Pool Vac Classic
Page 14
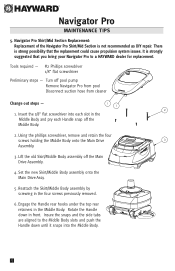
Turn off the Main Drive Assembly. 4. Using the phillips screwdriver, ...Body. 6 5 4 3 2 3 2 12 Engage the Handle rear hooks under the top rear retainers in front. Navigator Pro MAINTENANCE TIPS 5. Reattach the Skirt/Middle Body assembly by screwing in the Middle Body and pry each slot in the ...of the Navigator Pro Skirt/Mid Section is strongly suggested that the replacement could cause propulsion system issues. Set the new Skirt/Middle Body assembly onto the Main Drive Assy. 5. Insure the snaps and the side tabs are aligned to a HAYWARD dealer ...
Turn off the Main Drive Assembly. 4. Using the phillips screwdriver, ...Body. 6 5 4 3 2 3 2 12 Engage the Handle rear hooks under the top rear retainers in front. Navigator Pro MAINTENANCE TIPS 5. Reattach the Skirt/Middle Body assembly by screwing in the Middle Body and pry each slot in the ...of the Navigator Pro Skirt/Mid Section is strongly suggested that the replacement could cause propulsion system issues. Set the new Skirt/Middle Body assembly onto the Main Drive Assy. 5. Insure the snaps and the side tabs are aligned to a HAYWARD dealer ...
Pool Vac Classic
Page 15
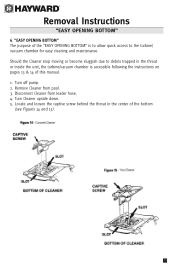
Sh1ould the Cleaner stop moving or become sluggish due to the turbine/ vacuum chamber for easy cleaning and maintenance. Removal Instructions "EASY OPENING BOTTOM" 6. Turn off pDump. 2. Turn Cleaner upside down. 5. "EASY OPENING BOTTOM" The purpose of the "EASY OPENING BOTTOM" is accessible following the instructions on pages 13 & 14 of the bottom...
Sh1ould the Cleaner stop moving or become sluggish due to the turbine/ vacuum chamber for easy cleaning and maintenance. Removal Instructions "EASY OPENING BOTTOM" 6. Turn off pDump. 2. Turn Cleaner upside down. 5. "EASY OPENING BOTTOM" The purpose of the "EASY OPENING BOTTOM" is accessible following the instructions on pages 13 & 14 of the bottom...
Pool Vac Classic
Page 17
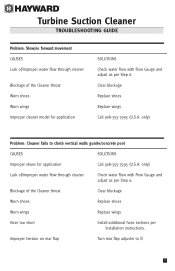
... Call 908-355-7995 (U.S.A. only) Problem: Cleaner fails to ||| 15 Clear blockage Replace shoes Replace wings Call 908-355-7995 (U.S.A. Improper tension on rear flap Turn rear flap adjuster to climb vertical walls gunite/concrete pool CAUSES SOLUTIONS Improper shoes for application SOLUTIONS Check water flow with Flow Gauge and adjust...
... Call 908-355-7995 (U.S.A. only) Problem: Cleaner fails to ||| 15 Clear blockage Replace shoes Replace wings Call 908-355-7995 (U.S.A. Improper tension on rear flap Turn rear flap adjuster to climb vertical walls gunite/concrete pool CAUSES SOLUTIONS Improper shoes for application SOLUTIONS Check water flow with Flow Gauge and adjust...
Pool Vac Classic
Page 18
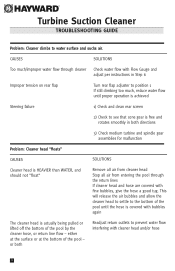
... - Turbine Suction Cleaner TROUBLESHOOTING GUIDE Problem: Cleaner climbs to see that cone gear is free and rotates smoothly in Step 6 Improper tension on rear flap Turn rear flap adjuster to position 1 If still climbing too much /improper water flow through cleaner Check water flow with Flow Gauge and adjust per instructions...
... - Turbine Suction Cleaner TROUBLESHOOTING GUIDE Problem: Cleaner climbs to see that cone gear is free and rotates smoothly in Step 6 Improper tension on rear flap Turn rear flap adjuster to position 1 If still climbing too much /improper water flow through cleaner Check water flow with Flow Gauge and adjust per instructions...


