
Model: RC9740 RC9742
Page 12
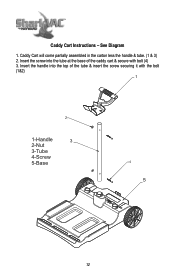
Insert the screw into the top of the caddy cart & secure with the bolt (1&2) 1 1-Handle 3 2-Nut 3-Tube 4-Screw 5-Base 5 12 Insert the handle into the tube at the base of the tube & insert the screw securing it with bolt (4) 3. Caddy Cart will come partially assembled in the carton less the handle & tube. (1 & 3) 2. See Diagram 1. Caddy Cart Instructions -
Insert the screw into the top of the caddy cart & secure with the bolt (1&2) 1 1-Handle 3 2-Nut 3-Tube 4-Screw 5-Base 5 12 Insert the handle into the tube at the base of the tube & insert the screw securing it with bolt (4) 3. Caddy Cart will come partially assembled in the carton less the handle & tube. (1 & 3) 2. See Diagram 1. Caddy Cart Instructions -
Model: RC9740 RC9742
Page 15
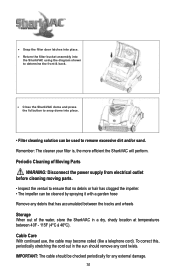
... button to snap dome into place. aning mo before cleaning moving parts. x the SharkVAC using the diagram shown to snap dome into place. Close the SharkVAC dome and press the lid button to snap dome into the SharkVAC using the diagram shown to remove excessive dirt and/or sand. • xxFiltFRFReiiellrtetmeecmrerlmcecellabeemenaarnnbi:niieTnnghgrg:esssTcooolhlelluuuaettntiioioceonnrlenyccaoacaunnnarenbfbirleetbeyuureossisueue,drdsthfteteiooldtmerreetroommriesoor,eveveftmefhiceeeoixxevccnmeeet...
... button to snap dome into place. aning mo before cleaning moving parts. x the SharkVAC using the diagram shown to snap dome into place. Close the SharkVAC dome and press the lid button to snap dome into the SharkVAC using the diagram shown to remove excessive dirt and/or sand. • xxFiltFRFReiiellrtetmeecmrerlmcecellabeemenaarnnbi:niieTnnghgrg:esssTcooolhlelluuuaettntiioioceonnrlenyccaoacaunnnarenbfbirleetbeyuureossisueue,drdsthfteteiooldtmerreetroommriesoor,eveveftmefhiceeeoixxevccnmeeet...

