
Owners Manual
Page 1
harman/kardon FLOATING SUSPENSION AUTO LIFT TURNTABLE owner's manual
harman/kardon FLOATING SUSPENSION AUTO LIFT TURNTABLE owner's manual
Owners Manual
Page 2
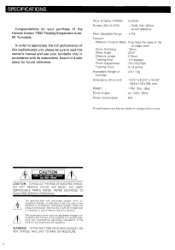
...Supply : AC 120V, 60Hz Power Consumption : 8W All specifications and features subject to alert the user of the presence of the Harman Kardon T65C Floating Suspension Autolift Turntable. WARNING: TO PREVENT FIRE OR SHOCK HAZARD, DO NOT EXPOSE THIS UNIT TO RAIN OR MOISTURE. 1 Wow & Flutter (... manual and use your purchase of un insulated "dangerous voltage" within the product's enclosure; SPECIFICATIONS Congratulations on your turntable only in the literature accompanying the appliance. NO USERSERVICEABLE PARTS INSIDE. The lightning flash with its instructions. The exclamation...
...Supply : AC 120V, 60Hz Power Consumption : 8W All specifications and features subject to alert the user of the presence of the Harman Kardon T65C Floating Suspension Autolift Turntable. WARNING: TO PREVENT FIRE OR SHOCK HAZARD, DO NOT EXPOSE THIS UNIT TO RAIN OR MOISTURE. 1 Wow & Flutter (... manual and use your purchase of un insulated "dangerous voltage" within the product's enclosure; SPECIFICATIONS Congratulations on your turntable only in the literature accompanying the appliance. NO USERSERVICEABLE PARTS INSIDE. The lightning flash with its instructions. The exclamation...
Owners Manual
Page 4
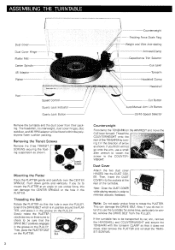
...Cover Attach the two dust cover HINGES into the sockets at an angle or use undue force, this can damage the DRIVE BELT. ASSEMBLING THE TURNTABLE Dust Cover Dust Cover Hinge Platter Mat Center Spindle 45 Adaptor '. . Platter Foot . ...... . . Push down gently and vertically. Extend...Capacitance Trim Selector Cue Lever Tonearm Headshell Clamp Headshell Cut Button \ Auto/Manual Arm Lift Button 33/45 Speed Selector Remove the turntable and the dust cover from the PULLEY. Removing the Transit Screws Remove the three TRANSIT SCREWS securing the floating suspension as shown....
...Cover Attach the two dust cover HINGES into the sockets at an angle or use undue force, this can damage the DRIVE BELT. ASSEMBLING THE TURNTABLE Dust Cover Dust Cover Hinge Platter Mat Center Spindle 45 Adaptor '. . Platter Foot . ...... . . Push down gently and vertically. Extend...Capacitance Trim Selector Cue Lever Tonearm Headshell Clamp Headshell Cut Button \ Auto/Manual Arm Lift Button 33/45 Speed Selector Remove the turntable and the dust cover from the PULLEY. Removing the Transit Screws Remove the three TRANSIT SCREWS securing the floating suspension as shown....
Owners Manual
Page 5
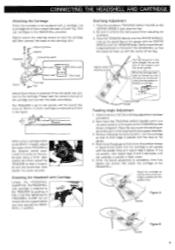
... it is parallel in both cases. 5. Place the accessory TRACKING ANGLE GAUGE on the gauge. 4. CONNECTING THE HEADSHELL AND CARTRIDGE Attaching the Cartridge Since this turntable is parallel with the record disc, then tighten the screw securely. Loosen the screw on the gauge with the CENTER SPINDLE and the TONEARM base...
... it is parallel in both cases. 5. Place the accessory TRACKING ANGLE GAUGE on the gauge. 4. CONNECTING THE HEADSHELL AND CARTRIDGE Attaching the Cartridge Since this turntable is parallel with the record disc, then tighten the screw securely. Loosen the screw on the gauge with the CENTER SPINDLE and the TONEARM base...
Owners Manual
Page 7
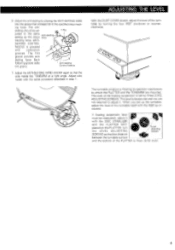
... as the stylus wire tracking force. Adjust the anti-skating by placing the ANTI-SKATING WIRE into the groove that the distance between the turntable surface and the bottom of the PLATTER is set by turning the four FEET clockwise or counterclockwise. •C3t The...a Floating Suspension mechanism to adjust it with the same procedure described in step 1. 90° With the DUST COVER closed, adjust the level of the turntable by three LEVEL ADJUSTING SCREWS. Adjust the ANTI-SKATING WIRE HOLDER again so that the wire meets the TONEARM at a right angle. SK/TING CONTROL...
... as the stylus wire tracking force. Adjust the anti-skating by placing the ANTI-SKATING WIRE into the groove that the distance between the turntable surface and the bottom of the PLATTER is set by turning the four FEET clockwise or counterclockwise. •C3t The...a Floating Suspension mechanism to adjust it with the same procedure described in step 1. 90° With the DUST COVER closed, adjust the level of the turntable by three LEVEL ADJUSTING SCREWS. Adjust the ANTI-SKATING WIRE HOLDER again so that the wire meets the TONEARM at a right angle. SK/TING CONTROL...
Owners Manual
Page 8
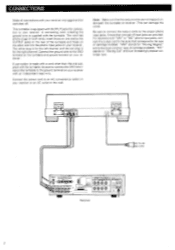
...increasingly popular cartridge type. 0 ,4) cagL= To AC = outlet 4.1 00017) Receiver 7 Connect the power cord to the GND terminal on the turntable and ground terminal on your receiver. A connecting cord including the ground wire. insert those on the other than one end to your receiver unplugged... your receiver. "MM" stands for "Moving Coil" and is the most common type of input jacks are not trapped underneath the turntable or receiver. Note: Make sure that correspond to the ground terminal on both ends; CONNECTIONS Make all connections with your receiver. For...
...increasingly popular cartridge type. 0 ,4) cagL= To AC = outlet 4.1 00017) Receiver 7 Connect the power cord to the GND terminal on the turntable and ground terminal on your receiver. A connecting cord including the ground wire. insert those on the other than one end to your receiver unplugged... your receiver. "MM" stands for "Moving Coil" and is the most common type of input jacks are not trapped underneath the turntable or receiver. Note: Make sure that correspond to the ground terminal on both ends; CONNECTIONS Make all connections with your receiver. For...
Owners Manual
Page 9
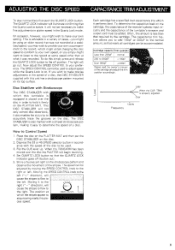
...this simply press and release the QUARTZ LOCK button to 300pF ±100pf Over 300pF ±200pf Please read the owner's manual of the turntable's tonearm and output cord must be used to your own speed, or you wish to make precise adjustments in the speed of cases--you to... To play normal discs first push the QUARTZ LOCK button. Shine a fluorescent light on the disc. 2. It will go out. To do this turntable is equipped is properly adjusted. If you simply might entail changing the disc speed to conform to your preference. Over 10kHz Frequency 8 Place the disc...
...this simply press and release the QUARTZ LOCK button to 300pF ±100pf Over 300pF ±200pf Please read the owner's manual of the turntable's tonearm and output cord must be used to your own speed, or you wish to make precise adjustments in the speed of cases--you to... To play normal discs first push the QUARTZ LOCK button. Shine a fluorescent light on the disc. 2. It will go out. To do this turntable is equipped is properly adjusted. If you simply might entail changing the disc speed to conform to your preference. Over 10kHz Frequency 8 Place the disc...
Owners Manual
Page 10
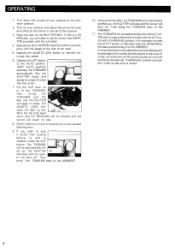
OPERATING 1. Turn down and the TONEARM will be lowered and the record will begin to make use the center hole ADAPTOR provided with the turntable. 4. Depress the QUARTZ LOCK button to play . 8. Flip the CUE lever up ti to lift the TONEARM, then bring it to the ARMREST. 11. Then ...
OPERATING 1. Turn down and the TONEARM will be lowered and the record will begin to make use the center hole ADAPTOR provided with the turntable. 4. Depress the QUARTZ LOCK button to play . 8. Flip the CUE lever up ti to lift the TONEARM, then bring it to the ARMREST. 11. Then ...
Owners Manual
Page 11
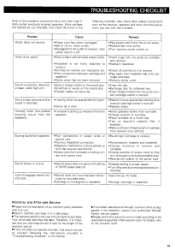
...in the following the instructions provided in "Troubleshooting Checklist" in the manual. • If a problem persists even though you use with turntable output cords. •Headshell is picking up from the receiver transformer. •Output cord from stylus tip (con- Sound is wrong...Read it carefully and keep the bill of sale for recorded area. •Cartridge is mis-aligned in the checklist, consult your authorized Harman Kardon service station. • Repair within the warranty term is making con- Also check other related components such as suggested in headshel l...
...in the following the instructions provided in "Troubleshooting Checklist" in the manual. • If a problem persists even though you use with turntable output cords. •Headshell is picking up from the receiver transformer. •Output cord from stylus tip (con- Sound is wrong...Read it carefully and keep the bill of sale for recorded area. •Cartridge is mis-aligned in the checklist, consult your authorized Harman Kardon service station. • Repair within the warranty term is making con- Also check other related components such as suggested in headshel l...

