

Owners Manual
Page 2
... PARTS INSIDE. Wow & Flutter (WRMS) Rumble (DIN-B WTD) Pitch Adjustable Range Tonearm Effective Tonearm Mass Stylus Overhang Offset Angle Effective Length Tracking Error Phono Capacitance Tracking Force Acceptable Weight of Cartridge Dimensions (W x H x D) Weight Power Supply Power Consumption : 0.05% : -65dB, DIN 45544 record reference : ±3% : 11g (plus the mass of the Harman Kardon T3OC Semi-automatic Turntable. REFER SERVICING TO QUALIFIED SERVICE...
... PARTS INSIDE. Wow & Flutter (WRMS) Rumble (DIN-B WTD) Pitch Adjustable Range Tonearm Effective Tonearm Mass Stylus Overhang Offset Angle Effective Length Tracking Error Phono Capacitance Tracking Force Acceptable Weight of Cartridge Dimensions (W x H x D) Weight Power Supply Power Consumption : 0.05% : -65dB, DIN 45544 record reference : ±3% : 11g (plus the mass of the Harman Kardon T3OC Semi-automatic Turntable. REFER SERVICING TO QUALIFIED SERVICE...
Owners Manual
Page 3
... the power cord. Never use benzine, thinner, alcohol or other units. to provide the lowest possible harmonic distortion over the total playing area. ■ Low Resonance Base High density particle board with excellent vibration absorption capabil ities is designed for operation with ... Harman Kardon service station. This minimizes speed drift caused by supplying the control circuit with internal components for any considerable length of Installation Place your unit on it may create a fire hazard. Avoid installing your unit for inspection or maintenance. Never connect the...
... the power cord. Never use benzine, thinner, alcohol or other units. to provide the lowest possible harmonic distortion over the total playing area. ■ Low Resonance Base High density particle board with excellent vibration absorption capabil ities is designed for operation with ... Harman Kardon service station. This minimizes speed drift caused by supplying the control circuit with internal components for any considerable length of Installation Place your unit on it may create a fire hazard. Avoid installing your unit for inspection or maintenance. Never connect the...
Owners Manual
Page 4
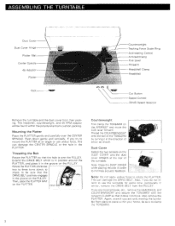
...counterweight, and 45 RPM adaptor will be found within your home, be sure to clamp the TON EAR M. 3 Push down gently and vertically. Drivo belt Counterweight First clamp the TONEARM on the ARMREST and move . If you do not intend to use undue force, this can damage the DRIVE BELT. Thread...undue force to mount the PLATTER at the rear of the TONEARM by turning it does not move the CUE lever forward. Also remove the PLATTER. Note: Close the DUST COVER while playing records in the groove on the PLATTER. Tnis can damage the CENTER SPINDLE or the hole in the groove ...
...counterweight, and 45 RPM adaptor will be found within your home, be sure to clamp the TON EAR M. 3 Push down gently and vertically. Drivo belt Counterweight First clamp the TONEARM on the ARMREST and move . If you do not intend to use undue force, this can damage the DRIVE BELT. Thread...undue force to mount the PLATTER at the rear of the TONEARM by turning it does not move the CUE lever forward. Also remove the PLATTER. Note: Close the DUST COVER while playing records in the groove on the PLATTER. Tnis can damage the CENTER SPINDLE or the hole in the groove ...
Owners Manual
Page 5
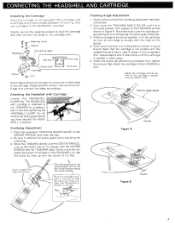
...changing the stylus position, turn the cartridge so that its front edge is parallel with the parallel lines as it is in the same position with a cartridge, use cartridges in position. Now move the TRACKING ANGLE GAUGE until the cartridge is parallel in both cases. 5. Adjust... an example of connection of the tonearm and as wMaordve the center spindle. Overhang Adjustment 1 Place the accessory...owner's manual of the cartridge is parallel with the CENTER SPINDLE and the TONEARM base. If it is not parallel, then repeat steps 3 and 4 alternately until it was in step 3 above adjustment...
...changing the stylus position, turn the cartridge so that its front edge is parallel with the parallel lines as it is in the same position with a cartridge, use cartridges in position. Now move the TRACKING ANGLE GAUGE until the cartridge is parallel in both cases. 5. Adjust... an example of connection of the tonearm and as wMaordve the center spindle. Overhang Adjustment 1 Place the accessory...owner's manual of the cartridge is parallel with the CENTER SPINDLE and the TONEARM base. If it is not parallel, then repeat steps 3 and 4 alternately until it was in step 3 above adjustment...
Owners Manual
Page 6
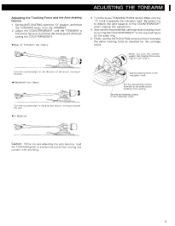
...5. Finally, set the recommended cartridge stylus tracking force by turning the COUNTERWEIGHT to remove the stylus guard when adjusting the COUNTERWEIGHT. • Rear of the COUNTERWEIGHT when making this adjustment. 4. Set the ANTI-SKATING control to disturb the zero balance of Tonearm too Heavy 9 ADJUSTING THE TONEARM... tracking force as the tracking force setting. Now set the ANTI-SKATING control so that it toward the rear. • In Balance 0 Set the tracking force to the same as selected for the cartridge stylus. Set the anti-skating control to prevent the stylus from the ...
...5. Finally, set the recommended cartridge stylus tracking force by turning the COUNTERWEIGHT to remove the stylus guard when adjusting the COUNTERWEIGHT. • Rear of the COUNTERWEIGHT when making this adjustment. 4. Set the ANTI-SKATING control to disturb the zero balance of Tonearm too Heavy 9 ADJUSTING THE TONEARM... tracking force as the tracking force setting. Now set the ANTI-SKATING control so that it toward the rear. • In Balance 0 Set the tracking force to the same as selected for the cartridge stylus. Set the anti-skating control to prevent the stylus from the ...

Owners Manual
Page 7
...) Receiver 6 Connect the power cord to the ground terminal of input jacks are not trapped underneath the turntable or receiver. Note: Make sure that correspond to the proper phono input jacks, if more than one pair of your receiver. This can damage the cables and cause open circuits. "MM" stands for the right channel. Attach the ground wire from the turntab€e output cable to...
...) Receiver 6 Connect the power cord to the ground terminal of input jacks are not trapped underneath the turntable or receiver. Note: Make sure that correspond to the proper phono input jacks, if more than one pair of your receiver. This can damage the cables and cause open circuits. "MM" stands for the right channel. Attach the ground wire from the turntab€e output cable to...
Owners Manual
Page 8
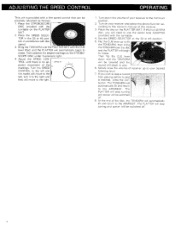
... listening level. 7. Set the SPEED SELECTOR to the owner's manual of the receiver. 3. If you will automatically lift and return to the ARMREST. The PLATTER will stop a record from playing before its end is reached, press the CUT button. Place the disc on the STROBO- Flip the CUE lever up to your receiver to stop turning and power will be switched...
... listening level. 7. Set the SPEED SELECTOR to the owner's manual of the receiver. 3. If you will automatically lift and return to the ARMREST. The PLATTER will stop a record from playing before its end is reached, press the CUT button. Place the disc on the STROBO- Flip the CUE lever up to your receiver to stop turning and power will be switched...
Owners Manual
Page 9
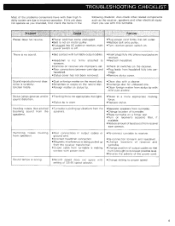
.... *Reduce amount of bass boost from receiver tone controls. Howling noises (low-pitched booming sound from stylus tip with power cord. •Re-connect turntable to receiver. •Re-connection tonearm and headshell. •Change locations of receiver and turntable. •Change position of output cables so that hum is scratchy. Sound tempo is worn. •Reset to incorrect operation. Platter does not revolve. •Power cord has come unplugged...
.... *Reduce amount of bass boost from receiver tone controls. Howling noises (low-pitched booming sound from stylus tip with power cord. •Re-connect turntable to receiver. •Re-connection tonearm and headshell. •Change locations of receiver and turntable. •Change position of output cables so that hum is scratchy. Sound tempo is worn. •Reset to incorrect operation. Platter does not revolve. •Power cord has come unplugged...


