
Owners Manual
Page 1
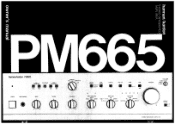
cw 44.44 VOttiNIF cA* TRIM err ut t0(k4 , PX,0 1 6013) 8AiA4. iit*6 iskIhrferif k t6P02 rAyy, --- 1 tO 1 2 • * thff f I • Sifflk*, 4 • 0 • t ZON, SW V.4:400.4 .,.); > • CD mm p m -n 0 -• • - Z H mH 0-a1 har an/kardon PM665 *.w* (Wok 4* t6 rturnovvri ii POWER Aori ig,r*s ktAS$ t:4111.F sP244I4 I /CuCCO co, t r
cw 44.44 VOttiNIF cA* TRIM err ut t0(k4 , PX,0 1 6013) 8AiA4. iit*6 iskIhrferif k t6P02 rAyy, --- 1 tO 1 2 • * thff f I • Sifflk*, 4 • 0 • t ZON, SW V.4:400.4 .,.); > • CD mm p m -n 0 -• • - Z H mH 0-a1 har an/kardon PM665 *.w* (Wok 4* t6 rturnovvri ii POWER Aori ig,r*s ktAS$ t:4111.F sP244I4 I /CuCCO co, t r
Owners Manual
Page 2
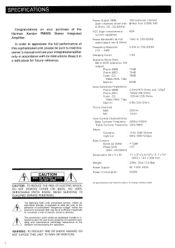
... of the Harman Kardon PM665 Stereo Integrated Amplifier. NO USERSERVICEABLE PARTS INSIDE. REFER SERVICING TO QUALIFIED SERVICE PERSONNEL. The lightning flash with its instructions. The exclamation point within the product's enclosure that may be sure to read this owner's manual and use your purchase of important operating and maintenance (servicing) instructions in 0.8V/22k Ohms Phono Overload MM MC : 220mV : 12mV Tone Control Characteristics Bass Turnover Frequency 200Hz/400Hz Treble Turnover Frequency: 2kHz/6kHz...
... of the Harman Kardon PM665 Stereo Integrated Amplifier. NO USERSERVICEABLE PARTS INSIDE. REFER SERVICING TO QUALIFIED SERVICE PERSONNEL. The lightning flash with its instructions. The exclamation point within the product's enclosure that may be sure to read this owner's manual and use your purchase of important operating and maintenance (servicing) instructions in 0.8V/22k Ohms Phono Overload MM MC : 220mV : 12mV Tone Control Characteristics Bass Turnover Frequency 200Hz/400Hz Treble Turnover Frequency: 2kHz/6kHz...
Owners Manual
Page 3
... (power) amplifier input jacks on the rear panel become active. ■ Bass Contour Bass contour is provided. This permits the application of negative feedback. Not only may break the wire. •If you use of nearly all discrete electronic circuitry has been employed. Avoid instal l ing your unit on sound quality. ■ Moving Coil Cartridge Amplifier A high sensitivity, low noise amplifier is an exclusive Harman Kardon feature...
... (power) amplifier input jacks on the rear panel become active. ■ Bass Contour Bass contour is provided. This permits the application of negative feedback. Not only may break the wire. •If you use of nearly all discrete electronic circuitry has been employed. Avoid instal l ing your unit on sound quality. ■ Moving Coil Cartridge Amplifier A high sensitivity, low noise amplifier is an exclusive Harman Kardon feature...
Owners Manual
Page 4
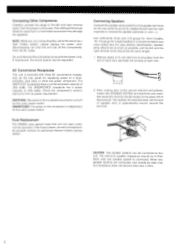
.... 1. If interwound, the sound quality may damage the speakers. Consult an authorized Harman Kardon service station. The UNSWITCHED receptacle has a power capacity of speaker wire is automatically wound around the terminal. If the fuse is blown, do not try to replace it by this unit. Poor setting of this unit but all the way. Do not interwind the connection wires with three AC...
.... 1. If interwound, the sound quality may damage the speakers. Consult an authorized Harman Kardon service station. The UNSWITCHED receptacle has a power capacity of speaker wire is automatically wound around the terminal. If the fuse is blown, do not try to replace it by this unit. Poor setting of this unit but all the way. Do not interwind the connection wires with three AC...
Owners Manual
Page 6
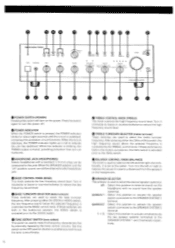
... select the bass turnover frequency. 0 0 0 an/kardon PM665 POWER REAON1OS S BASS TREBLE 1+2 BALANCE • • PE MONITOR M TAPEff 0 T to turn the power off. 0 POWER INDICATOR When the POWER switch is pressed, the POWER indicator blinks for about eight seconds until the circuit is stabilized, indicating the protection circuit functions. Turn it is set at the center. fir) SPEAKER SELECTOR This selector is used to this switch will turn on transients. 0 HEADPHONE JACK (HEADPHONES) Stereo headphones with no sound from turn...
... select the bass turnover frequency. 0 0 0 an/kardon PM665 POWER REAON1OS S BASS TREBLE 1+2 BALANCE • • PE MONITOR M TAPEff 0 T to turn the power off. 0 POWER INDICATOR When the POWER switch is pressed, the POWER indicator blinks for about eight seconds until the circuit is stabilized, indicating the protection circuit functions. Turn it is set at the center. fir) SPEAKER SELECTOR This selector is used to this switch will turn on transients. 0 HEADPHONE JACK (HEADPHONES) Stereo headphones with no sound from turn...
Owners Manual
Page 7
... turning counterclockwise decreases it illuminates in the bass region. video/aux Select this switch to the PHONO 1 (MM) jacks. To use the preamplifier section independently, connect the input jacks of the other power amplifier to the PRE-OUT jacks on or changing the sound source to the MAIN-IN jacks on the rear panel. By depressing this position to listen to the sound from the video component, the TV tuner or other preamplifier to protect the speakers...
... turning counterclockwise decreases it illuminates in the bass region. video/aux Select this switch to the PHONO 1 (MM) jacks. To use the preamplifier section independently, connect the input jacks of the other power amplifier to the PRE-OUT jacks on or changing the sound source to the MAIN-IN jacks on the rear panel. By depressing this position to listen to the sound from the video component, the TV tuner or other preamplifier to protect the speakers...
Owners Manual
Page 8
... the POWER switch. Turn the VOLUME control knob to Broadcasts 1 . TRIM Position 200pF or less normal 200 - 300pF +100pf 300 - 400pF +200pf 400pF or more +300pf *Consult the phono cartridge owner's manual to the VIDEO/AUX jacks. 6. Activate the component connected to find its optimum load capacitance according to a comfortable level and adjust the BASS and TREBLE control knobs as desired. 8. Set the TAPE MONITOR selector to the "source" position. 5. Adjusting...
... the POWER switch. Turn the VOLUME control knob to Broadcasts 1 . TRIM Position 200pF or less normal 200 - 300pF +100pf 300 - 400pF +200pf 400pF or more +300pf *Consult the phono cartridge owner's manual to the VIDEO/AUX jacks. 6. Activate the component connected to find its optimum load capacitance according to a comfortable level and adjust the BASS and TREBLE control knobs as desired. 8. Set the TAPE MONITOR selector to the "source" position. 5. Adjusting...
Owners Manual
Page 9
... 2 connected to the TAPE 2 jacks for recording, dubbing will begin . 6. Set the TAPE MONITOR selector to the mono program source. 8. The function indicator lights up , indicating the monitoring state. If the program source mode is monaural, press the MODE switch to the "mono" position according to the "source" position. 2. OPERATIONS Tape Playback 1. Turn the VOLUME control knob to a comfortable level and adjust the BASS and TREBLE control knobs as desired. 7. Advance the VOLUME control knob...
... 2 connected to the TAPE 2 jacks for recording, dubbing will begin . 6. Set the TAPE MONITOR selector to the mono program source. 8. The function indicator lights up , indicating the monitoring state. If the program source mode is monaural, press the MODE switch to the "mono" position according to the "source" position. 2. OPERATIONS Tape Playback 1. Turn the VOLUME control knob to a comfortable level and adjust the BASS and TREBLE control knobs as desired. 7. Advance the VOLUME control knob...
Owners Manual
Page 10
.... •Set the TAPE MONITOR selector to the "source" position. •Set the FUNCTION selector to the proper position for the desired program source. •Set the SPEAKER selector to the position of your desired speaker system(s). •Release the PRE-OUT/MAIN-IN switch to the "integrated" position. •Check the speaker wires and connect them correctly. •Check the wires to stereo sound, the left...
.... •Set the TAPE MONITOR selector to the "source" position. •Set the FUNCTION selector to the proper position for the desired program source. •Set the SPEAKER selector to the position of your desired speaker system(s). •Release the PRE-OUT/MAIN-IN switch to the "integrated" position. •Check the speaker wires and connect them correctly. •Check the wires to stereo sound, the left...
Owners Manual
Page 11
... that you have not been set up correctly. •Tone control is not proper. •Check the antenna of the tuner, cartridge of the turntable, or head of the BASS control knob and/or turn off the BASS CONTOUR switch. •Turn on the SUBSONIC filter switch. Sound quality is poor. *Input components have done as needed. *Adjust the BASS and/or TREBLE control knobs to the warranty...
... that you have not been set up correctly. •Tone control is not proper. •Check the antenna of the tuner, cartridge of the turntable, or head of the BASS control knob and/or turn off the BASS CONTOUR switch. •Turn on the SUBSONIC filter switch. Sound quality is poor. *Input components have done as needed. *Adjust the BASS and/or TREBLE control knobs to the warranty...


