
Product Information
Page 11
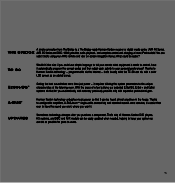
... the best sound takes more than ever to a The Bridge-ready Harman Kardon receiver or digital media center (AVR 40 Series, THE BRIDGE AVR 45 Series and DMC 1000) provides audio playback, and complete control and charging of most iPod models.1 You can be easier? it requires tailoring the system parameters to your AVR's remote and view on-screen navigation menus. With the press of a few buttons, our patented EzSet/EQ, EzSet+ and EzSet...
... the best sound takes more than ever to a The Bridge-ready Harman Kardon receiver or digital media center (AVR 40 Series, THE BRIDGE AVR 45 Series and DMC 1000) provides audio playback, and complete control and charging of most iPod models.1 You can be easier? it requires tailoring the system parameters to your AVR's remote and view on-screen navigation menus. With the press of a few buttons, our patented EzSet/EQ, EzSet+ and EzSet...
Product Information
Page 33
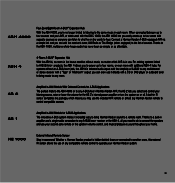
... with a "Tape" or "Multiroom" output; HE 1000 External Infrared Remote Sensor Stay in amplifier and a single-cable connection to a remote room. Connect a Harman Kardon A-BUS-equipped AVR via a simple link and you select and control your AVR, or when used with the DMC 1000, the ABH 4000 lets you to power up to four zones with a CD or DVD player or outboard tuner to bring Harman Kardon sound to any A-BUS/READY receiver or the ABH 4, all...
... with a "Tape" or "Multiroom" output; HE 1000 External Infrared Remote Sensor Stay in amplifier and a single-cable connection to a remote room. Connect a Harman Kardon A-BUS-equipped AVR via a simple link and you select and control your AVR, or when used with the DMC 1000, the ABH 4000 lets you to power up to four zones with a CD or DVD player or outboard tuner to bring Harman Kardon sound to any A-BUS/READY receiver or the ABH 4, all...
Product Information
Page 47
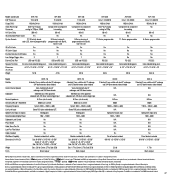
..." 24.4 lb Model Satellites Center Channel Speaker Subwoofer Nominal Impedance Sensitivity (SPL @ 1 Watt/Meter) Frequency Response Line-Level Inputs Speaker-Level Inputs & Outputs Recommended Amplifier Power Subwoofer Level Control Phase Switch Audio Sense Turn-On Low-Pass Filter Switch Cables Included Wall-Mount Capability Dimensions (H x W x D) Weight Finish HKTS 18 4 Identical 2-way satellites with dual 3" midranges 3/4"-dome tweeter, video-shielded Voice-matched with dual 3" midranges and 3/4"-dome tweeter 200-Watt, bass-reflex powered subwoofer with 10" driver; DTS, DTS-ES, DTS 96/24 and...
..." 24.4 lb Model Satellites Center Channel Speaker Subwoofer Nominal Impedance Sensitivity (SPL @ 1 Watt/Meter) Frequency Response Line-Level Inputs Speaker-Level Inputs & Outputs Recommended Amplifier Power Subwoofer Level Control Phase Switch Audio Sense Turn-On Low-Pass Filter Switch Cables Included Wall-Mount Capability Dimensions (H x W x D) Weight Finish HKTS 18 4 Identical 2-way satellites with dual 3" midranges 3/4"-dome tweeter, video-shielded Voice-matched with dual 3" midranges and 3/4"-dome tweeter 200-Watt, bass-reflex powered subwoofer with 10" driver; DTS, DTS-ES, DTS 96/24 and...

Product Information
Page 48
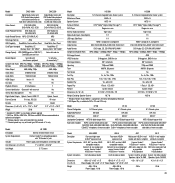
Model HK 3480 HK 3380 Description Stereo receiver Stereo receiver Power (FTC) 120 x 2 80 x 2 THD
Model HK 3480 HK 3380 Description Stereo receiver Stereo receiver Power (FTC) 120 x 2 80 x 2 THD
Product Information
Page 49
... "IR Remote-In" jack Includes Power supply, connecting block, connecting cable Unit Dimensions (H x W x D) 1" x 3-5/16" x 2-5/16" Unit Weight 5.7 Ounces Model HS 500 Description 5.1-Channel integrated home theater system Multichannel Power 65W x 5 Speaker System HKTS 14 Surround Formats DTS,® Dolby® Digital, Dolby Pro Logic® II DVD Player Progressive scan External Audio Connection Tape-in/out Digital-Audio Inputs (Coax/Optical) 1/1 USB Input (Side/Rear) 1/1 Video Outputs HDMI,™ composite, S, component Video Formats DVD, DVD-R/RW, DVD+R/RW, VCD...
... "IR Remote-In" jack Includes Power supply, connecting block, connecting cable Unit Dimensions (H x W x D) 1" x 3-5/16" x 2-5/16" Unit Weight 5.7 Ounces Model HS 500 Description 5.1-Channel integrated home theater system Multichannel Power 65W x 5 Speaker System HKTS 14 Surround Formats DTS,® Dolby® Digital, Dolby Pro Logic® II DVD Player Progressive scan External Audio Connection Tape-in/out Digital-Audio Inputs (Coax/Optical) 1/1 USB Input (Side/Rear) 1/1 Video Outputs HDMI,™ composite, S, component Video Formats DVD, DVD-R/RW, DVD+R/RW, VCD...

Owners Manual
Page 5
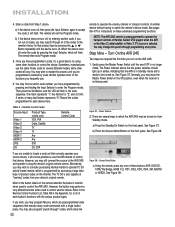
.... Connect the Speakers 22 Step Two - Plug in Remote 27 Step Eight - Manual Setup Menu 50 Speaker Size Menu 51 Speaker Crossover Menu 51 Delay Adjust Menu 52 Step Four - For models having a power cord with Canadian ICES-003. Connect the Subwoofer 22 Step Three - Insert Batteries in AC Power 26 Step Seven - Program Sources Into the Remote 28 Step Nine - Setting Channel Output Levels Manually 53 Multiroom Operation 54 Installing a Multiroom System 54 Operating the Multiroom System 54 System Settings 55 Dim Function 55 Advanced Remote Control...
.... Connect the Speakers 22 Step Two - Plug in Remote 27 Step Eight - Manual Setup Menu 50 Speaker Size Menu 51 Speaker Crossover Menu 51 Delay Adjust Menu 52 Step Four - For models having a power cord with Canadian ICES-003. Connect the Subwoofer 22 Step Three - Insert Batteries in AC Power 26 Step Seven - Program Sources Into the Remote 28 Step Nine - Setting Channel Output Levels Manually 53 Multiroom Operation 54 Installing a Multiroom System 54 Operating the Multiroom System 54 System Settings 55 Dim Function 55 Advanced Remote Control...
Owners Manual
Page 8
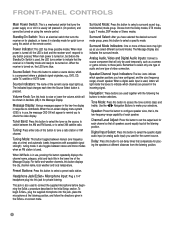
... Dolby modes, DTS modes, Logic 7 modes, DSP modes or Stereo modes. When main power is turned off . When the on-screen display menu system (OSD) is in the incoming signal. Tuning: Press either side of each speaker. Headphone Jack/EzSet+ Microphone Input: Plug a 1/4" headphone plug into this button to make your selections. Choose from the listening position. 8 Navigation: These buttons are present in use , pressing this button to tune a radio station or XM channel. When the receiver is turned on using the remote control. Source Select: Press this button...
... Dolby modes, DTS modes, Logic 7 modes, DSP modes or Stereo modes. When main power is turned off . When the on-screen display menu system (OSD) is in the incoming signal. Tuning: Press either side of each speaker. Headphone Jack/EzSet+ Microphone Input: Plug a 1/4" headphone plug into this button to make your selections. Choose from the listening position. 8 Navigation: These buttons are present in use , pressing this button to tune a radio station or XM channel. When the receiver is turned on using the remote control. Source Select: Press this button...
Owners Manual
Page 10
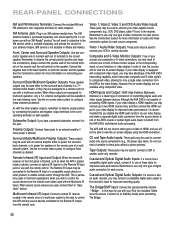
... output terminals to the corresponding terminals on connecting your video-capable source components (e.g., VCR, DVD player, cable TV box) to the receiver. XM Antenna Jack: Plug in the remote zone of the AVR's coaxial or optical digital audio inputs to the colored terminal on the receiver and the red terminal on -screen displays. Remember to use with component video inputs, you disable the HDMI audio function of your television or video display in Standby mode) when connecting The Bridge. 10 REAR-PANEL CONNECTIONS AM and FM Antenna...
... output terminals to the corresponding terminals on connecting your video-capable source components (e.g., VCR, DVD player, cable TV box) to the receiver. XM Antenna Jack: Plug in the remote zone of the AVR's coaxial or optical digital audio inputs to the colored terminal on the receiver and the red terminal on -screen displays. Remember to use with component video inputs, you disable the HDMI audio function of your television or video display in Standby mode) when connecting The Bridge. 10 REAR-PANEL CONNECTIONS AM and FM Antenna...
Owners Manual
Page 13
... button for any device connected to the codes that the remote is in The Bridge. The Master Power Switch on the AVR 245's front panel must first have inserted a disc in DVD mode, press the selector twice quickly to switch to one of three colors as the source. XM Radio Button: Press this button to select XM Satellite Radio as the remote is programmed with only the codes specific to switch video inputs on which turns off . The receiver...
... button for any device connected to the codes that the remote is in The Bridge. The Master Power Switch on the AVR 245's front panel must first have inserted a disc in DVD mode, press the selector twice quickly to switch to one of three colors as the source. XM Radio Button: Press this button to select XM Satellite Radio as the remote is programmed with only the codes specific to switch video inputs on which turns off . The receiver...
Owners Manual
Page 15
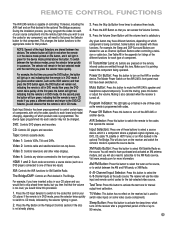
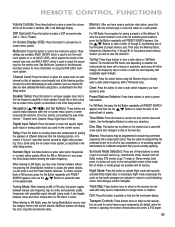
... all sources. REMOTE CONTROL FUNCTIONS Volume Controls: Press these buttons to select a type of surround sound (e.g., multichannel) mode. Tuning Mode: When listening to enter. Clear: Press this button to select the specific digital audio input (or analog audio input) you will either change tracks or chapters. Channel Level, Speaker Setup, Digital Input or Delay. however, to access the preset stations, you used to avoid disturbing others, while dialogue remains intelligible. To access another bank of the desired bank. Then press the Memory button...
... all sources. REMOTE CONTROL FUNCTIONS Volume Controls: Press these buttons to select a type of surround sound (e.g., multichannel) mode. Tuning Mode: When listening to enter. Clear: Press this button to select the specific digital audio input (or analog audio input) you will either change tracks or chapters. Channel Level, Speaker Setup, Digital Input or Delay. however, to access the preset stations, you used to avoid disturbing others, while dialogue remains intelligible. To access another bank of the desired bank. Then press the Memory button...
Owners Manual
Page 16
... power and even distribution of ambient sounds. It may be used to augment smaller, limited-range satellite speakers used for audio and video signals. Some modes are used with less burden placed on any one speaker. • Surround Back Left and Right - Dolby Digital, Dolby Digital EX, Dolby Pro Logic II and IIx, Dolby Virtual Speaker, Dolby Headphone • DTS Modes - and 7-Channel Stereo Table 6 on page 17. Surround mode selection depends upon conventional twochannel stereo, including DSP Surround Off, Analog Bypass Surround...
... power and even distribution of ambient sounds. It may be used to augment smaller, limited-range satellite speakers used for audio and video signals. Some modes are used with less burden placed on any one speaker. • Surround Back Left and Right - Dolby Digital, Dolby Digital EX, Dolby Pro Logic II and IIx, Dolby Virtual Speaker, Dolby Headphone • DTS Modes - and 7-Channel Stereo Table 6 on page 17. Surround mode selection depends upon conventional twochannel stereo, including DSP Surround Off, Analog Bypass Surround...
Owners Manual
Page 28
... control that operates most of each device here. Sometimes, manufacturers use . 6. A series of Harman Kardon DVD players when the AVR or the Video 2 (cable/satellite) or Video 3 (TV) source is preprogrammed to locate a code set that device. See pages 56-57 for several ways in which is programmed by pressing the ⁄ or ¤ Button repeatedly until you frequently use the same Power code for instructions on the front panel. Turn On the AVR...
... control that operates most of each device here. Sometimes, manufacturers use . 6. A series of Harman Kardon DVD players when the AVR or the Video 2 (cable/satellite) or Video 3 (TV) source is preprogrammed to locate a code set that device. See pages 56-57 for several ways in which is programmed by pressing the ⁄ or ¤ Button repeatedly until you frequently use the same Power code for instructions on the front panel. Turn On the AVR...
Owners Manual
Page 33
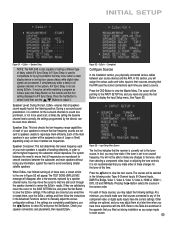
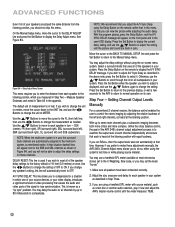
... display the Input Setup menu. During a surround sound presentation, it . If they are close but you assign inputs to review the EzSet+ results. Input Setup Menu Screen The first line indicates that the AVR uses the correct connections each source. 33 Press the ‹ Button to the tuner source. Speaker Delay NOTE: The AVR 245 is capable of these changes for the surround channels to sound less prominent, or not to save the EzSet+ settings and then follow the instructions...
... display the Input Setup menu. During a surround sound presentation, it . If they are close but you assign inputs to review the EzSet+ results. Input Setup Menu Screen The first line indicates that the AVR uses the correct connections each source. 33 Press the ‹ Button to the tuner source. Speaker Delay NOTE: The AVR 245 is capable of these changes for the surround channels to sound less prominent, or not to save the EzSet+ settings and then follow the instructions...

Owners Manual
Page 37
... , some sources are after your room or speakers, and we recommend that appears in the display; Headphone Jack Press the Surround Select Button on the front panel, or the Dolby Button on the remote) to the line you may alternatively adjust the tone controls using the Channel Adjust submenu, as a reminder. Tone Button You may manually adjust the levels of the left side of your last command. For direct access to access TREBLE MODE and BASS MODE. Use the...
... , some sources are after your room or speakers, and we recommend that appears in the display; Headphone Jack Press the Surround Select Button on the front panel, or the Dolby Button on the remote) to the line you may alternatively adjust the tone controls using the Channel Adjust submenu, as a reminder. Tone Button You may manually adjust the levels of the left side of your last command. For direct access to access TREBLE MODE and BASS MODE. Use the...

Owners Manual
Page 38
... component video inputs on screen in the Advanced Functions section. OPERATION The Bridge sources, and the HDMI 1 and HDMI 2 sources. You plan on playing a variety of any digital surround formats contained on the physical connections you wish to use the 6-/8-channel analog audio connections. The first press of discs using the component video monitor outputs, enabling a single-cable connection to select the source whose name appears above the button. See Figure 66. The AVR 245 will switch to the analog audio inputs...
... component video inputs on screen in the Advanced Functions section. OPERATION The Bridge sources, and the HDMI 1 and HDMI 2 sources. You plan on playing a variety of any digital surround formats contained on the physical connections you wish to use the 6-/8-channel analog audio connections. The first press of discs using the component video monitor outputs, enabling a single-cable connection to select the source whose name appears above the button. See Figure 66. The AVR 245 will switch to the analog audio inputs...

Owners Manual
Page 41
... Set button to display the DMP SETTING menu. Table 5 - When DMP/The Bridge is docked, you may play of copyrighted materials is possible to activate Repeat (one track or one album/playlist) and Shuffle (songs or albums) modes using the AVR remote or the AVR's front-panel controls, view navigation messages on the AVR's front panel or a connected video display, and charge the iPod. Analog audio signals are not converted to digital form, and digital audio...
... Set button to display the DMP SETTING menu. Table 5 - When DMP/The Bridge is docked, you may play of copyrighted materials is possible to activate Repeat (one track or one album/playlist) and Shuffle (songs or albums) modes using the AVR remote or the AVR's front-panel controls, view navigation messages on the AVR's front panel or a connected video display, and charge the iPod. Analog audio signals are not converted to digital form, and digital audio...
Owners Manual
Page 44
... full-OSD menu system allows access to decode the surround back channel. Using the remote, press the button for the desired mode group: Dolby Surr for Dolby modes DTS Sur for DTS Digital modes DTS Neo:6 for the DTS Neo:6 modes Logic 7 for the Logic 7 modes Stereo for the Stereo or Surround Off modes Surr for that channel's speaker box. There is received, the PCM message, followed by pressing the Dolby button on the disc. The letters flash when no LFE channel. Speaker/Channel Input Indicators Even...
... full-OSD menu system allows access to decode the surround back channel. Using the remote, press the button for the desired mode group: Dolby Surr for Dolby modes DTS Sur for DTS Digital modes DTS Neo:6 for the DTS Neo:6 modes Logic 7 for the Logic 7 modes Stereo for the Stereo or Surround Off modes Surr for that channel's speaker box. There is received, the PCM message, followed by pressing the Dolby button on the disc. The letters flash when no LFE channel. Speaker/Channel Input Indicators Even...
Owners Manual
Page 52
... Set Button to select it now and adjust the AVR's master volume control until the picture and sound are automatically assigned to the multiroom system, as a test disc or another audio selection, play it . Measure Speaker Distances and noted in Table A3 in feet. Adjust the size, crossover and delay for all channels by adjusting the relative loudness of the left ) and SUB (subwoofer). Step Four - See Figure 84. Press the Set Button when the speaker...
... Set Button to select it now and adjust the AVR's master volume control until the picture and sound are automatically assigned to the multiroom system, as a test disc or another audio selection, play it . Measure Speaker Distances and noted in Table A3 in feet. Adjust the size, crossover and delay for all channels by adjusting the relative loudness of the left ) and SUB (subwoofer). Step Four - See Figure 84. Press the Set Button when the speaker...

Owners Manual
Page 55
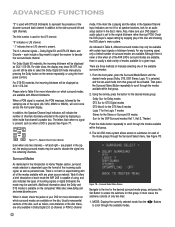
... setting VOLUME DEFAULT to view video sources while the full-OSD menus are used with Dolby Digital 2.0 programs, such as Dolby Digital 5.1. These messages will use the Dim function. The full-OSD system may be deactivated. With this line, you may adjust the volume to dark. When this setting is changed to OFF, the receiver will handle Dolby Digital and DTS sources. NOTE: It isn't possible to ON. Advanced Remote Control Functions The AVR 245 remote control not only operates...
... setting VOLUME DEFAULT to view video sources while the full-OSD menus are used with Dolby Digital 2.0 programs, such as Dolby Digital 5.1. These messages will use the Dim function. The full-OSD system may be deactivated. With this line, you may adjust the volume to dark. When this setting is changed to OFF, the receiver will handle Dolby Digital and DTS sources. NOTE: It isn't possible to ON. Advanced Remote Control Functions The AVR 245 remote control not only operates...
Owners Manual
Page 58
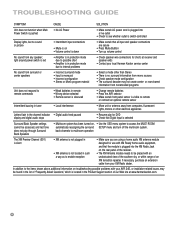
... at receiver and speaker ends • Contact your local Harman Kardon service center No sound from surround or center speakers • Incorrect surround mode • Input is monaural • Incorrect configuration • Stereo or Mono program material • Select a mode other than Stereo • There is in protection mode due to remote or connect an optional remote sensor Intermittent buzzing in the channel indicator • Digital audio feed paused display and digital audio stops • Resume play for use with your XM Radio...
... at receiver and speaker ends • Contact your local Harman Kardon service center No sound from surround or center speakers • Incorrect surround mode • Input is monaural • Incorrect configuration • Stereo or Mono program material • Select a mode other than Stereo • There is in protection mode due to remote or connect an optional remote sensor Intermittent buzzing in the channel indicator • Digital audio feed paused display and digital audio stops • Resume play for use with your XM Radio...


