
Owners Manual
Page 1
ASSEMBLY and OPERATION MANUAL CITATION X AHCESGITPEA-ETMLIAOOASNKWNYEXSTRTHDEEMRSIGN harman kardon
ASSEMBLY and OPERATION MANUAL CITATION X AHCESGITPEA-ETMLIAOOASNKWNYEXSTRTHDEEMRSIGN harman kardon

Owners Manual
Page 2
.... Conventional speakers beam the sound at you on vertical and horizontal planes. Replace the conventional speakers with natural tone quality. There is reflected from the ceilings, walls, etc. The Citation X achieves precisely this design, the precise process of the world's finest speaker system. You are now the owner of what occurs in the wall. no "hole-in the same room with...
.... Conventional speakers beam the sound at you on vertical and horizontal planes. Replace the conventional speakers with natural tone quality. There is reflected from the ceilings, walls, etc. The Citation X achieves precisely this design, the precise process of the world's finest speaker system. You are now the owner of what occurs in the wall. no "hole-in the same room with...
Owners Manual
Page 3
... this instruction manual thoroughly prior to the folded horn. The driver is directly coupled to assembly of the horn. It provides omni-directional sound by the horn damps completely the mechanical resonance of 20 to the throat of the speaker system. total flux 196, 000 maxwells; twin cone construction with foam plastic front and rear suspension...
... this instruction manual thoroughly prior to the folded horn. The driver is directly coupled to assembly of the horn. It provides omni-directional sound by the horn damps completely the mechanical resonance of 20 to the throat of the speaker system. total flux 196, 000 maxwells; twin cone construction with foam plastic front and rear suspension...
Owners Manual
Page 4
...panel resonances. * Driver is constructed of aluminum wire for low mass and strength. * Double plastic foam surround (front and rear) allow tremendous excursions for exceptional low frequency response without restraining the cone. This minimizes the standing wave ratio within the Citation horn is 20-50, 000 cycles per second. * Power rating is greater than 30 watts integrated program... to the amplifier. -3- SPECIFICATIONS AND FEATURES DRIVER * 8" unit manufactured to our specifications by fuse located on rear of cabinet. * Nominal impedance is 16 ohms. * Usable frequency range within the...
...panel resonances. * Driver is constructed of aluminum wire for low mass and strength. * Double plastic foam surround (front and rear) allow tremendous excursions for exceptional low frequency response without restraining the cone. This minimizes the standing wave ratio within the Citation horn is 20-50, 000 cycles per second. * Power rating is greater than 30 watts integrated program... to the amplifier. -3- SPECIFICATIONS AND FEATURES DRIVER * 8" unit manufactured to our specifications by fuse located on rear of cabinet. * Nominal impedance is 16 ohms. * Usable frequency range within the...
Owners Manual
Page 5
... purchase, all parts supplied with the Harman-Kardon Citation X are found defective. 3. Harman-Kardon neither assumes nor authorizes any one else to assume for any other liablity in connection with you in such instances, but please note that only you , notify the transportation company without delay. UNPACKING After unpacking the Citation X speaker, place the small parts and driver on the part of HarmanKardon. Harman-Kardon reserves the...
... purchase, all parts supplied with the Harman-Kardon Citation X are found defective. 3. Harman-Kardon neither assumes nor authorizes any one else to assume for any other liablity in connection with you in such instances, but please note that only you , notify the transportation company without delay. UNPACKING After unpacking the Citation X speaker, place the small parts and driver on the part of HarmanKardon. Harman-Kardon reserves the...
Owners Manual
Page 6
... specific problem. Attach a tag to the unit indicating your Harman-Kardon Citation X, please address all questions pertinent to the assembly, testing, or installations of value. You will inspect and repair your own efforts and after you require assistance to obtain the specified performance. SERVICE POLICY Harman-Kardon has established a special consumer service division to answer all correspondence to: HARMAN-KARDON, INC. Our superbly equipped factory service...
... specific problem. Attach a tag to the unit indicating your Harman-Kardon Citation X, please address all questions pertinent to the assembly, testing, or installations of value. You will inspect and repair your own efforts and after you require assistance to obtain the specified performance. SERVICE POLICY Harman-Kardon has established a special consumer service division to answer all correspondence to: HARMAN-KARDON, INC. Our superbly equipped factory service...
Owners Manual
Page 7
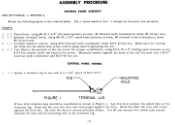
... TAB MOUNTING HOLE FIGURE I TERMINAL LUG Wires with a #1/4" external tooth lockwasher and #1/4-20 hex nut. Bend the other tab over the wire and crimp tight against the first tab. Cut off any excess wire which may extend between the small tabs ...bare wire. CONTROL PANEL WIRING 1 ( ) Solder a terminal lug to the control panel. Bend one end of a 1 5/8" piece of the screw. Be sure the wire is secure and then solder. STEP # 1 ( ) Fuse block, using #6-32 x 5/8" flat head machine screws, #6 internal tooth lockwashers under #6-32 hex nuts. 2 ( ) Speaker terminal block, using ...
... TAB MOUNTING HOLE FIGURE I TERMINAL LUG Wires with a #1/4" external tooth lockwasher and #1/4-20 hex nut. Bend the other tab over the wire and crimp tight against the first tab. Cut off any excess wire which may extend between the small tabs ...bare wire. CONTROL PANEL WIRING 1 ( ) Solder a terminal lug to the control panel. Bend one end of a 1 5/8" piece of the screw. Be sure the wire is secure and then solder. STEP # 1 ( ) Fuse block, using #6-32 x 5/8" flat head machine screws, #6 internal tooth lockwashers under #6-32 hex nuts. 2 ( ) Speaker terminal block, using ...

Owners Manual
Page 8
... this connection. Solder all wires which are connected to the speaker terminal block.) 3 ( ) Connect the free end of the brown wire to lug #1 on the acoustic balance control. Connect one half turn around both of the wires. 4 ( ) Connect the free end of the bare wire to lug #2 on all wires. SEE FIGURE D. Wrap the wire one end to lug #1 on the acoustic balance control. Solder this connection. 3 ( ) Connect one...
... this connection. Solder all wires which are connected to the speaker terminal block.) 3 ( ) Connect the free end of the brown wire to lug #1 on the acoustic balance control. Connect one half turn around both of the wires. 4 ( ) Connect the free end of the bare wire to lug #2 on all wires. SEE FIGURE D. Wrap the wire one end to lug #1 on the acoustic balance control. Solder this connection. 3 ( ) Connect one...
Owners Manual
Page 9
...center opening toward the center of the cabinet. Push up close to the negative (-) terminal. Position the guide blocks as the drive unit is lowered into the cabinet. Return the screw with a hammer to the red band). Measure 4" from the positive (4-) terminal (terminal closest to start them into position. Measure 1" from the stud located... the cabinet. These are guide lines for the black wire. Replace the nut. Mount the drive unit using #7 x 1 1/4" flat head wood screws. Do not use force to tighten the nut as you may damage the high frequency stabilizer unit. 3 ( ...
...center opening toward the center of the cabinet. Push up close to the negative (-) terminal. Position the guide blocks as the drive unit is lowered into the cabinet. Return the screw with a hammer to the red band). Measure 4" from the positive (4-) terminal (terminal closest to start them into position. Measure 1" from the stud located... the cabinet. These are guide lines for the black wire. Replace the nut. Mount the drive unit using #7 x 1 1/4" flat head wood screws. Do not use force to tighten the nut as you may damage the high frequency stabilizer unit. 3 ( ...
Owners Manual
Page 10
... rear of the Citation X name plate is to the back of the control panel. NOTE Installation of the control panel. Allow to remain free. 9 ( ) Mount the control panel to terminal #2 on the name plate mounting template for the correct position. Fill holes "B" and "C" with a hammer. ) 10 ( ) Connect the brown wire to terminal #4 on the speaker terminal block. 11 ( ) Connect the black wire to the cabinet using...
... rear of the Citation X name plate is to the back of the control panel. NOTE Installation of the control panel. Allow to remain free. 9 ( ) Mount the control panel to terminal #2 on the name plate mounting template for the correct position. Fill holes "B" and "C" with a hammer. ) 10 ( ) Connect the brown wire to terminal #4 on the speaker terminal block. 11 ( ) Connect the black wire to the cabinet using...
Owners Manual
Page 11
... cord (commonly called "Zip" cord) is connected to the ground terminal of the driving signal, rather than one moving forward during a specific segment of the amplifier. CONNECTING THE SPEAKER TO THE AMPLIFIER Most any type of wire may be used should be connected to the 16 ohm output terminal of the amplifier (as in a stereo installation, to the amplifier. To assure proper phasing, the "+" terminal...
... cord (commonly called "Zip" cord) is connected to the ground terminal of the driving signal, rather than one moving forward during a specific segment of the amplifier. CONNECTING THE SPEAKER TO THE AMPLIFIER Most any type of wire may be used should be connected to the 16 ohm output terminal of the amplifier (as in a stereo installation, to the amplifier. To assure proper phasing, the "+" terminal...

Owners Manual
Page 12
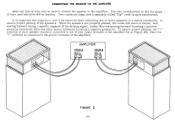
... by placing the speakers along the wall as 6 inches in homes, studios, and auditoriums has given us a number of experimenting on your own part may well be rewarding. No set down for stereo listening over conventional loudspeaker systems. The combination of direct and reflected radiation presented to the listener prevents unnatural focusing of the sound source, and gives instead...
... by placing the speakers along the wall as 6 inches in homes, studios, and auditoriums has given us a number of experimenting on your own part may well be rewarding. No set down for stereo listening over conventional loudspeaker systems. The combination of direct and reflected radiation presented to the listener prevents unnatural focusing of the sound source, and gives instead...

Owners Manual
Page 13
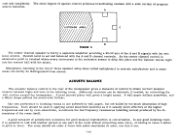
...program material, cross feeding via the blend control (available on any desired degree. 3. Where too great a spread is obtained on most good preamplifiers) will fill in the middle and reduce separation to listen in depth but more lateral spread is desirable. NORMAL ROOM-TWO SPEAKER ARRANGEMENT 15 FEET LISTENING AREA SOUND... APPEARS TO BE COMING FROM THESE AREAS. 20 FEET FIGURE 2 Here the room is needed. Adjust wall position to suit. -12-
...program material, cross feeding via the blend control (available on any desired degree. 3. Where too great a spread is obtained on most good preamplifiers) will fill in the middle and reduce separation to listen in depth but more lateral spread is desirable. NORMAL ROOM-TWO SPEAKER ARRANGEMENT 15 FEET LISTENING AREA SOUND... APPEARS TO BE COMING FROM THESE AREAS. 20 FEET FIGURE 2 Here the room is needed. Adjust wall position to suit. -12-

Owners Manual
Page 14
... extremely effective presentation of the speakers along the wall will vary the spread and depth. 5. Larger rooms, studios, auditoriums and more stubborn irregularly shaped rooms are best handled with irregular shapes generally ...lend themselves to out shine the two in every way except -13- LARGER ROOMS, STUDIO, ETC. In fact, our experience has shown the three speaker setup to the same treatment as outlined above. 6. 4. IRREGULAR SHAPED ROOMS Rooms with a three speaker arrangement. Changing the position of spacious stereo sound...
... extremely effective presentation of the speakers along the wall will vary the spread and depth. 5. Larger rooms, studios, auditoriums and more stubborn irregularly shaped rooms are best handled with irregular shapes generally ...lend themselves to out shine the two in every way except -13- LARGER ROOMS, STUDIO, ETC. In fact, our experience has shown the three speaker setup to the same treatment as outlined above. 6. 4. IRREGULAR SHAPED ROOMS Rooms with a three speaker arrangement. Changing the position of spacious stereo sound...
Owners Manual
Page 15
... a fabric drape softens the sound even further. The extra degree of spatial control produces breathtaking realism with a wide variety of the room itself. Overall level is fed by the dimensions of program A V / / LISTENING AREA C / B FIGURE 5 The center channel speaker is set and balanced with its own level control. Additional variation can by over-absorbtion, accentuate the low frequency resonances (standing waves) produced by...
... a fabric drape softens the sound even further. The extra degree of spatial control produces breathtaking realism with a wide variety of the room itself. Overall level is fed by the dimensions of program A V / / LISTENING AREA C / B FIGURE 5 The center channel speaker is set and balanced with its own level control. Additional variation can by over-absorbtion, accentuate the low frequency resonances (standing waves) produced by...

Owners Manual
Page 16
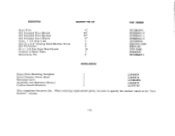
...32 Hex Nut Speaker Terminal Blo0k #6-32 x 3/4" Round Head Machine Screw #6 Internal Tooth Lockwasher #6-32 Hex Nut Acoustic Balance Control #3/8 Internal Tooth Lockwasher #3/8-32 Hex Nut #114-20 x 2" Binding Head Machine Screw #1/4 Flatwasher Masonite Washer #1/4 External Tooth Lockwasher ...#1/4-20 Hex Nut Terminal Lug 1 2 2 2 1 4 4 4 1 1 1 1 1 1 1 1 6 -15- ST3944957 KH632-10SN KL6-SC KN632- PARTS LIST DESCRIPTION Cabinet Top Cover Drive Assembly Flexible Seal Back Plate Control Panel Coil Stubby Screwdriver Guide Block QUANTITY PER KIT 1 1 1 1 1 1 1 1 2 PART NUMBER...
...32 Hex Nut Speaker Terminal Blo0k #6-32 x 3/4" Round Head Machine Screw #6 Internal Tooth Lockwasher #6-32 Hex Nut Acoustic Balance Control #3/8 Internal Tooth Lockwasher #3/8-32 Hex Nut #114-20 x 2" Binding Head Machine Screw #1/4 Flatwasher Masonite Washer #1/4 External Tooth Lockwasher ...#1/4-20 Hex Nut Terminal Lug 1 2 2 2 1 4 4 4 1 1 1 1 1 1 1 1 6 -15- ST3944957 KH632-10SN KL6-SC KN632- PARTS LIST DESCRIPTION Cabinet Top Cover Drive Assembly Flexible Seal Back Plate Control Panel Coil Stubby Screwdriver Guide Block QUANTITY PER KIT 1 1 1 1 1 1 1 1 2 PART NUMBER...
Owners Manual
Page 17
..." #18 Stranded Wire (White) 6" Fuse, 1 1/2 Amp 3 AG 2 #10-32 x 3/4" Binding Head Machine Screw 4 #10 Flatwasher 4 #7 x 1 1/4 Flat Head Wood Screw 12 Citation X Name Plate 1 Escutcheon Pin 4 MISCELLANEOUS PART NUMBER WCO1VI4933 WIRE5041-0 WIRE5041- 1 WIRE5041-9 ZCOM2953 KM1032-12SN KW10-SC VP7- 20SN B3944945 STCOM4971 Name Plate Mounting Template 1 Serial Number Notice Sheet 1 Warranty Card 1 Assembly and Operation Manual 1 Citation Sound Brochure 1 L3944996 L3945014...
..." #18 Stranded Wire (White) 6" Fuse, 1 1/2 Amp 3 AG 2 #10-32 x 3/4" Binding Head Machine Screw 4 #10 Flatwasher 4 #7 x 1 1/4 Flat Head Wood Screw 12 Citation X Name Plate 1 Escutcheon Pin 4 MISCELLANEOUS PART NUMBER WCO1VI4933 WIRE5041-0 WIRE5041- 1 WIRE5041-9 ZCOM2953 KM1032-12SN KW10-SC VP7- 20SN B3944945 STCOM4971 Name Plate Mounting Template 1 Serial Number Notice Sheet 1 Warranty Card 1 Assembly and Operation Manual 1 Citation Sound Brochure 1 L3944996 L3945014...


